Android Dialog Tutorial with Examples
1. Android Dialog
In Android, the Dialog is a small window that appears to reminds the user to make a decision or enter additional information. The dialog does not fill the entire screen, and it usually displays in modal mode, that means the user has to make a decision to close it in order to interact with other parts of the application.
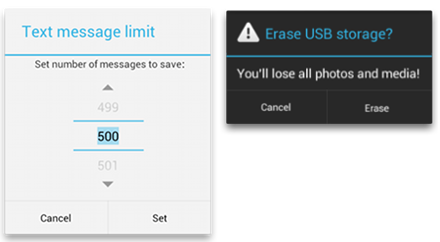
If you want a Dialog, write a class extends from the Dialog class or use its existing subclasses. Please stay away from using the Dialog class directly.
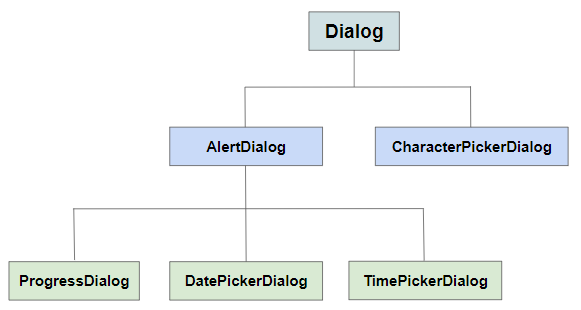
AlertDialog
AlertDialog is a direct subclass of the Dialog. It consists of a header, content area, and 1, 2 or 3 buttons. It is easy for you to get a dialog box with a few lines of codes.
CharacterPickerDialog
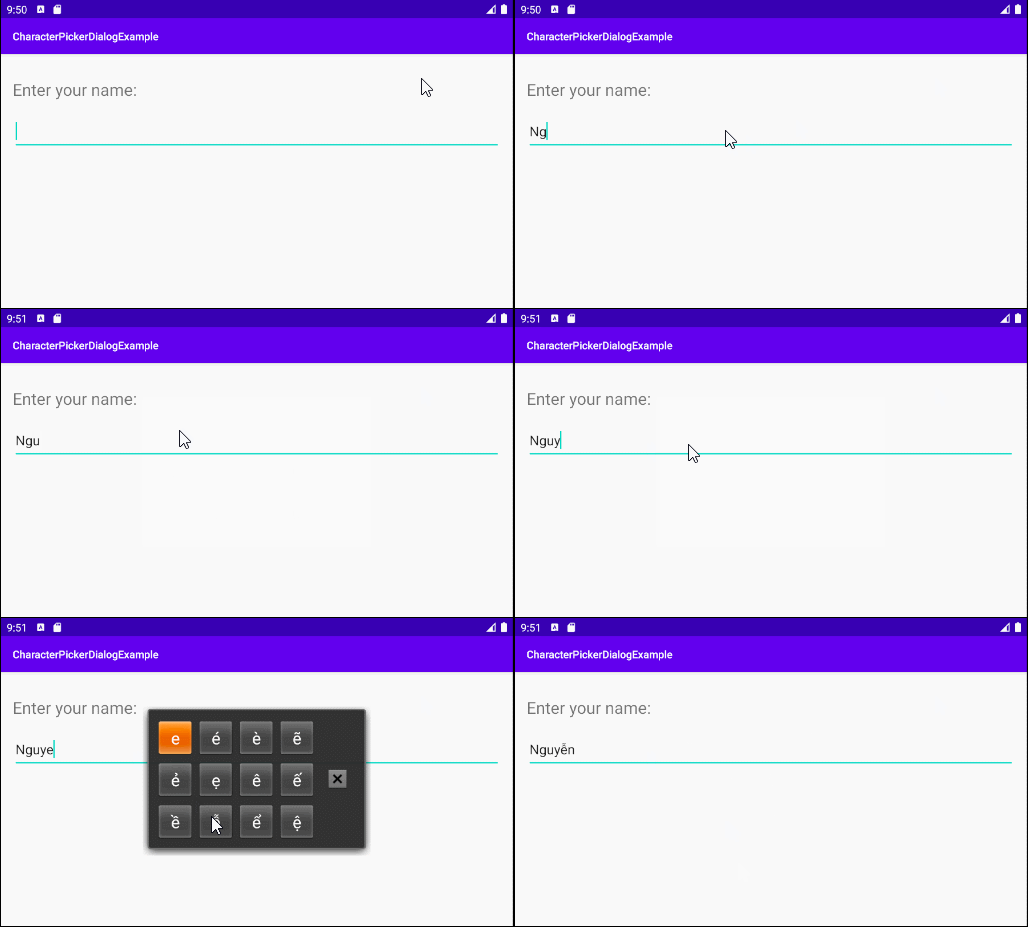
Android CharacterPickerDialog is a dialog box that permits the user to select "accented characters" of a base character. Oftentimes, the CharacterPickerDialog is useful because not all of the phones have the Keyboard Layout that is appropriate for a particular language.
DatePickerDialog & TimePickerDialog
Allows the user to select a date or time.
ProgressDialog
ProgressDialog is a dialog box that shows a progress. Basically, this dialog is unsafe when it appears because it hinders the user from interacting with the application (The progress is not completed). You should consider using the ProgressBar instead of the ProgressDialog.
DialogFragment vs Dialog
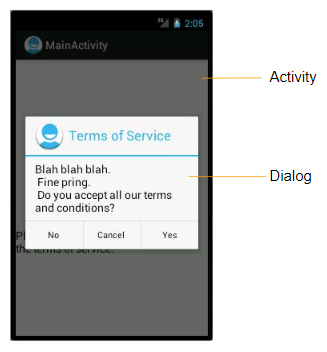
Dialogs are created and displayed in an Activity, they do not have callback methods to be able to identify the status of the Activity lifecycle, so sometimes your Activity needs to tell the Dialog what to do in different periods of time.
To simplify that, take the situation as an example: Your application is displaying a Dialog filled with data, for some reason the user has not interacted with the device for a certain period of time. If so, the device will go into sleeping state and onPause() method of the Activity will be called to pause the app. As soon as the user comes back and re-interacts with the device, onResume() method of the Activity will be called to resume the app. Additionally, you need to write codes in onResume() to request the Dialog to refresh the data displaying. Remember that you don't need to do that if the Dialogs are only used to show notifications, or to display the fixed data .
DialogFragment is a Fragment that contains a Dialog. Its callback methods is self-aware of different states in the lifecycle of the Activity, so DialogFragment can smartly do tasks by itself instead of following the Activity instructions. In addition, Dialogs will be closed if the user rotates the phone screen, while DialogFragment is more user-friendly, it will rotate in accordance with the orientation of the phone screen.
That is the key reason why you should use DialogFragment instead of Dialog. Obviously, it will make your codes clearer. However, you do not need to worry because using Dialog is really convenient in most cases.
2. Example of Custom Dialog
Example preview:
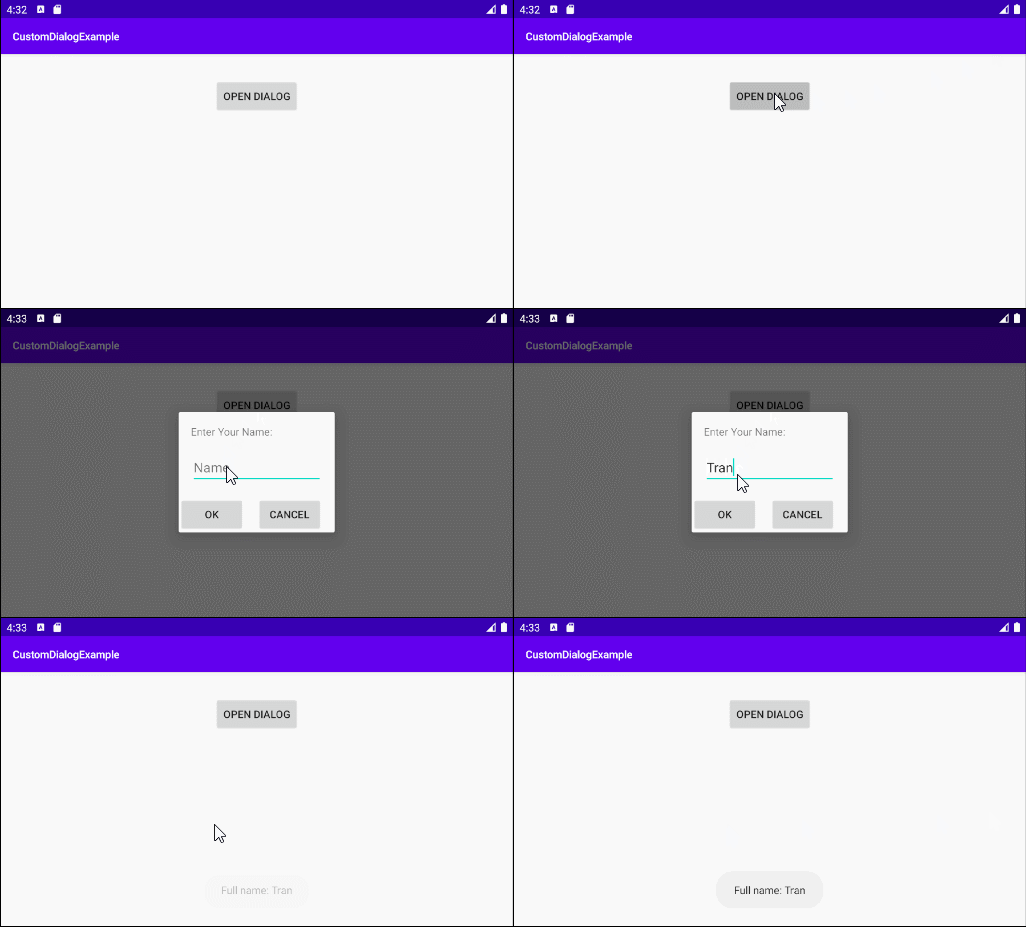
Now, create a new project on Android Studio:
- File > New > New Project > Empty Activity
- Name: CustomDialogExample
- Package name: org.o7planning.customdialogexample
- Language: Java
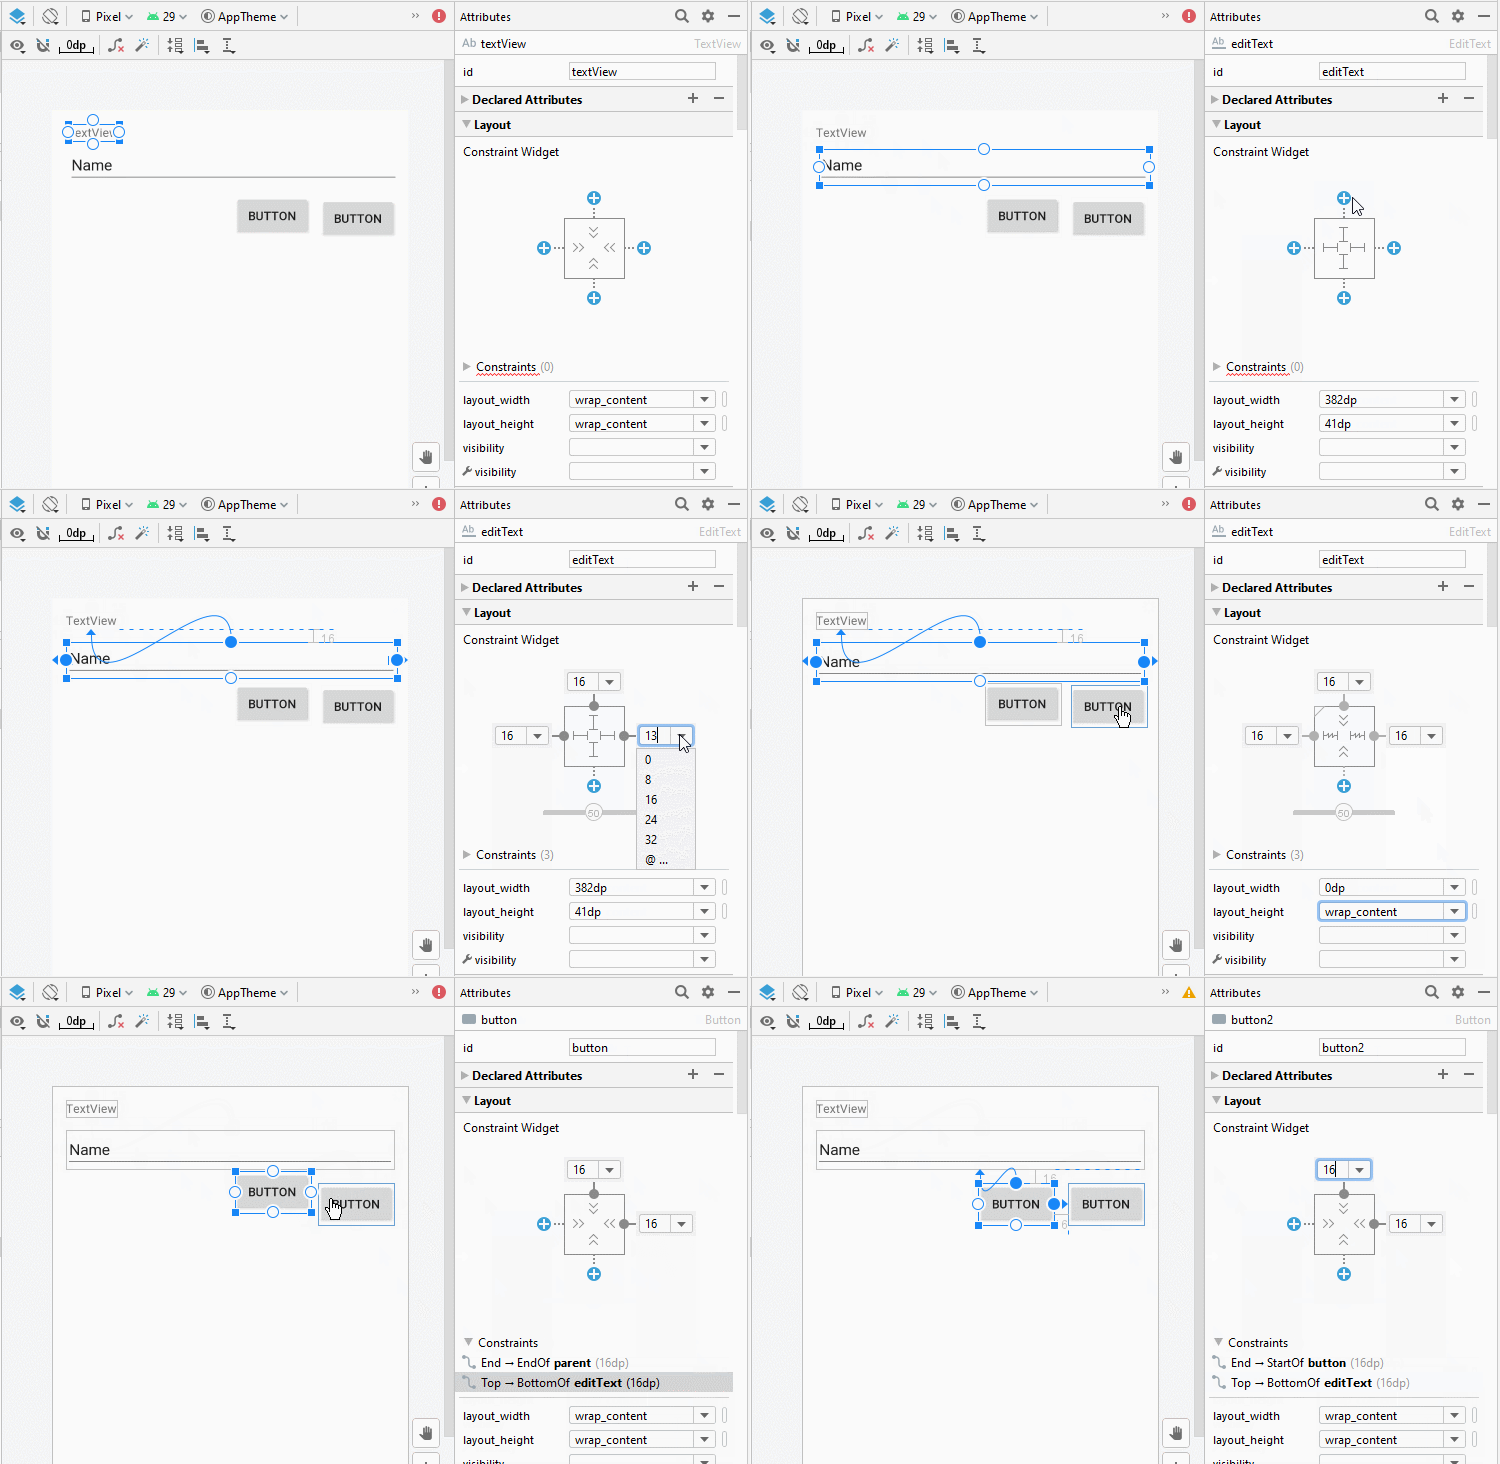
First, let's start off with designing the interface for the dialog:
- File > New > Android Resource File
- File name: layout_custom_dialog.xml
- Resource type: Layout
- Root element: androidx.constraintlayout.widget.ConstraintLayout
- Directory name: layout
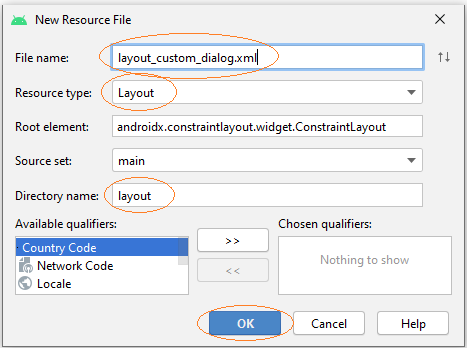
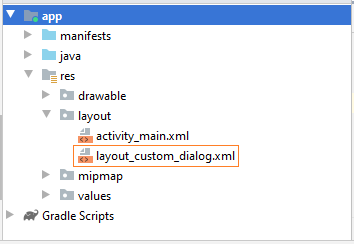
Then design the Interface of the custom Dialog:
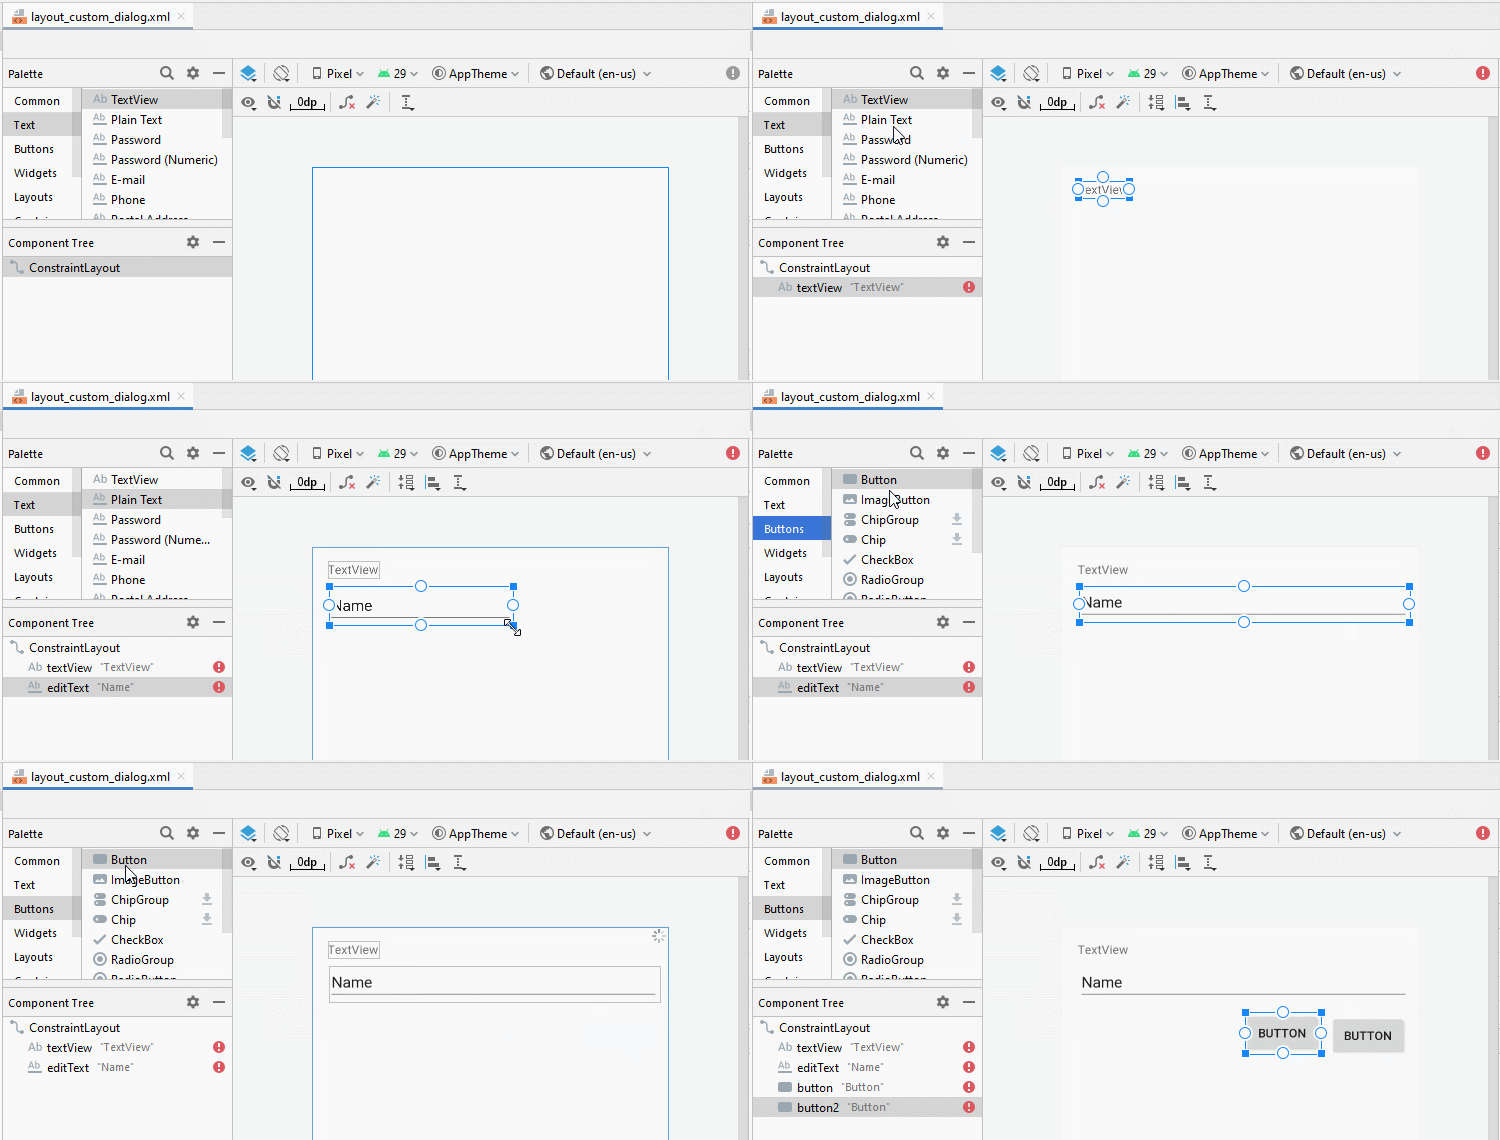
After that, set ID, and Text for the components in the interface:
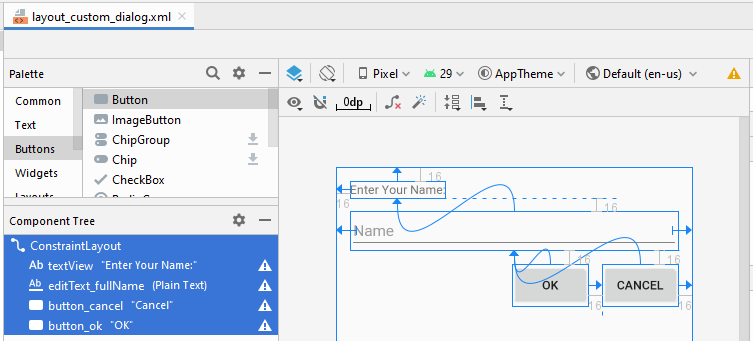
layout_custom_dialog.xml
<?xml version="1.0" encoding="utf-8"?>
<androidx.constraintlayout.widget.ConstraintLayout
    xmlns:android="http://schemas.android.com/apk/res/android"
    xmlns:app="http://schemas.android.com/apk/res-auto"
    xmlns:tools="http://schemas.android.com/tools"
    android:layout_width="match_parent"
    android:layout_height="match_parent">

    <TextView
        android:id="@+id/textView"
        android:layout_width="wrap_content"
        android:layout_height="wrap_content"
        android:layout_marginStart="16dp"
        android:layout_marginLeft="16dp"
        android:layout_marginTop="16dp"
        android:text="Enter Your Name:"
        app:layout_constraintStart_toStartOf="parent"
        app:layout_constraintTop_toTopOf="parent" />

    <EditText
        android:id="@+id/editText_fullName"
        android:layout_width="0dp"
        android:layout_height="wrap_content"
        android:layout_marginStart="16dp"
        android:layout_marginLeft="16dp"
        android:layout_marginTop="16dp"
        android:layout_marginEnd="16dp"
        android:layout_marginRight="16dp"
        android:ems="10"
        android:hint="Name"
        android:inputType="textPersonName"
        app:layout_constraintEnd_toEndOf="parent"
        app:layout_constraintStart_toStartOf="parent"
        app:layout_constraintTop_toBottomOf="@+id/textView" />

    <Button
        android:id="@+id/button_cancel"
        android:layout_width="wrap_content"
        android:layout_height="wrap_content"
        android:layout_marginTop="16dp"
        android:layout_marginEnd="16dp"
        android:layout_marginRight="16dp"
        android:text="Cancel"
        app:layout_constraintEnd_toEndOf="parent"
        app:layout_constraintTop_toBottomOf="@+id/editText_fullName" />

    <Button
        android:id="@+id/button_ok"
        android:layout_width="wrap_content"
        android:layout_height="wrap_content"
        android:layout_marginTop="16dp"
        android:layout_marginEnd="16dp"
        android:layout_marginRight="16dp"
        android:text="OK"
        app:layout_constraintEnd_toStartOf="@+id/button_cancel"
        app:layout_constraintTop_toBottomOf="@+id/editText_fullName" />
</androidx.constraintlayout.widget.ConstraintLayout>
Finally, create a CustomDialog class extending from the Dialog class:
CustomDialog.java
package org.o7planning.customdialogexample;

import android.app.Activity;
import android.app.Dialog;
import android.content.Context;
import android.os.Bundle;
import android.view.View;
import android.view.Window;
import android.widget.Button;
import android.widget.EditText;
import android.widget.Toast;

public class CustomDialog extends Dialog {

    interface FullNameListener {
        public void fullNameEntered(String fullName);
    }

    public Context context;

    private EditText editTextFullName;
    private Button buttonOK;
    private Button buttonCancel;

    private CustomDialog.FullNameListener listener;

    public CustomDialog(Context context, CustomDialog.FullNameListener listener) {
        super(context);
        this.context = context;
        this.listener = listener;
    }

    @Override
    protected void onCreate(Bundle savedInstanceState) {
        super.onCreate(savedInstanceState);
        requestWindowFeature(Window.FEATURE_NO_TITLE);
        setContentView(R.layout.layout_custom_dialog);

        this.editTextFullName = (EditText) findViewById(R.id.editText_fullName);
        this.buttonOK = (Button) findViewById(R.id.button_ok);
        this.buttonCancel  = (Button) findViewById(R.id.button_cancel);

        this.buttonOK .setOnClickListener(new View.OnClickListener() {
            @Override
            public void onClick(View v) {
                 buttonOKClick();
            }
        });
        this.buttonCancel.setOnClickListener(new View.OnClickListener() {
            @Override
            public void onClick(View v) {
                 buttonCancelClick();
            }
        });
    }

    // User click "OK" button.
    private void buttonOKClick()  {
        String fullName = this.editTextFullName.getText().toString();

        if(fullName== null || fullName.isEmpty())  {
            Toast.makeText(this.context, "Please enter your name", Toast.LENGTH_LONG).show();
            return;
        }
        this.dismiss(); // Close Dialog

        if(this.listener!= null)  {
            this.listener.fullNameEntered(fullName);
        }
    }

    // User click "Cancel" button.
    private void buttonCancelClick()  {
        this.dismiss();
    }
}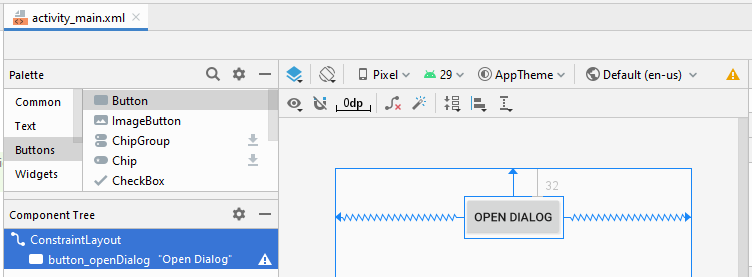
activity_main.xml
<?xml version="1.0" encoding="utf-8"?>
<androidx.constraintlayout.widget.ConstraintLayout
    xmlns:android="http://schemas.android.com/apk/res/android"
    xmlns:app="http://schemas.android.com/apk/res-auto"
    xmlns:tools="http://schemas.android.com/tools"
    android:layout_width="match_parent"
    android:layout_height="match_parent"
    tools:context=".MainActivity">

    <Button
        android:id="@+id/button_openDialog"
        android:layout_width="wrap_content"
        android:layout_height="wrap_content"
        android:layout_marginTop="32dp"
        android:text="Open Dialog"
        app:layout_constraintEnd_toEndOf="parent"
        app:layout_constraintStart_toStartOf="parent"
        app:layout_constraintTop_toTopOf="parent" />

</androidx.constraintlayout.widget.ConstraintLayout>
MainActivity.java
package org.o7planning.customdialogexample;

import androidx.appcompat.app.AppCompatActivity;

import android.os.Bundle;
import android.view.View;
import android.widget.Button;
import android.widget.Toast;

public class MainActivity extends AppCompatActivity {

    private Button buttonOpenDialog;

    @Override
    protected void onCreate(Bundle savedInstanceState) {
        super.onCreate(savedInstanceState);
        setContentView(R.layout.activity_main);

        this.buttonOpenDialog = (Button) this.findViewById(R.id.button_openDialog);

        this.buttonOpenDialog.setOnClickListener(new View.OnClickListener() {
            @Override
            public void onClick(View v) {
                buttonOpenDialogClicked();
            }
        });
    }

    private void buttonOpenDialogClicked()  {
        CustomDialog.FullNameListener listener = new CustomDialog.FullNameListener() {
            @Override
            public void fullNameEntered(String fullName) {
                Toast.makeText(MainActivity.this, "Full name: " + fullName, Toast.LENGTH_LONG).show();
            }
        };
        final CustomDialog dialog = new CustomDialog(this, listener);

        dialog.show();
    }
}
Android Programming Tutorials
- Configure Android Emulator in Android Studio
- Android ToggleButton Tutorial with Examples
- Create a simple File Finder Dialog in Android
- Android TimePickerDialog Tutorial with Examples
- Android DatePickerDialog Tutorial with Examples
- What is needed to get started with Android?
- Install Android Studio on Windows
- Install Intel® HAXM for Android Studio
- Android AsyncTask Tutorial with Examples
- Android AsyncTaskLoader Tutorial with Examples
- Android Tutorial for Beginners - Basic examples
- How to know the phone number of Android Emulator and change it
- Android TextInputLayout Tutorial with Examples
- Android CardView Tutorial with Examples
- Android ViewPager2 Tutorial with Examples
- Get Phone Number in Android using TelephonyManager
- Android Phone Call Tutorial with Examples
- Android Wifi Scanning Tutorial with Examples
- Android 2D Game Tutorial for Beginners
- Android DialogFragment Tutorial with Examples
- Android CharacterPickerDialog Tutorial with Examples
- Android Tutorial for Beginners - Hello Android
- Using Android Device File Explorer
- Enable USB Debugging on Android Device
- Android UI Layouts Tutorial with Examples
- Android SMS Tutorial with Examples
- Android SQLite Database Tutorial with Examples
- Google Maps Android API Tutorial with Examples
- Android Text to Speech Tutorial with Examples
- Android Space Tutorial with Examples
- Android Toast Tutorial with Examples
- Create a custom Android Toast
- Android SnackBar Tutorial with Examples
- Android TextView Tutorial with Examples
- Android TextClock Tutorial with Examples
- Android EditText Tutorial with Examples
- Android TextWatcher Tutorial with Examples
- Format Credit Card Number with Android TextWatcher
- Android Clipboard Tutorial with Examples
- Create a simple File Chooser in Android
- Android AutoCompleteTextView and MultiAutoCompleteTextView Tutorial with Examples
- Android ImageView Tutorial with Examples
- Android ImageSwitcher Tutorial with Examples
- Android ScrollView and HorizontalScrollView Tutorial with Examples
- Android WebView Tutorial with Examples
- Android SeekBar Tutorial with Examples
- Android Dialog Tutorial with Examples
- Android AlertDialog Tutorial with Examples
- Android RatingBar Tutorial with Examples
- Android ProgressBar Tutorial with Examples
- Android Spinner Tutorial with Examples
- Android Button Tutorial with Examples
- Android Switch Tutorial with Examples
- Android ImageButton Tutorial with Examples
- Android FloatingActionButton Tutorial with Examples
- Android CheckBox Tutorial with Examples
- Android RadioGroup and RadioButton Tutorial with Examples
- Android Chip and ChipGroup Tutorial with Examples
- Using image assets and icon assets of Android Studio
- Setting SD Card for Android Emulator
- ChipGroup and Chip Entry Example
- How to add external libraries to Android Project in Android Studio?
- How to disable the permissions already granted to the Android application?
- How to remove applications from Android Emulator?
- Android LinearLayout Tutorial with Examples
- Android TableLayout Tutorial with Examples
- Android FrameLayout Tutorial with Examples
- Android QuickContactBadge Tutorial with Examples
- Android StackView Tutorial with Examples
- Android Camera Tutorial with Examples
- Android MediaPlayer Tutorial with Examples
- Android VideoView Tutorial with Examples
- Playing Sound effects in Android with SoundPool
- Android Networking Tutorial with Examples
- Android JSON Parser Tutorial with Examples
- Android SharedPreferences Tutorial with Examples
- Android Internal Storage Tutorial with Examples
- Android External Storage Tutorial with Examples
- Android Intents Tutorial with Examples
- Example of an explicit Android Intent, calling another Intent
- Example of implicit Android Intent, open a URL, send an email
- Android Services Tutorial with Examples
- Android Notifications Tutorial with Examples
- Android DatePicker Tutorial with Examples
- Android TimePicker Tutorial with Examples
- Android Chronometer Tutorial with Examples
- Android OptionMenu Tutorial with Examples
- Android ContextMenu Tutorial with Examples
- Android PopupMenu Tutorial with Examples
- Android Fragments Tutorial with Examples
- Android ListView Tutorial with Examples
- Android ListView with Checkbox using ArrayAdapter
- Android GridView Tutorial with Examples
Show More