Android Spinner Tutorial with Examples
1. Android Spinner
In Android, Spinner is a ViewGroup that allows the user to select a value from a list of values. By default, Android Spinner works like a Dropdown List or Combox in other programming languages.
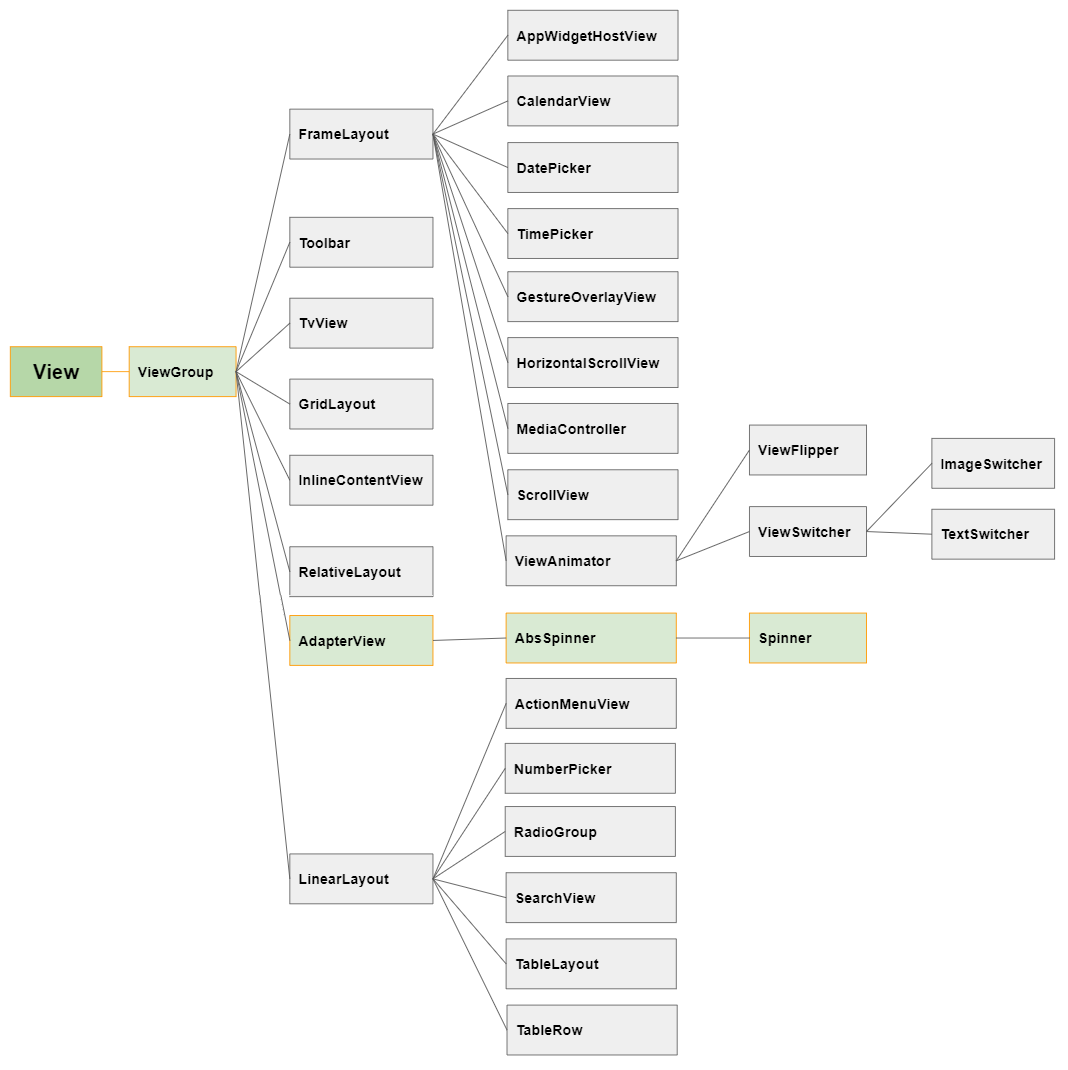
When the user clicks on Android Spinner, a list consisting of all the values will be dropped down, and the user can choose one.
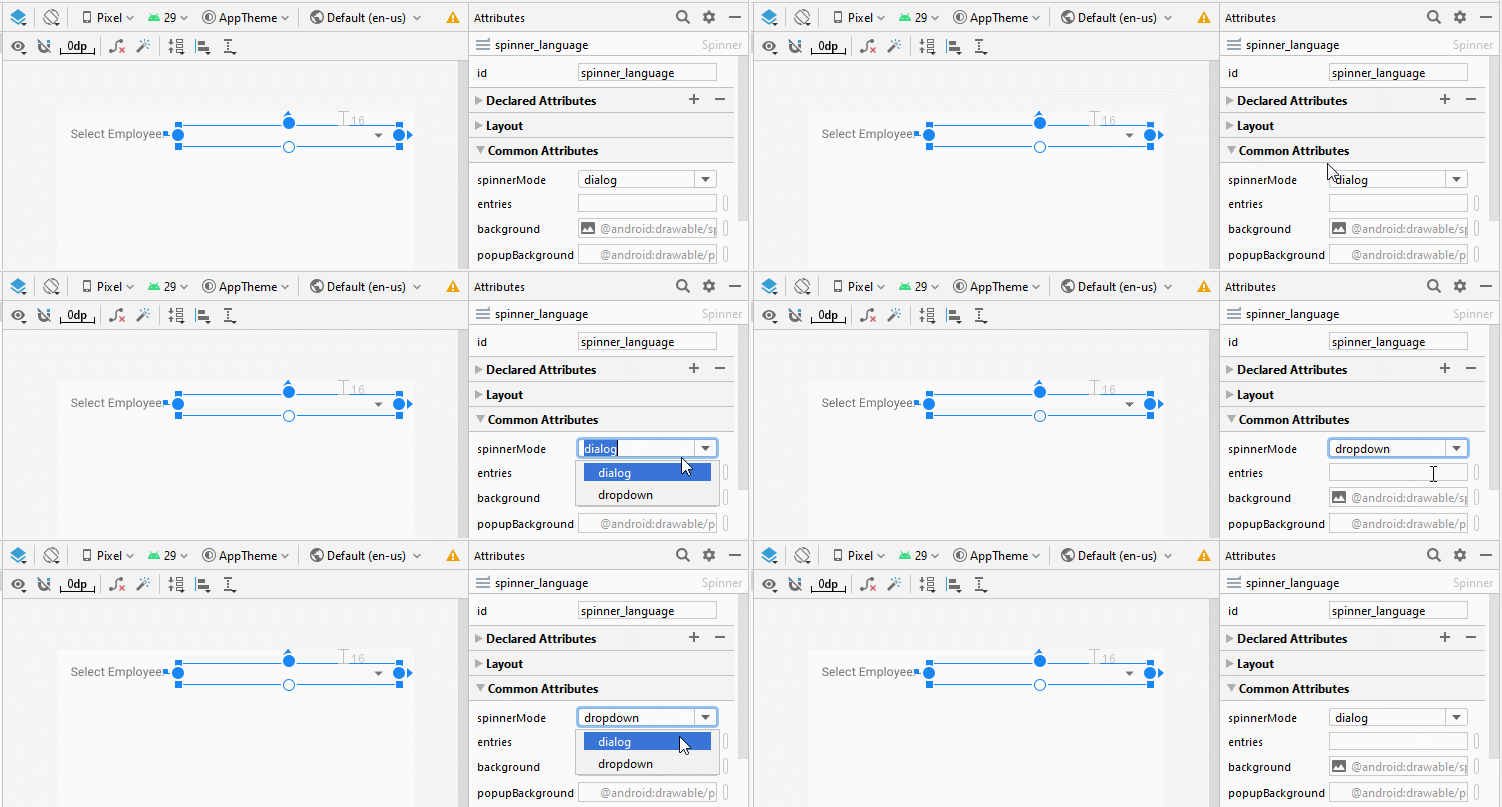
Android Spinner has 2 modes with completely different interfaces:
- android:spinnerMode="dropdown"
- android:spinnerMode="dialog"
android:spinnerMode="dropdown"
When the user clicks on the Spinner, a Dropdown List will be displayed permitting the user to select one value. This is the default mode of Spinner.
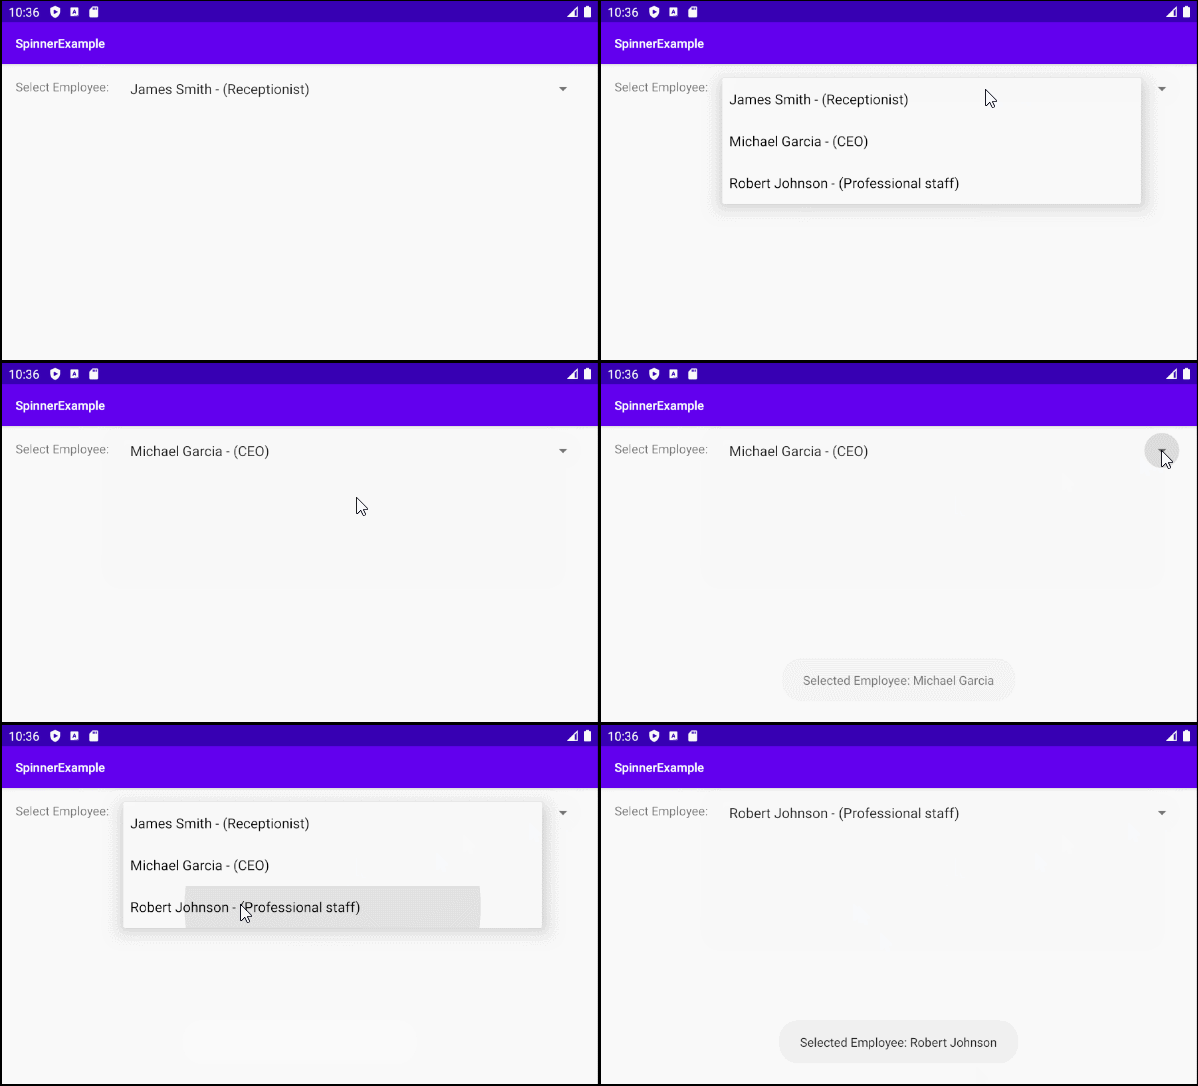
android:spinnerMode="dropdown"
android:spinnerMode="dialog"
When the user clicks on the Spinner,a Dialog containing a list of values will be displayed allowing the user to select a value.
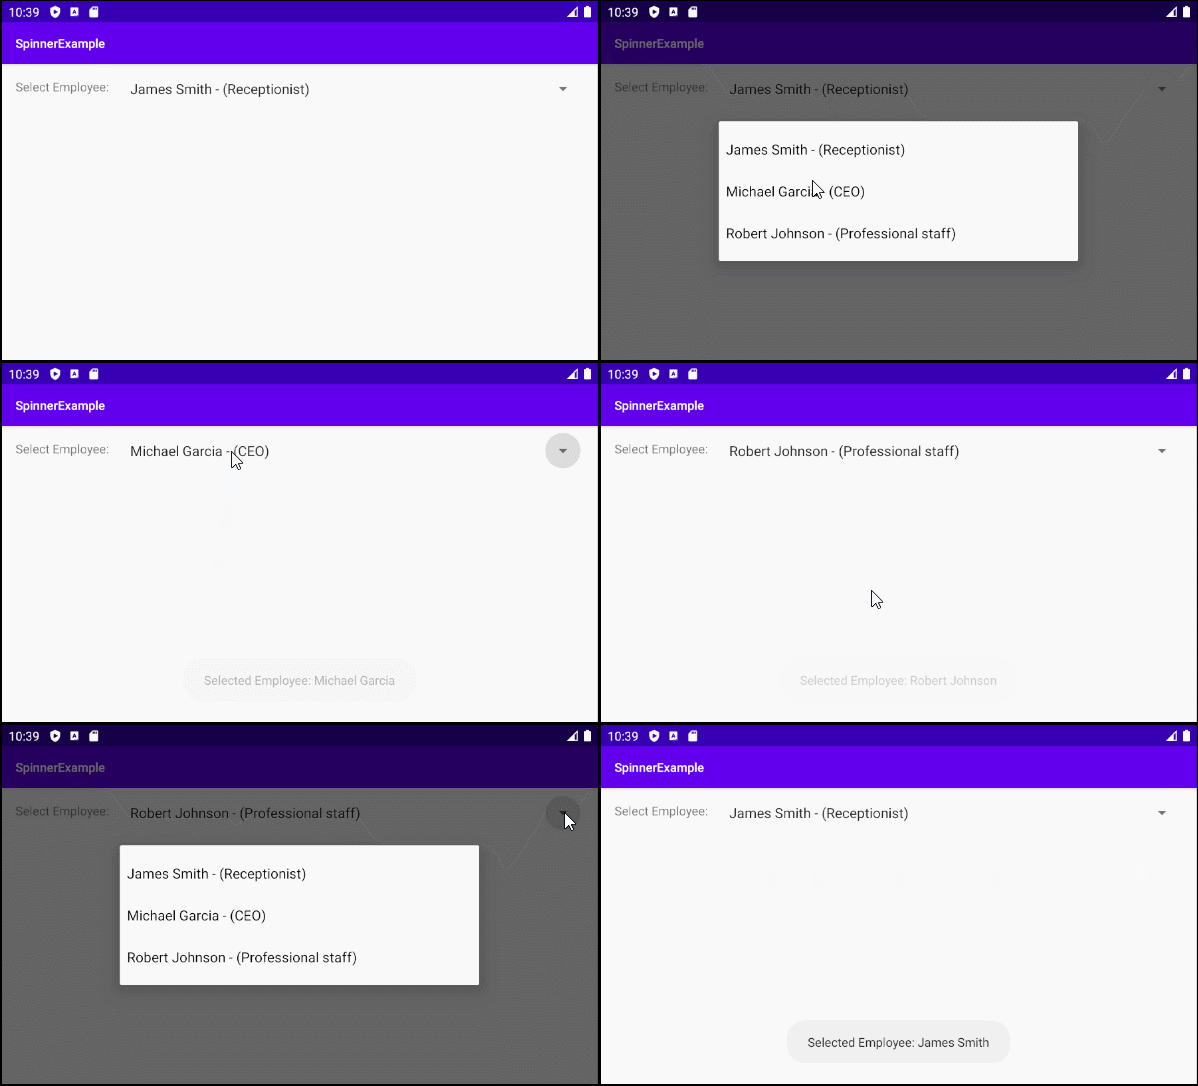
android:spinnerMode="dialog"
2. Example of Spinner + ArrayAdapter
OK, Now let's get started with a simple example using Spinner and ArrayAdapter. In this example, the Spinner will contain a list of Employee objects:
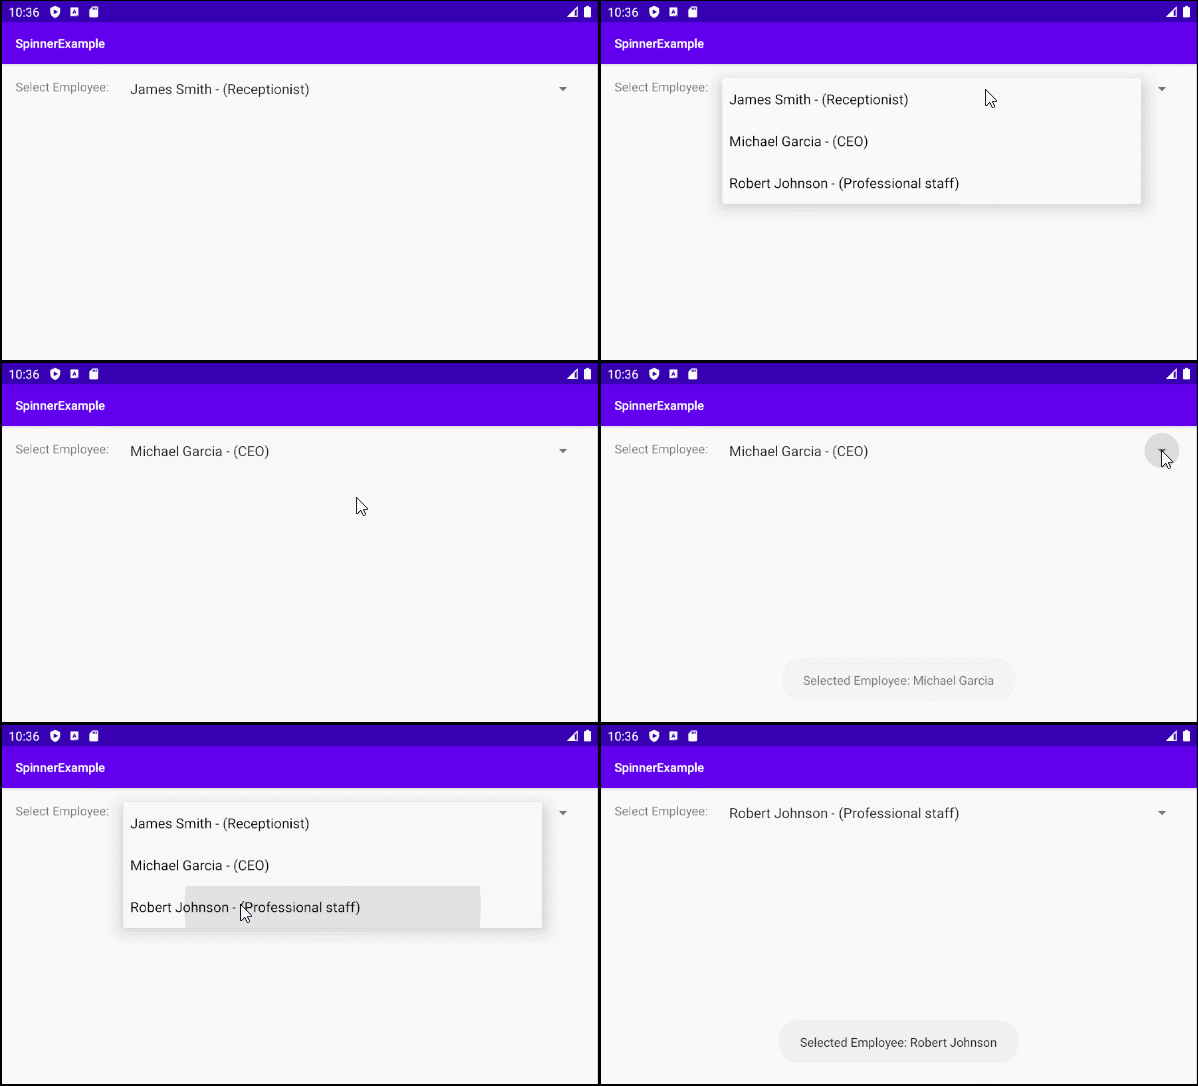
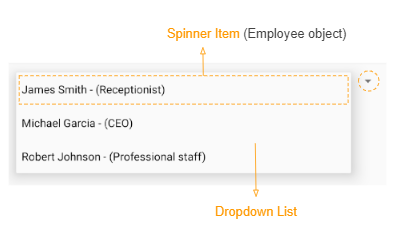
An Adapter combines a Spinner-Item Layout Resource and data to create a Spinner.
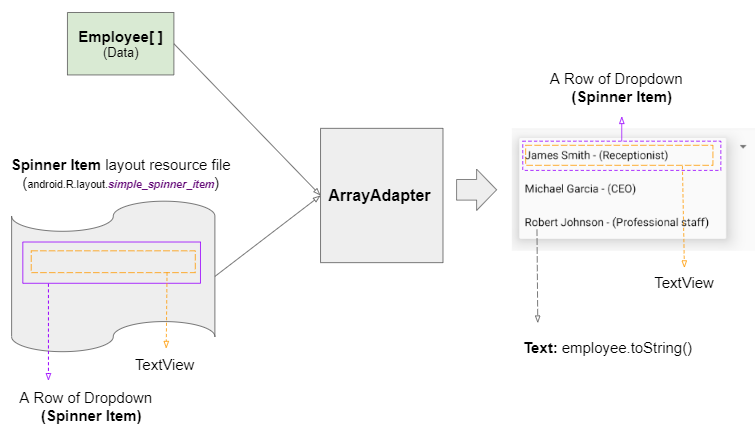
ArrayAdapter is a class available in Android library. It is a simple Adapter, which accepts a simple Spinner-Item Layout Resource including a TextView, and possibly CheckBox, ImageView, etc.
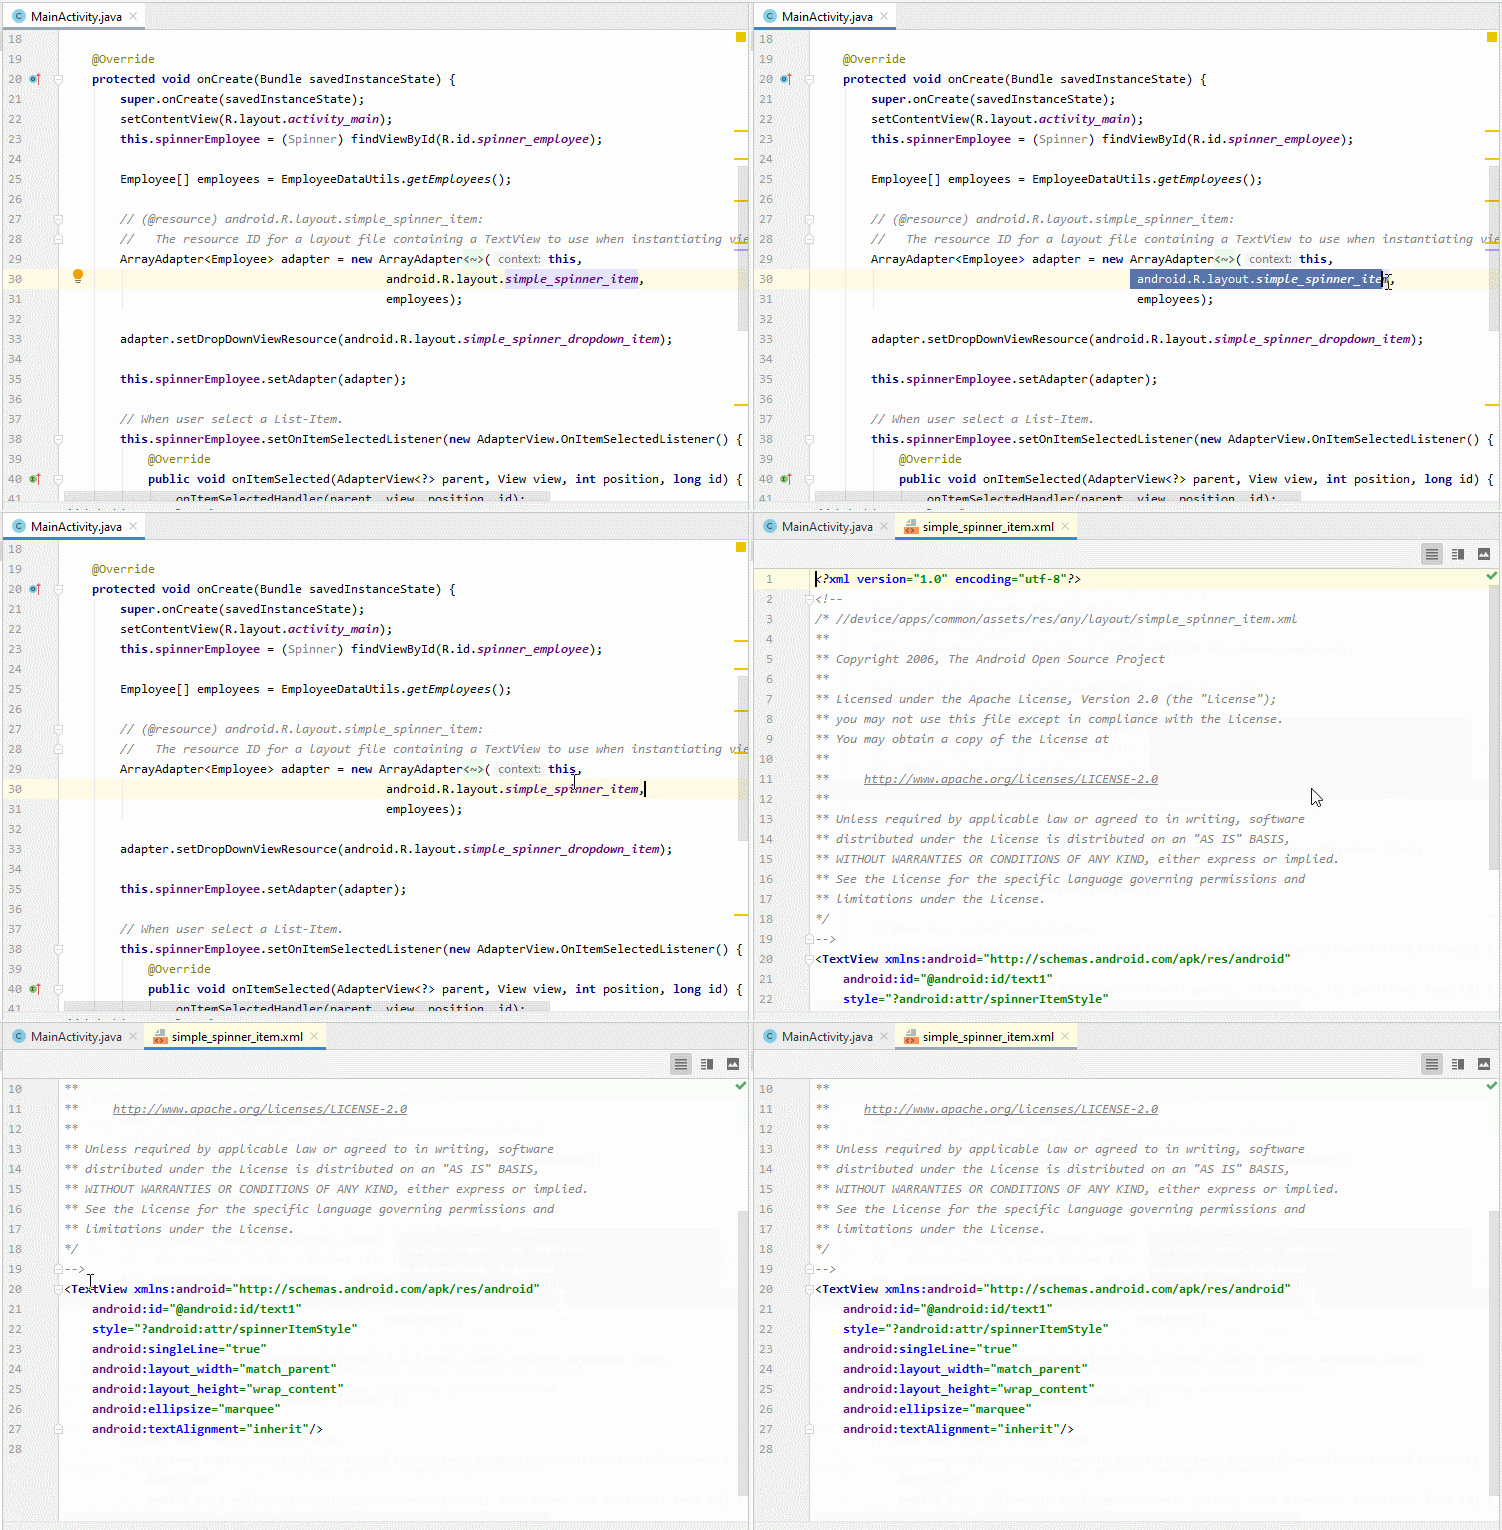
For example: A simple Spinner-Item Layout Resource whose ID is android.R.layout.simple_spinner_item is already defined in Android SDK and you can use it. Android Studio allows you to view the contents of these files. What to do is just hold down the CONTROL key and click on it, which is demonstrated below:
On Android Studio, create a project:
- File > New > New Project > Empty Activity
- Name: SpinnerExample
- Package name: org.o7planning.spinnerexample
- Language: Java
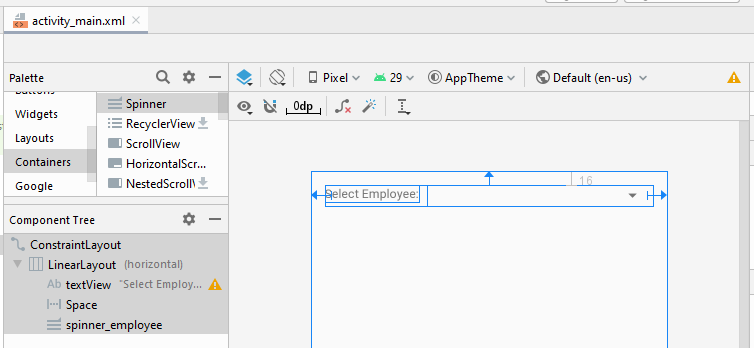
activity_main.xml
<?xml version="1.0" encoding="utf-8"?>
<androidx.constraintlayout.widget.ConstraintLayout
    xmlns:android="http://schemas.android.com/apk/res/android"
    xmlns:app="http://schemas.android.com/apk/res-auto"
    xmlns:tools="http://schemas.android.com/tools"
    android:layout_width="match_parent"
    android:layout_height="match_parent"
    tools:context=".MainActivity">

    <LinearLayout
        android:layout_width="0dp"
        android:layout_height="wrap_content"
        android:layout_marginStart="16dp"
        android:layout_marginLeft="16dp"
        android:layout_marginTop="16dp"
        android:layout_marginEnd="16dp"
        android:layout_marginRight="16dp"
        android:orientation="horizontal"
        app:layout_constraintEnd_toEndOf="parent"
        app:layout_constraintStart_toStartOf="parent"
        app:layout_constraintTop_toTopOf="parent">

        <TextView
            android:id="@+id/textView"
            android:layout_width="wrap_content"
            android:layout_height="wrap_content"
            android:layout_weight="0"
            android:text="Select Employee:" />

        <Space
            android:layout_width="10dp"
            android:layout_height="wrap_content"
            android:layout_weight="0" />

        <Spinner
            android:id="@+id/spinner_employee"
            android:layout_width="wrap_content"
            android:layout_height="wrap_content"
            android:layout_weight="1" />
    </LinearLayout>

</androidx.constraintlayout.widget.ConstraintLayout>
MainActivity.java
package org.o7planning.spinnerexample;

import android.os.Bundle;
import android.view.View;
import android.widget.Adapter;
import android.widget.AdapterView;
import android.widget.ArrayAdapter;
import android.widget.Spinner;
import android.widget.Toast;

import androidx.appcompat.app.AppCompatActivity;

public class MainActivity extends AppCompatActivity {

    private Spinner spinnerEmployee;

    @Override
    protected void onCreate(Bundle savedInstanceState) {
        super.onCreate(savedInstanceState);
        setContentView(R.layout.activity_main);
        this.spinnerEmployee = (Spinner) findViewById(R.id.spinner_employee);

        Employee[] employees = EmployeeDataUtils.getEmployees();

        // (@resource) android.R.layout.simple_spinner_item:
        //   The resource ID for a layout file containing a TextView to use when instantiating views.
        //    (Layout for one ROW of Spinner)
        ArrayAdapter<Employee> adapter = new ArrayAdapter<Employee>(this,
                                              android.R.layout.simple_spinner_item,
                                              employees);

        // Layout for All ROWs of Spinner.  (Optional for ArrayAdapter).
        adapter.setDropDownViewResource(android.R.layout.simple_spinner_dropdown_item);

        this.spinnerEmployee.setAdapter(adapter);

        // When user select a List-Item.
        this.spinnerEmployee.setOnItemSelectedListener(new AdapterView.OnItemSelectedListener() {

            @Override
            public void onItemSelected(AdapterView<?> parent, View view, int position, long id) {
                onItemSelectedHandler(parent, view, position, id);
            }

            @Override
            public void onNothingSelected(AdapterView<?> parent) {

            }
        });
    }


    private void onItemSelectedHandler(AdapterView<?> adapterView, View view, int position, long id) {
        Adapter adapter = adapterView.getAdapter();
        Employee employee = (Employee) adapter.getItem(position);

        Toast.makeText(getApplicationContext(), "Selected Employee: " + employee.getFullName() ,Toast.LENGTH_SHORT).show();
    }

}
Employee.java
package org.o7planning.spinnerexample;

public class Employee {

    private String firstName;
    private String lastName;
    private String position;
    private int salary;

    public Employee(String firstName, String lastName, String position, int salary) {
        this.firstName = firstName;
        this.lastName = lastName;
        this.position = position;
        this.salary = salary;
    }

    public String getFirstName() {
        return firstName;
    }

    public void setFirstName(String firstName) {
        this.firstName = firstName;
    }

    public String getLastName() {
        return lastName;
    }

    public void setLastName(String lastName) {
        this.lastName = lastName;
    }

    public String getPosition() {
        return position;
    }

    public void setPosition(String position) {
        this.position = position;
    }

    public int getSalary() {
        return salary;
    }

    public void setSalary(int salary) {
        this.salary = salary;
    }

    public String getFullName()  {
        return this.firstName + " " + this.lastName;
    }

    // Text show in Spinner
    @Override
    public String toString()  {
        return this.getFullName() + " - (" + this.position+")";
    }
}
EmployeeDataUtils.java
package org.o7planning.spinnerexample;

public class EmployeeDataUtils {

    public static Employee[] getEmployees()  {
        Employee emp1 = new Employee("James", "Smith", "Receptionist", 1000);
        Employee emp2 = new Employee("Michael", "Garcia", "CEO", 50000);
        Employee emp3 = new Employee("Robert", "Johnson", "Professional staff", 2000);

        return new Employee[] {emp1, emp2, emp3};
    }
}
3. Example of Spinner + CustomAdapter
Custom Adapter helps you get a more complex and beautiful Spinner. Below is an illustration of a Spinner containing a list of Language objects. It is also our next example:
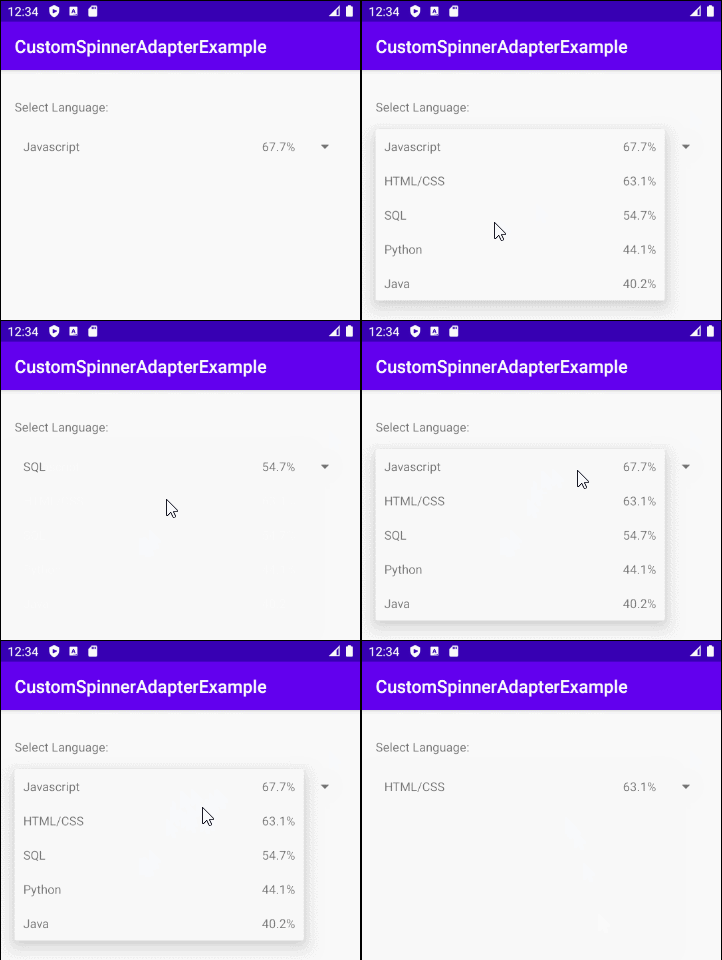
In this example, we are going to be creating a "Spinner Item Layout Resource File" to define the Layout of a row of Spinner. CustomAdapter will combine data and "Spinner Item Layout Resource" to form a Spinner that the user can see.
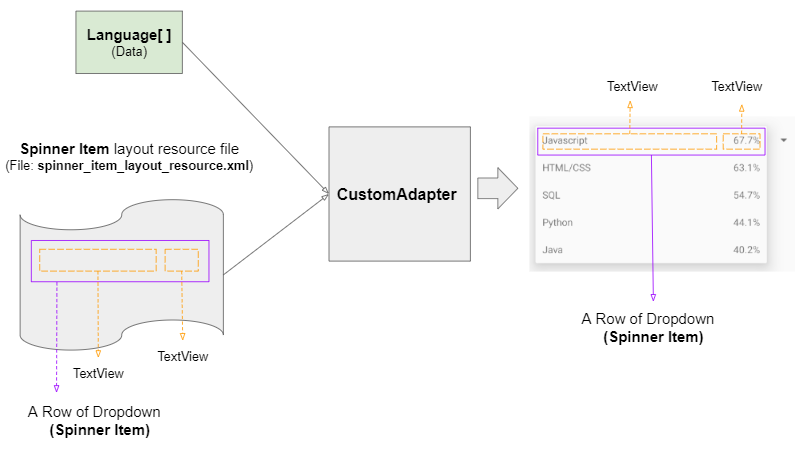
OK. Now on Android Studio, create a project:
- File > New > New Project > Empty Activity
- Name: CustomSpinnerAdapterExample
- Package name: org.o7planning.customspinneradapterexample
- Language: Java
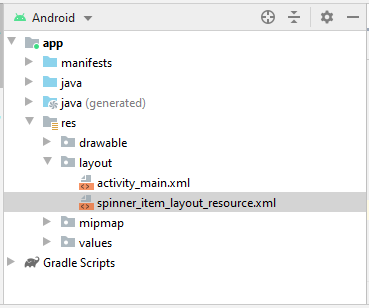
Firstly, we need to create a Layout Resource File to define the Layout for the Spinner Item:
Next, on Android Studio, choose the "layout" folder, and select:
- File > New > Layout Resource File
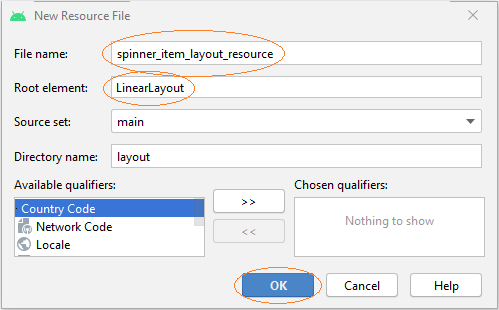
- File Name: spinner_item_layout_resource.xml
- Root element: LinearLayout
Then design the spinner_item_layout_resource interface:
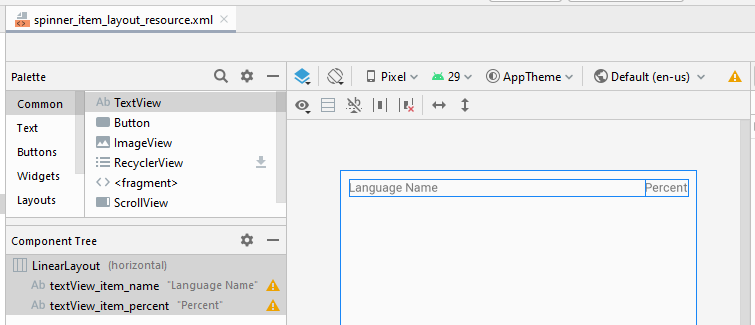
spinner_item_layout_resource.xml
<?xml version="1.0" encoding="utf-8"?>
<LinearLayout xmlns:android="http://schemas.android.com/apk/res/android"
    xmlns:app="http://schemas.android.com/apk/res-auto"
    android:layout_width="match_parent"
    android:layout_height="match_parent"
    android:orientation="horizontal"
    android:padding="10dp">

    <TextView
        android:id="@+id/textView_item_name"
        android:layout_width="wrap_content"
        android:layout_height="wrap_content"
        android:layout_weight="1"
        android:text="Language Name" />

    <TextView
        android:id="@+id/textView_item_percent"
        android:layout_width="wrap_content"
        android:layout_height="wrap_content"
        android:layout_weight="0"
        android:text="Percent" />
</LinearLayout>
Lastly, here is the main interface of the application:
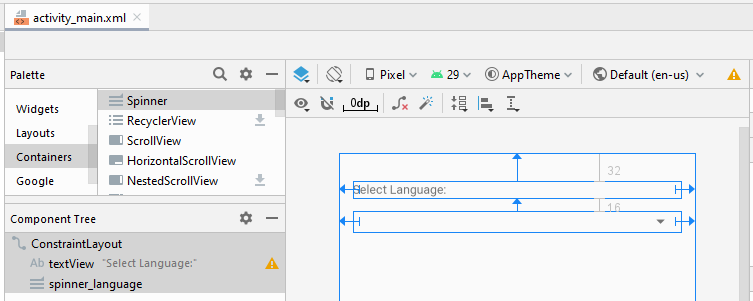
activity_main.xml
<?xml version="1.0" encoding="utf-8"?>
<androidx.constraintlayout.widget.ConstraintLayout
    xmlns:android="http://schemas.android.com/apk/res/android"
    xmlns:app="http://schemas.android.com/apk/res-auto"
    xmlns:tools="http://schemas.android.com/tools"
    android:layout_width="match_parent"
    android:layout_height="match_parent"
    tools:context=".MainActivity">

    <TextView
        android:id="@+id/textView"
        android:layout_width="0dp"
        android:layout_height="wrap_content"
        android:layout_marginStart="16dp"
        android:layout_marginLeft="16dp"
        android:layout_marginTop="32dp"
        android:layout_marginEnd="16dp"
        android:layout_marginRight="16dp"
        android:text="Select Language:"
        app:layout_constraintEnd_toEndOf="parent"
        app:layout_constraintHorizontal_bias="1.0"
        app:layout_constraintStart_toStartOf="parent"
        app:layout_constraintTop_toTopOf="parent" />

    <Spinner
        android:id="@+id/spinner_language"
        android:layout_width="wrap_content"
        android:layout_height="wrap_content"
        android:layout_marginStart="16dp"
        android:layout_marginLeft="16dp"
        android:layout_marginTop="16dp"
        android:spinnerMode="dialog"
        app:layout_constraintStart_toStartOf="parent"
        app:layout_constraintTop_toBottomOf="@+id/textView" />

</androidx.constraintlayout.widget.ConstraintLayout>
MainActivity.java
package org.o7planning.customspinneradapterexample;

import androidx.appcompat.app.AppCompatActivity;

import android.os.Bundle;
import android.widget.Spinner;

import java.util.List;

public class MainActivity extends AppCompatActivity {

    private Spinner spinner;
    private List<Language> languages;

    @Override
    protected void onCreate(Bundle savedInstanceState) {
        super.onCreate(savedInstanceState);
        setContentView(R.layout.activity_main);

        // Data:
        this.languages = LanguageDataUtils.getLanguages();


        this.spinner = (Spinner) this.findViewById(R.id.spinner_language);

        // Adapter"
        CustomAdapter adapter = new CustomAdapter(MainActivity.this,
                R.layout.spinner_item_layout_resource,
                R.id.textView_item_name,
                R.id.textView_item_percent,
                this.languages);

        this.spinner.setAdapter(adapter);
    }

}
CustomAdapter.java
package org.o7planning.customspinneradapterexample;

import android.app.Activity;
import android.view.View;
import android.view.ViewGroup;
import android.view.LayoutInflater;
import android.widget.BaseAdapter;
import android.widget.TextView;

import java.util.List;

public class CustomAdapter extends BaseAdapter  {

    private LayoutInflater flater;
    private List<Language> list;
    private int listItemLayoutResource;
    private int textViewItemNameId;
    private int textViewItemPercentId;


    // Arguments example:
    //  @listItemLayoutResource: R.layout.spinner_item_layout_resource
    //        (File: layout/spinner_item_layout_resource.xmll)
    //  @textViewItemNameId: R.id.textView_item_name
    //        (A TextVew in file layout/spinner_item_layout_resource.xmlxml)
    //  @textViewItemPercentId: R.id.textView_item_percent
    //        (A TextVew in file layout/spinner_item_layout_resource.xmll)
    public CustomAdapter(Activity context, int listItemLayoutResource,
                         int textViewItemNameId, int textViewItemPercentId,
                         List<Language> list) {
        this.listItemLayoutResource = listItemLayoutResource;

        this.textViewItemNameId = textViewItemNameId;
        this.textViewItemPercentId = textViewItemPercentId;
        this.list = list;
        this.flater = context.getLayoutInflater();
    }

    @Override
    public int getCount() {
        if(this.list == null)  {
            return 0;
        }
        return this.list.size();
    }

    @Override
    public Object getItem(int position) {
        return this.list.get(position);
    }

    @Override
    public long getItemId(int position) {
        Language language = (Language) this.getItem(position);
        return language.getId();
        // return position; (Return position if you need).
    }

    @Override
    public View getView(int position, View convertView, ViewGroup parent) {

        Language language = (Language) getItem(position);

        // Example: @listItemLayoutResource: R.layout.spinner_item_layout_resource
        // (File: layout/spinner_item_layout_resourcerce.xml)
        View rowView = this.flater.inflate(this.listItemLayoutResource, null,true);

        // Example: @textViewItemNameId: R.id.textView_item_name
        // (A TextView in file layout/spinner_item_layout_resourcerce.xml)
        TextView textViewItemName = (TextView) rowView.findViewById(this.textViewItemNameId);
        textViewItemName.setText(language.getName());

        // Example: @textViewItemPercentId: R.id.textView_item_percent
        // (A TextView in file layout/spinner_item_layout_resource.xmlxml)
        TextView textViewItemPercent = (TextView) rowView.findViewById(textViewItemPercentId);
        textViewItemPercent.setText(language.getPercent() + "%");

        return rowView;
    }
}
Language.java
package org.o7planning.customspinneradapterexample;

public class Language {

    private long id;
    private String name;
    private float percent;

    public Language(long id, String name, float percent) {
        this.id = id;
        this.name = name;
        this.percent = percent;
    }

    public long getId() {
        return id;
    }

    public void setId(long id) {
        this.id = id;
    }

    public String getName() {
        return name;
    }

    public void setName(String name) {
        this.name = name;
    }

    public float getPercent() {
        return percent;
    }

    public void setPercent(float percent) {
        this.percent = percent;
    }
}
LanguageDataUtils.java
package org.o7planning.customspinneradapterexample;

import java.util.ArrayList;
import java.util.List;

public class LanguageDataUtils {

    public static List<Language> getLanguages( ) {
        Language javascript = new Language(1,"Javascript", 67.7f);
        Language htmlCss = new Language(2,"HTML/CSS", 63.1f);
        Language sql = new Language(3,"SQL", 54.7f);
        Language python = new Language(4,"Python", 44.1f);
        Language java = new Language(5, "Java", 40.2f);

        List<Language> list = new ArrayList<Language>();
        list.add(javascript);
        list.add(htmlCss);
        list.add(sql);
        list.add(python);
        list.add(java);

        return list;
    }
}
Android Programming Tutorials
- Configure Android Emulator in Android Studio
- Android ToggleButton Tutorial with Examples
- Create a simple File Finder Dialog in Android
- Android TimePickerDialog Tutorial with Examples
- Android DatePickerDialog Tutorial with Examples
- What is needed to get started with Android?
- Install Android Studio on Windows
- Install Intel® HAXM for Android Studio
- Android AsyncTask Tutorial with Examples
- Android AsyncTaskLoader Tutorial with Examples
- Android Tutorial for Beginners - Basic examples
- How to know the phone number of Android Emulator and change it
- Android TextInputLayout Tutorial with Examples
- Android CardView Tutorial with Examples
- Android ViewPager2 Tutorial with Examples
- Get Phone Number in Android using TelephonyManager
- Android Phone Call Tutorial with Examples
- Android Wifi Scanning Tutorial with Examples
- Android 2D Game Tutorial for Beginners
- Android DialogFragment Tutorial with Examples
- Android CharacterPickerDialog Tutorial with Examples
- Android Tutorial for Beginners - Hello Android
- Using Android Device File Explorer
- Enable USB Debugging on Android Device
- Android UI Layouts Tutorial with Examples
- Android SMS Tutorial with Examples
- Android SQLite Database Tutorial with Examples
- Google Maps Android API Tutorial with Examples
- Android Text to Speech Tutorial with Examples
- Android Space Tutorial with Examples
- Android Toast Tutorial with Examples
- Create a custom Android Toast
- Android SnackBar Tutorial with Examples
- Android TextView Tutorial with Examples
- Android TextClock Tutorial with Examples
- Android EditText Tutorial with Examples
- Android TextWatcher Tutorial with Examples
- Format Credit Card Number with Android TextWatcher
- Android Clipboard Tutorial with Examples
- Create a simple File Chooser in Android
- Android AutoCompleteTextView and MultiAutoCompleteTextView Tutorial with Examples
- Android ImageView Tutorial with Examples
- Android ImageSwitcher Tutorial with Examples
- Android ScrollView and HorizontalScrollView Tutorial with Examples
- Android WebView Tutorial with Examples
- Android SeekBar Tutorial with Examples
- Android Dialog Tutorial with Examples
- Android AlertDialog Tutorial with Examples
- Android RatingBar Tutorial with Examples
- Android ProgressBar Tutorial with Examples
- Android Spinner Tutorial with Examples
- Android Button Tutorial with Examples
- Android Switch Tutorial with Examples
- Android ImageButton Tutorial with Examples
- Android FloatingActionButton Tutorial with Examples
- Android CheckBox Tutorial with Examples
- Android RadioGroup and RadioButton Tutorial with Examples
- Android Chip and ChipGroup Tutorial with Examples
- Using image assets and icon assets of Android Studio
- Setting SD Card for Android Emulator
- ChipGroup and Chip Entry Example
- How to add external libraries to Android Project in Android Studio?
- How to disable the permissions already granted to the Android application?
- How to remove applications from Android Emulator?
- Android LinearLayout Tutorial with Examples
- Android TableLayout Tutorial with Examples
- Android FrameLayout Tutorial with Examples
- Android QuickContactBadge Tutorial with Examples
- Android StackView Tutorial with Examples
- Android Camera Tutorial with Examples
- Android MediaPlayer Tutorial with Examples
- Android VideoView Tutorial with Examples
- Playing Sound effects in Android with SoundPool
- Android Networking Tutorial with Examples
- Android JSON Parser Tutorial with Examples
- Android SharedPreferences Tutorial with Examples
- Android Internal Storage Tutorial with Examples
- Android External Storage Tutorial with Examples
- Android Intents Tutorial with Examples
- Example of an explicit Android Intent, calling another Intent
- Example of implicit Android Intent, open a URL, send an email
- Android Services Tutorial with Examples
- Android Notifications Tutorial with Examples
- Android DatePicker Tutorial with Examples
- Android TimePicker Tutorial with Examples
- Android Chronometer Tutorial with Examples
- Android OptionMenu Tutorial with Examples
- Android ContextMenu Tutorial with Examples
- Android PopupMenu Tutorial with Examples
- Android Fragments Tutorial with Examples
- Android ListView Tutorial with Examples
- Android ListView with Checkbox using ArrayAdapter
- Android GridView Tutorial with Examples
Show More