Android TableLayout Tutorial with Examples
1. Android TableLayout
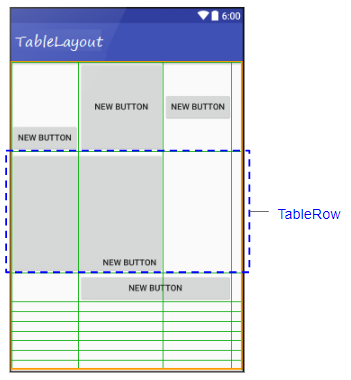
TableLayout arranges the View(s) in table format. Specifically, TableLayout is a ViewGroup containing one or more TableRow(s). Each TableRow is a row in the table containing cells. Child View(s) can be placed in one cell or in a merged cell from adjacent cells of a row. Unlike tables in HTML, you cannot merge consecutive cells in the one column.
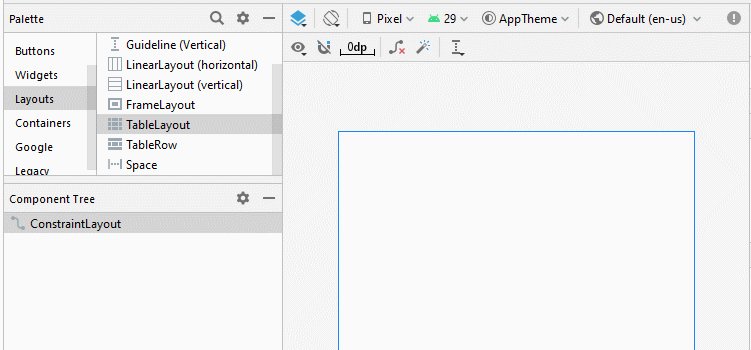
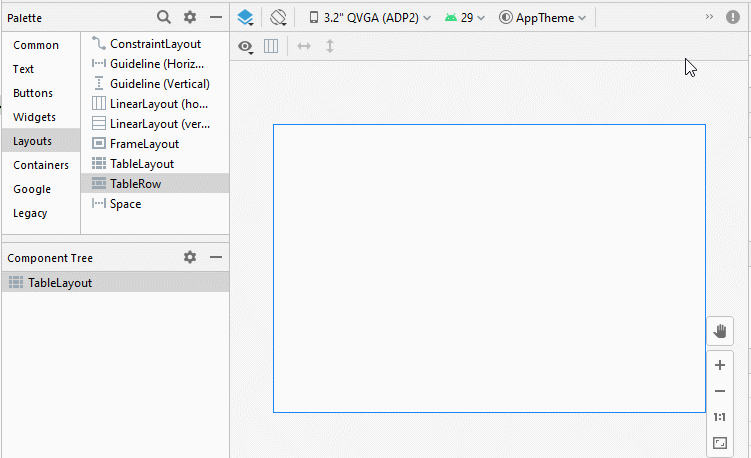
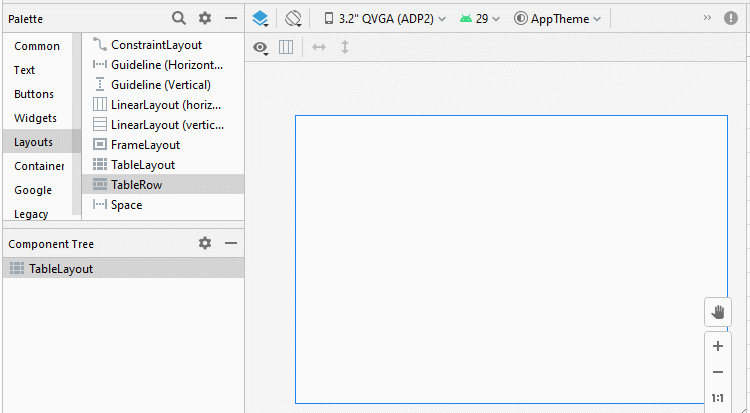
TableLayout is similar to a regular View, which you can drag and drop it into an available interface:
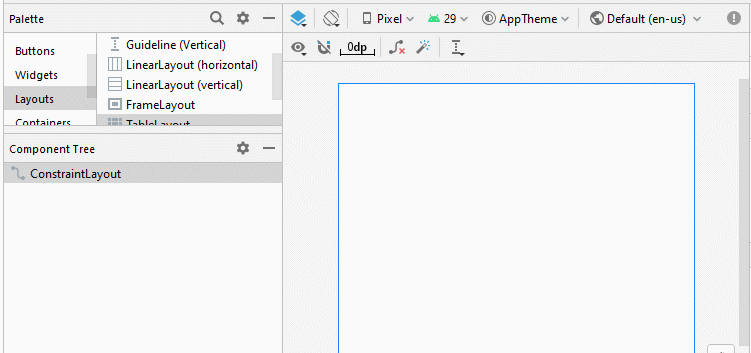
Or use it as an original Layout of the interface:
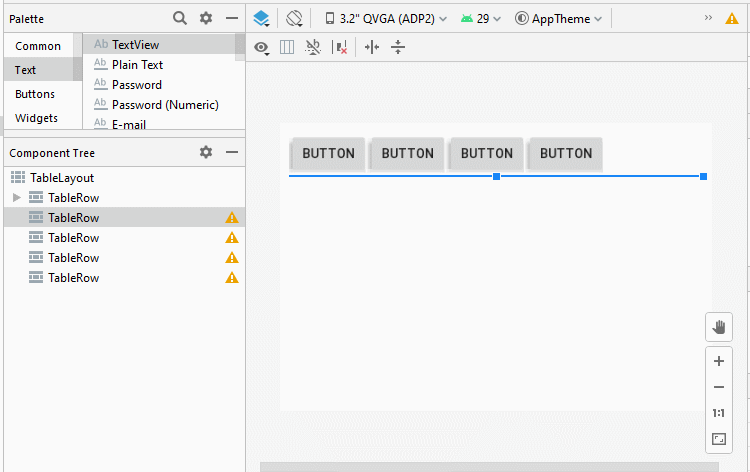
Add TableRow(s)and View(s)to the TableLayout:
2. TableLayout - android:stretchColumns
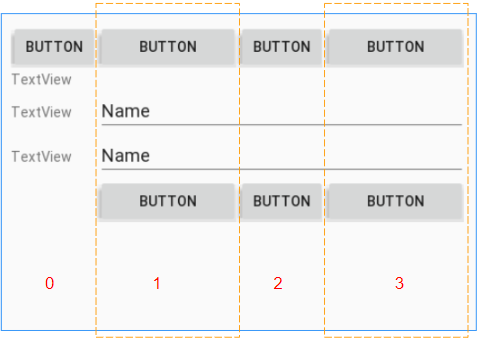
In TableLayout the columns are indexed 0, 1, 2 ... The android:stretchColumns attribute allows you to specify which columns will be stretched to fill the free horizontal space of the TableLayout.

<!-- The columns with indexes 0 and 2 will be stretched. -->
<TableLayout
    ...
    android:stretchColumns="0, 2">

     ...

</TableLayout>


<!-- All columns will be stretched. -->
<TableLayout
    ...
    android:stretchColumns="*">

     ...

</TableLayout>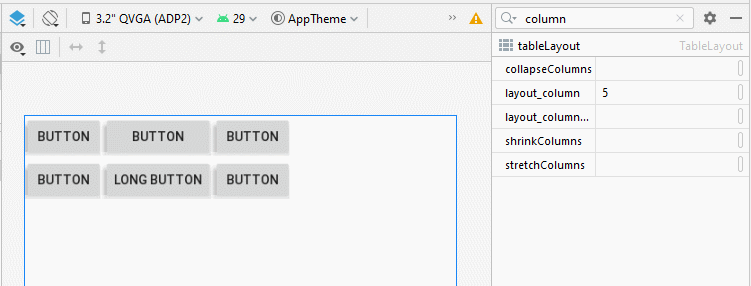
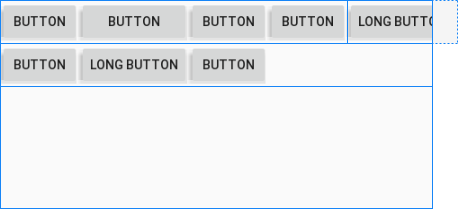
3. TableLayout - android:shrinkColumns
In contrast to android:stretchColumns, the android:shrinkColumns attribute specifies columns that will be shrinked to prevent child View(s) from spilling out of TableLayout.
<!-- The columns with indexes 0 and 2 will be shrinked. -->
<TableLayout
    ...
    android:shrinkColumns="0, 2">

     ...

</TableLayout>


<!-- All columns will be shrinked. -->
<TableLayout
    ...
    android:shrinkColumns="*">

     ...

</TableLayout>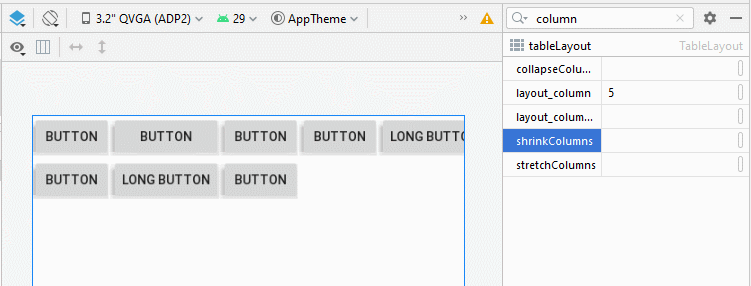
4. TableLayout - android:collapseColumns
The android:collapseColumns attribute specifies columns that will be collapsed, meaning that the width of the column will be 0, and as a result, that column will be hidden.
<!-- The columns with indexes 0 and 2 will be collapsed-->
<TableLayout
    ...
    android:collapseColumns="0, 2">

     ...

</TableLayout>


<!-- All columns will be collapsed---->
<TableLayout
    ...
    android:collapseColumns="*">

     ...

</TableLayout>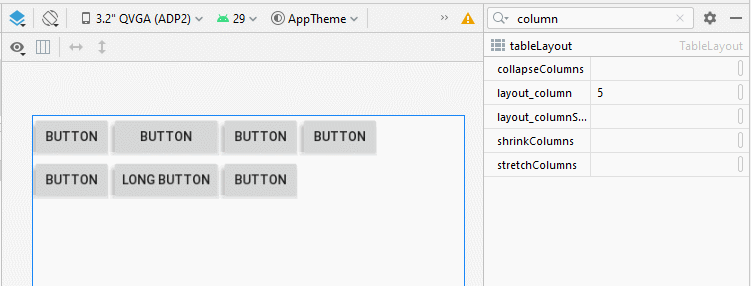
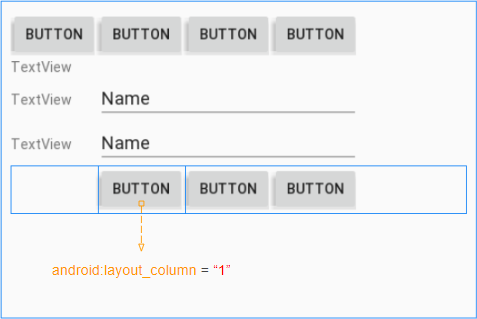
5. View - android:layout_column
The android:layout_column attribute is applied to a child View in a TableRow in orderto specify its column index. The values can probably be 0, 1, 2, ...
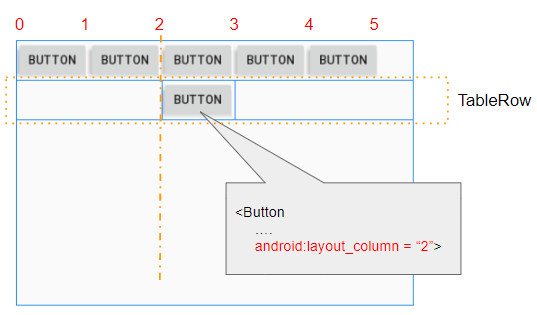
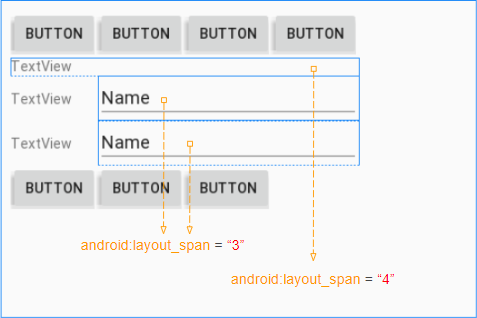
6. View - android:layout_span
The android:layout_span attribute is applied to the child View(s) to specify the number of consecutive cells in a TableRow that will be merged together.

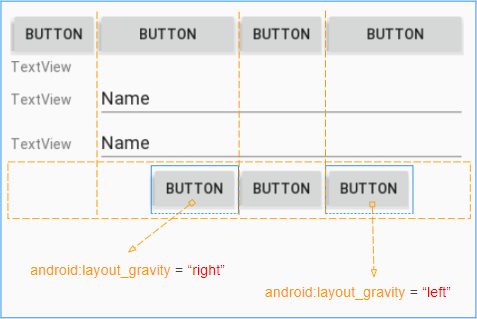
7. View - android:layout_gravity
The android:layout_gravity attribute is applied to child View(s) (of TableRow) to specify its relative position compared to the cell containing it. This attribute affects the behavior of the android:layout_width attribute.
Case 1: If the android:layout_gravity attribute is not set for the child View (of TableRow), the width of the child View will always fill the cell containing it, which means the android:layout_width attribute will always get the MATCH_PARENT value.
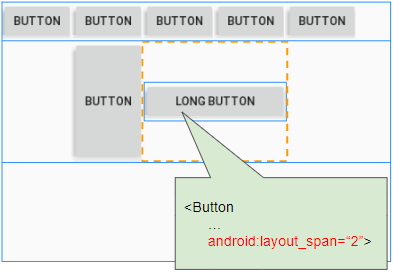
Case 2: If the android:layout_gravity attribute is set for the child View (of TableRow), the child View will always have the default width, which means the android:layout_width attribute will always get the WRAP_CONTENT value.
The android:layout_gravity attribute is used to specify the location of the View in the cell containing it.
Constant in Java | Value | Description |
Gravity.LEFT | left | |
Gravity.CENTER_HORIZONTAL | center_horizontal | |
Gravity.RIGHT | right | |
Gravity.TOP | top | |
Gravity.CENTER_VERTICAL | center_vertical | |
Gravity.BOTTOM | bottom | |
Gravity.START | start | |
Gravity.END | end | |
Gravity.CENTER | center | |
8. View - android:layout_weight
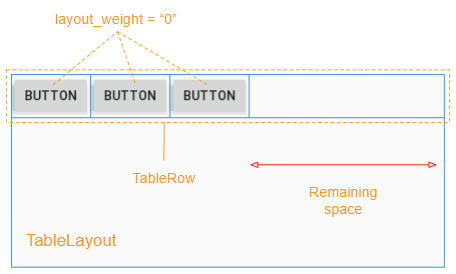
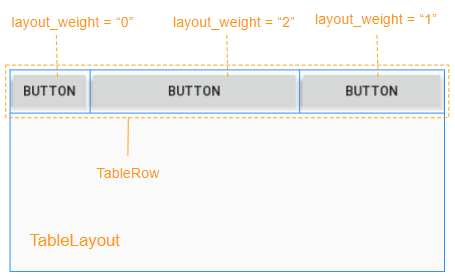
The android:layout_weight attribute is used for child View(s) (of TableRow), which specifies how much space the child View takes up in the parent View (TableRow) horizontally. A layout_weight value greater than 0 allows the child View to expand in order to fill in the remaining space of the parent View. The child View can specify a layout_weight value; then all the remaining space in the parent View will be assigned to child View(s) according to their layout_weight ratio.
When all the child View(s) (of TableRow) have android:layout_weight = 0, you will see an empty space in the parent View (TableRow):
The child View(s) with android:layout_weight>0 will take up the free space of the parent View (TableRow):

The free space of the parent View (TableRow) will be allocated to the child View(s) according to their layout_weight ratio.
9. Example of TableLayout
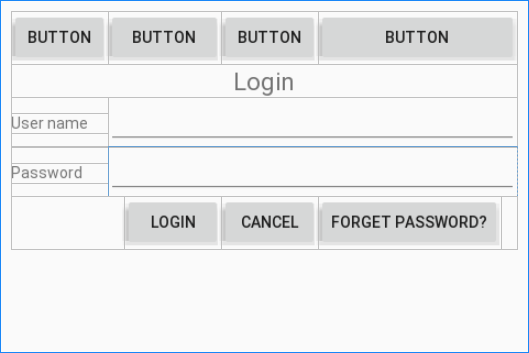
Have a look at the login window below. Do you think TableLayout can be usedto design its interface?
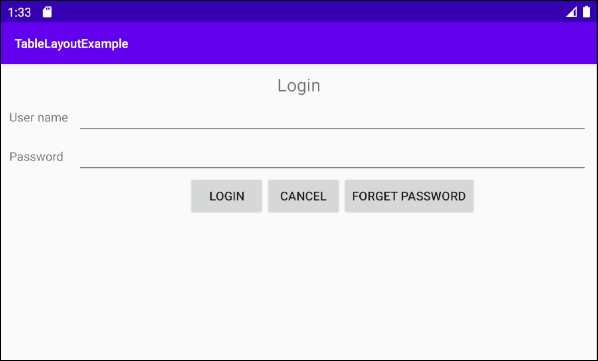
The answer is "Absolutely yes", and here is a design idea draft:
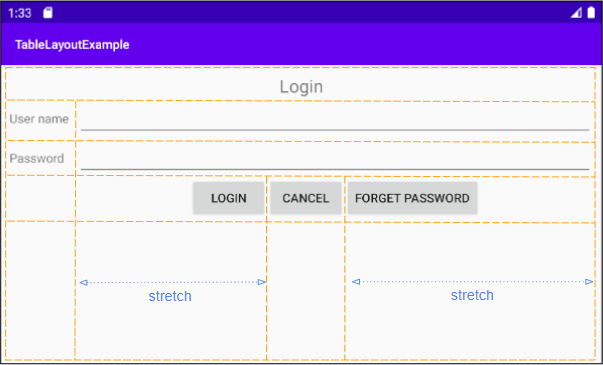
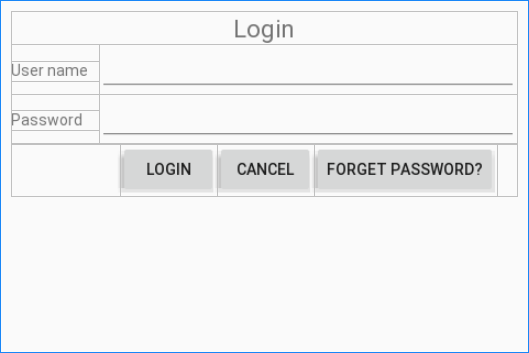
Next is to implement the idea:
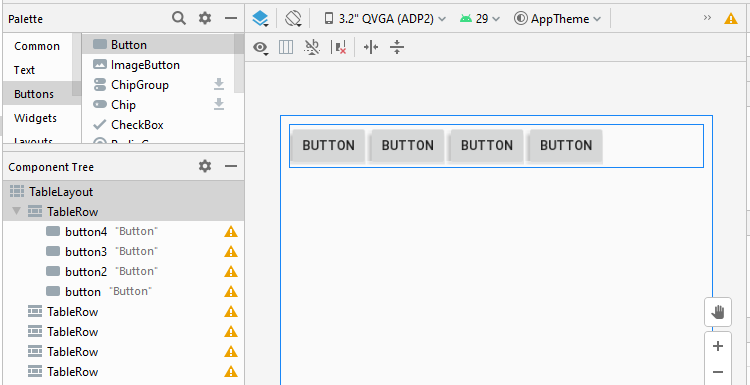
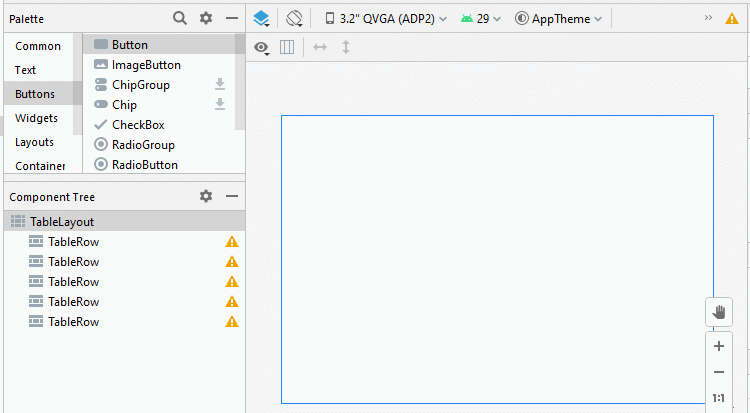
Step 1: Add 5 TableRow(s) to the TableLayout:
Step 2: Add 4 Button(s)to the first TableRow. We will have a four-column TableLayout which makes the design process easier. The first TableRow will be removed from the interface when the design process is complete.
Step 3: Add other child View(s)to the interface:
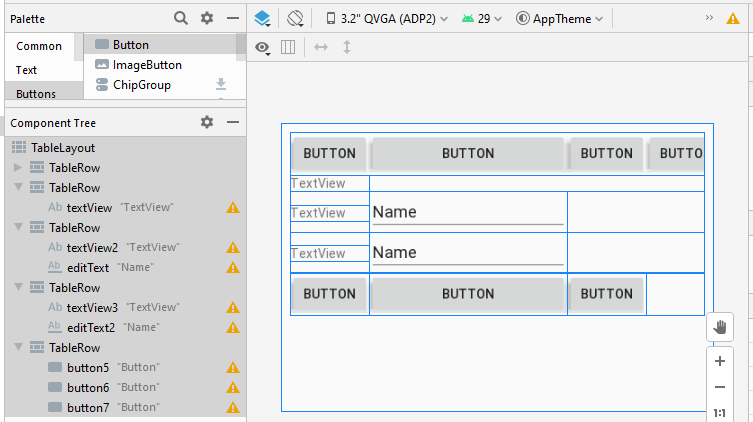
Step 4: Set the android:layout_span attribute for some child View(s):
Step 5: Set the android:layout_column for the "Login" button:
Step 6: Stretch the columns with index 1 and 3:
- (TableLayout) android:stretchColumns = "1, 3"
Step 7: Set the android:layout_gravity attribute for the "Login" and "Forget Password" buttons:
Bước 8: Set text, textSize, padding, and gravity for the child View(s) in the interface:
Step 9: Remove the first TableRow, and the interface design is done.
layout_main.xml
<?xml version="1.0" encoding="utf-8"?>
<TableLayout xmlns:android="http://schemas.android.com/apk/res/android"
    xmlns:app="http://schemas.android.com/apk/res-auto"
    xmlns:tools="http://schemas.android.com/tools"
    android:layout_width="match_parent"
    android:layout_height="match_parent"
    android:padding="10dp"
    android:stretchColumns="1, 3"
    tools:context=".MainActivity">

    <TableRow
        android:layout_width="match_parent"
        android:layout_height="match_parent">

        <TextView
            android:id="@+id/textView"
            android:layout_width="wrap_content"
            android:layout_height="wrap_content"
            android:layout_span="4"
            android:gravity="center"
            android:text="Login"
            android:textSize="22sp" />
    </TableRow>

    <TableRow
        android:layout_width="match_parent"
        android:layout_height="match_parent">

        <TextView
            android:id="@+id/textView2"
            android:layout_width="wrap_content"
            android:layout_height="wrap_content"
            android:paddingRight="10dp"
            android:text="User name" />

        <EditText
            android:id="@+id/editText"
            android:layout_width="wrap_content"
            android:layout_height="wrap_content"
            android:layout_span="3"
            android:ems="10"
            android:inputType="textPersonName" />
    </TableRow>

    <TableRow
        android:layout_width="match_parent"
        android:layout_height="match_parent">

        <TextView
            android:id="@+id/textView3"
            android:layout_width="wrap_content"
            android:layout_height="wrap_content"
            android:paddingRight="10dp"
            android:text="Password" />

        <EditText
            android:id="@+id/editText2"
            android:layout_width="wrap_content"
            android:layout_height="wrap_content"
            android:layout_span="3"
            android:ems="10"
            android:inputType="textPassword" />
    </TableRow>

    <TableRow
        android:layout_width="match_parent"
        android:layout_height="match_parent">

        <Button
            android:id="@+id/button5"
            android:layout_width="wrap_content"
            android:layout_height="wrap_content"
            android:layout_column="1"
            android:layout_gravity="right"
            android:text="Login" />

        <Button
            android:id="@+id/button6"
            android:layout_width="wrap_content"
            android:layout_height="wrap_content"
            android:text="Cancel" />

        <Button
            android:id="@+id/button7"
            android:layout_width="wrap_content"
            android:layout_height="wrap_content"
            android:layout_gravity="left"
            android:text="Forget Password?" />
    </TableRow>
</TableLayout>
Android Programming Tutorials
- Configure Android Emulator in Android Studio
- Android ToggleButton Tutorial with Examples
- Create a simple File Finder Dialog in Android
- Android TimePickerDialog Tutorial with Examples
- Android DatePickerDialog Tutorial with Examples
- What is needed to get started with Android?
- Install Android Studio on Windows
- Install Intel® HAXM for Android Studio
- Android AsyncTask Tutorial with Examples
- Android AsyncTaskLoader Tutorial with Examples
- Android Tutorial for Beginners - Basic examples
- How to know the phone number of Android Emulator and change it
- Android TextInputLayout Tutorial with Examples
- Android CardView Tutorial with Examples
- Android ViewPager2 Tutorial with Examples
- Get Phone Number in Android using TelephonyManager
- Android Phone Call Tutorial with Examples
- Android Wifi Scanning Tutorial with Examples
- Android 2D Game Tutorial for Beginners
- Android DialogFragment Tutorial with Examples
- Android CharacterPickerDialog Tutorial with Examples
- Android Tutorial for Beginners - Hello Android
- Using Android Device File Explorer
- Enable USB Debugging on Android Device
- Android UI Layouts Tutorial with Examples
- Android SMS Tutorial with Examples
- Android SQLite Database Tutorial with Examples
- Google Maps Android API Tutorial with Examples
- Android Text to Speech Tutorial with Examples
- Android Space Tutorial with Examples
- Android Toast Tutorial with Examples
- Create a custom Android Toast
- Android SnackBar Tutorial with Examples
- Android TextView Tutorial with Examples
- Android TextClock Tutorial with Examples
- Android EditText Tutorial with Examples
- Android TextWatcher Tutorial with Examples
- Format Credit Card Number with Android TextWatcher
- Android Clipboard Tutorial with Examples
- Create a simple File Chooser in Android
- Android AutoCompleteTextView and MultiAutoCompleteTextView Tutorial with Examples
- Android ImageView Tutorial with Examples
- Android ImageSwitcher Tutorial with Examples
- Android ScrollView and HorizontalScrollView Tutorial with Examples
- Android WebView Tutorial with Examples
- Android SeekBar Tutorial with Examples
- Android Dialog Tutorial with Examples
- Android AlertDialog Tutorial with Examples
- Android RatingBar Tutorial with Examples
- Android ProgressBar Tutorial with Examples
- Android Spinner Tutorial with Examples
- Android Button Tutorial with Examples
- Android Switch Tutorial with Examples
- Android ImageButton Tutorial with Examples
- Android FloatingActionButton Tutorial with Examples
- Android CheckBox Tutorial with Examples
- Android RadioGroup and RadioButton Tutorial with Examples
- Android Chip and ChipGroup Tutorial with Examples
- Using image assets and icon assets of Android Studio
- Setting SD Card for Android Emulator
- ChipGroup and Chip Entry Example
- How to add external libraries to Android Project in Android Studio?
- How to disable the permissions already granted to the Android application?
- How to remove applications from Android Emulator?
- Android LinearLayout Tutorial with Examples
- Android TableLayout Tutorial with Examples
- Android FrameLayout Tutorial with Examples
- Android QuickContactBadge Tutorial with Examples
- Android StackView Tutorial with Examples
- Android Camera Tutorial with Examples
- Android MediaPlayer Tutorial with Examples
- Android VideoView Tutorial with Examples
- Playing Sound effects in Android with SoundPool
- Android Networking Tutorial with Examples
- Android JSON Parser Tutorial with Examples
- Android SharedPreferences Tutorial with Examples
- Android Internal Storage Tutorial with Examples
- Android External Storage Tutorial with Examples
- Android Intents Tutorial with Examples
- Example of an explicit Android Intent, calling another Intent
- Example of implicit Android Intent, open a URL, send an email
- Android Services Tutorial with Examples
- Android Notifications Tutorial with Examples
- Android DatePicker Tutorial with Examples
- Android TimePicker Tutorial with Examples
- Android Chronometer Tutorial with Examples
- Android OptionMenu Tutorial with Examples
- Android ContextMenu Tutorial with Examples
- Android PopupMenu Tutorial with Examples
- Android Fragments Tutorial with Examples
- Android ListView Tutorial with Examples
- Android ListView with Checkbox using ArrayAdapter
- Android GridView Tutorial with Examples
Show More