Android EditText Tutorial with Examples
1. Android EditText
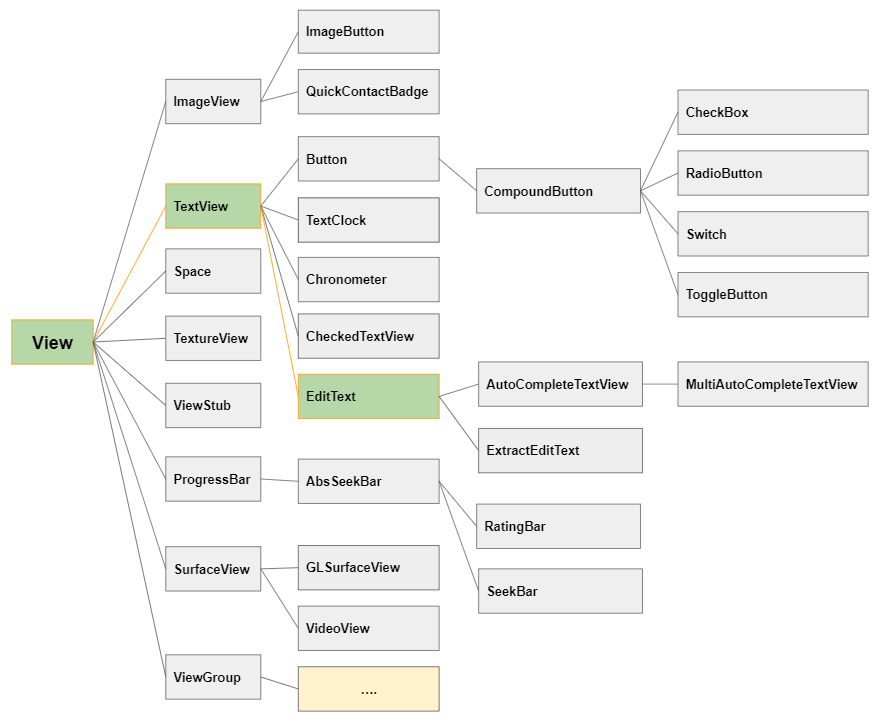
In Android, EditText is a subclass of TextView,so it inherits all the features of a TextView. In addition, it has new features that allow the user to enter or modify the text for various purposes. Therefore, you need to specify a data type which can accept through the android:inputType attribute.
<EditText
     android:id="@+id/txtSub"
     android:layout_width="match_parent"
     android:layout_height="wrap_content"
     android:hint="Subject"
     android:inputType="text"
     ... />
EditText editText = (EditText) this.findViewById(R.id.editText1);
// Set Text:
editText.setText("New Text");
// Get Text
String text = editText.getText().toString();Create an EditText by using Java code:
public class MainActivity extends AppCompatActivity {

    @Override
    protected void onCreate(Bundle savedInstanceState) {
        super.onCreate(savedInstanceState);
        setContentView(R.layout.activity_main);

        LinearLayout linearLayout =  (LinearLayout) findViewById(R.id.linearlayout);

        // Create a EditText
        EditText editText = new EditText(this);
        editText.setHint("Subject");
        linearLayout.addView(editText);

        // Set Text
        editText.setText("Some Text");

        // Get Text
        String text = editText.getText().toString();
    }

}
2. android:inputType
The android:inputType attribute specifies the type of data that EditText can accept. Simultaneously, it suggests Android to assist the user when he/she enters data, such as displaying a virtual keyboard that matches the data type of the EditText. However, it does not guarantee that the user will enter the correct type of data, so you also need some additional manipulation.
Here are some common values of android:inputType:
textUri | Allow to enter a URI. |
textEmailAddress | Allow to enter an Email address. |
textPersonName | Allow to enter the name of a person |
textPassword | Allow to enter a password, users only see the asterisk characters (*) (or similar). |
textVisiblePassword | Allow enter a password, and the user can read its contents. |
number | For entering numeric data. |
phone | For entering a phone number |
date | For entering a date |
time | For entering a time |
textMultiLine | Allows entering text data on multiple lines. |
You can combine multiple values which are separated by ( | ) in order to create a new one for android:inputType.
<EditText
  android:inputType="textCapSentences|textMultiLine"
/>
android:inputType="textPassword"
Allows a password to be entered, and the user will only see asterisks (*) (or similar).
<!-- A Text Password -->
<EditText
    android:id="@+id/editText_password"
    android:hint="Password"
    android:inputType="textPassword" ...
/>
android:inputType="numberPassword"
Allows the user to enter a password containing numeric characters only.
<!-- A Numeric Password -->
<EditText
    android:id="@+id/editText_password"
    android:hint="Numeric Password"
    android:inputType="numberPassword"  ...
/>
android:inputType="textVisiblePassword"
android:inputType="text"
EditText accepts all types of plain text data.
android:inputType=" textMultiLine"
The android:inputType="textMultiLine" attribute allows EditText to display text on multiple lines. With this attribute, you also need to combine it with the android.gravity="left|top" attribute to set the text displayed at the top left corner.
<EditText
    android:id="@+id/editText_test1"
    android:background="#F1FDDC"
    android:gravity="top|left"
    android:inputType="textMultiLine|text"
    android:padding="10dp"
    android:text="0123456789" ... />
android:inputType="number"
Allows the user to enter numeric data as well as supports a virtual keyboard for the numeric input data.
android:inputType="textEmailAddress"
This virtual keyboard is simpler to enter an Email than the regular virtual keyboard. It removes invalid characters for an email address.
<EditText
    android:id="@+id/editText_email"
    android:hint="Email"
    android:inputType="textEmailAddress"
    ...
/>
The Java code checks whether the email entered by the user is valid or not:
public boolean isEmailValid(CharSequence email) {
    return android.util.Patterns.EMAIL_ADDRESS.matcher(email).matches();
}
android:inputType="date"
With the aim of entering Date data, the virtual keyboard has a suitable layout for this data type.

<EditText
    android:id="@+id/editText_birthday"
    android:hint="dd-MM-yyyy"
    android:inputType="date"
    ...
/>
Note: With android:inputType="date", the user still can enter a Date data that does not match your hint. Therefore, if you want to make sure that the user is entering a data that matches the specified Date format such as "dd-MM-yyyy", you have to combine EditText and TextWatcher.
3. EditText Attributes
Basically, most of the attributes of EditText are inherited from TextView:
android:gravity | It is used to specify how to align the text like left, right, center, top, etc. |
android:text | It is used to set the text. |
android:hint | It is used to display the hint text when text is empty |
android:textColor | It is used to change the color of the text. |
android:textColorHint | It is used to change the text color of hint text. |
android:textSize | It is used to specify the size of the text. |
android:textStyle | It is used to change the style (bold, italic, bolditalic) of text. |
android:background | It is used to set the background color for edit text control |
android:ems | It is used to make the textview be exactly this many ems wide. |
android:width | It makes the TextView be exactly this many pixels wide. |
android:height | It makes the TextView be exactly this many pixels tall. |
android:maxWidth | It is used to make the TextView be at most this many pixels wide. |
android:minWidth | It is used to make the TextView be at least this many pixels wide. |
android:textAllCaps | It is used to present the text in all CAPS |
android:typeface | It is used to specify the Typeface (normal, sans, serif, monospace) for the text. |
android:textColorHighlight | It is used to change the color of text selection highlight. |
android:inputType | It is used to specify the type of text being placed in text fields. |
android:fontFamily | It is used to specify the fontFamily for the text. |
android:editable | If we set false, EditText won't allow us to enter or modify the text |
android:textColorHint
The android:hint attribute is used to display a hint text for the user when the EditText text is empty.
android:textColorHighlight
Sets the background color for the selected sub-text.
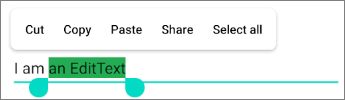
<EditText
    android:id="@+id/editText"
    android:inputType="text"
    android:text="I am an EditText"
    android:textColorHighlight="#24AC55" ... />
android: android:maxLength
Specifies the maximum number of characters of the text.
android:editable
This attribute is no longer used in EditText. If you do not want the user to change the text content of EditText, adopt one of the solutions below:
Solution 1:
<EditText
    android:id="@+id/myEditText"
    android:layout_width="match_parent"
    android:layout_height="wrap_content"
    android:hint="Hint"
    android:focusable="false"
    android:clickable="false"
    android:cursorVisible="false"
    />
You can get the same result with Java code:
EditText editText = findViewById(R.id.myEditText);
editText.setFocusable(false);
editText.setClickable(false);
editText.setCursorVisible(false);
Solution 2:
EditText editText = (EditText) findViewById(R.id.editText);
editText.setKeyListener(null);
Solution 3:
private void setNonEditable(EditText editText) {
    // Need to disable displaying Virtual Keyboard.
    editText.setInputType(InputType.TYPE_NULL);

    // editText.setTextIsSelectable(false); // ?
    editText.setOnKeyListener(new View.OnKeyListener() {
        @Override
        public boolean onKey(View v, int keyCode, KeyEvent event) {
            // Blocks input from hardware keyboards.
            return true;
        }
    });
}
4. EditText Methods
In addition to the methods inherited from TextView, EditText also has its own methods:
- void selectAll()
- void setSelection(int start, int stop) .
- void setSelection(int index)
- void extendSelection(int index)
selectAll()
Selects the entire text.
setSelection(int start, int stop)
Selects a sub-text from start to stop. The index starts from 0, 1, 2 and so on.
setSelection(int index)
Move the cursor to the position of the index of "index".
extendSelection(int index)
Selects a sub-text from the current position of the cursor to the position of the index of "index".
Note: You can see the example of how to use these methods at the end of the article.
5. Ví dụ EditText
In this example, I'm going to show you how to use selectAll(), extendSelection(), and setSelection() methods of EditText. Here is the preview image of the example:
Here is the application interface:

activity_main.xml
<?xml version="1.0" encoding="utf-8"?>
<androidx.constraintlayout.widget.ConstraintLayout
    xmlns:android="http://schemas.android.com/apk/res/android"
    xmlns:app="http://schemas.android.com/apk/res-auto"
    xmlns:tools="http://schemas.android.com/tools"
    android:layout_width="match_parent"
    android:layout_height="match_parent"
    tools:context=".MainActivity">

    <EditText
        android:id="@+id/editText_test"
        android:layout_width="0dp"
        android:layout_height="wrap_content"
        android:layout_marginStart="16dp"
        android:layout_marginLeft="16dp"
        android:layout_marginTop="16dp"
        android:layout_marginEnd="16dp"
        android:layout_marginRight="16dp"
        android:ems="10"
        android:inputType="text"
        android:text="0123456789"
        android:textSize="50sp"
        app:layout_constraintEnd_toEndOf="parent"
        app:layout_constraintStart_toStartOf="parent"
        app:layout_constraintTop_toTopOf="parent" />

    <TextView
        android:id="@+id/textView_info"
        android:layout_width="0dp"
        android:layout_height="wrap_content"
        android:layout_marginStart="16dp"
        android:layout_marginLeft="16dp"
        android:layout_marginTop="8dp"
        android:layout_marginEnd="16dp"
        android:layout_marginRight="16dp"
        android:background="#F3FBDE"
        android:gravity="center_horizontal"
        android:text="(Info)"
        android:textColor="#3F51B5"
        app:layout_constraintEnd_toEndOf="parent"
        app:layout_constraintStart_toStartOf="parent"
        app:layout_constraintTop_toBottomOf="@+id/editText_test" />

    <LinearLayout
        android:id="@+id/linearLayout"
        android:layout_width="wrap_content"
        android:layout_height="wrap_content"
        android:layout_marginTop="16dp"
        android:orientation="horizontal"
        app:layout_constraintEnd_toEndOf="parent"
        app:layout_constraintStart_toStartOf="parent"
        app:layout_constraintTop_toBottomOf="@+id/textView_info">

        <Button
            android:id="@+id/button_selectAll"
            android:layout_width="wrap_content"
            android:layout_height="wrap_content"
            android:text="selectAll()"
            android:textAllCaps="false" />

        <Button
            android:id="@+id/button_extendSelection"
            android:layout_width="wrap_content"
            android:layout_height="wrap_content"
            android:text="extendSelection(5)"
            android:textAllCaps="false" />
    </LinearLayout>

    <LinearLayout
        android:layout_width="wrap_content"
        android:layout_height="wrap_content"
        android:layout_marginTop="8dp"
        android:orientation="horizontal"
        app:layout_constraintEnd_toEndOf="parent"
        app:layout_constraintStart_toStartOf="parent"
        app:layout_constraintTop_toBottomOf="@+id/linearLayout">

        <Button
            android:id="@+id/button_setSelection1"
            android:layout_width="wrap_content"
            android:layout_height="wrap_content"
            android:text="setSelection(3)"
            android:textAllCaps="false" />

        <Button
            android:id="@+id/button_setSelection2"
            android:layout_width="wrap_content"
            android:layout_height="wrap_content"
            android:text="setSelection(2, 7)"
            android:textAllCaps="false" />
    </LinearLayout>

</androidx.constraintlayout.widget.ConstraintLayout>
MainActivity.java
package com.example.edittextexample;

import androidx.appcompat.app.AppCompatActivity;

import android.os.Bundle;
import android.text.TextWatcher;
import android.view.View;
import android.widget.Button;
import android.widget.EditText;
import android.widget.TextView;

public class MainActivity extends AppCompatActivity {

    private EditText editTextTest;
    private TextView textViewInfo;

    private Button button_selectAll;
    private Button button_setSelection1;
    private Button button_setSelection2;
    private Button button_extendSelection;

    @Override
    protected void onCreate(Bundle savedInstanceState) {
        super.onCreate(savedInstanceState);
        setContentView(R.layout.activity_main);

        this.editTextTest = (EditText) this.findViewById(R.id.editText_test);
        this.textViewInfo = (TextView) this.findViewById(R.id.textView_info);

        this.button_selectAll = (Button) this.findViewById(R.id.button_selectAll);
        this.button_setSelection1 = (Button) this.findViewById(R.id.button_setSelection1);
        this.button_setSelection2 = (Button) this.findViewById(R.id.button_setSelection2);
        this.button_extendSelection = (Button) this.findViewById(R.id.button_extendSelection);

        // Focus
        this.editTextTest.requestFocus();

        this.button_selectAll.setOnClickListener(new View.OnClickListener() {
            @Override
            public void onClick(View v) {
                selectAllHandler();
            }
        });

        this.button_setSelection1.setOnClickListener(new View.OnClickListener() {
            @Override
            public void onClick(View v) {
                setSelection1Handler();
            }
        });

        this.button_setSelection2.setOnClickListener(new View.OnClickListener() {
            @Override
            public void onClick(View v) {
                setSelection2Handler();
            }
        });

        this.button_extendSelection.setOnClickListener(new View.OnClickListener() {
            @Override
            public void onClick(View v) {
                extendSelectionHandler();
            }
        });
    }

    // Usage of: editText.selectALl()
    private void selectAllHandler() {
        this.editTextTest.selectAll();
        this.textViewInfo.setText("selectAll()");
    }

    // Usage of: editText.setSelection(int index)
    private void setSelection1Handler() {
        this.editTextTest.setSelection(3);
        this.textViewInfo.setText("setSelection(3)");
    }

    // Usage of: editText.setSelection(int start, int stop)
    private void setSelection2Handler() {
        this.editTextTest.setSelection(2, 7);
        this.textViewInfo.setText("setSelection(2, 7)");
    }

    // Usage of: editText.extendSelection(int index)
    private void extendSelectionHandler() {
        this.editTextTest.extendSelection(5);

        int selectionStart = this.editTextTest.getSelectionStart();
        this.textViewInfo.setText("selectionStart = " + selectionStart+ " --> extendSelection(5)");
    }

}

Android Programming Tutorials
- Configure Android Emulator in Android Studio
- Android ToggleButton Tutorial with Examples
- Create a simple File Finder Dialog in Android
- Android TimePickerDialog Tutorial with Examples
- Android DatePickerDialog Tutorial with Examples
- What is needed to get started with Android?
- Install Android Studio on Windows
- Install Intel® HAXM for Android Studio
- Android AsyncTask Tutorial with Examples
- Android AsyncTaskLoader Tutorial with Examples
- Android Tutorial for Beginners - Basic examples
- How to know the phone number of Android Emulator and change it
- Android TextInputLayout Tutorial with Examples
- Android CardView Tutorial with Examples
- Android ViewPager2 Tutorial with Examples
- Get Phone Number in Android using TelephonyManager
- Android Phone Call Tutorial with Examples
- Android Wifi Scanning Tutorial with Examples
- Android 2D Game Tutorial for Beginners
- Android DialogFragment Tutorial with Examples
- Android CharacterPickerDialog Tutorial with Examples
- Android Tutorial for Beginners - Hello Android
- Using Android Device File Explorer
- Enable USB Debugging on Android Device
- Android UI Layouts Tutorial with Examples
- Android SMS Tutorial with Examples
- Android SQLite Database Tutorial with Examples
- Google Maps Android API Tutorial with Examples
- Android Text to Speech Tutorial with Examples
- Android Space Tutorial with Examples
- Android Toast Tutorial with Examples
- Create a custom Android Toast
- Android SnackBar Tutorial with Examples
- Android TextView Tutorial with Examples
- Android TextClock Tutorial with Examples
- Android EditText Tutorial with Examples
- Android TextWatcher Tutorial with Examples
- Format Credit Card Number with Android TextWatcher
- Android Clipboard Tutorial with Examples
- Create a simple File Chooser in Android
- Android AutoCompleteTextView and MultiAutoCompleteTextView Tutorial with Examples
- Android ImageView Tutorial with Examples
- Android ImageSwitcher Tutorial with Examples
- Android ScrollView and HorizontalScrollView Tutorial with Examples
- Android WebView Tutorial with Examples
- Android SeekBar Tutorial with Examples
- Android Dialog Tutorial with Examples
- Android AlertDialog Tutorial with Examples
- Android RatingBar Tutorial with Examples
- Android ProgressBar Tutorial with Examples
- Android Spinner Tutorial with Examples
- Android Button Tutorial with Examples
- Android Switch Tutorial with Examples
- Android ImageButton Tutorial with Examples
- Android FloatingActionButton Tutorial with Examples
- Android CheckBox Tutorial with Examples
- Android RadioGroup and RadioButton Tutorial with Examples
- Android Chip and ChipGroup Tutorial with Examples
- Using image assets and icon assets of Android Studio
- Setting SD Card for Android Emulator
- ChipGroup and Chip Entry Example
- How to add external libraries to Android Project in Android Studio?
- How to disable the permissions already granted to the Android application?
- How to remove applications from Android Emulator?
- Android LinearLayout Tutorial with Examples
- Android TableLayout Tutorial with Examples
- Android FrameLayout Tutorial with Examples
- Android QuickContactBadge Tutorial with Examples
- Android StackView Tutorial with Examples
- Android Camera Tutorial with Examples
- Android MediaPlayer Tutorial with Examples
- Android VideoView Tutorial with Examples
- Playing Sound effects in Android with SoundPool
- Android Networking Tutorial with Examples
- Android JSON Parser Tutorial with Examples
- Android SharedPreferences Tutorial with Examples
- Android Internal Storage Tutorial with Examples
- Android External Storage Tutorial with Examples
- Android Intents Tutorial with Examples
- Example of an explicit Android Intent, calling another Intent
- Example of implicit Android Intent, open a URL, send an email
- Android Services Tutorial with Examples
- Android Notifications Tutorial with Examples
- Android DatePicker Tutorial with Examples
- Android TimePicker Tutorial with Examples
- Android Chronometer Tutorial with Examples
- Android OptionMenu Tutorial with Examples
- Android ContextMenu Tutorial with Examples
- Android PopupMenu Tutorial with Examples
- Android Fragments Tutorial with Examples
- Android ListView Tutorial with Examples
- Android ListView with Checkbox using ArrayAdapter
- Android GridView Tutorial with Examples
Show More