Android SnackBar Tutorial with Examples
1. Android Snackbar
Android Snackbar is a small interface component that provides a brief response after one user action. It appears at the bottom of the screen, and automatically disappears after the timeout or when the user interacts elsewhere on the screen.
Snackbar also provides a button as an option to perform the action. For example, undo an action that has just been performed or retry doing the action last performed if it fails.
Snackbar with action button
Snackbar snackbar = Snackbar
.make(baseView, "Message is deleted", Snackbar.LENGTH_LONG)
.setAction("UNDO", new View.OnClickListener() {
@Override
public void onClick(View view) {
// Show another Snackbar.
Snackbar snackbar1 = Snackbar.make(baseView, "Message is restored!", Snackbar.LENGTH_SHORT);
snackbar1.show();
}
});
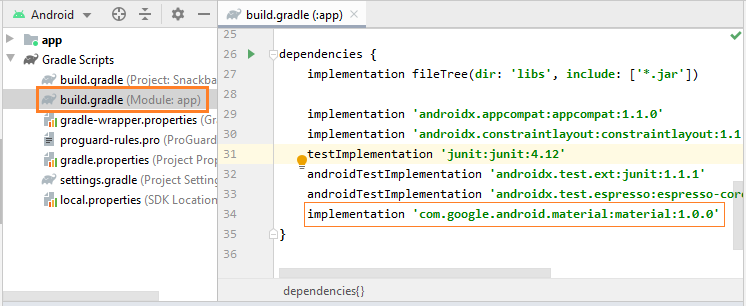
snackbar.show();Snackbar is not available in Android SDK, so you need to declare this library in build.gradle (Module app):
build.gradle (Module: app)
...
dependencies {
    ...
    implementation 'com.google.android.material:material:1.0.0'
}
Then check out the later version here:
2. Example of Snackbar
Great! Now we are going to create a simple project using Snackbar. In case there are other more complex applications involving Snackbar, FloatingActionButton, etc, you'd better use CoordinatorLayout. (See more in the second example).
Example preview:
Snackbar (Default)

Snackbar with action button

Snackbar (Styling)
Alright, now on Android Studio, create a project:
- File > New > New Project > Empty Activity
- Name: SnackbarExample
- Package name: org.o7planning.snackbarexample
- Language: Java
As mentioned earlier, Snackbar is not available in Android SDK yet; therefore, you need to declare the following library to your project:
build.gradle (Module: app)
...
dependencies {
    ...
    implementation 'com.google.android.material:material:1.0.0'
}
The interface of the application will look like this:
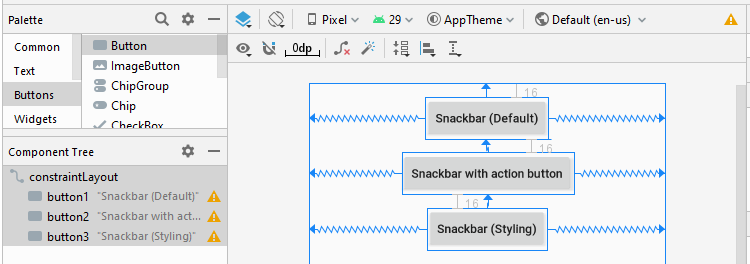
activity_main.xml
<?xml version="1.0" encoding="utf-8"?>
<androidx.constraintlayout.widget.ConstraintLayout
    xmlns:android="http://schemas.android.com/apk/res/android"
    xmlns:app="http://schemas.android.com/apk/res-auto"
    xmlns:tools="http://schemas.android.com/tools"
    android:id="@+id/constraintLayout"
    android:layout_width="match_parent"
    android:layout_height="match_parent"
    tools:context=".MainActivity">


    <Button
        android:id="@+id/button1"
        android:layout_width="wrap_content"
        android:layout_height="wrap_content"
        android:layout_alignParentTop="true"
        android:layout_centerHorizontal="true"
        android:layout_marginTop="16dp"
        android:text="Snackbar (Default)"
        android:textAllCaps="false"
        app:layout_constraintEnd_toEndOf="parent"
        app:layout_constraintStart_toStartOf="parent"
        app:layout_constraintTop_toTopOf="parent" />

    <Button
        android:id="@+id/button2"
        android:layout_width="wrap_content"
        android:layout_height="wrap_content"
        android:layout_below="@+id/button1"
        android:layout_centerHorizontal="true"
        android:layout_marginTop="16dp"
        android:text="Snackbar with action button"
        android:textAllCaps="false"
        app:layout_constraintEnd_toEndOf="parent"
        app:layout_constraintStart_toStartOf="parent"
        app:layout_constraintTop_toBottomOf="@+id/button1" />

    <Button
        android:id="@+id/button3"
        android:layout_width="wrap_content"
        android:layout_height="wrap_content"
        android:layout_below="@+id/button2"
        android:layout_centerHorizontal="true"
        android:layout_marginTop="16dp"
        android:text="Snackbar (Styling)"
        android:textAllCaps="false"
        app:layout_constraintEnd_toEndOf="parent"
        app:layout_constraintStart_toStartOf="parent"
        app:layout_constraintTop_toBottomOf="@+id/button2" />
</androidx.constraintlayout.widget.ConstraintLayout>
MainActivity.java
package org.o7planning.snackbarexample;

import androidx.appcompat.app.AppCompatActivity;

import android.graphics.Color;
import android.os.Build;
import android.os.Bundle;
import android.view.Gravity;
import android.view.View;
import android.widget.Button;
import android.widget.TextView;

import com.google.android.material.snackbar.Snackbar;

public class MainActivity extends AppCompatActivity {

    private View baseView;

    private Button button1;
    private Button button2;
    private Button button3;

    @Override
    protected void onCreate(Bundle savedInstanceState) {
        super.onCreate(savedInstanceState);
        setContentView(R.layout.activity_main);

        // Container
        this.baseView = this.findViewById(R.id.constraintLayout);

        this.button1 = (Button) this.findViewById(R.id.button1);
        this.button2 = (Button) this.findViewById(R.id.button2);
        this.button3 = (Button) this.findViewById(R.id.button3);

        this.button1.setOnClickListener(new View.OnClickListener() {
            @Override
            public void onClick(View v) {
                showSnackbarDefault();
            }
        });
        this.button2.setOnClickListener(new View.OnClickListener() {
            @Override
            public void onClick(View v) {
                showSnackbarActionCall();
            }
        });
        this.button3.setOnClickListener(new View.OnClickListener() {
            @Override
            public void onClick(View v) {
                showSnackbarCustom();
            }
        });
    }

    private void showSnackbarDefault()  {
        Snackbar snackbar = Snackbar
                .make(this.baseView, "Install successful!", Snackbar.LENGTH_LONG);
        // Show
        snackbar.show();
    }

    private void showSnackbarActionCall() {

        Snackbar snackbar = Snackbar
                .make(this.baseView, "Message is deleted", Snackbar.LENGTH_LONG)
                .setAction("UNDO", new View.OnClickListener() {
                    @Override
                    public void onClick(View view) {
                        // Show another Snackbar.
                        Snackbar snackbar1 = Snackbar.make(baseView, "Message is restored!", Snackbar.LENGTH_SHORT);
                        snackbar1.show();
                    }
                });

        snackbar.show();
    }


    private void showSnackbarCustom() {
        Snackbar snackbar = Snackbar
                .make(this.baseView, "Try again!", Snackbar.LENGTH_LONG)
                .setAction("RETRY", new View.OnClickListener() {
                    @Override
                    public void onClick(View view) {
                    }
                });
        snackbar.setActionTextColor(Color.RED);
        View sbView = snackbar.getView();
        TextView textView = sbView.findViewById(com.google.android.material.R.id.snackbar_text);
        textView.setTextColor(Color.YELLOW);
        // Align center.
        if (Build.VERSION.SDK_INT >= Build.VERSION_CODES.M){
            textView.setTextAlignment(View.TEXT_ALIGNMENT_CENTER);
        } else {
            textView.setGravity(Gravity.CENTER_HORIZONTAL);
        }
        // Show Sneckbar
        snackbar.show();
    }
}
3. Example of Snackbar (+CoordinatorLayout)
In case there is a complex application involving Snackbar, FloatingActionButton, etc, you should use CoordinatorLayout. It helps prevent the overlap between Snackbar and FloatingActionButton.
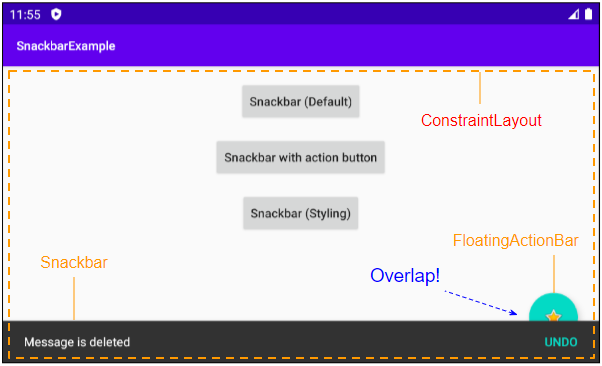
Using Snackbar, FloatingActionBar along with CoordinatorLayout brings you the smooth interface and avoids the overlap.
Read this article for more details on the CoordinatorLayout:
- Android CoordinatorLayout
Android Programming Tutorials
- Configure Android Emulator in Android Studio
- Android ToggleButton Tutorial with Examples
- Create a simple File Finder Dialog in Android
- Android TimePickerDialog Tutorial with Examples
- Android DatePickerDialog Tutorial with Examples
- What is needed to get started with Android?
- Install Android Studio on Windows
- Install Intel® HAXM for Android Studio
- Android AsyncTask Tutorial with Examples
- Android AsyncTaskLoader Tutorial with Examples
- Android Tutorial for Beginners - Basic examples
- How to know the phone number of Android Emulator and change it
- Android TextInputLayout Tutorial with Examples
- Android CardView Tutorial with Examples
- Android ViewPager2 Tutorial with Examples
- Get Phone Number in Android using TelephonyManager
- Android Phone Call Tutorial with Examples
- Android Wifi Scanning Tutorial with Examples
- Android 2D Game Tutorial for Beginners
- Android DialogFragment Tutorial with Examples
- Android CharacterPickerDialog Tutorial with Examples
- Android Tutorial for Beginners - Hello Android
- Using Android Device File Explorer
- Enable USB Debugging on Android Device
- Android UI Layouts Tutorial with Examples
- Android SMS Tutorial with Examples
- Android SQLite Database Tutorial with Examples
- Google Maps Android API Tutorial with Examples
- Android Text to Speech Tutorial with Examples
- Android Space Tutorial with Examples
- Android Toast Tutorial with Examples
- Create a custom Android Toast
- Android SnackBar Tutorial with Examples
- Android TextView Tutorial with Examples
- Android TextClock Tutorial with Examples
- Android EditText Tutorial with Examples
- Android TextWatcher Tutorial with Examples
- Format Credit Card Number with Android TextWatcher
- Android Clipboard Tutorial with Examples
- Create a simple File Chooser in Android
- Android AutoCompleteTextView and MultiAutoCompleteTextView Tutorial with Examples
- Android ImageView Tutorial with Examples
- Android ImageSwitcher Tutorial with Examples
- Android ScrollView and HorizontalScrollView Tutorial with Examples
- Android WebView Tutorial with Examples
- Android SeekBar Tutorial with Examples
- Android Dialog Tutorial with Examples
- Android AlertDialog Tutorial with Examples
- Android RatingBar Tutorial with Examples
- Android ProgressBar Tutorial with Examples
- Android Spinner Tutorial with Examples
- Android Button Tutorial with Examples
- Android Switch Tutorial with Examples
- Android ImageButton Tutorial with Examples
- Android FloatingActionButton Tutorial with Examples
- Android CheckBox Tutorial with Examples
- Android RadioGroup and RadioButton Tutorial with Examples
- Android Chip and ChipGroup Tutorial with Examples
- Using image assets and icon assets of Android Studio
- Setting SD Card for Android Emulator
- ChipGroup and Chip Entry Example
- How to add external libraries to Android Project in Android Studio?
- How to disable the permissions already granted to the Android application?
- How to remove applications from Android Emulator?
- Android LinearLayout Tutorial with Examples
- Android TableLayout Tutorial with Examples
- Android FrameLayout Tutorial with Examples
- Android QuickContactBadge Tutorial with Examples
- Android StackView Tutorial with Examples
- Android Camera Tutorial with Examples
- Android MediaPlayer Tutorial with Examples
- Android VideoView Tutorial with Examples
- Playing Sound effects in Android with SoundPool
- Android Networking Tutorial with Examples
- Android JSON Parser Tutorial with Examples
- Android SharedPreferences Tutorial with Examples
- Android Internal Storage Tutorial with Examples
- Android External Storage Tutorial with Examples
- Android Intents Tutorial with Examples
- Example of an explicit Android Intent, calling another Intent
- Example of implicit Android Intent, open a URL, send an email
- Android Services Tutorial with Examples
- Android Notifications Tutorial with Examples
- Android DatePicker Tutorial with Examples
- Android TimePicker Tutorial with Examples
- Android Chronometer Tutorial with Examples
- Android OptionMenu Tutorial with Examples
- Android ContextMenu Tutorial with Examples
- Android PopupMenu Tutorial with Examples
- Android Fragments Tutorial with Examples
- Android ListView Tutorial with Examples
- Android ListView with Checkbox using ArrayAdapter
- Android GridView Tutorial with Examples
Show More