Android LinearLayout Tutorial with Examples
1. Android LinearLayout
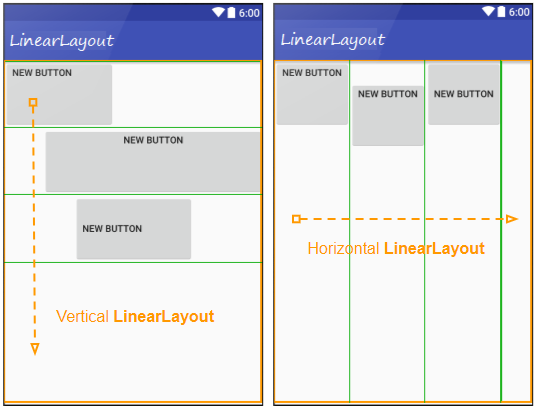
LinearLayout is a ViewGroup that arranges the child View(s) in a single direction, either vertically or horizontally. You can specify its orientation by using the android:orientation attribute.
<!-- Horizontal LinearLayout (Default) -->
<LinearLayout
    ...
    android:orientation="horizontal">

   ...
</LinearLayout>


<!-- Vertical LinearLayout -->
<LinearLayout
    ...
    android:orientation="vertical">

   ...
</LinearLayout>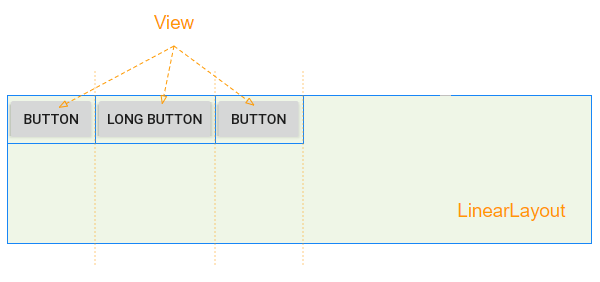
For example: Use Java code to create LinearLayout, and add child View(s) to LinearLayout:
// linearLayout = new LinearLayout(MainActivity.this);
// linearLayout.setOrientation(LinearLayout.HORIZONTAL);

LinearLayout.LayoutParams layoutParams
        = new LinearLayout.LayoutParams(LinearLayout.LayoutParams.WRAP_CONTENT,
        LinearLayout.LayoutParams.WRAP_CONTENT, 0);

Button button1 = new Button(this);
button1.setText("Button");
linearLayout.addView(button1, layoutParams);

Button button2 = new Button(this);
button2.setText("Long Button");
button2.setLayoutParams(layoutParams);
linearLayout.addView(button2);
2. android:layout_weight
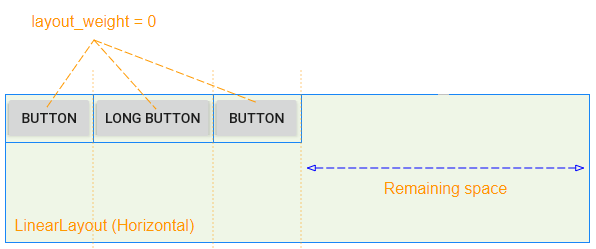
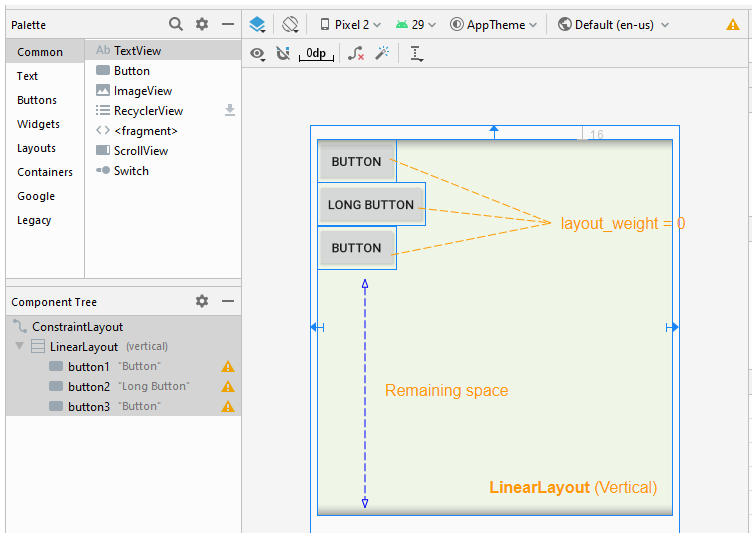
android:layout_weight is an important attribute used for child View(s) of LinearLayout. It specifies how much space the child View(s) will take up in the parent View (LinearLayout) (horizontally or vertically). A layout_weight value greater than zero allows the child View to expand to fill any remaining space in the parent View. Child View(s) can be specified with a layout_weight value > 0, and then any remaining space in the parent View will be assigned to child View(s) according to their layout_weight ratio.
When all the child View(s) have android:layout_weight=0, you will see an empty space in the parent View(LinearLayout):
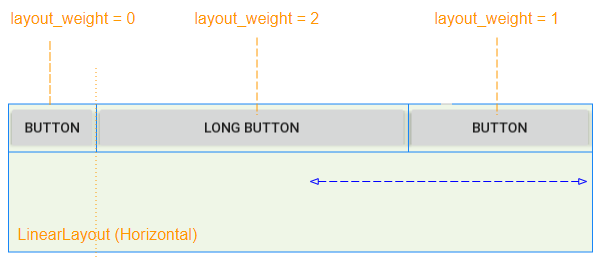
The child View(s)have android:layout_weight>0 will take up the free space of the parent View (LinearLayout):

The free space of the parent View (LinearLayout) will be allocated to the child View(s) in accordance with their layout_weight ratio.
The android:layout_weight attribute means the same thing in a vertical LinearLayout:
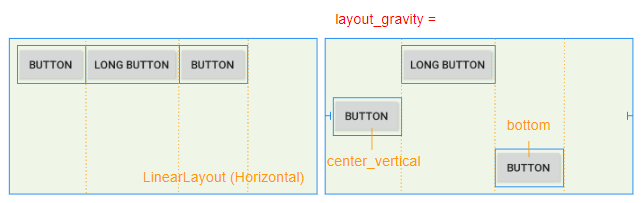
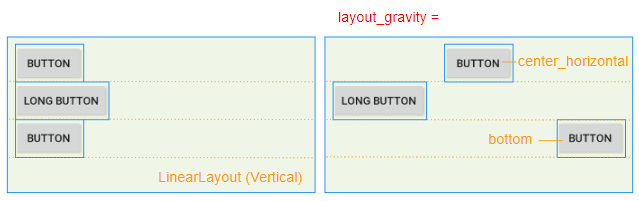
3. android:layout_gravity
The android:layout_gravity attribute is applied to a child View to specify the relative position of the child View within the parent View (LinearLayout).
Constant in Java | Value | Description |
Gravity.LEFT | left | |
Gravity.CENTER_HORIZONTAL | center_horizontal | |
Gravity.RIGHT | right | |
Gravity.TOP | top | |
Gravity.CENTER_VERTICAL | center_vertical | |
Gravity.BOTTOM | bottom | |
Gravity.START | start | |
Gravity.END | end | |
Gravity.CENTER | center | |
4. android:padding
Padding is the space in LinearLayout (inside the border), and surrounds 4 sides of the content.
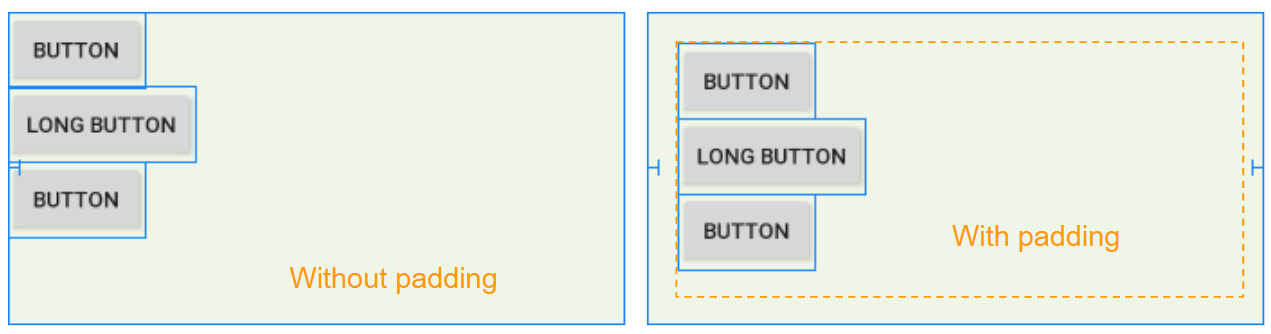
You can set padding for LinearLayout by using the following attributes:
- android:padding
- android:paddingTop
- android:paddingRight
- android:paddingBottom
- android:paddingLeft
<LinearLayout
    ...
    android:orientation="horizontal"
    android:paddingTop="20dp"
    android:paddingRight="30dp"
    android:paddingBottom="10dp"
    android:paddingLeft="20dp">

    <Button
        android:id="@+id/button1"
        android:layout_width="wrap_content"
        android:layout_height="wrap_content"
        android:layout_weight="0"
        android:text="Button" />

</LinearLayout>
5. LinearLayout spacing
Sometimes if you would like to set the space among the child View(s) of LinearLayout, there are several ways for you to handle this:
android:layout_margin
By applying the android:layout_margin attribute to all child View(s) of LinearLayout will help set the distance between them.
* layout_margin (Java code) *
// linearLayout = new LinearLayout(MainActivity.this);
// linearLayout.setOrientation(LinearLayout.HORIZONTAL);

LinearLayout.LayoutParams layoutParams
        = new LinearLayout.LayoutParams(LinearLayout.LayoutParams.WRAP_CONTENT,
                          LinearLayout.LayoutParams.WRAP_CONTENT, 0);
layoutParams.setMargins(30, 20, 30, 0);

Button button1 = new Button(this);
button1.setText("Button");
linearLayout.addView(button1, layoutParams);

Button button2 = new Button(this);
button2.setText("Long Button");
button2.setLayoutParams(layoutParams);
linearLayout.addView(button2);
Space View
Android 4.0+ (API Level 14+) supports a new type of View called Space, which helps you add a free space to the interface. You can use Space to separate the child View(s) within LinearLayout.
<LinearLayout
    ...
    android:layout_width="0dp"
    android:layout_height="200dp"
    android:background="#EFF6E7"
    android:orientation="horizontal">

    <Button
        android:id="@+id/button1"
        android:layout_width="wrap_content"
        android:layout_height="wrap_content"
        android:layout_weight="0"
        android:text="Button" />

    <Space
        android:layout_width="10dp"
        android:layout_height="wrap_content"
        android:layout_weight="0" />

    <Button
        android:id="@+id/button2"
        android:layout_width="wrap_content"
        android:layout_height="wrap_content"
        android:layout_weight="0"
        android:text="Long Button" />

    <Button
        android:id="@+id/button3"
        android:layout_width="wrap_content"
        android:layout_height="wrap_content"
        android:layout_weight="0"
        android:text="Button" />
</LinearLayout>
* Add Space (Java code) *
// linearLayout = new LinearLayout(MainActivity.this);
// linearLayout.setOrientation(LinearLayout.HORIZONTAL);

LinearLayout.LayoutParams layoutParams
        = new LinearLayout.LayoutParams(LinearLayout.LayoutParams.WRAP_CONTENT,
        LinearLayout.LayoutParams.WRAP_CONTENT, 0);

LinearLayout.LayoutParams layoutParams2
        = new LinearLayout.LayoutParams(15,
        LinearLayout.LayoutParams.WRAP_CONTENT, 0);

Button button1 = new Button(this);
button1.setText("Button");
linearLayout.addView(button1, layoutParams);

// Create a Space View.
Space space = new Space(this);
space.setLayoutParams(layoutParams2);
linearLayout.addView(space);

Button button2 = new Button(this);
button2.setText("Long Button");
button2.setLayoutParams(layoutParams);
linearLayout.addView(button2);
android:divider
Android 3.0+ (API Level 11+) permits you to add a Divider between the two child View(s) in LinearLayout. Moreover, you can specify the style and color for the Divider.
* Divider *
<LinearLayout
    ...
    android:orientation="horizontal">

    <Button
        android:id="@+id/button1"
        android:layout_width="wrap_content"
        android:layout_height="wrap_content"
        android:layout_weight="0"
        android:text="Button" />

     <!-- Divider -->
    <View
        android:id="@+id/divider"
        android:layout_width="15dp"
        android:layout_height="match_parent"
        android:layout_weight="0"
        android:background="?android:attr/listDivider" />

    <Button
        android:id="@+id/button2"
        android:layout_width="wrap_content"
        android:layout_height="wrap_content"
        android:layout_weight="0"
        android:text="Long Button" />

    <Button
        android:id="@+id/button3"
        android:layout_width="wrap_content"
        android:layout_height="wrap_content"
        android:layout_weight="0"
        android:text="Button" />
</LinearLayout>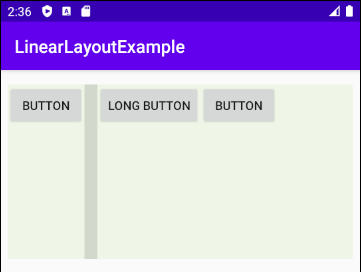
* Add Divider (Java code) *
// linearLayout = new LinearLayout(MainActivity.this);
// linearLayout.setOrientation(LinearLayout.HORIZONTAL);

LinearLayout.LayoutParams layoutParams
        = new LinearLayout.LayoutParams(LinearLayout.LayoutParams.WRAP_CONTENT,
        LinearLayout.LayoutParams.WRAP_CONTENT, 0);

LinearLayout.LayoutParams layoutParams2
        = new LinearLayout.LayoutParams(15,
        LinearLayout.LayoutParams.MATCH_PARENT, 0);

Button button1 = new Button(this);
button1.setText("Button");
linearLayout.addView(button1, layoutParams);

// Create a Divider.
View divider = new View(this);
// android:background="?android:attr/listDivider"
divider.setBackgroundResource(android.R.drawable.divider_horizontal_bright);
linearLayout.addView(divider, layoutParams2);

Button button2 = new Button(this);
button2.setText("Long Button");
button2.setLayoutParams(layoutParams);
linearLayout.addView(button2);
See more detailed article about Divider, it helps you customize Divider to suit your application:
- Android Divider
Android Programming Tutorials
- Configure Android Emulator in Android Studio
- Android ToggleButton Tutorial with Examples
- Create a simple File Finder Dialog in Android
- Android TimePickerDialog Tutorial with Examples
- Android DatePickerDialog Tutorial with Examples
- What is needed to get started with Android?
- Install Android Studio on Windows
- Install Intel® HAXM for Android Studio
- Android AsyncTask Tutorial with Examples
- Android AsyncTaskLoader Tutorial with Examples
- Android Tutorial for Beginners - Basic examples
- How to know the phone number of Android Emulator and change it
- Android TextInputLayout Tutorial with Examples
- Android CardView Tutorial with Examples
- Android ViewPager2 Tutorial with Examples
- Get Phone Number in Android using TelephonyManager
- Android Phone Call Tutorial with Examples
- Android Wifi Scanning Tutorial with Examples
- Android 2D Game Tutorial for Beginners
- Android DialogFragment Tutorial with Examples
- Android CharacterPickerDialog Tutorial with Examples
- Android Tutorial for Beginners - Hello Android
- Using Android Device File Explorer
- Enable USB Debugging on Android Device
- Android UI Layouts Tutorial with Examples
- Android SMS Tutorial with Examples
- Android SQLite Database Tutorial with Examples
- Google Maps Android API Tutorial with Examples
- Android Text to Speech Tutorial with Examples
- Android Space Tutorial with Examples
- Android Toast Tutorial with Examples
- Create a custom Android Toast
- Android SnackBar Tutorial with Examples
- Android TextView Tutorial with Examples
- Android TextClock Tutorial with Examples
- Android EditText Tutorial with Examples
- Android TextWatcher Tutorial with Examples
- Format Credit Card Number with Android TextWatcher
- Android Clipboard Tutorial with Examples
- Create a simple File Chooser in Android
- Android AutoCompleteTextView and MultiAutoCompleteTextView Tutorial with Examples
- Android ImageView Tutorial with Examples
- Android ImageSwitcher Tutorial with Examples
- Android ScrollView and HorizontalScrollView Tutorial with Examples
- Android WebView Tutorial with Examples
- Android SeekBar Tutorial with Examples
- Android Dialog Tutorial with Examples
- Android AlertDialog Tutorial with Examples
- Android RatingBar Tutorial with Examples
- Android ProgressBar Tutorial with Examples
- Android Spinner Tutorial with Examples
- Android Button Tutorial with Examples
- Android Switch Tutorial with Examples
- Android ImageButton Tutorial with Examples
- Android FloatingActionButton Tutorial with Examples
- Android CheckBox Tutorial with Examples
- Android RadioGroup and RadioButton Tutorial with Examples
- Android Chip and ChipGroup Tutorial with Examples
- Using image assets and icon assets of Android Studio
- Setting SD Card for Android Emulator
- ChipGroup and Chip Entry Example
- How to add external libraries to Android Project in Android Studio?
- How to disable the permissions already granted to the Android application?
- How to remove applications from Android Emulator?
- Android LinearLayout Tutorial with Examples
- Android TableLayout Tutorial with Examples
- Android FrameLayout Tutorial with Examples
- Android QuickContactBadge Tutorial with Examples
- Android StackView Tutorial with Examples
- Android Camera Tutorial with Examples
- Android MediaPlayer Tutorial with Examples
- Android VideoView Tutorial with Examples
- Playing Sound effects in Android with SoundPool
- Android Networking Tutorial with Examples
- Android JSON Parser Tutorial with Examples
- Android SharedPreferences Tutorial with Examples
- Android Internal Storage Tutorial with Examples
- Android External Storage Tutorial with Examples
- Android Intents Tutorial with Examples
- Example of an explicit Android Intent, calling another Intent
- Example of implicit Android Intent, open a URL, send an email
- Android Services Tutorial with Examples
- Android Notifications Tutorial with Examples
- Android DatePicker Tutorial with Examples
- Android TimePicker Tutorial with Examples
- Android Chronometer Tutorial with Examples
- Android OptionMenu Tutorial with Examples
- Android ContextMenu Tutorial with Examples
- Android PopupMenu Tutorial with Examples
- Android Fragments Tutorial with Examples
- Android ListView Tutorial with Examples
- Android ListView with Checkbox using ArrayAdapter
- Android GridView Tutorial with Examples
Show More