Android Tutorial for Beginners - Basic examples
1. Introduction
This document is based on:
Android Studio 3.6.1
You are viewing the series of Android programming tutorials, this is the 2nd tutorial, in this document I will guide you how to develop an Android application step by step, the basics will be covered include:
- Call Activity from another Activity.
- Process basic event.
- Develop basic interface and work with resource.
Before starting with this document, please ensure that you have run successfully "Hello Android" example and learn about the structure of an Android project. You can look at:
2. Create Android Project
If you are working with an Android project in Android Studio, close this project, we will create a different project.
In Android Studio select:
- File/Close Project
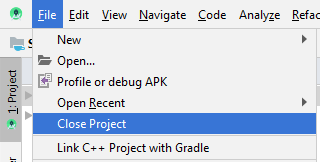
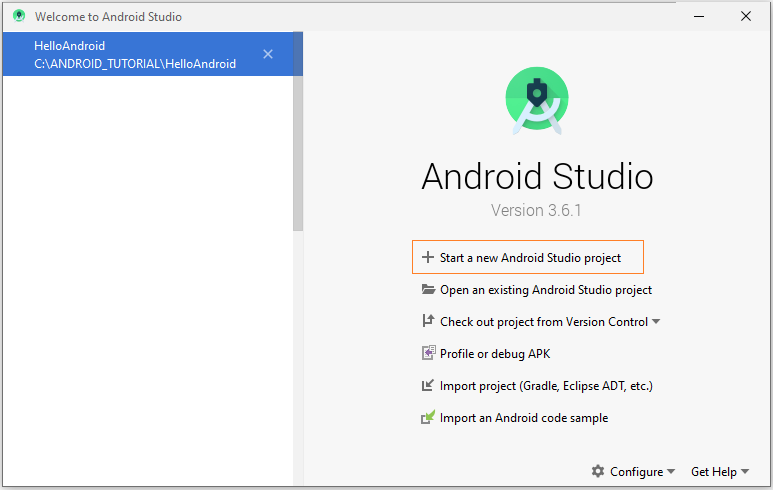
Create new project:
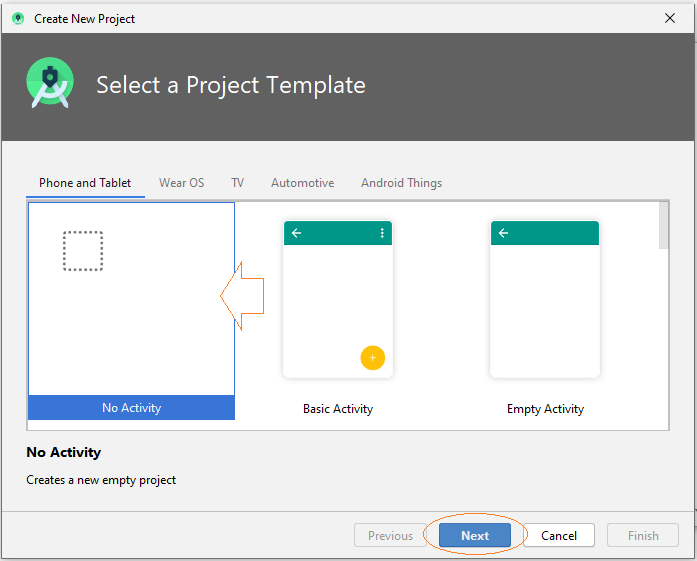
Next, the Wizard will ask if you want to create an Activity or not, select "Add No Activity", wizard will create an empty project that is not included an Activity.
Enter:
- Name: AndroidBasic2
- Package name: org.o7planning.androidbasic2
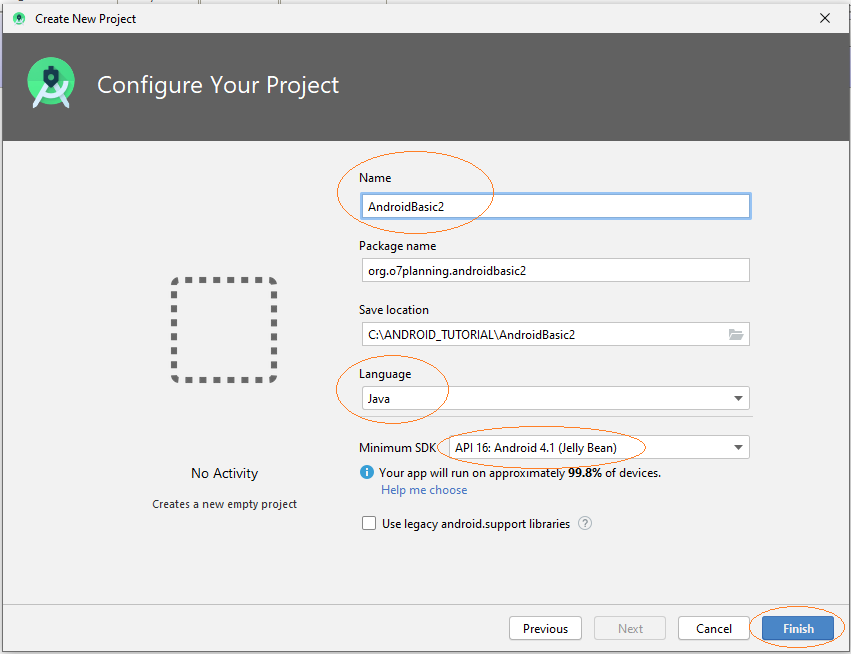
The application which is creating will be used on Phone and Tablet.
Note: API 16, Android 4.1 is currently used on most of the Phone and Tab devices (Approximately 94%).
Project has been created.
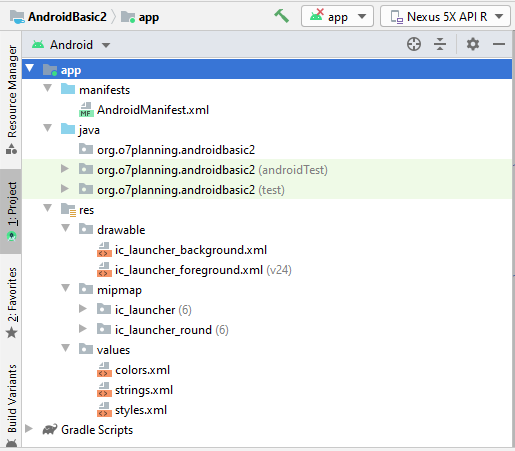
3. Create MainActivity and sub Activities
We will create a main activity (MainActivity),this Activity will be called when application is run. On MainActivity will have buttons to call the other Activities.
In Android Studio select:
- File/New/Activity/Empty Activity
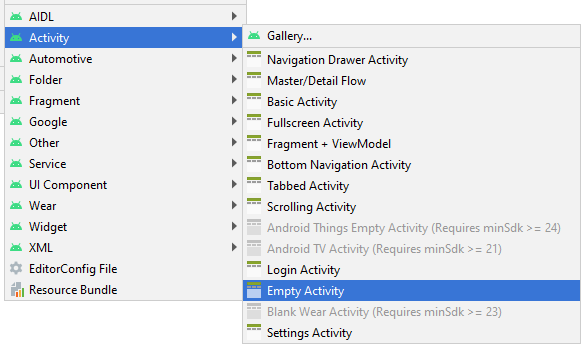
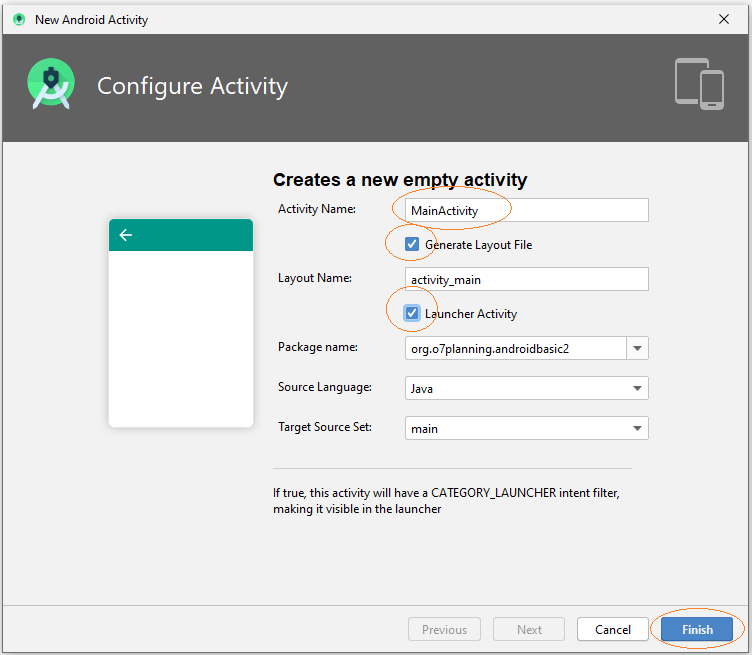
MainActivity has been created and included MainActivity.java and main_activity.xml files, information on this Activity has been registered with AndroidManifest.xml.
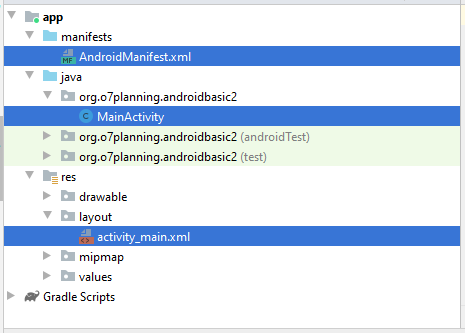
Similarly, we add 5 Activities.
- Example1Activity
- Example2Activity
- Example3Activity
- Example4Activity
- Example5Activity
In Android Studio select:
- File/New/Activity/Empty Activity
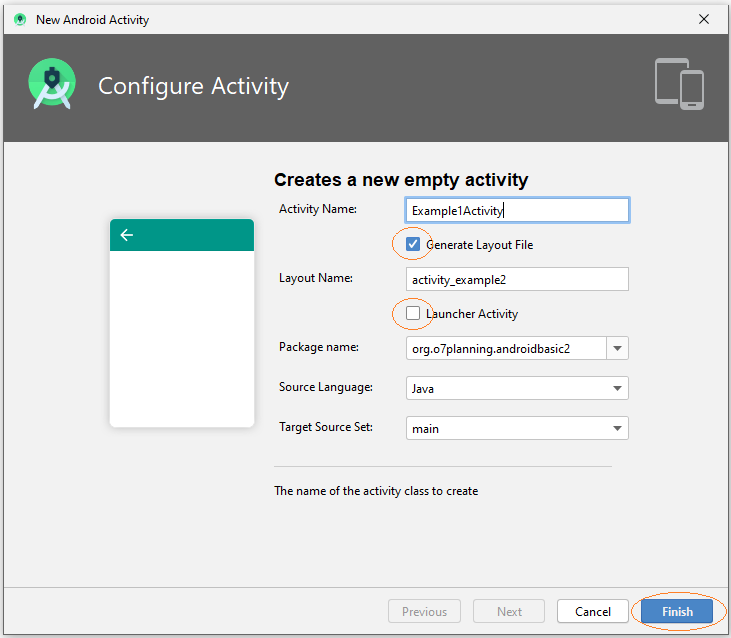
Note: All Activities that has been created is not main Activity, it is called from MainActivity, thus, you should not check to "Launcher Activity".
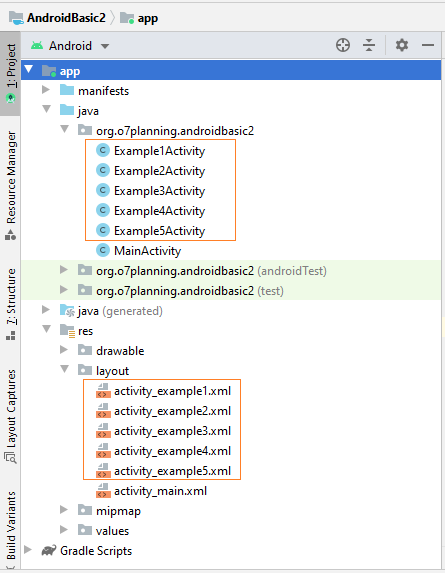
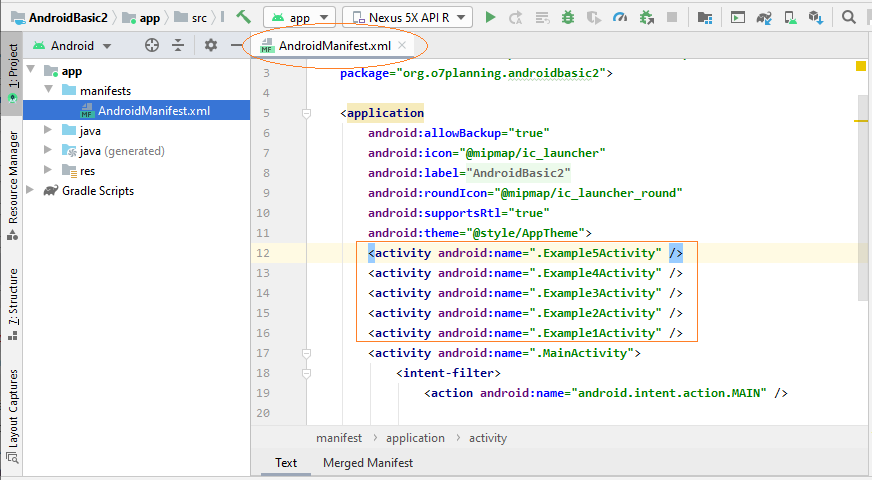
That's OK, 5 new Activitiies has been created, and they have been registered with AndroidManifest.xml.
4. Interface design for main_activity.xml
On Android Studio open main_activity.xml to design the interface for it.
Design window has 3 modes:
- Code
- Split
- Design
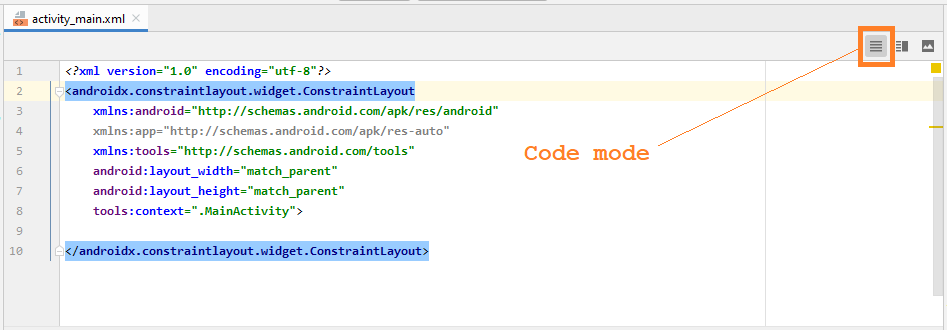
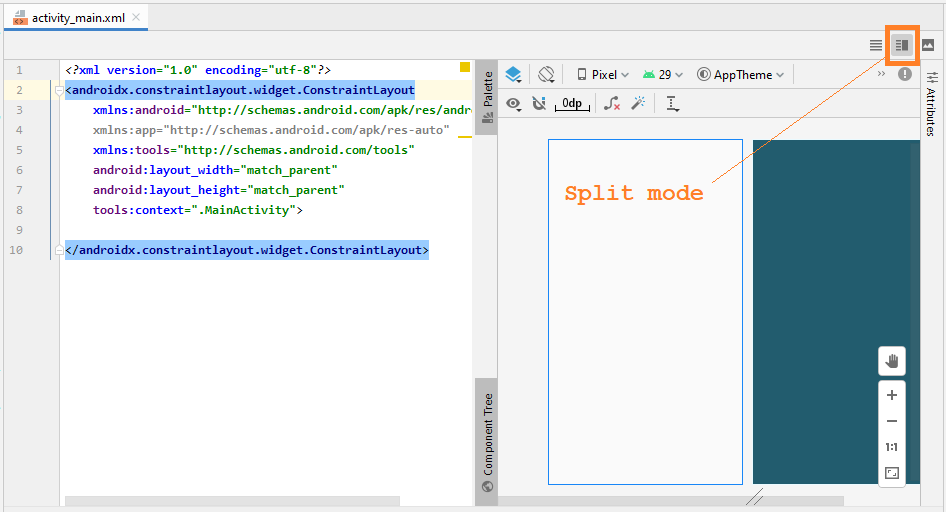
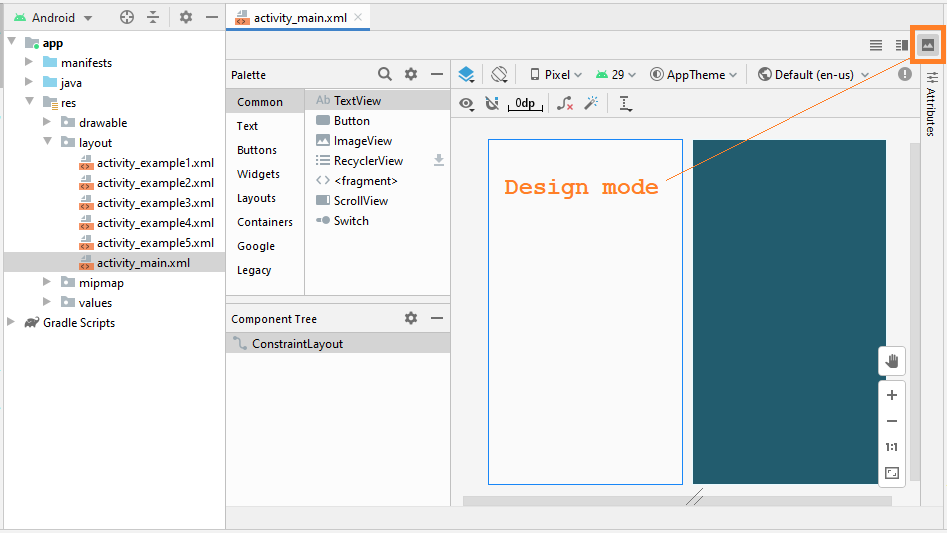
Mostly you work in Design mode, it helps you drag and drop components into the interface and automatically generate XML code:
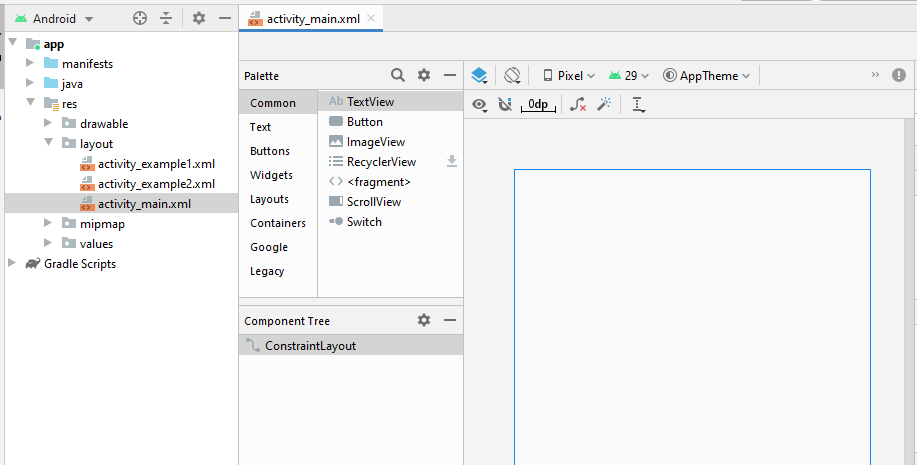
OK, we will design a simple interface, including 5 Button(s):
Drag and drop 5 Button(s) into the interface:
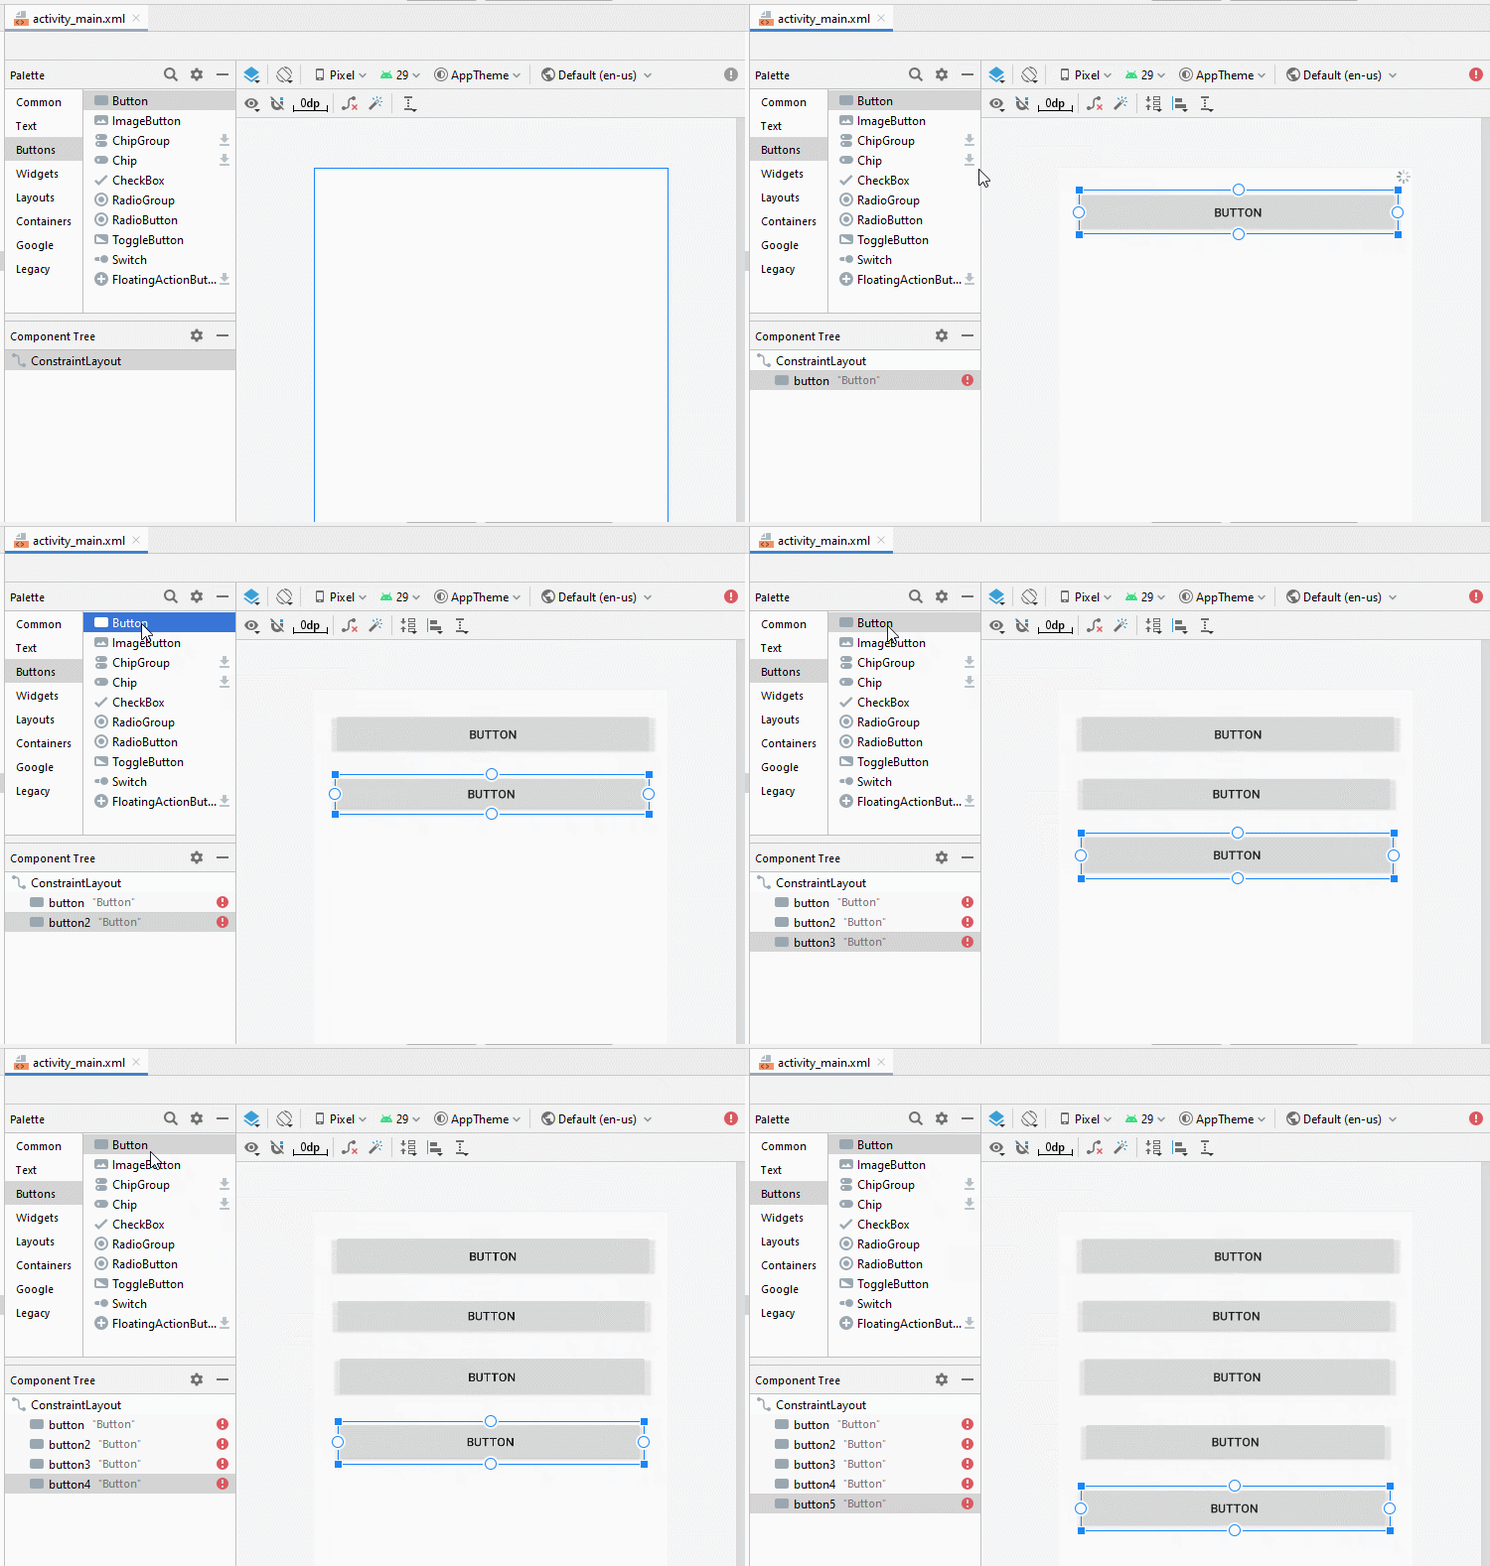
Set constraints for the buttons.
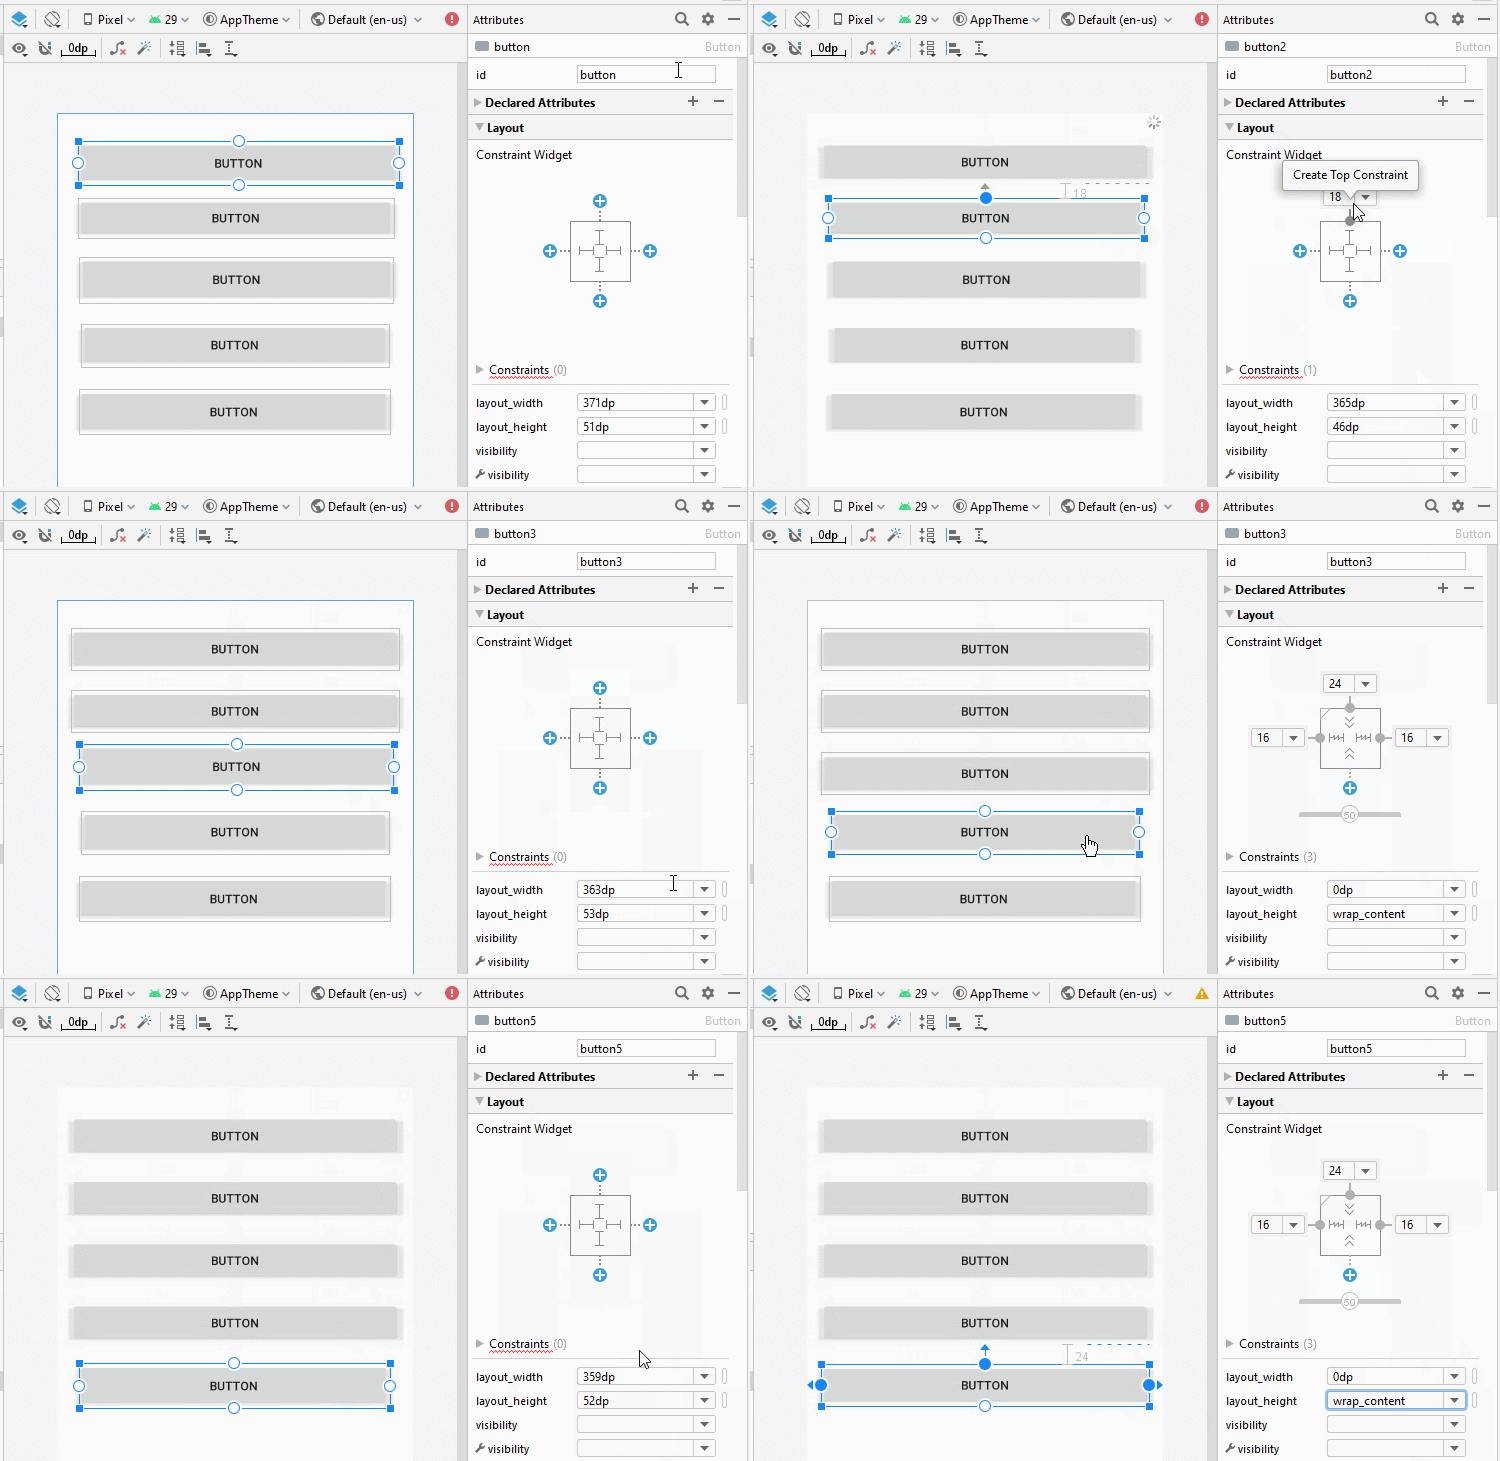
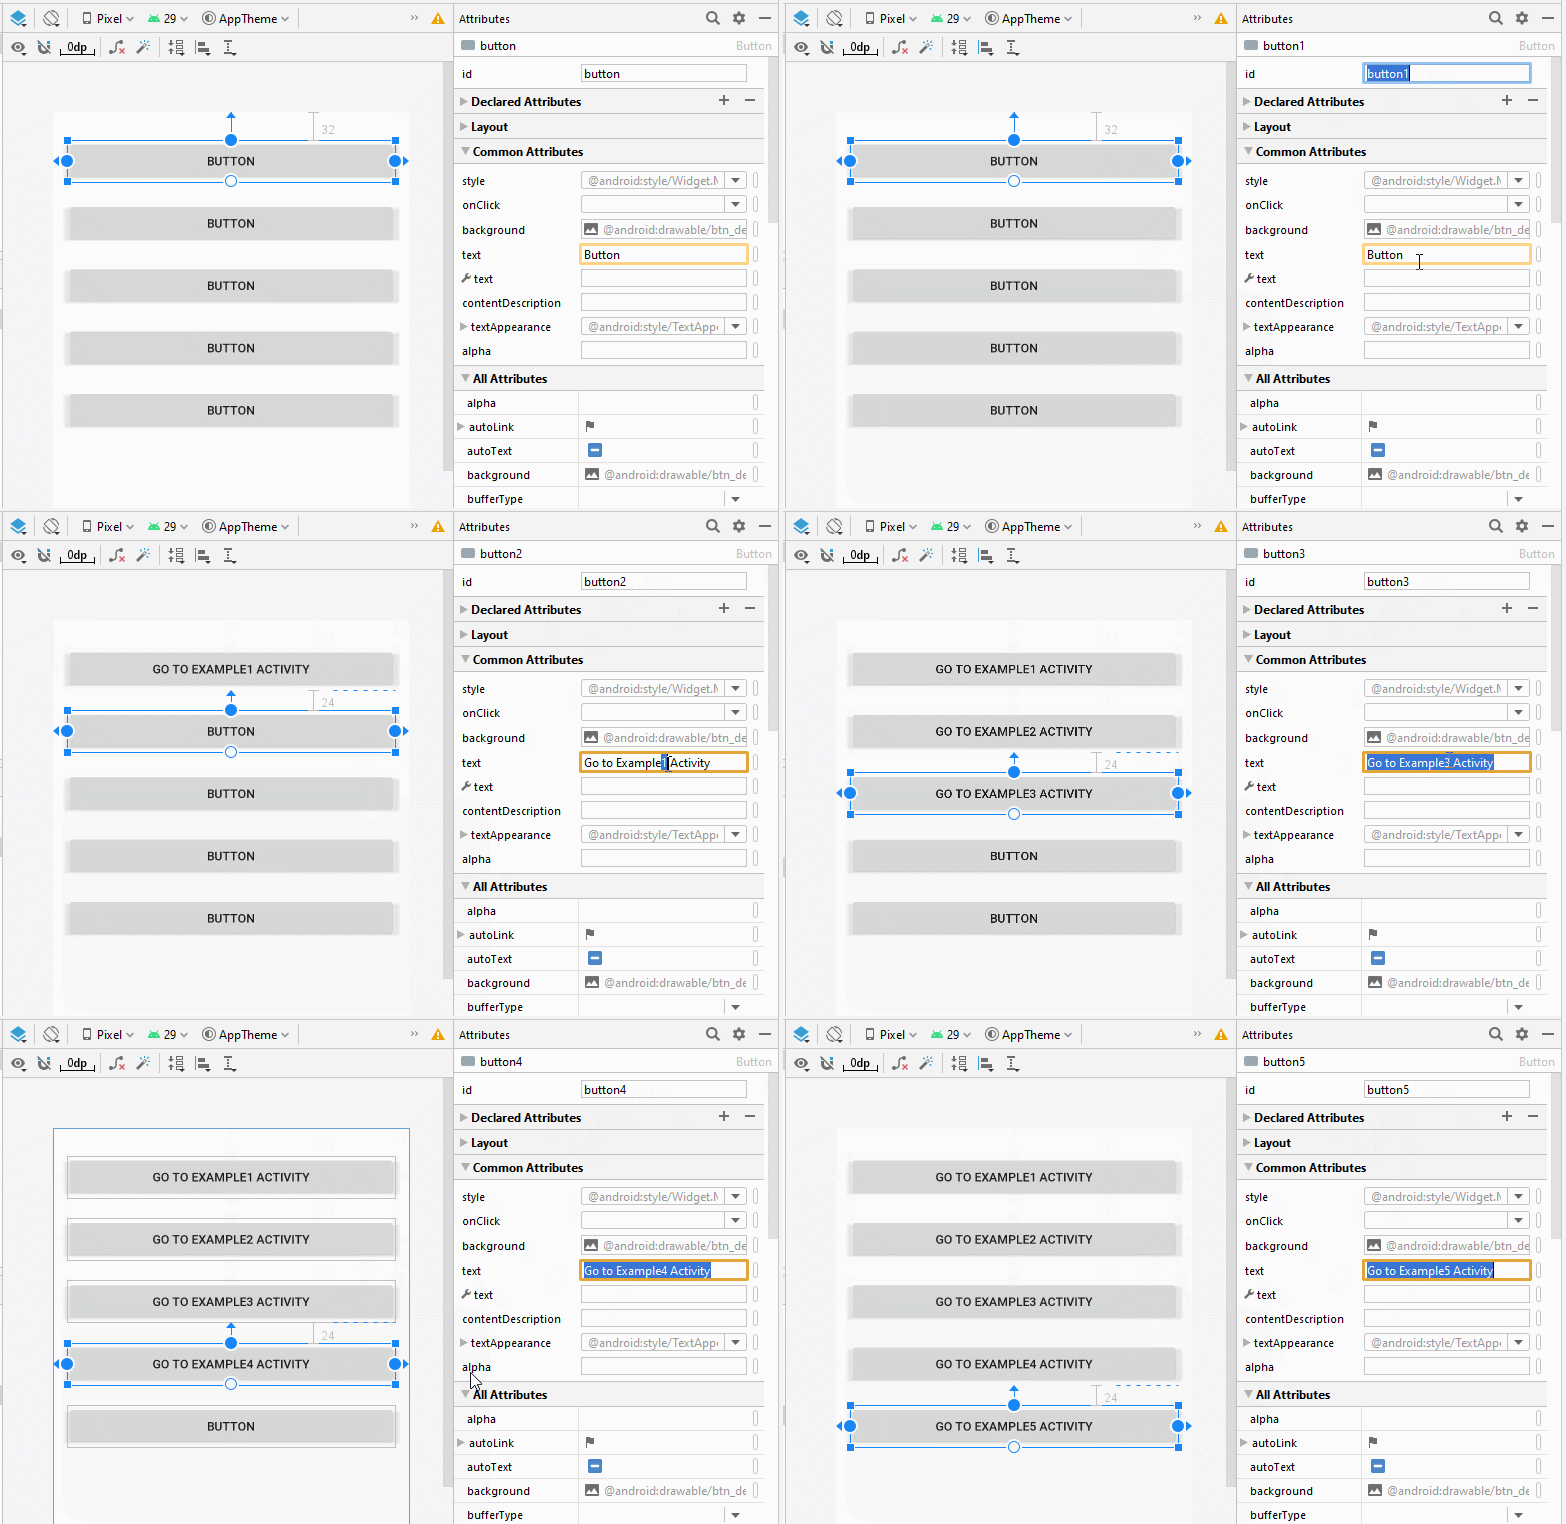
Set ID, Text for buttons on the interface. ID is very important, in Java code you can access a Button through its ID.
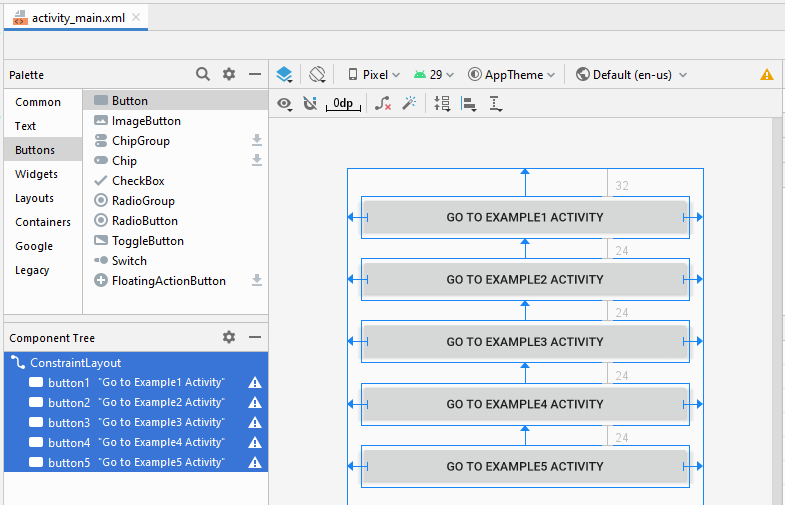
On the design window, switch to Code mode, you will see the generated XML code.
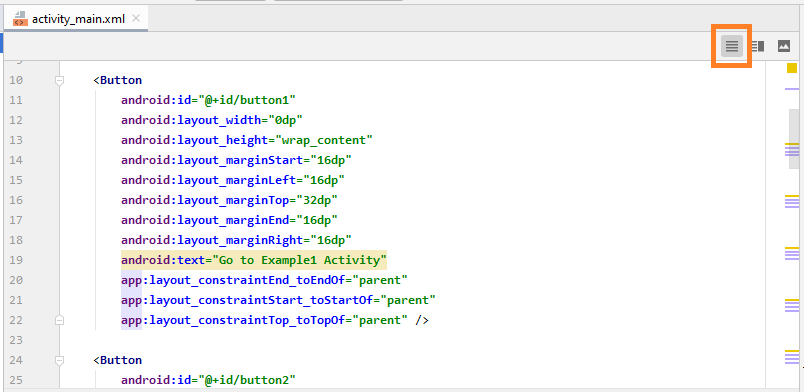
Below is the content of my activity_main.xml file, you can copy and paste into your Code window to have the same interface.
activity_main.xml
<?xml version="1.0" encoding="utf-8"?>
<androidx.constraintlayout.widget.ConstraintLayout
    xmlns:android="http://schemas.android.com/apk/res/android"
    xmlns:app="http://schemas.android.com/apk/res-auto"
    xmlns:tools="http://schemas.android.com/tools"
    android:layout_width="match_parent"
    android:layout_height="match_parent"
    tools:context=".MainActivity">

    <Button
        android:id="@+id/button1"
        android:layout_width="0dp"
        android:layout_height="wrap_content"
        android:layout_marginStart="16dp"
        android:layout_marginLeft="16dp"
        android:layout_marginTop="32dp"
        android:layout_marginEnd="16dp"
        android:layout_marginRight="16dp"
        android:text="Go to Example1 Activity"
        app:layout_constraintEnd_toEndOf="parent"
        app:layout_constraintStart_toStartOf="parent"
        app:layout_constraintTop_toTopOf="parent" />

    <Button
        android:id="@+id/button2"
        android:layout_width="0dp"
        android:layout_height="wrap_content"
        android:layout_marginStart="16dp"
        android:layout_marginLeft="16dp"
        android:layout_marginTop="24dp"
        android:layout_marginEnd="16dp"
        android:layout_marginRight="16dp"
        android:text="Go to Example2 Activity"
        app:layout_constraintEnd_toEndOf="parent"
        app:layout_constraintStart_toStartOf="parent"
        app:layout_constraintTop_toBottomOf="@+id/button1" />

    <Button
        android:id="@+id/button3"
        android:layout_width="0dp"
        android:layout_height="wrap_content"
        android:layout_marginStart="16dp"
        android:layout_marginLeft="16dp"
        android:layout_marginTop="24dp"
        android:layout_marginEnd="16dp"
        android:layout_marginRight="16dp"
        android:text="Go to Example3 Activity"
        app:layout_constraintEnd_toEndOf="parent"
        app:layout_constraintStart_toStartOf="parent"
        app:layout_constraintTop_toBottomOf="@+id/button2" />

    <Button
        android:id="@+id/button4"
        android:layout_width="0dp"
        android:layout_height="wrap_content"
        android:layout_marginStart="16dp"
        android:layout_marginLeft="16dp"
        android:layout_marginTop="24dp"
        android:layout_marginEnd="16dp"
        android:layout_marginRight="16dp"
        android:text="Go to Example4 Activity"
        app:layout_constraintEnd_toEndOf="parent"
        app:layout_constraintStart_toStartOf="parent"
        app:layout_constraintTop_toBottomOf="@+id/button3" />

    <Button
        android:id="@+id/button5"
        android:layout_width="0dp"
        android:layout_height="wrap_content"
        android:layout_marginStart="16dp"
        android:layout_marginLeft="16dp"
        android:layout_marginTop="24dp"
        android:layout_marginEnd="16dp"
        android:layout_marginRight="16dp"
        android:text="Go to Example5 Activity"
        app:layout_constraintEnd_toEndOf="parent"
        app:layout_constraintStart_toStartOf="parent"
        app:layout_constraintTop_toBottomOf="@+id/button4" />
</androidx.constraintlayout.widget.ConstraintLayout>
5. Call an Activity from an Activity
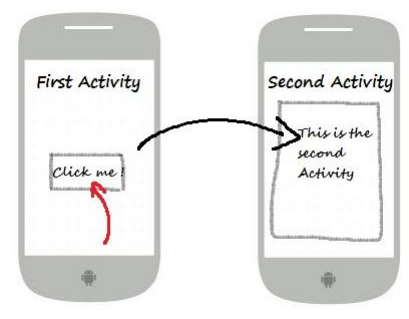
Here we will handle events when the user clicks on the Buttons, and they will call Example1Activity, ..Example5Activity respectively.
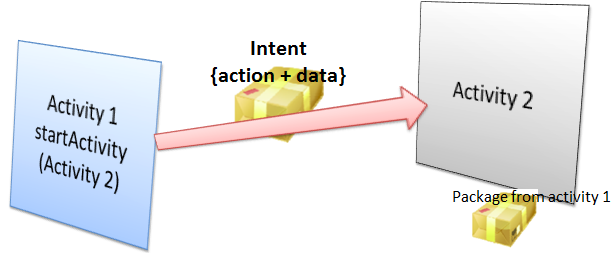
Activities talk with each other via Intent object. For example, Activity1 wants to call Activity2 to run, it will encapsulate what needs to say, and the request to an Intent object and send this Intent object to Activity2. You can see the illustration below.
Open MainActivity class, you can access the Button(s) via its ID on Java code
// Get button by ID
Button button1 = (Button) this.findViewById(R.id.go_button1);

// Register listener user clicks on the button1.
button1.setOnClickListener(new Button.OnClickListener() {

  @Override
  public void onClick(View v) {

     // Create a Intent:
     // (This object contains content that will be sent to Example1Activity).

      Intent myIntent = new Intent(MainActivity.this, Example1Activity.class);

      // Parameter for Intent.
      myIntent.putExtra("text1", "This is text1 sent from MainActivity at " + new Date());
      myIntent.putExtra("text2", "This is text2 sent from MainActivity at " + new Date());

      // Start Example1Activity.
      MainActivity.this.startActivity(myIntent);
  }
});
Complete Code of MainActivity.java:
MainActivity.java
package org.o7planning.androidbasic2;

import androidx.appcompat.app.AppCompatActivity;
import android.os.Bundle;
import android.content.Intent;
import android.view.View;
import android.widget.Button;

import java.util.Date;

public class MainActivity extends AppCompatActivity {

    private Button button1;
    private Button button2;
    private Button button3;
    private Button button4;
    private Button button5;

    @Override
    protected void onCreate(Bundle savedInstanceState) {
        super.onCreate(savedInstanceState);
        setContentView(R.layout.activity_main);

        // Find Button by its ID
        this.button1 = (Button) this.findViewById(R.id.button1);

        // Find button by its ID
        this.button2 = (Button) this.findViewById(R.id.button2);

        // Find button by its ID.
        this.button3 = (Button) this.findViewById(R.id.button3);

        // Find button by its ID.
        this.button4 = (Button) this.findViewById(R.id.button4);

        // Find button by its ID.
        this.button5 = (Button) this.findViewById(R.id.button5);

        // Called when the user clicks the button1.
        button1.setOnClickListener(new Button.OnClickListener() {

            @Override
            public void onClick(View v) {

                // Create a Intent:
                // (This object contains content that will be sent to Example1Activity).
                Intent myIntent = new Intent(MainActivity.this, Example1Activity.class);

                // Put parameters
                myIntent.putExtra("text1", "This is text1 sent from MainActivity at " + new Date());
                myIntent.putExtra("text2", "This is text2 sent from MainActivity at " + new Date());

                // Start Example1Activity.
                MainActivity.this.startActivity(myIntent);
            }
        });

        // Called when the user clicks the button2.
        button2.setOnClickListener(new Button.OnClickListener() {

            @Override
            public void onClick(View v) {

                // Create a Intent:
                // (This object contains content that will be sent to Example2Activity).
                Intent myIntent = new Intent(MainActivity.this, Example2Activity.class);

                // Start Example2Activity.
                MainActivity.this.startActivity(myIntent);
            }
        });

        // Called when the user clicks the button3.
        button3.setOnClickListener(new Button.OnClickListener() {

            @Override
            public void onClick(View v) {

                // Create a Intent:
                // (This object contains content that will be sent to Example3Activity).
                Intent myIntent = new Intent(MainActivity.this, Example3Activity.class);


                MainActivity.this.startActivity(myIntent);
            }
        });

        button4.setOnClickListener(new Button.OnClickListener() {

            @Override
            public void onClick(View v) {

                // Create a Intent:
                // (This object contains content that will be sent to Example4Activity).
                Intent myIntent = new Intent(MainActivity.this, Example4Activity.class);

                // Start Example4Activity.
                MainActivity.this.startActivity(myIntent);
            }
        });

        button5.setOnClickListener(new Button.OnClickListener() {

            @Override
            public void onClick(View v) {

                // Create a Intent:
                // (This object contains content that will be sent to Example5Activity).
                Intent myIntent = new Intent(MainActivity.this, Example5Activity.class);

                // Start Example5Activity.
                MainActivity.this.startActivity(myIntent);
            }
        });
    }
}
6. Example1Activity - Call another Activity
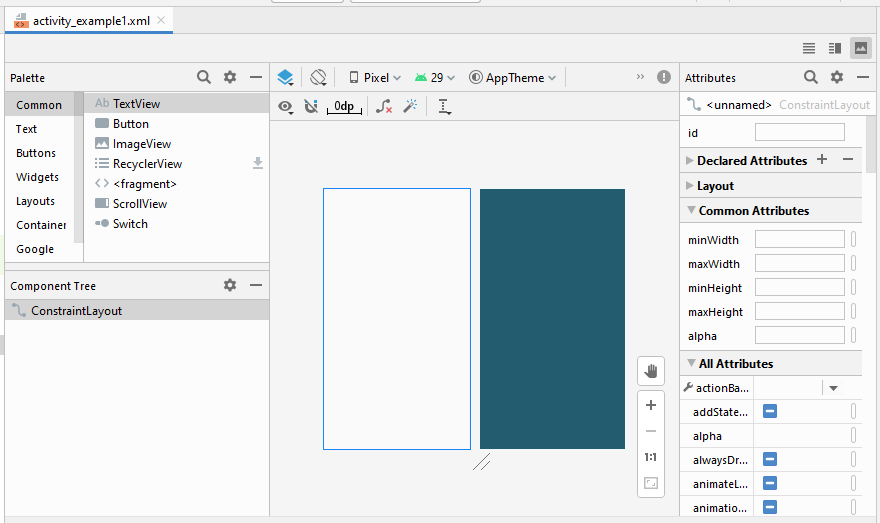
Next, open activity_example1.xml to design interface for Example1Activity
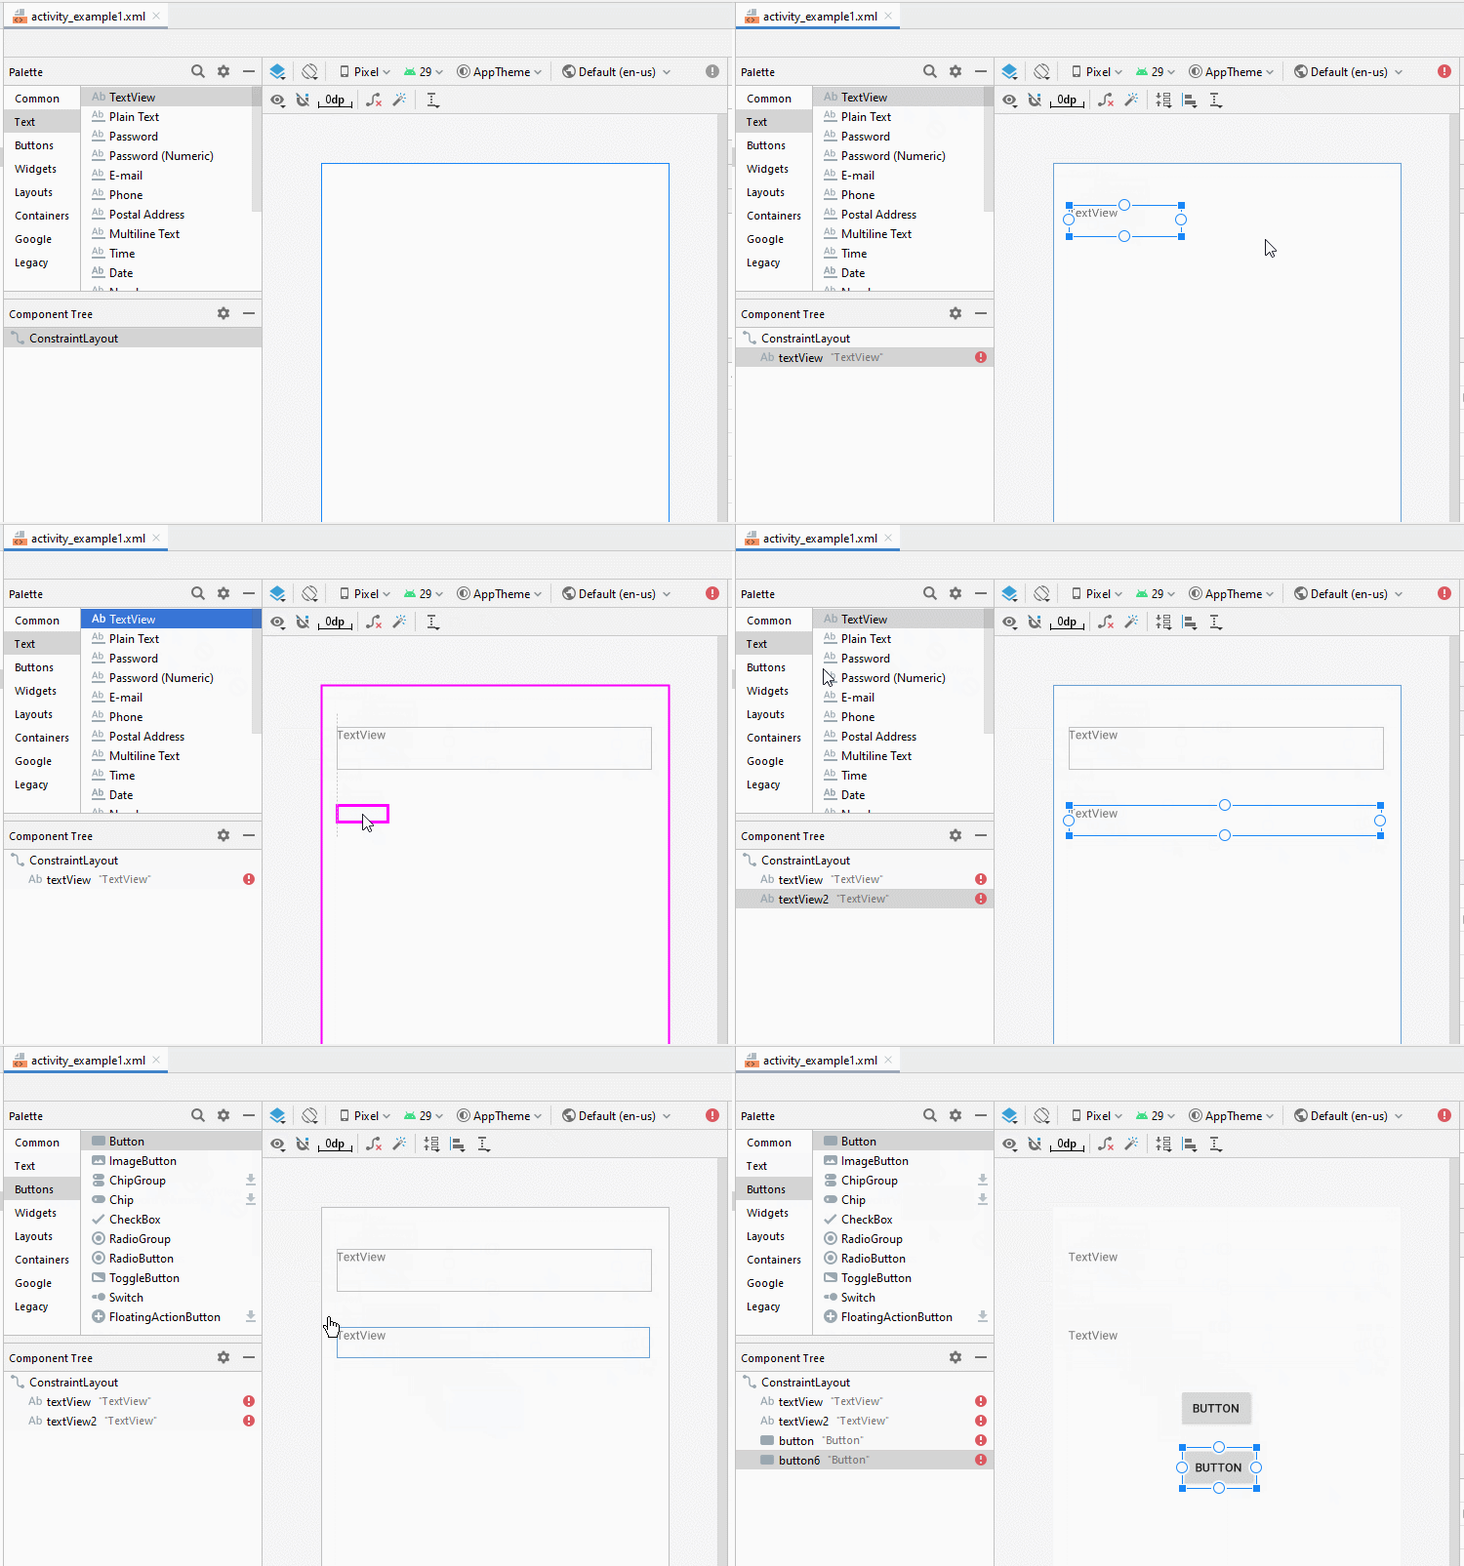
Set constraints for the components on the interface.
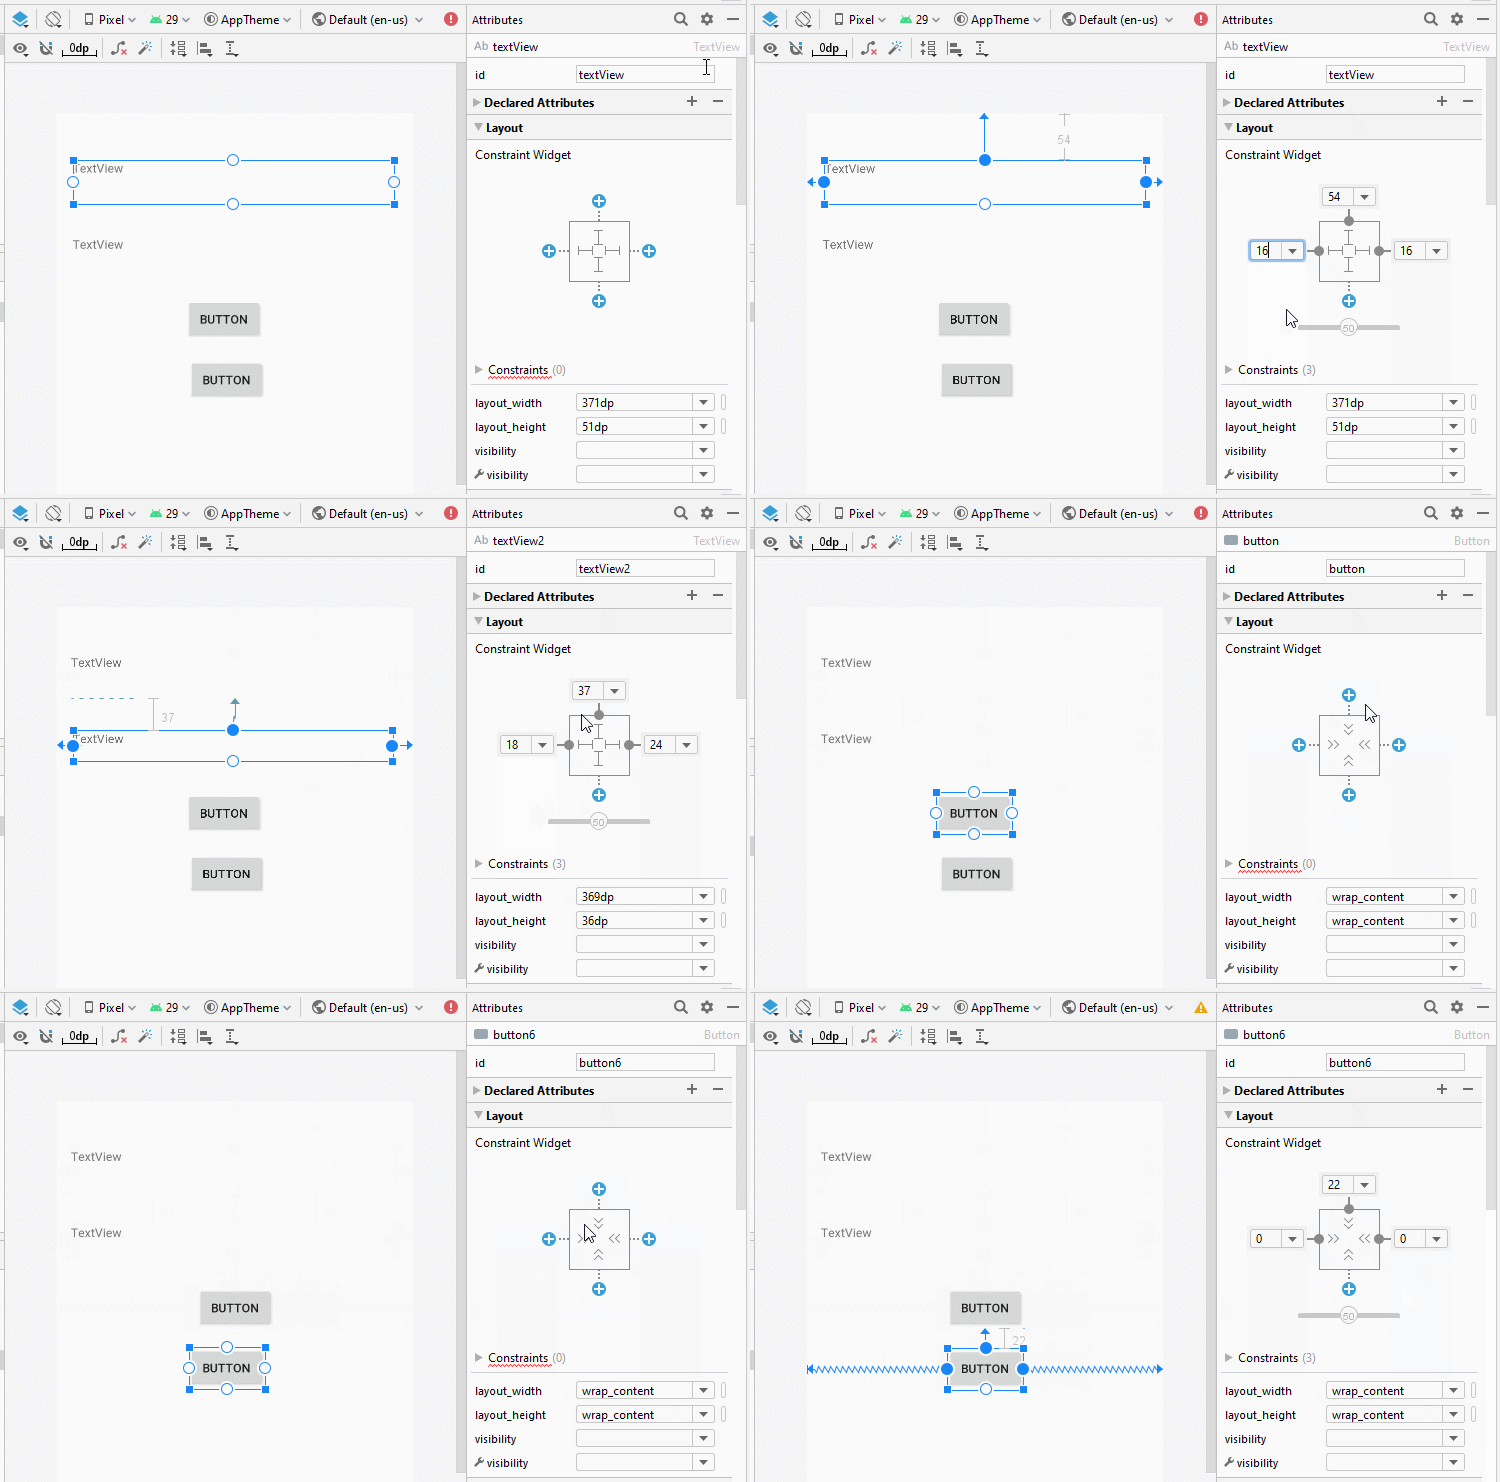
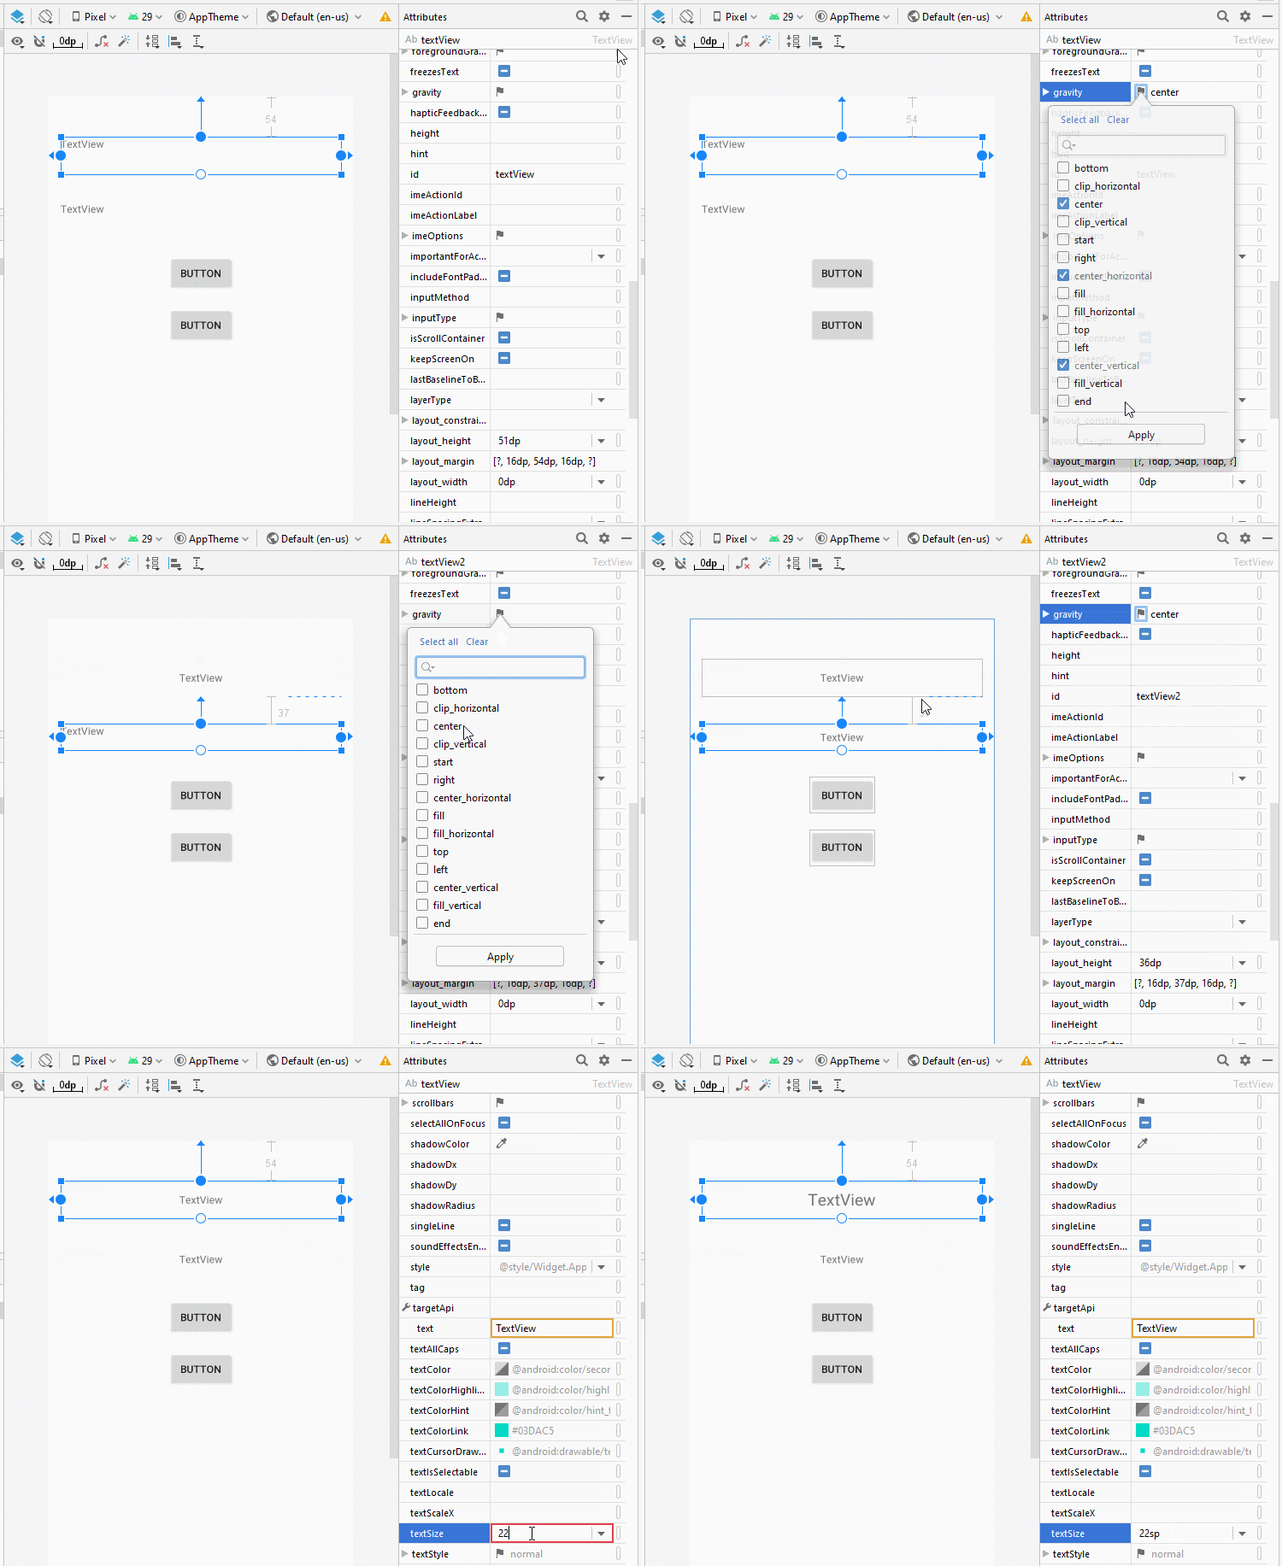
Set ID, Text for components on the interface:
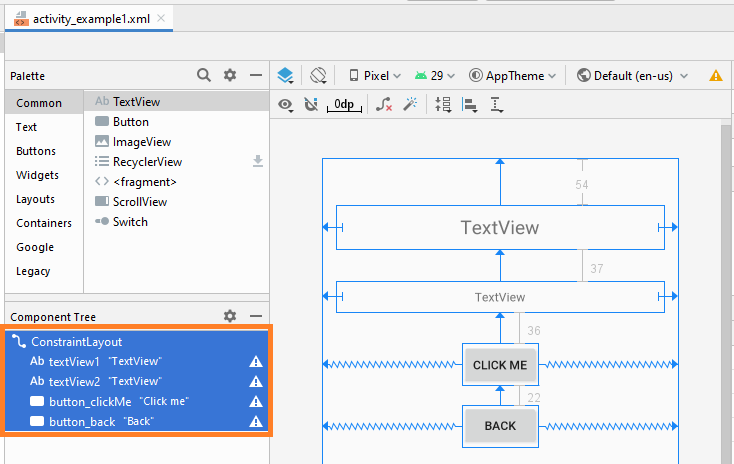
activity_example1.xml
<?xml version="1.0" encoding="utf-8"?>
<androidx.constraintlayout.widget.ConstraintLayout
    xmlns:android="http://schemas.android.com/apk/res/android"
    xmlns:app="http://schemas.android.com/apk/res-auto"
    xmlns:tools="http://schemas.android.com/tools"
    android:layout_width="match_parent"
    android:layout_height="match_parent"
    tools:context=".Example1Activity">

    <TextView
        android:id="@+id/textView1"
        android:layout_width="0dp"
        android:layout_height="51dp"
        android:layout_marginStart="16dp"
        android:layout_marginLeft="16dp"
        android:layout_marginTop="54dp"
        android:layout_marginEnd="16dp"
        android:layout_marginRight="16dp"
        android:gravity="center"
        android:text="TextView"
        android:textSize="22sp"
        app:layout_constraintEnd_toEndOf="parent"
        app:layout_constraintStart_toStartOf="parent"
        app:layout_constraintTop_toTopOf="parent" />

    <TextView
        android:id="@+id/textView2"
        android:layout_width="0dp"
        android:layout_height="36dp"
        android:layout_marginStart="16dp"
        android:layout_marginLeft="16dp"
        android:layout_marginTop="37dp"
        android:layout_marginEnd="16dp"
        android:layout_marginRight="16dp"
        android:gravity="center"
        android:text="TextView"
        app:layout_constraintEnd_toEndOf="parent"
        app:layout_constraintStart_toStartOf="parent"
        app:layout_constraintTop_toBottomOf="@+id/textView1" />

    <Button
        android:id="@+id/button_clickMe"
        android:layout_width="wrap_content"
        android:layout_height="wrap_content"
        android:layout_marginTop="36dp"
        android:text="Click me"
        app:layout_constraintEnd_toEndOf="parent"
        app:layout_constraintStart_toStartOf="parent"
        app:layout_constraintTop_toBottomOf="@+id/textView2" />

    <Button
        android:id="@+id/button_back"
        android:layout_width="wrap_content"
        android:layout_height="wrap_content"
        android:layout_marginTop="22dp"
        android:text="Back"
        app:layout_constraintEnd_toEndOf="parent"
        app:layout_constraintStart_toStartOf="parent"
        app:layout_constraintTop_toBottomOf="@+id/button_clickMe" />
</androidx.constraintlayout.widget.ConstraintLayout>
Example1Activity.java
package org.o7planning.androidbasic2;

import androidx.appcompat.app.AppCompatActivity;

import android.os.Bundle;
import android.content.Intent;
import android.view.View;
import android.widget.Button;
import android.widget.TextView;


public class Example1Activity extends AppCompatActivity {

    private Button buttonClickMe;
    private Button buttonBack;
    private TextView textView1;
    private TextView textView2;

    @Override
    protected void onCreate(Bundle savedInstanceState) {
        super.onCreate(savedInstanceState);
        setContentView(R.layout.activity_example1);

        // Find TextView by its ID
        this.textView1  = (TextView)this.findViewById(R.id.textView1);

        // Find TextView by its ID
        this.textView2 = (TextView)this.findViewById(R.id.textView2);

        this.buttonClickMe = (Button)this.findViewById(R.id.button_clickMe);

        this.buttonBack = (Button)this.findViewById(R.id.button_back);

        // Get the intent sent from MainActivity.
        Intent intent = getIntent();

        // Parameter in Intent, sent from MainActivity
        String value1 = intent.getStringExtra("text1");

        // Parameter in Intent, sent from MainActivity
        String value2 = intent.getStringExtra("text2");

        this.textView1.setText(value1);
        this.textView2.setText(value2);

        // When user click "Click me" button.
        this.buttonClickMe.setOnClickListener(new Button.OnClickListener() {

            @Override
            public void onClick(View v) {
                textView2.setText("You click button");
            }
        });

        // When user long click "Click me" button.
        this.buttonClickMe.setOnLongClickListener(new Button.OnLongClickListener() {


            // return true if the callback consumed the long click, false otherwise.
            @Override
            public boolean onLongClick(View v) {
                textView2.setText("You long click button");
                return true;
            }
        });

        // When user click "Back" button.
        this.buttonBack.setOnClickListener(new Button.OnClickListener() {

            @Override
            public void onClick(View v) {
                // Back to previous Activity.
                Example1Activity.this.finish();
            }
        });

    }
}
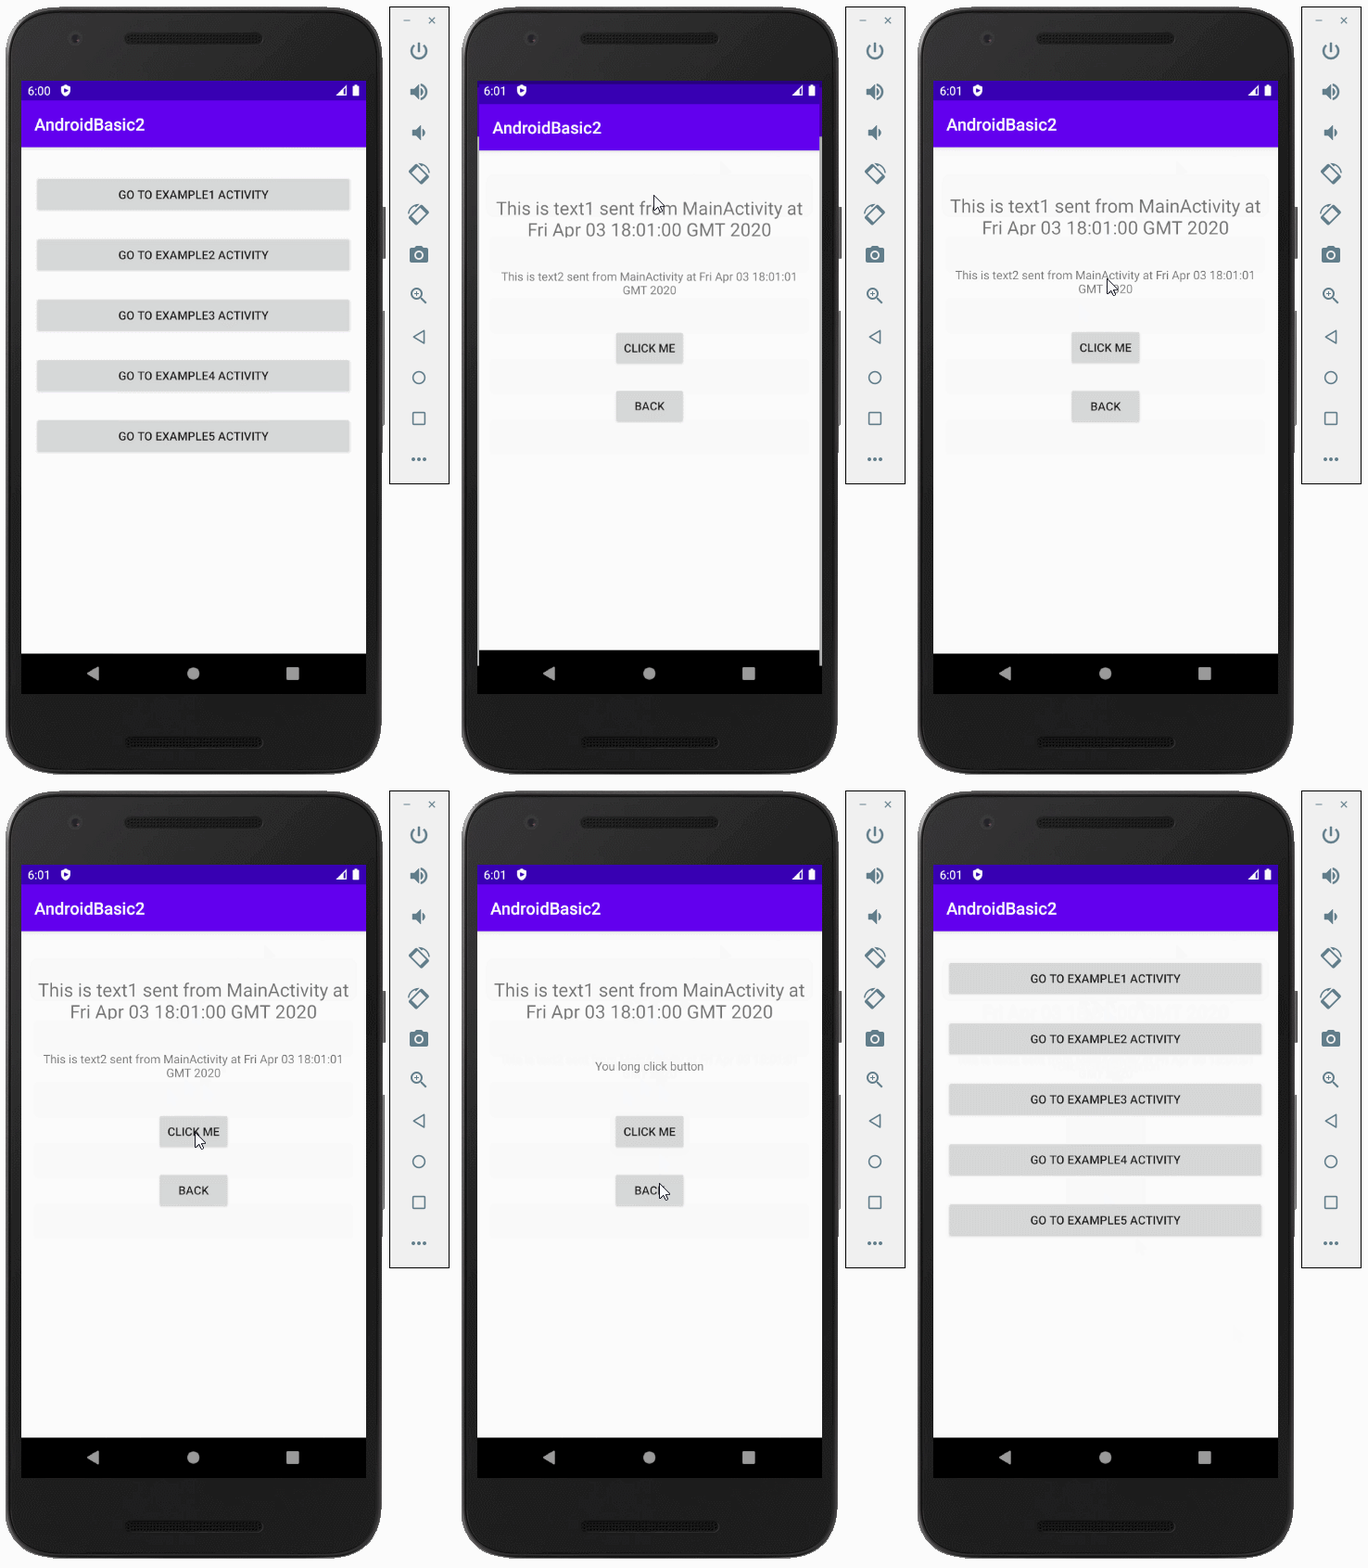
Running the example:
Android Programming Tutorials
- Configure Android Emulator in Android Studio
- Android ToggleButton Tutorial with Examples
- Create a simple File Finder Dialog in Android
- Android TimePickerDialog Tutorial with Examples
- Android DatePickerDialog Tutorial with Examples
- What is needed to get started with Android?
- Install Android Studio on Windows
- Install Intel® HAXM for Android Studio
- Android AsyncTask Tutorial with Examples
- Android AsyncTaskLoader Tutorial with Examples
- Android Tutorial for Beginners - Basic examples
- How to know the phone number of Android Emulator and change it
- Android TextInputLayout Tutorial with Examples
- Android CardView Tutorial with Examples
- Android ViewPager2 Tutorial with Examples
- Get Phone Number in Android using TelephonyManager
- Android Phone Call Tutorial with Examples
- Android Wifi Scanning Tutorial with Examples
- Android 2D Game Tutorial for Beginners
- Android DialogFragment Tutorial with Examples
- Android CharacterPickerDialog Tutorial with Examples
- Android Tutorial for Beginners - Hello Android
- Using Android Device File Explorer
- Enable USB Debugging on Android Device
- Android UI Layouts Tutorial with Examples
- Android SMS Tutorial with Examples
- Android SQLite Database Tutorial with Examples
- Google Maps Android API Tutorial with Examples
- Android Text to Speech Tutorial with Examples
- Android Space Tutorial with Examples
- Android Toast Tutorial with Examples
- Create a custom Android Toast
- Android SnackBar Tutorial with Examples
- Android TextView Tutorial with Examples
- Android TextClock Tutorial with Examples
- Android EditText Tutorial with Examples
- Android TextWatcher Tutorial with Examples
- Format Credit Card Number with Android TextWatcher
- Android Clipboard Tutorial with Examples
- Create a simple File Chooser in Android
- Android AutoCompleteTextView and MultiAutoCompleteTextView Tutorial with Examples
- Android ImageView Tutorial with Examples
- Android ImageSwitcher Tutorial with Examples
- Android ScrollView and HorizontalScrollView Tutorial with Examples
- Android WebView Tutorial with Examples
- Android SeekBar Tutorial with Examples
- Android Dialog Tutorial with Examples
- Android AlertDialog Tutorial with Examples
- Android RatingBar Tutorial with Examples
- Android ProgressBar Tutorial with Examples
- Android Spinner Tutorial with Examples
- Android Button Tutorial with Examples
- Android Switch Tutorial with Examples
- Android ImageButton Tutorial with Examples
- Android FloatingActionButton Tutorial with Examples
- Android CheckBox Tutorial with Examples
- Android RadioGroup and RadioButton Tutorial with Examples
- Android Chip and ChipGroup Tutorial with Examples
- Using image assets and icon assets of Android Studio
- Setting SD Card for Android Emulator
- ChipGroup and Chip Entry Example
- How to add external libraries to Android Project in Android Studio?
- How to disable the permissions already granted to the Android application?
- How to remove applications from Android Emulator?
- Android LinearLayout Tutorial with Examples
- Android TableLayout Tutorial with Examples
- Android FrameLayout Tutorial with Examples
- Android QuickContactBadge Tutorial with Examples
- Android StackView Tutorial with Examples
- Android Camera Tutorial with Examples
- Android MediaPlayer Tutorial with Examples
- Android VideoView Tutorial with Examples
- Playing Sound effects in Android with SoundPool
- Android Networking Tutorial with Examples
- Android JSON Parser Tutorial with Examples
- Android SharedPreferences Tutorial with Examples
- Android Internal Storage Tutorial with Examples
- Android External Storage Tutorial with Examples
- Android Intents Tutorial with Examples
- Example of an explicit Android Intent, calling another Intent
- Example of implicit Android Intent, open a URL, send an email
- Android Services Tutorial with Examples
- Android Notifications Tutorial with Examples
- Android DatePicker Tutorial with Examples
- Android TimePicker Tutorial with Examples
- Android Chronometer Tutorial with Examples
- Android OptionMenu Tutorial with Examples
- Android ContextMenu Tutorial with Examples
- Android PopupMenu Tutorial with Examples
- Android Fragments Tutorial with Examples
- Android ListView Tutorial with Examples
- Android ListView with Checkbox using ArrayAdapter
- Android GridView Tutorial with Examples
Show More