Android ListView Tutorial with Examples
1. What is ListView?
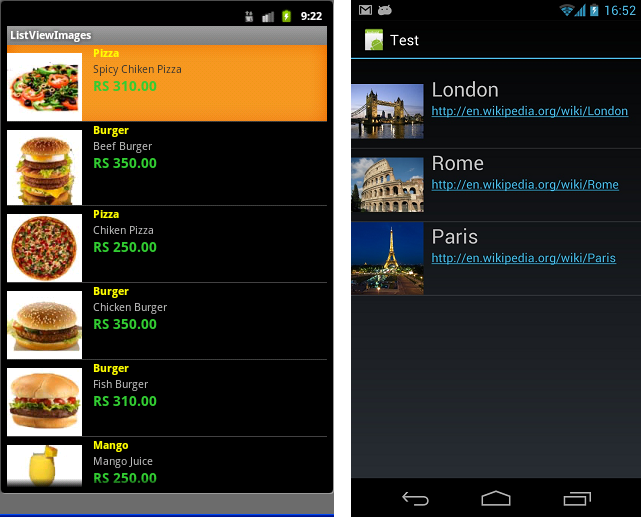
ListView is a view group which displays elements according to a list and can be scrolled vertically. Listview is an important view and is used widely in Android applications.
A simple example of ListView is your contact book, where you have a list of your contacts displayed in a ListView.
A simple example of ListView is your contact book, where you have a list of your contacts displayed in a ListView.
Addition to ListView, Android also provides you another similar view is ExpandableListView

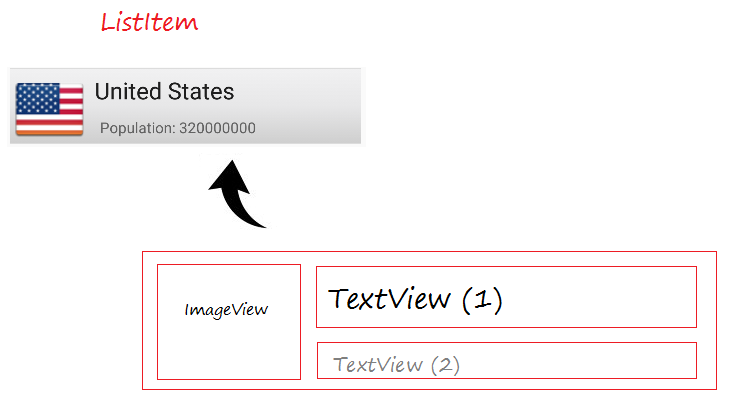
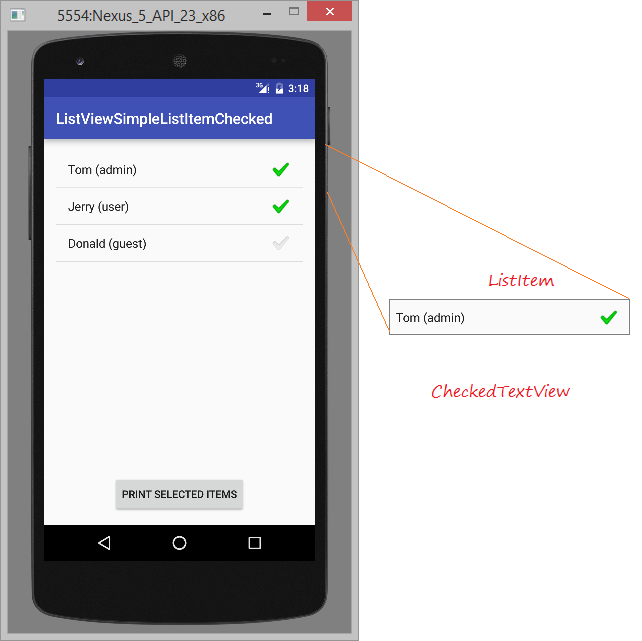
ListItem
An Android ListView is made from a group of ListItem(s). ListItems are individual rows in listview where the data will be displayed. Any data in listview is displayed only through listItem. Consider Listview as scrollable group of ListItems.
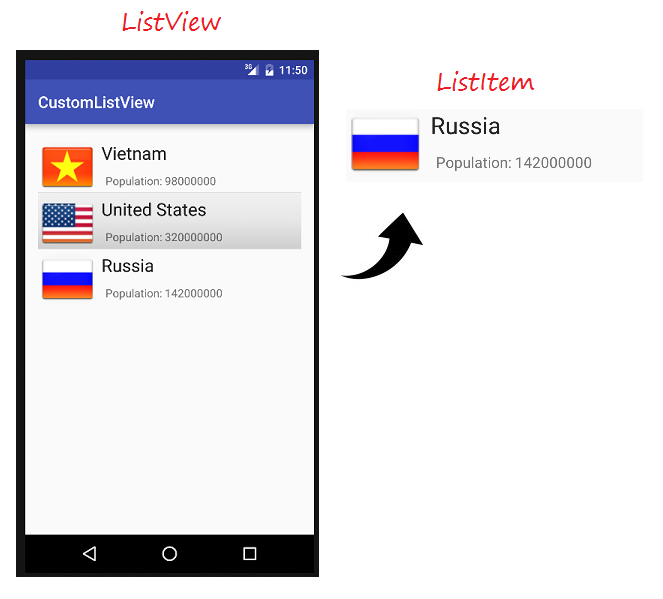
A Listitem is a piece of the interface which can be created by a number of View.
Android builds some several different ListItem forms, called the pre-defined layout, which will be mentioned in the examples of this document.
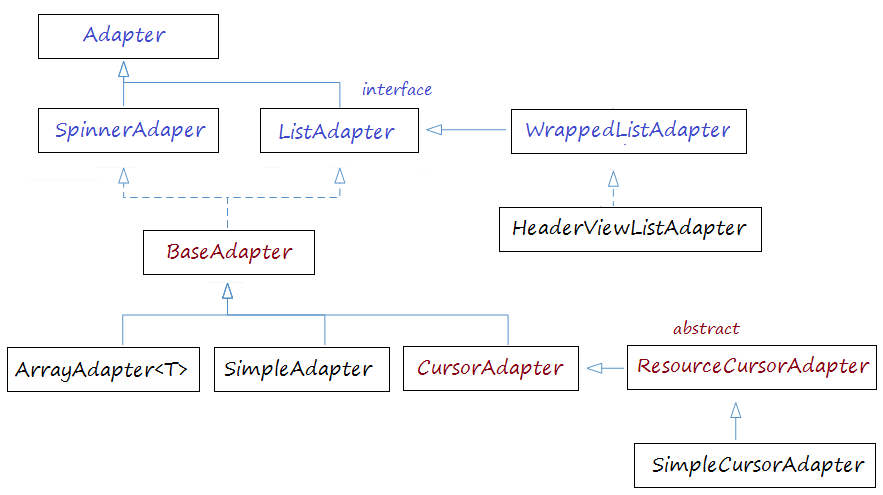
Adapter
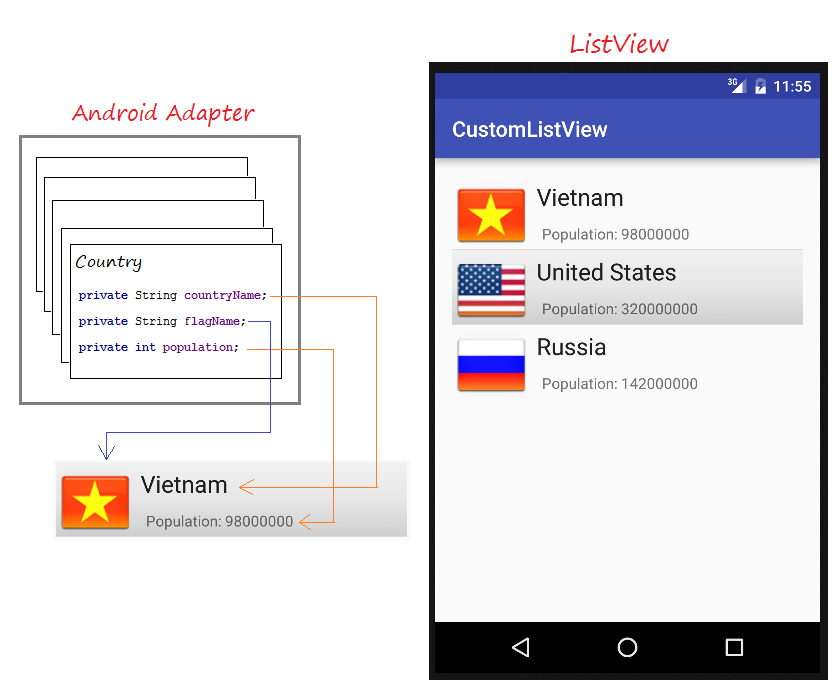
Android Adapter is a bridge between the View (e.g. ListView) and the underlying data for that view. An adapter manages the data and adapts the data to the individual rows (listItems) of the view.
You can bind the Adapter with Android listview via setAdapter method. Now, Let us see how adapter works with the help of the following image.
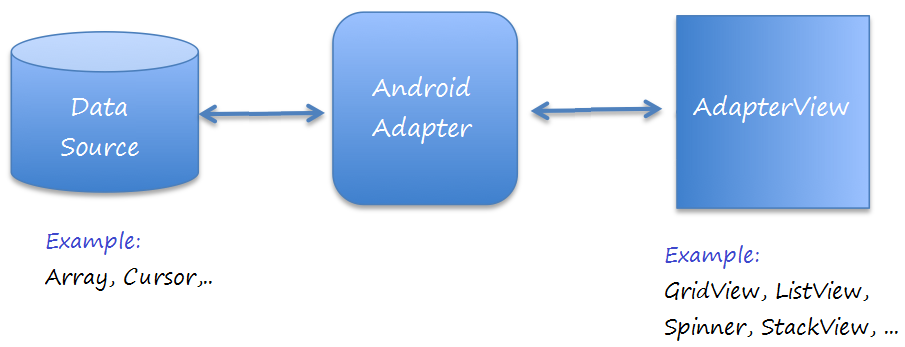
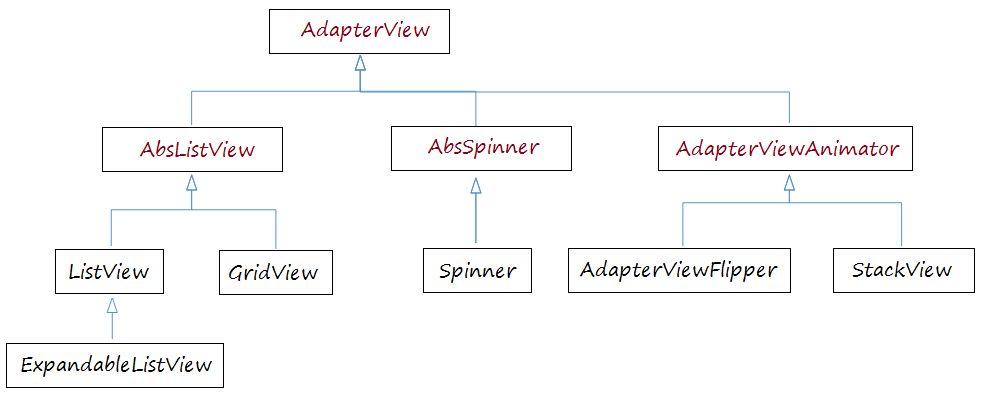
AdapterView
There are many View needed Android Adapter to manage displayed data, these Views is subclass of AdapterView, you can see it in the below illustration:
Android Adapter
ListView Selector
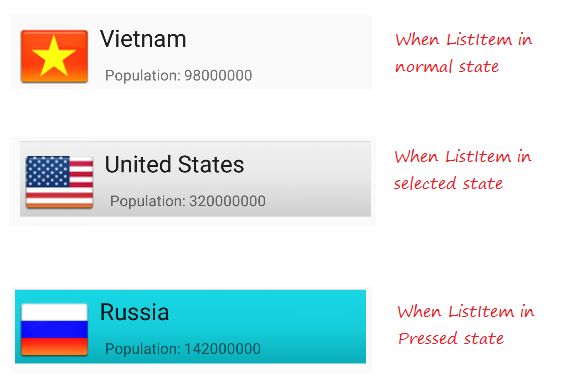
To make ListView become more beautiful, you need to customize the effects, such as changing the background color of ListItem when cursor moves over it, or change background color when it is selected. You can see an example for customizing ListView Selector in the end of this document.
2. Basic ListView using ArrayAdapter
ArrayAdapter
ArrayAdapter used to display the ListView with simple ListItem, ListItem can be made from only one TextView, CheckedTextView, EditText, ...
In case where you want to have a ListView with more complex ListItem, you can manually create a customized Adapter.
In case where you want to have a ListView with more complex ListItem, you can manually create a customized Adapter.

ListView and ArrayAdapter example
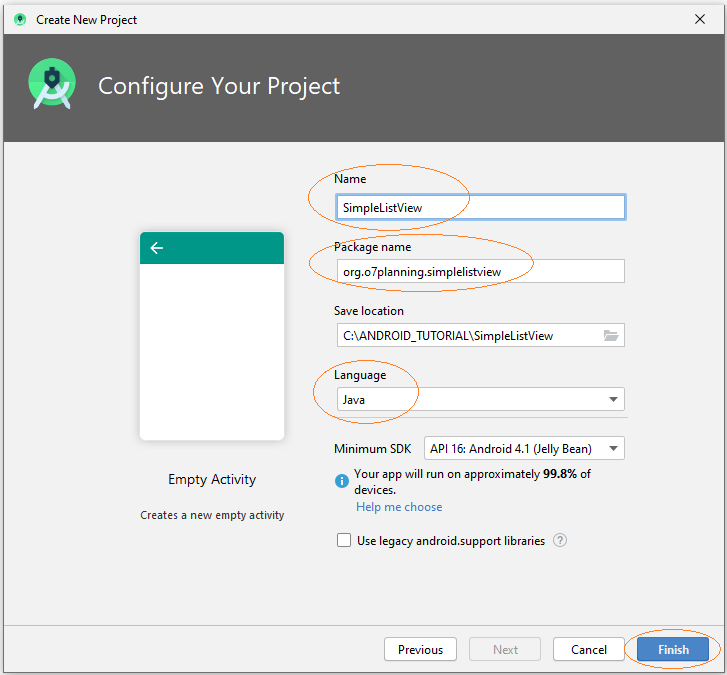
Create New Project named SimpleListView.

The interface of the application:
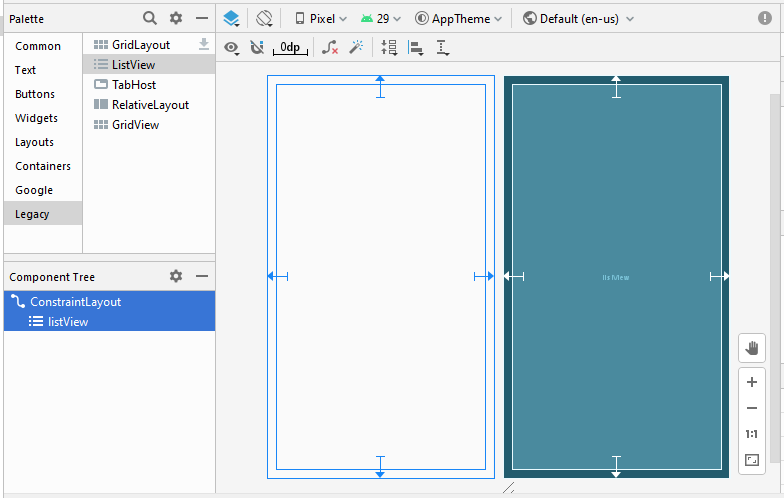
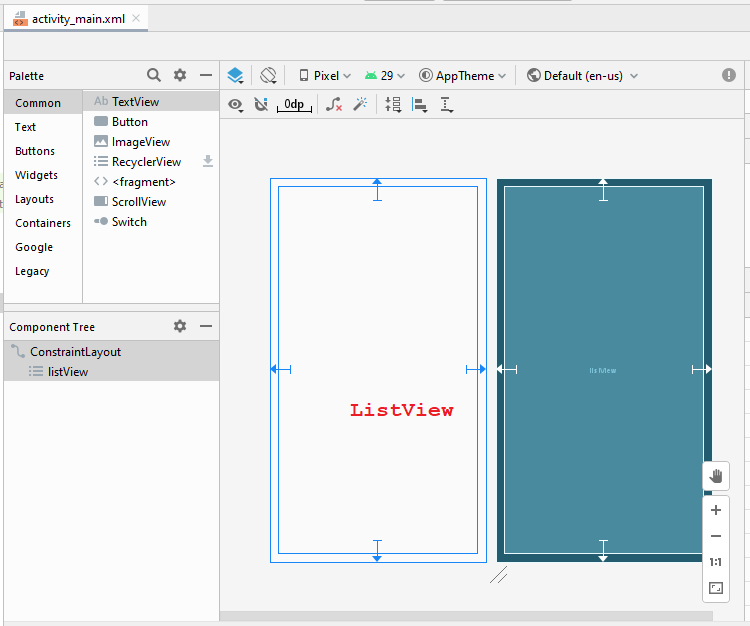
activity_main.xml
<?xml version="1.0" encoding="utf-8"?>
<androidx.constraintlayout.widget.ConstraintLayout
    xmlns:android="http://schemas.android.com/apk/res/android"
    xmlns:app="http://schemas.android.com/apk/res-auto"
    xmlns:tools="http://schemas.android.com/tools"
    android:layout_width="match_parent"
    android:layout_height="match_parent"
    tools:context=".MainActivity">

    <ListView
        android:id="@+id/listView"
        android:layout_width="0dp"
        android:layout_height="0dp"
        android:layout_marginStart="16dp"
        android:layout_marginLeft="16dp"
        android:layout_marginTop="16dp"
        android:layout_marginEnd="16dp"
        android:layout_marginRight="16dp"
        android:layout_marginBottom="16dp"
        app:layout_constraintBottom_toBottomOf="parent"
        app:layout_constraintEnd_toEndOf="parent"
        app:layout_constraintStart_toStartOf="parent"
        app:layout_constraintTop_toTopOf="parent" />
</androidx.constraintlayout.widget.ConstraintLayout>
UserAccount.java
package org.o7planning.simplelistview;

import java.io.Serializable;

public class UserAccount implements Serializable {

    private String userName;
    private String userType;

    private boolean active;

    public UserAccount(String userName, String userType)  {
        this.userName= userName;
        this.userType = userType;
        this.active= true;
    }

    public UserAccount(String userName, String userType, boolean active)  {
        this.userName= userName;
        this.userType = userType;
        this.active= active;
    }

    public String getUserType() {
        return userType;
    }

    public void setUserType(String userType) {
        this.userType = userType;
    }

    public String getUserName() {
        return userName;
    }

    public void setUserName(String userName) {
        this.userName = userName;
    }

    public boolean isActive() {
        return active;
    }

    public void setActive(boolean active) {
        this.active = active;
    }

    @Override
    public String toString() {
        return this.userName +" ("+ this.userType+")";
    }

}
MainActivity.java
package org.o7planning.simplelistview;
import androidx.appcompat.app.AppCompatActivity;
import android.os.Bundle;
import android.widget.ArrayAdapter;
import android.widget.ListView;
public class MainActivity extends AppCompatActivity {
@Override
protected void onCreate(Bundle savedInstanceState) {
super.onCreate(savedInstanceState);
setContentView(R.layout.activity_main);
ListView listView = (ListView)findViewById(R.id.listView);
//
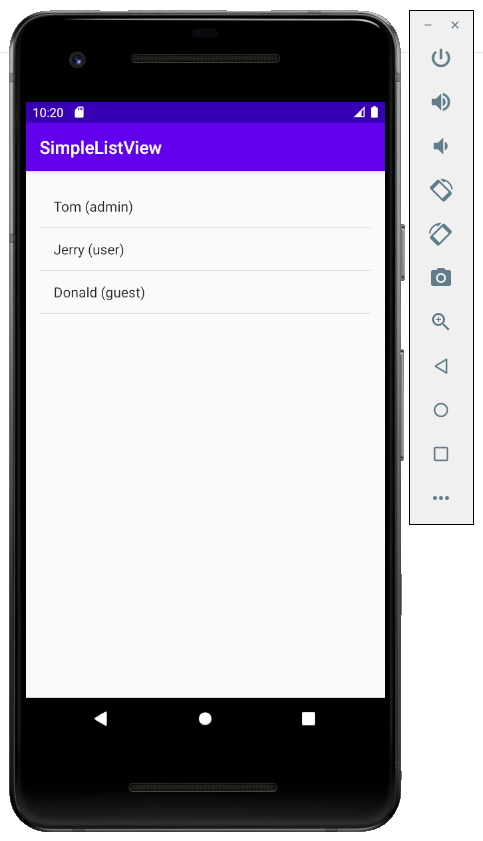
UserAccount tom = new UserAccount("Tom","admin");
UserAccount jerry = new UserAccount("Jerry","user");
UserAccount donald = new UserAccount("Donald","guest", false);
UserAccount[] users = new UserAccount[]{tom,jerry, donald};
// android.R.layout.simple_list_item_1 is a constant predefined layout of Android.
// used to create a ListView with simple ListItem (Only one TextView).
ArrayAdapter<UserAccount> arrayAdapter
= new ArrayAdapter<UserAccount>(this, android.R.layout.simple_list_item_1 , users);
listView.setAdapter(arrayAdapter);
}
}Running the example:
The layouts is available to work with ArrayAdapter
Android built some Layout (for Grid Item, List Item, ..) can work with ArrayAdapter.
android.R.layout.simple_list_item_1
- This is a simple layout of ListItem, created by single TextView (You can see examples above).
android.R.layout.simple_list_item_checked & android.R.layout.simple_list_item_multiple_choice
- Two Layout above are the simple layouts to create a ListView with ListItem created by single checkbox.
You can see this example here:
3. Customizing ListView using BaseAdapter
You can customize a ListView. Your Adapter should extend from BaseAdapter class.
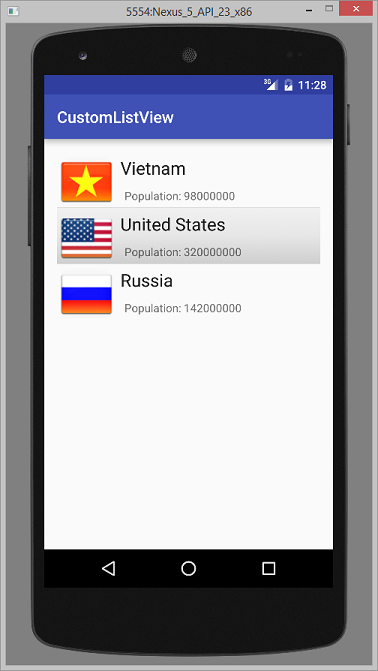
Custom ListView example
Create new project named CustomListView.

Preview application:
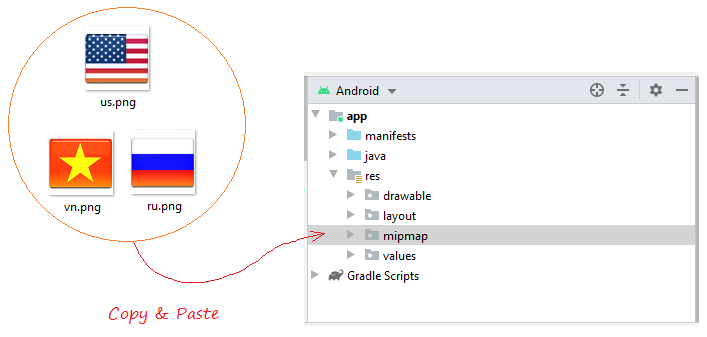
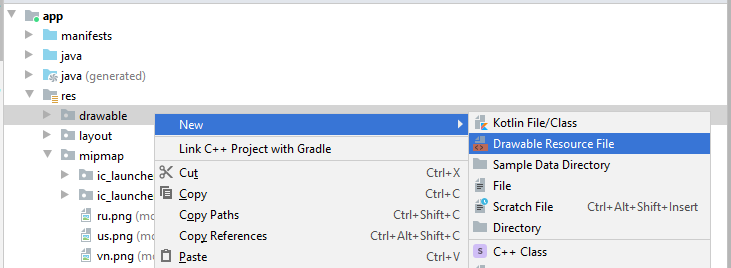
Firstly you need to prepare some images:
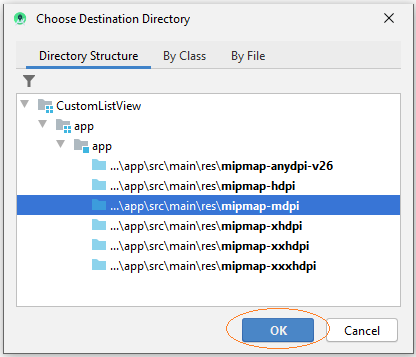
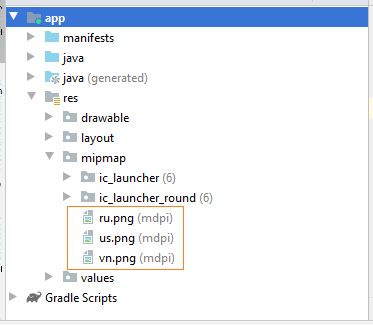
Copy and paste the image file into the mipmap folder:
 |  |  |
vn.png | us.png | ru.png |
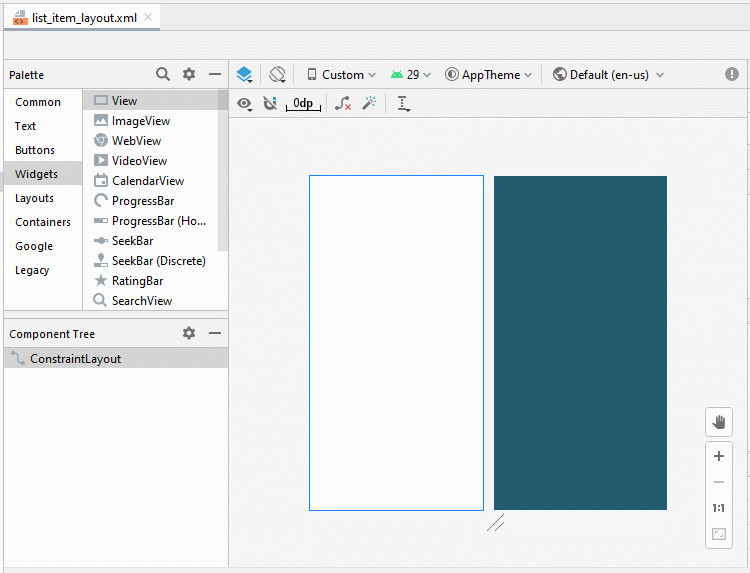
You need to create a layout for listitem. In Android Studio right-click the res/layout and selecte:
- New/Layout resource file
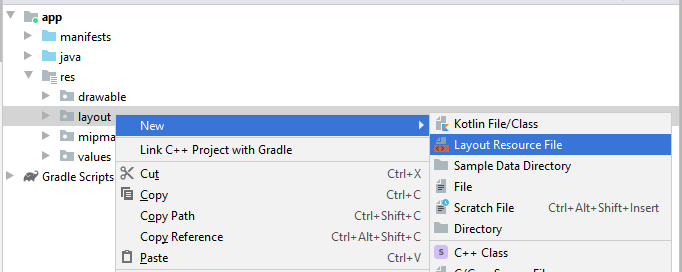
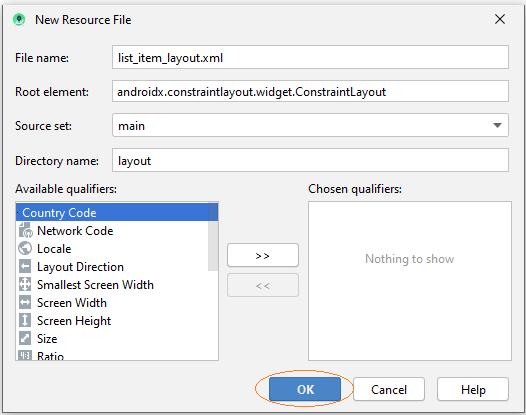
Enter:
- File name: list_item_layout.xml
- Root element: androidx.constraintlayout.widget.ConstraintLayout
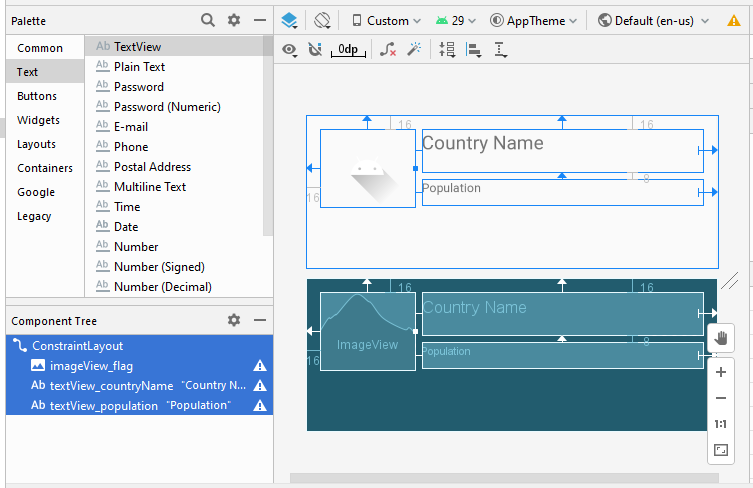
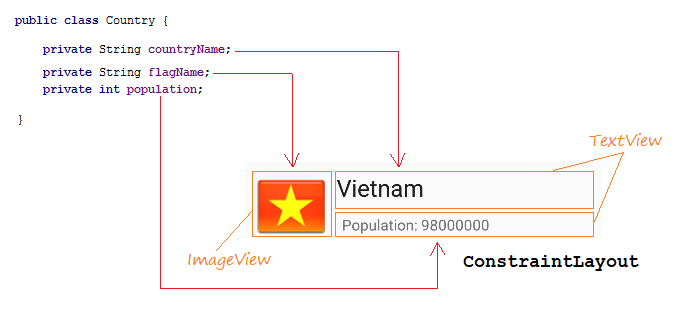
Interface Design for List-Item.

Interface design:
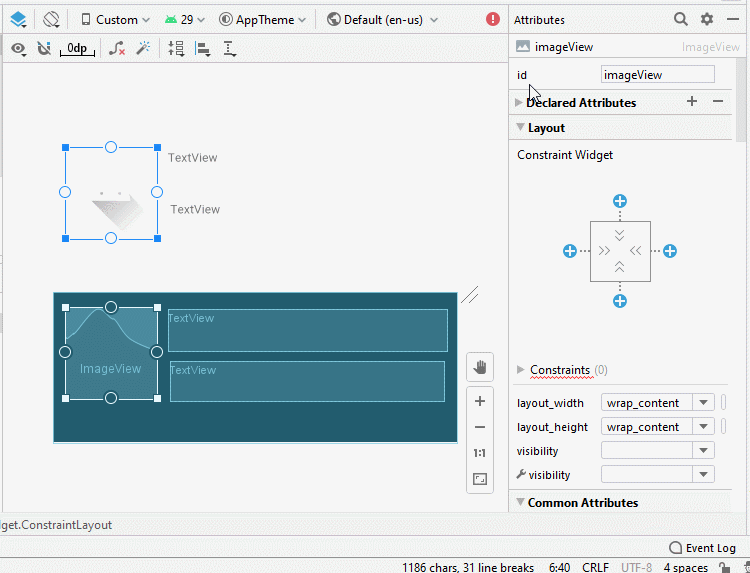
Set ID, Text for components on the interface.
ImageView
TextView 1:
TextView 2:
- ID: imageView_flag
TextView 1:
- ID: textView_countryName
- Text: Country Name
TextView 2:
- ID: textView_population
- Text: Population ....
list_item_layout.xml
<?xml version="1.0" encoding="utf-8"?>
<androidx.constraintlayout.widget.ConstraintLayout
    xmlns:android="http://schemas.android.com/apk/res/android"
    xmlns:app="http://schemas.android.com/apk/res-auto"
    xmlns:tools="http://schemas.android.com/tools"
    android:layout_width="match_parent"
    android:layout_height="match_parent">

    <ImageView
        android:id="@+id/imageView_flag"
        android:layout_width="110sp"
        android:layout_height="90sp"
        android:layout_marginStart="16dp"
        android:layout_marginLeft="16dp"
        android:layout_marginTop="16dp"
        app:layout_constraintStart_toStartOf="parent"
        app:layout_constraintTop_toTopOf="parent"
        app:srcCompat="@drawable/ic_launcher_foreground"
        tools:ignore="VectorDrawableCompat" />

    <TextView
        android:id="@+id/textView_countryName"
        android:layout_width="0dp"
        android:layout_height="50dp"
        android:layout_marginStart="8dp"
        android:layout_marginLeft="8dp"
        android:layout_marginTop="16dp"
        android:layout_marginEnd="16dp"
        android:layout_marginRight="16dp"
        android:text="Country Name"
        android:textSize="22sp"
        app:layout_constraintEnd_toEndOf="parent"
        app:layout_constraintStart_toEndOf="@+id/imageView_flag"
        app:layout_constraintTop_toTopOf="parent" />

    <TextView
        android:id="@+id/textView_population"
        android:layout_width="0dp"
        android:layout_height="30dp"
        android:layout_marginStart="8dp"
        android:layout_marginLeft="8dp"
        android:layout_marginTop="8dp"
        android:layout_marginEnd="16dp"
        android:layout_marginRight="16dp"
        android:text="Population"
        app:layout_constraintEnd_toEndOf="parent"
        app:layout_constraintStart_toEndOf="@+id/imageView_flag"
        app:layout_constraintTop_toBottomOf="@+id/textView_countryName" />
</androidx.constraintlayout.widget.ConstraintLayout>
Country.java
package org.o7planning.customlistview;

public class Country {

    private String countryName;

    // Image name (Without extension)
    private String flagName;
    private int population;

    public Country(String countryName, String flagName, int population) {
        this.countryName= countryName;
        this.flagName= flagName;
        this.population= population;
    }

    public int getPopulation() {
        return population;
    }

    public void setPopulation(int population) {
        this.population = population;
    }

    public String getCountryName() {
        return countryName;
    }

    public void setCountryName(String countryName) {
        this.countryName = countryName;
    }

    public String getFlagName() {
        return flagName;
    }

    public void setFlagName(String flagName) {
        this.flagName = flagName;
    }

    @Override
    public String toString()  {
        return this.countryName+" (Population: "+ this.population+")";
    }
}- activity_main.xml
activity_main.xml
<?xml version="1.0" encoding="utf-8"?>
<androidx.constraintlayout.widget.ConstraintLayout
    xmlns:android="http://schemas.android.com/apk/res/android"
    xmlns:app="http://schemas.android.com/apk/res-auto"
    xmlns:tools="http://schemas.android.com/tools"
    android:layout_width="match_parent"
    android:layout_height="match_parent"
    tools:context=".MainActivity">

    <ListView
        android:id="@+id/listView"
        android:layout_width="0dp"
        android:layout_height="0dp"
        android:layout_marginStart="16dp"
        android:layout_marginLeft="16dp"
        android:layout_marginTop="16dp"
        android:layout_marginEnd="16dp"
        android:layout_marginRight="16dp"
        android:layout_marginBottom="16dp"
        app:layout_constraintBottom_toBottomOf="parent"
        app:layout_constraintEnd_toEndOf="parent"
        app:layout_constraintStart_toStartOf="parent"
        app:layout_constraintTop_toTopOf="parent" />
</androidx.constraintlayout.widget.ConstraintLayout>
CustomListAdapter is a class extending from BaseAdapter, used to display data on the List-Item.
CustomListAdapter.java
package org.o7planning.customlistview;

import android.content.Context;
import android.util.Log;
import android.view.LayoutInflater;
import android.view.View;
import android.view.ViewGroup;
import android.widget.BaseAdapter;
import android.widget.ImageView;
import android.widget.TextView;
import java.util.List;

public class CustomListAdapter  extends BaseAdapter {

    private List<Country> listData;
    private LayoutInflater layoutInflater;
    private Context context;

    public CustomListAdapter(Context aContext,  List<Country> listData) {
        this.context = aContext;
        this.listData = listData;
        layoutInflater = LayoutInflater.from(aContext);
    }

    @Override
    public int getCount() {
        return listData.size();
    }

    @Override
    public Object getItem(int position) {
        return listData.get(position);
    }

    @Override
    public long getItemId(int position) {
        return position;
    }

    public View getView(int position, View convertView, ViewGroup parent) {
        ViewHolder holder;
        if (convertView == null) {
            convertView = layoutInflater.inflate(R.layout.list_item_layout, null);
            holder = new ViewHolder();
            holder.flagView = (ImageView) convertView.findViewById(R.id.imageView_flag);
            holder.countryNameView = (TextView) convertView.findViewById(R.id.textView_countryName);
            holder.populationView = (TextView) convertView.findViewById(R.id.textView_population);
            convertView.setTag(holder);
        } else {
            holder = (ViewHolder) convertView.getTag();
        }

        Country country = this.listData.get(position);
        holder.countryNameView.setText(country.getCountryName());
        holder.populationView.setText("Population: " + country.getPopulation());

        int imageId = this.getMipmapResIdByName(country.getFlagName());

        holder.flagView.setImageResource(imageId);

        return convertView;
    }

    // Find Image ID corresponding to the name of the image (in the directory mipmap).
    public int getMipmapResIdByName(String resName)  {
        String pkgName = context.getPackageName();
        // Return 0 if not found.
        int resID = context.getResources().getIdentifier(resName , "mipmap", pkgName);
        Log.i("CustomListView", "Res Name: "+ resName+"==> Res ID = "+ resID);
        return resID;
    }

    static class ViewHolder {
        ImageView flagView;
        TextView countryNameView;
        TextView populationView;
    }

}
ActivityMain.java
package org.o7planning.customlistview;

import androidx.appcompat.app.AppCompatActivity;

import android.os.Bundle;
import android.view.View;
import android.widget.AdapterView;
import android.widget.ListView;
import android.widget.Toast;
import java.util.ArrayList;
import java.util.List;

public class MainActivity extends AppCompatActivity {

    @Override
    protected void onCreate(Bundle savedInstanceState) {
        super.onCreate(savedInstanceState);
        setContentView(R.layout.activity_main);


        List<Country> image_details = getListData();
        final ListView listView = (ListView) findViewById(R.id.listView);
        listView.setAdapter(new CustomListAdapter(this, image_details));

        // When the user clicks on the ListItem
        listView.setOnItemClickListener(new AdapterView.OnItemClickListener() {

            @Override
            public void onItemClick(AdapterView<?> a, View v, int position, long id) {
                Object o = listView.getItemAtPosition(position);
                Country country = (Country) o;
                Toast.makeText(MainActivity.this, "Selected :" + " " + country, Toast.LENGTH_LONG).show();
            }
        });
    }

    private  List<Country> getListData() {
        List<Country> list = new ArrayList<Country>();
        Country vietnam = new Country("Vietnam", "vn", 98000000);
        Country usa = new Country("United States", "us", 320000000);
        Country russia = new Country("Russia", "ru", 142000000);


        list.add(vietnam);
        list.add(usa);
        list.add(russia);

        return list;
    }

}
Running the example:

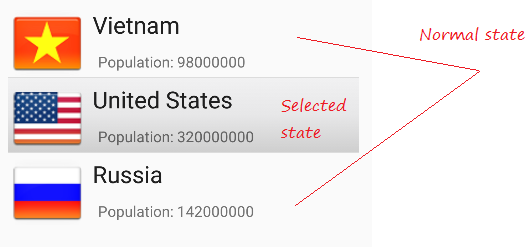
Custom Selector example
To make ListView become more beautiful, you need to customize the effects, such as changing the background color of ListItem when cursor moves over it, or change background color when it is selected. We continue with the example above.
Create the configuration files:
- File name: item_state_normal.xml
- Directory: drawable

item_state_normal.xml
<?xml version="1.0" encoding="utf-8"?>

<shape xmlns:android="http://schemas.android.com/apk/res/android"
  android:shape="rectangle">

  <gradient
      android:startColor="#f1f1f2"
      android:centerColor="#e7e7e8"
      android:endColor="#cfcfcf"
      android:angle="270" />

</shape>
When the list item in a normal state, styles which is set up in item_state_normal.xml will be applied to the ListItem.
Similarly create three different files:
- item_state_pressed.xml
- item_state_selected.xml
- list_selector.xml
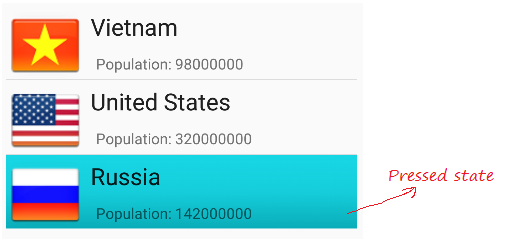
When List Item is pressed, the styles set up in item_state_pressed.xml will be applied to the ListItem
item_state_pressed.xml
<?xml version="1.0" encoding="utf-8"?>

<shape xmlns:android="http://schemas.android.com/apk/res/android"
  android:shape="rectangle">

  <gradient
      android:startColor="#18d7e5"
      android:centerColor="#16cedb"
      android:endColor="#09adb9"
      android:angle="270" />

</shape>
When List Item is selected, the styles set up in item_state_selected.xml will be applied to the ListItem
item_state_selected.xml
<?xml version="1.0" encoding="utf-8"?>

<shape xmlns:android="http://schemas.android.com/apk/res/android"
  android:shape="rectangle">

  <gradient
      android:startColor="#18d7e5"
      android:centerColor="#16cedb"
      android:endColor="#09adb9"
      android:angle="270" />

</shape>
Mapping the specific status of the ListItem with xml files.
list_selector.xml
<?xml version="1.0" encoding="utf-8"?>

<selector xmlns:android="http://schemas.android.com/apk/res/android">

       <item
           android:state_selected="false"
           android:state_pressed="false"
           android:drawable="@drawable/item_state_normal" />

       <item android:state_pressed="true"
           android:drawable="@drawable/item_state_pressed" />

       <item android:state_selected="true"
           android:state_pressed="false"
           android:drawable="@drawable/item_state_selected" />


</selector>
Set ListSelector for ListView:
<ListView
     ...
     android:listSelector="@drawable/list_selector"/>
activity_main.xml
<?xml version="1.0" encoding="utf-8"?>
<androidx.constraintlayout.widget.ConstraintLayout
    xmlns:android="http://schemas.android.com/apk/res/android"
    xmlns:app="http://schemas.android.com/apk/res-auto"
    xmlns:tools="http://schemas.android.com/tools"
    android:layout_width="match_parent"
    android:layout_height="match_parent"
    tools:context=".MainActivity">

    <ListView
        android:id="@+id/listView"
        android:layout_width="0dp"
        android:layout_height="0dp"
        android:layout_marginStart="16dp"
        android:layout_marginLeft="16dp"
        android:layout_marginTop="16dp"
        android:layout_marginEnd="16dp"
        android:layout_marginRight="16dp"
        android:layout_marginBottom="16dp"
        app:layout_constraintBottom_toBottomOf="parent"
        app:layout_constraintEnd_toEndOf="parent"
        app:layout_constraintStart_toStartOf="parent"
        app:layout_constraintTop_toTopOf="parent"
        android:listSelector="@drawable/list_selector"/>

</androidx.constraintlayout.widget.ConstraintLayout>
Rerun you application:

Android Programming Tutorials
- Configure Android Emulator in Android Studio
- Android ToggleButton Tutorial with Examples
- Create a simple File Finder Dialog in Android
- Android TimePickerDialog Tutorial with Examples
- Android DatePickerDialog Tutorial with Examples
- What is needed to get started with Android?
- Install Android Studio on Windows
- Install Intel® HAXM for Android Studio
- Android AsyncTask Tutorial with Examples
- Android AsyncTaskLoader Tutorial with Examples
- Android Tutorial for Beginners - Basic examples
- How to know the phone number of Android Emulator and change it
- Android TextInputLayout Tutorial with Examples
- Android CardView Tutorial with Examples
- Android ViewPager2 Tutorial with Examples
- Get Phone Number in Android using TelephonyManager
- Android Phone Call Tutorial with Examples
- Android Wifi Scanning Tutorial with Examples
- Android 2D Game Tutorial for Beginners
- Android DialogFragment Tutorial with Examples
- Android CharacterPickerDialog Tutorial with Examples
- Android Tutorial for Beginners - Hello Android
- Using Android Device File Explorer
- Enable USB Debugging on Android Device
- Android UI Layouts Tutorial with Examples
- Android SMS Tutorial with Examples
- Android SQLite Database Tutorial with Examples
- Google Maps Android API Tutorial with Examples
- Android Text to Speech Tutorial with Examples
- Android Space Tutorial with Examples
- Android Toast Tutorial with Examples
- Create a custom Android Toast
- Android SnackBar Tutorial with Examples
- Android TextView Tutorial with Examples
- Android TextClock Tutorial with Examples
- Android EditText Tutorial with Examples
- Android TextWatcher Tutorial with Examples
- Format Credit Card Number with Android TextWatcher
- Android Clipboard Tutorial with Examples
- Create a simple File Chooser in Android
- Android AutoCompleteTextView and MultiAutoCompleteTextView Tutorial with Examples
- Android ImageView Tutorial with Examples
- Android ImageSwitcher Tutorial with Examples
- Android ScrollView and HorizontalScrollView Tutorial with Examples
- Android WebView Tutorial with Examples
- Android SeekBar Tutorial with Examples
- Android Dialog Tutorial with Examples
- Android AlertDialog Tutorial with Examples
- Android RatingBar Tutorial with Examples
- Android ProgressBar Tutorial with Examples
- Android Spinner Tutorial with Examples
- Android Button Tutorial with Examples
- Android Switch Tutorial with Examples
- Android ImageButton Tutorial with Examples
- Android FloatingActionButton Tutorial with Examples
- Android CheckBox Tutorial with Examples
- Android RadioGroup and RadioButton Tutorial with Examples
- Android Chip and ChipGroup Tutorial with Examples
- Using image assets and icon assets of Android Studio
- Setting SD Card for Android Emulator
- ChipGroup and Chip Entry Example
- How to add external libraries to Android Project in Android Studio?
- How to disable the permissions already granted to the Android application?
- How to remove applications from Android Emulator?
- Android LinearLayout Tutorial with Examples
- Android TableLayout Tutorial with Examples
- Android FrameLayout Tutorial with Examples
- Android QuickContactBadge Tutorial with Examples
- Android StackView Tutorial with Examples
- Android Camera Tutorial with Examples
- Android MediaPlayer Tutorial with Examples
- Android VideoView Tutorial with Examples
- Playing Sound effects in Android with SoundPool
- Android Networking Tutorial with Examples
- Android JSON Parser Tutorial with Examples
- Android SharedPreferences Tutorial with Examples
- Android Internal Storage Tutorial with Examples
- Android External Storage Tutorial with Examples
- Android Intents Tutorial with Examples
- Example of an explicit Android Intent, calling another Intent
- Example of implicit Android Intent, open a URL, send an email
- Android Services Tutorial with Examples
- Android Notifications Tutorial with Examples
- Android DatePicker Tutorial with Examples
- Android TimePicker Tutorial with Examples
- Android Chronometer Tutorial with Examples
- Android OptionMenu Tutorial with Examples
- Android ContextMenu Tutorial with Examples
- Android PopupMenu Tutorial with Examples
- Android Fragments Tutorial with Examples
- Android ListView Tutorial with Examples
- Android ListView with Checkbox using ArrayAdapter
- Android GridView Tutorial with Examples
Show More