Android Tutorial for Beginners - Hello Android
1. Introduction
This document is guidelines on programming Android for beginners. It uses Android Studio tool. Ensure that you have installed Android Studio, if you have not already installed you can view the instructions at:
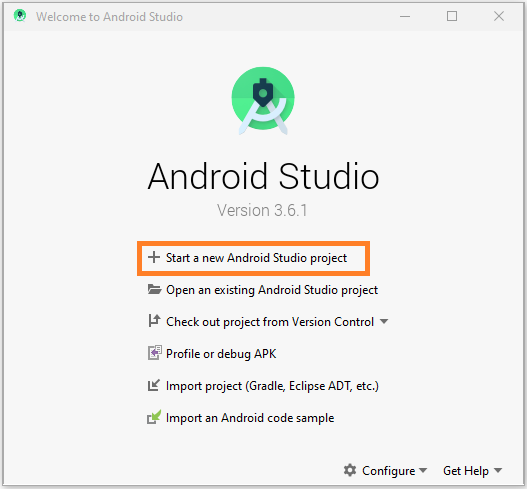
2. Running Android Studio
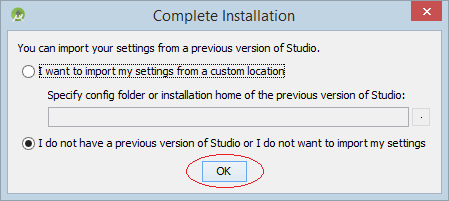
In the first run, Android Studio ask you:
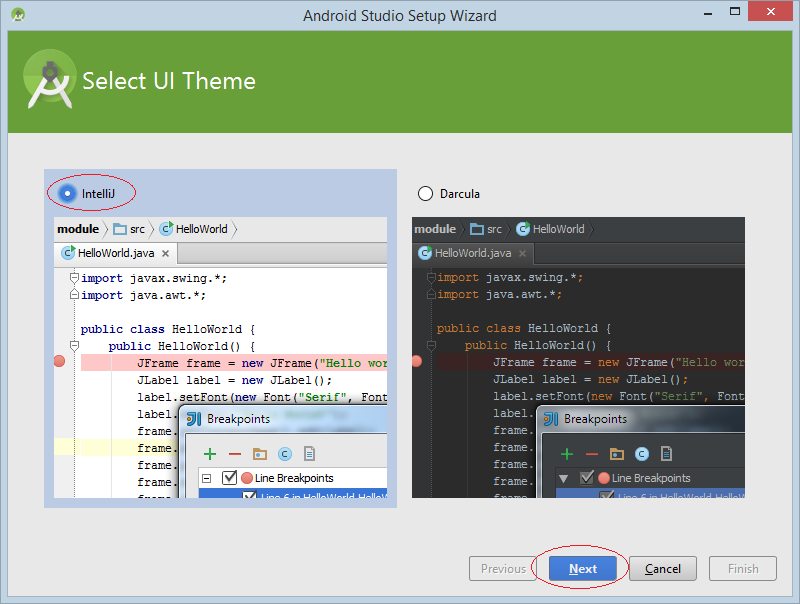
Selecting a theme that you like:
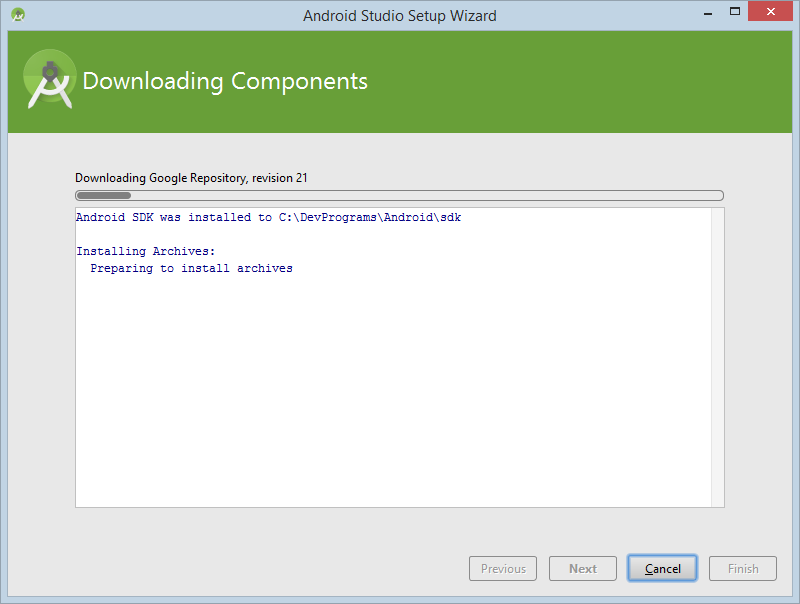
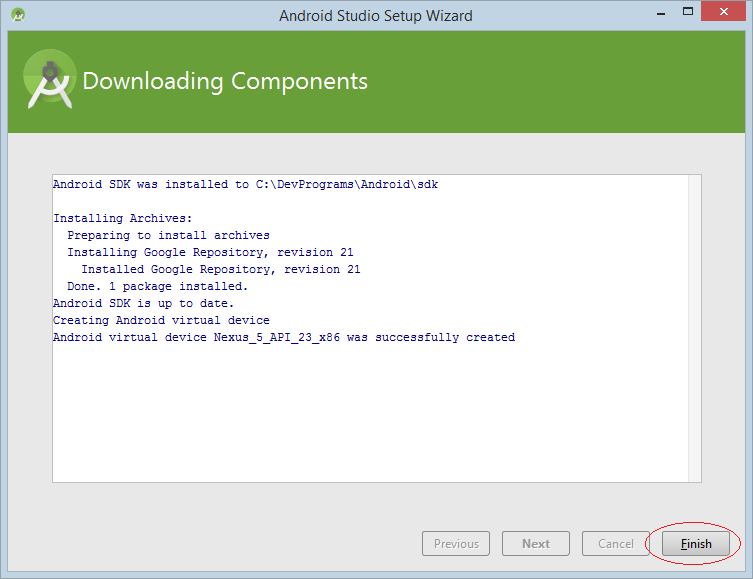
At the first run, Android needs to download some components. You need to wait until the download and install process completed.
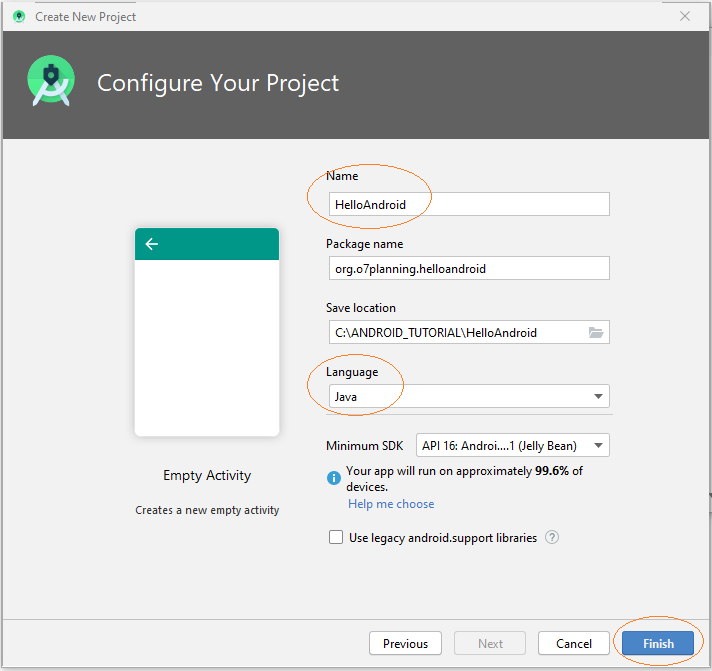
3. Creating your first project
Firstly you need to create and run successfully a first project.
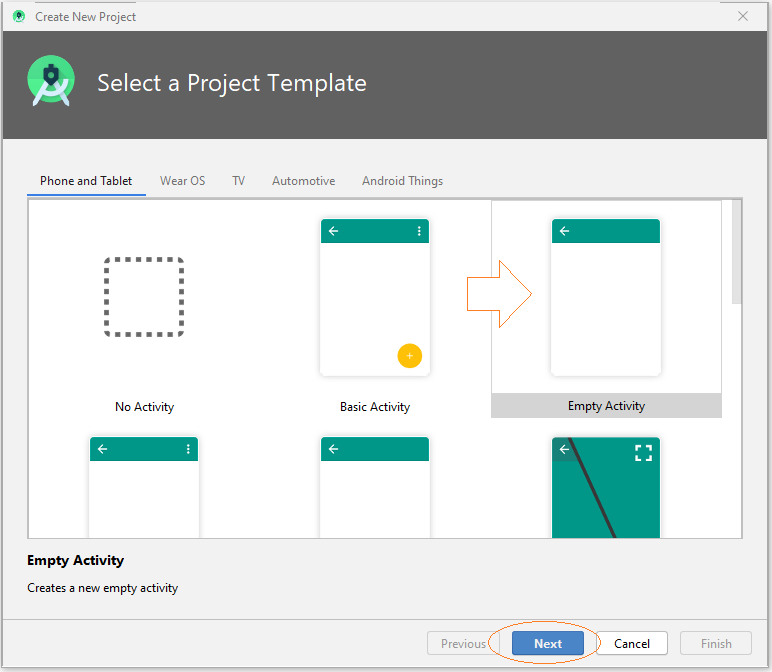
Enter:
- Name: HelloAndroid
- Package name: org.o7planning.helloandroid
Project has been created.

4. Running Application
Make sure you have installed a virtual device (An emulator phone), which is necessary to deploy your application.
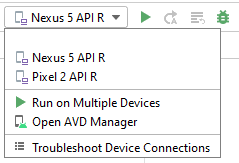
If you do not see any virtual devices on the drop-down list, you need to create one, see the instructions below:
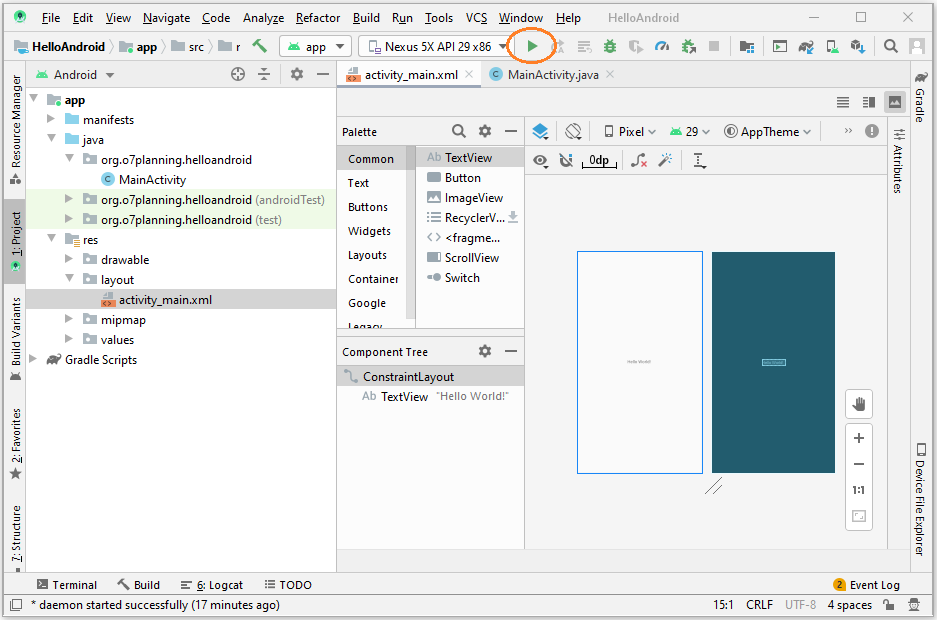
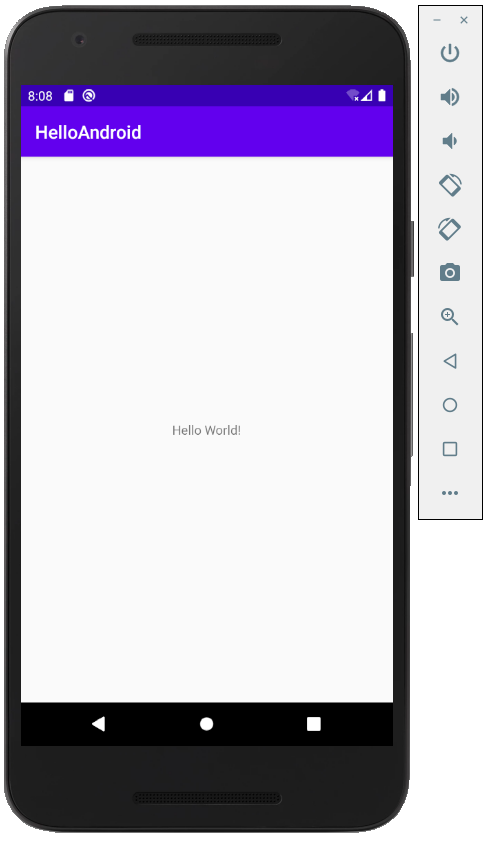
Screen simulation has shown the phone, and write out the words "Hello World".
If running error (or simulated device does not open), or you see the message below, that means you have not installed Intel Emulator Accelerator, you need to install it.
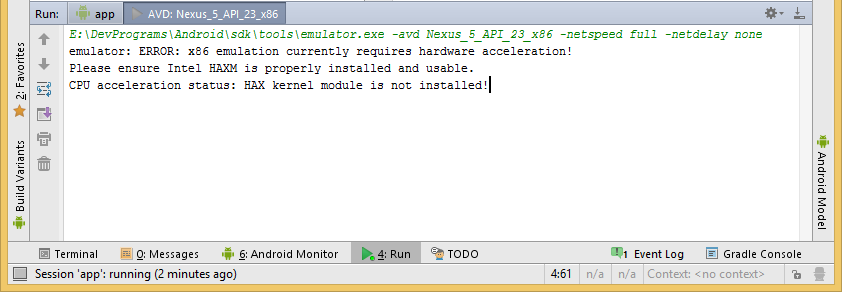
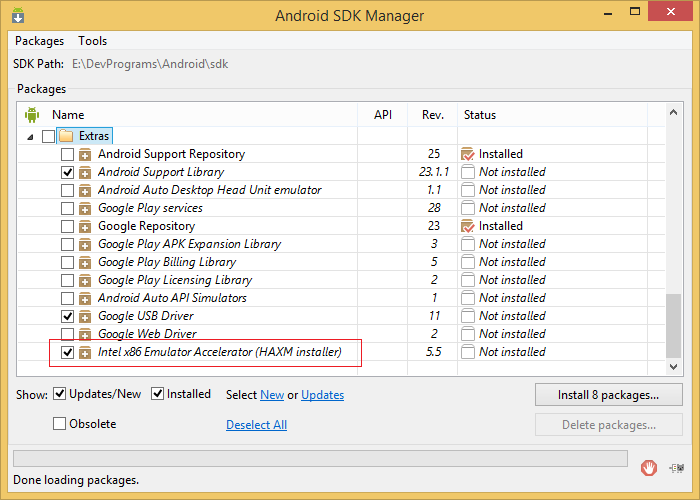
You need to Install Intel HAXM:
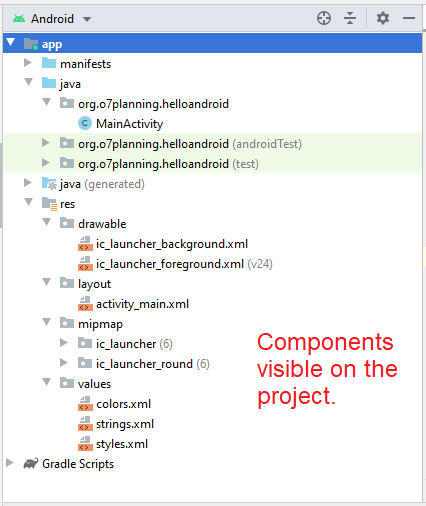
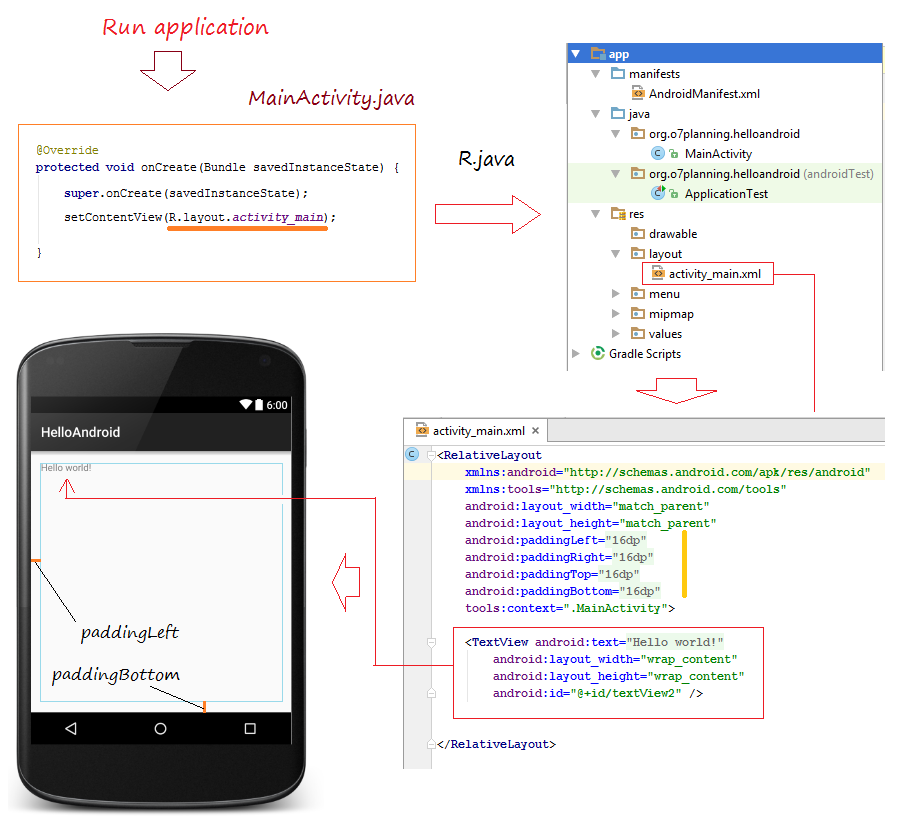
5. Overview of Android Project Structure
Here is the image of your project on the Android Studio:
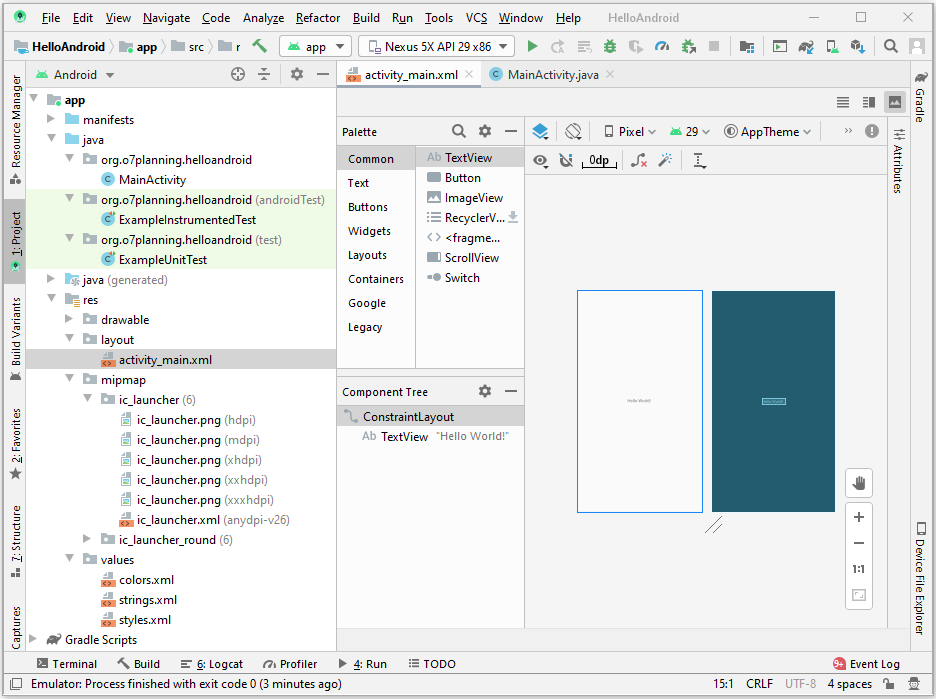
File or directory | Description |
AndroidManifest.xml | This is the manifest file which describes the fundamental characteristics of the app and defines each of its components. |
java | This contains the .java source files for your project. By default, it includes an MainActivity.java source file having an activity class that runs when your app is launched using the app icon. |
res/drawable | The previous Android version used this folder to store images, the current version replaced by mipmap folder for images. This directory is almost no longer used. |
res/layout | This is a directory for files that define your app's user interface. |
res/menu | The menu folder with XML of the items that will appear on the Action Bar |
res/mipmap | Used contains 'mipmap' images |
res/values | This is a directory for other various XML files that contain a collection of resources, such as strings and colours definitions. |
AndroidManifest.xml
Whatever component you develop as a part of your application, you must declare all its components in a AndroidManifest.xml. This file works as an interface between Android OS and your application, so if you do not declare your component in this file, then it will not be considered by the OS. For example, a default manifest file will look like as following file
AndroidManifest.xml
<?xml version="1.0" encoding="utf-8"?>
<manifest xmlns:android="http://schemas.android.com/apk/res/android"
    package="org.o7planning.helloandroid" >

    <application
        android:allowBackup="true"
        android:icon="@mipmap/ic_launcher"
        android:label="@string/app_name"
        android:theme="@style/AppTheme" >
        <activity
            android:name=".MainActivity"
            android:label="@string/app_name" >
            <intent-filter>
                <action android:name="android.intent.action.MAIN" />

                <category android:name="android.intent.category.LAUNCHER" />
            </intent-filter>
        </activity>
    </application>

</manifest>
res/mipmap
You need to understand more about the images in the mipmap folder, see the image below, there is an image file in the mipmap folder.
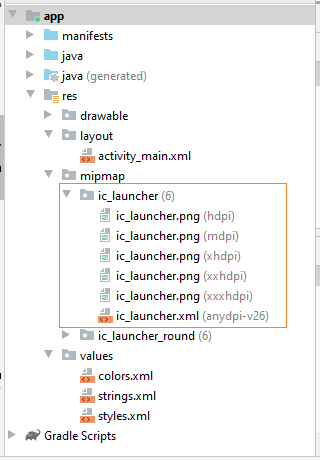
One of the problems I occasionally come across while using Android apps is that I see images that are blurry, pixelated, or stretched awkwardly. The solution to this problem is to create a drawable folder for each of the densities that Android supports, and place the correctly scaled image inside each folder. There are 6 different density ranges (measured in dots per inch) that Android supports:
- ldpi: Low-density screens; approximately 120dpi
- mdpi: Medium-density (on traditional HVGA) screens; approximately 160dpi
- hdpi: High-density screens; approximately 240dpi
- xhdpi: Extra high-density screens; approximately 320dpi. Added in API Level 8
- nodpi: This can be used for bitmap resources that you do not want to be scaled to match the device density
- tvdpi: Screens somewhere between mdpi and hdpi; approximately 213dpi. This is not considered a “primary” density group. It is mostly intended for televisions and most apps shouldn’t need it—providing mdpi and hdpi resources is sufficient for most apps and the system will scale them as appropriate. This qualifier was introduced with API level 13.
6. Android Activity Lifecycle
Firstly, what is Activity?
Activity is a Java code that supports a screen or UI. In other words, building block of the user interface is the activity. Activity class is a pre-defined class in Android and every application which has UI must inherit it to create window.
For example, MainActivity class is an Activity that extends from available Activity in libraries. The figure below illustrates the lifecycle of an Activity.
A lifecycle of Activity describes of the processes of an Activity since it started launching, until the applications is shutdown. Including processes that Activity stopped temporarily, resume, ..
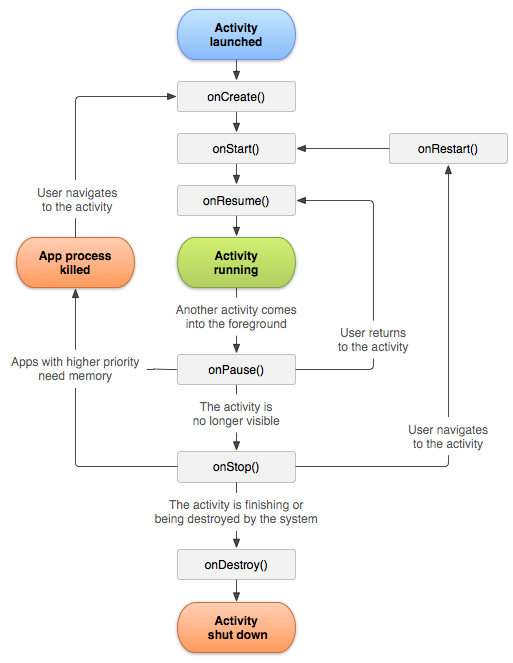
To more easily understood, you can modify the code of MainActivity class, override the onStart(), onResume(),.. methods, Add on the message which demonstrates method has been run. Rerun the application and see what happens
MainActivity.java
package org.o7planning.helloandroid;

import androidx.appcompat.app.AppCompatActivity;
import android.util.Log;
import android.os.Bundle;

public class MainActivity extends AppCompatActivity {

    public static final String TAG ="MyMessage";

    @Override
    protected void onCreate(Bundle savedInstanceState) {
        super.onCreate(savedInstanceState);
        setContentView(R.layout.activity_main);
        // Print Log
        Log.i(TAG,"onCreate");
    }


    @Override
    protected void onStop() {
        super.onStop();
        // Print Log
        Log.i(TAG,"onStop");
    }

    @Override
    protected void onDestroy() {
        super.onDestroy();
        // Print Log
        Log.i(TAG,"onDestroy");
    }

    @Override
    protected void onPause() {
        super.onPause();
        // Print Log
        Log.i(TAG,"onPause");
    }

    @Override
    protected void onResume() {
        super.onResume();
        // Print Log
        Log.i(TAG,"onResume");      }

    @Override
    protected void onStart() {
        super.onStart();
        // Print Log
        Log.i(TAG,"onStart");
    }

    @Override
    protected void onRestart() {
        super.onRestart();
        // Print Log
        Log.i(TAG,"onRestart");
    }

}
Rerun your application, and you see the messages recorded on logcat window.
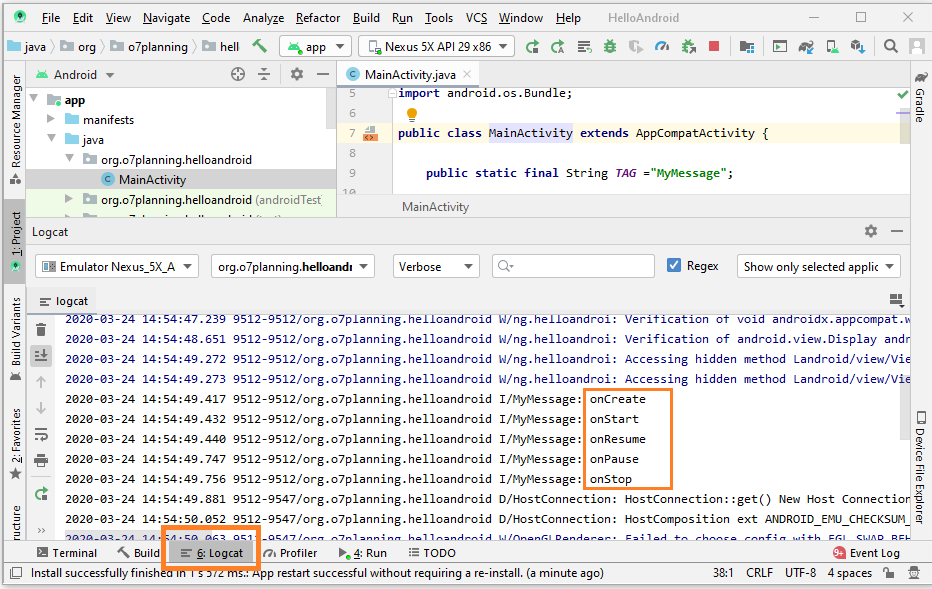
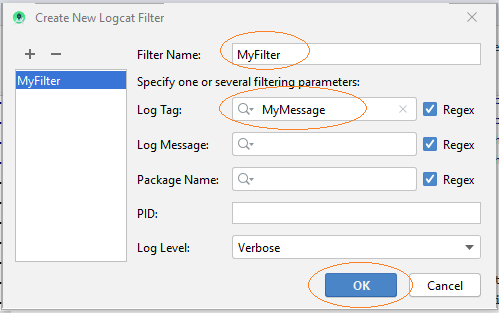
You can setup the filter to logcat only display your message.
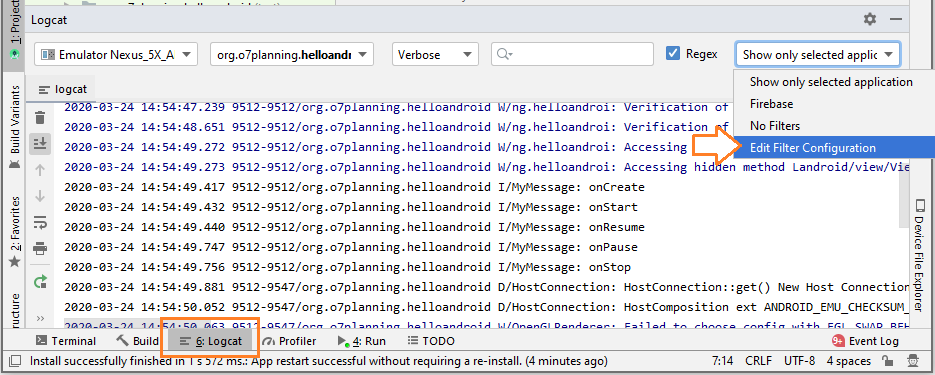
Enter:
- Filter Name: My Filter
- Log Tag (regex): MyMessage
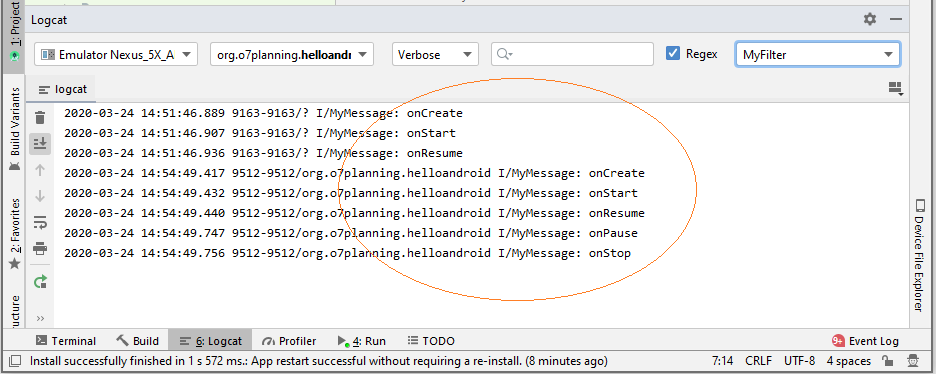
Now, logcat window only displays your messages.
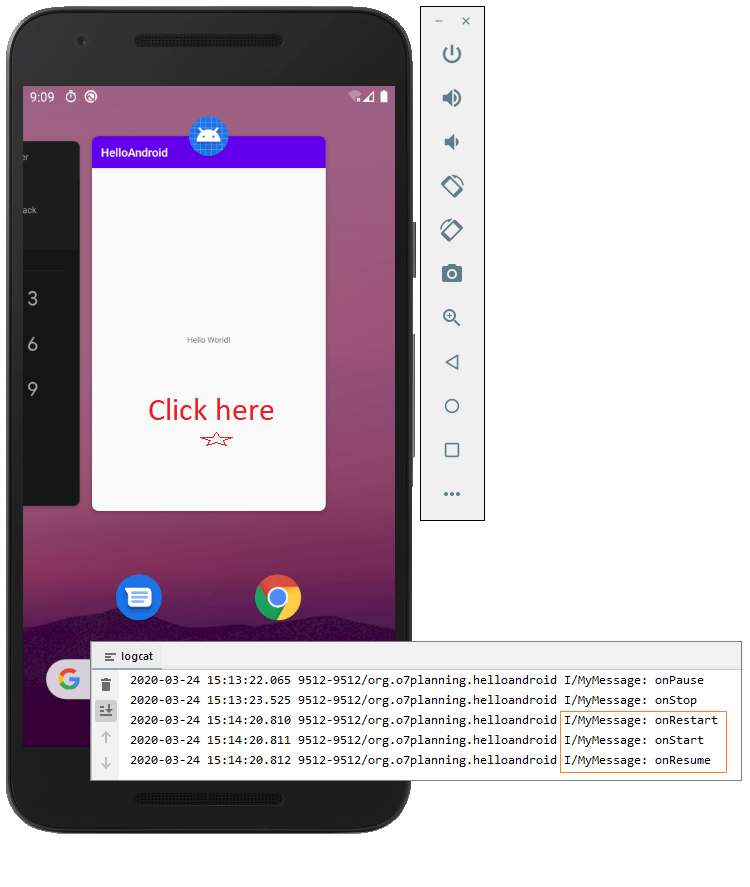
Your phone screen:

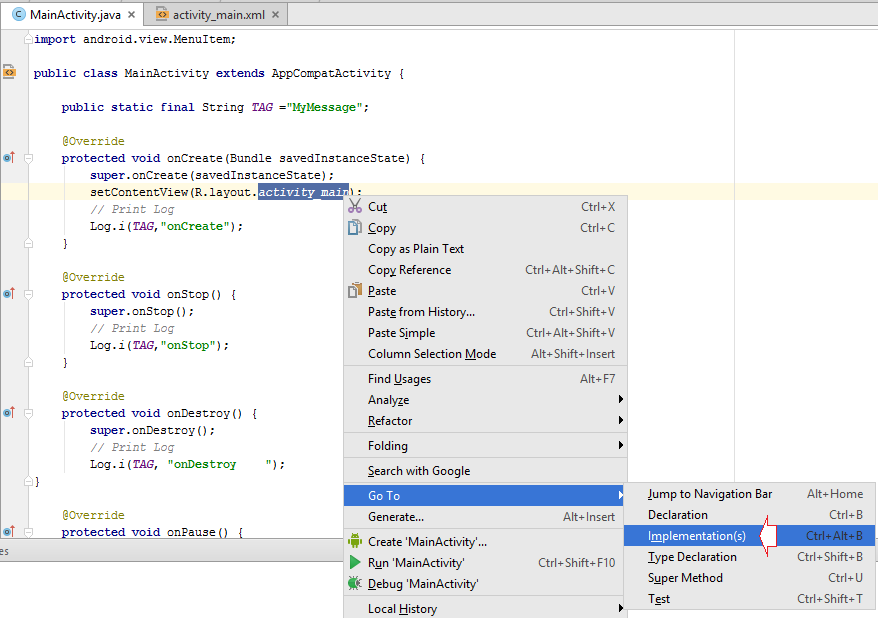
7. How does Android Application run?
You've run successfully first Android app, and now we will look back at how Android has been run since the application is called.
What you see on the Project window are not all components involved creating your application. There are components that are generated automatically by the compiler program. And it does not display on Project window. For example, based on the structure of the source files in your project, the compiler creates a R.java source file that defines constants for the resources on the project.
To view the R.java file on Android Studio, open MainActivity class, right click on R.layout.main_activity and select Go To/Implementation (s)
Note: Android Studio> = 2.0 no longer allows you to view R.java file, because this is an automatically generated file and does not allow modifications.
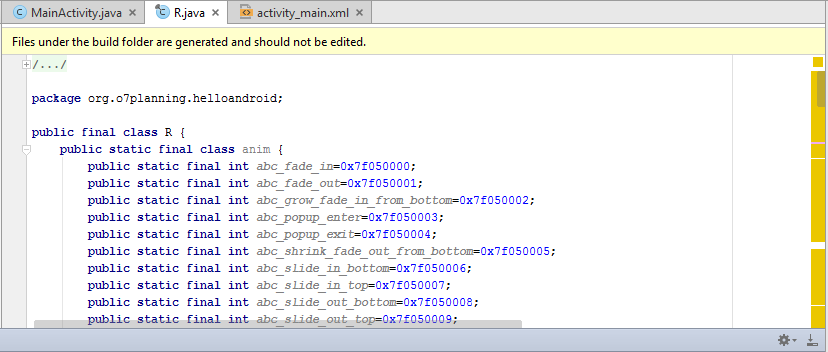
The constants defined in class R.java are created corresponding to the resources on the Project:
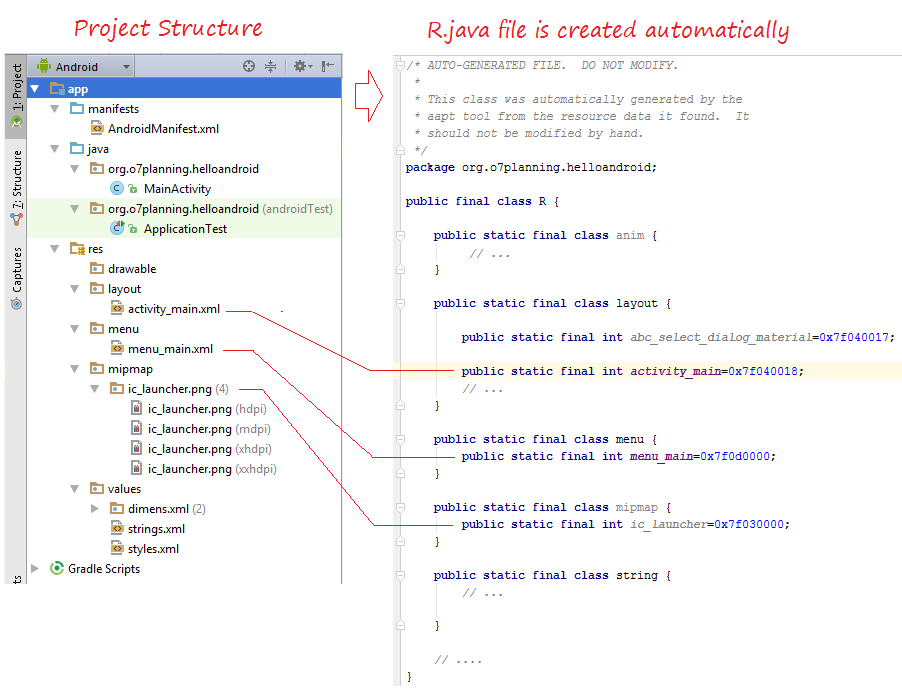
So somewhere in the Project, you can use the constants to refer resources in the project. Such as, R.layout.activity_main is a constant which refers activity_main.xml file in the res/layout folder.
The operating principle:
8. What makes the user interface?
Maybe now you are thinking that main_ativity.xml is the file that creates application interface. That's right 50%. Substantially, main_activity.xml is a file that defines the entities involved in the application's interface, and how they are arranged on the screen. Activity will read this file and draw up the application interface. Thus, the interface of applications essentially created by Activity
Here's the code Activity read main_activity.xml file to create the interface.
MainActivity.java
package org.o7planning.helloandroid;

import android.support.v7.app.AppCompatActivity;
import android.os.Bundle;
import android.util.Log;
import android.view.Menu;
import android.view.MenuItem;

public class MainActivity extends AppCompatActivity {

   public static final String TAG ="MyMessage";

   @Override
   protected void onCreate(Bundle savedInstanceState) {
       super.onCreate(savedInstanceState);

       // Read activity_main.xml to draw user interface.
       setContentView(R.layout.activity_main);
   }

   // .....
}
Activity may not need to read xml file to create the application interface:
MainActivity.java
package org.o7planning.helloandroid;
import androidx.appcompat.app.AppCompatActivity;
import android.graphics.Color;
import android.os.Bundle;
import android.widget.Button;
import android.widget.RelativeLayout;
public class MainActivity extends AppCompatActivity {
@Override
protected void onCreate(Bundle savedInstanceState) {
super.onCreate(savedInstanceState);
// Layout
RelativeLayout layout = new RelativeLayout(this);
layout.setBackgroundColor(Color.GREEN);
// Tạo Button
Button button = new Button(this);
button.setText("My Button");
// Add button to Layout
layout.addView(button);
// Content View
setContentView(layout);
}
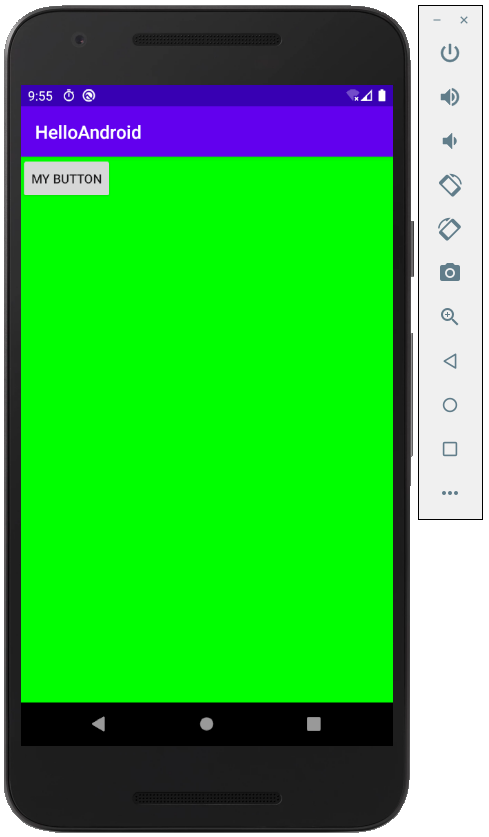
}And rerun the application:
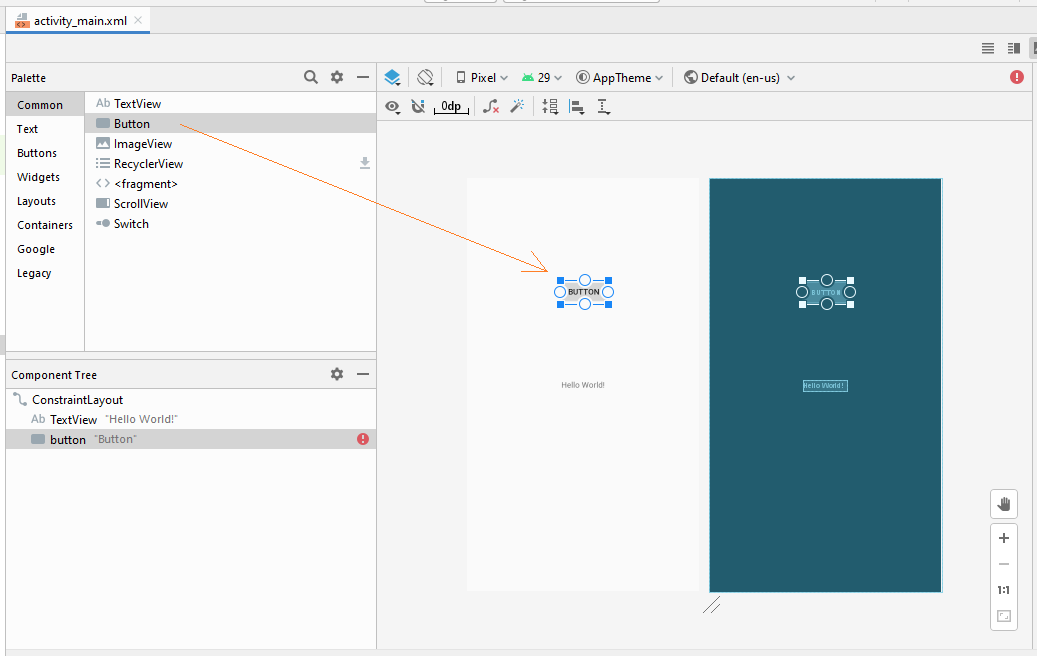
Current Android Studio version do not support you in designing Intuitive Interface on Java. However, it supports effectively in designing Intuitive Interface on xml files, Android Studio will generate the XML code for you. Actually, interface design on XML will make your applications maintain more easily.
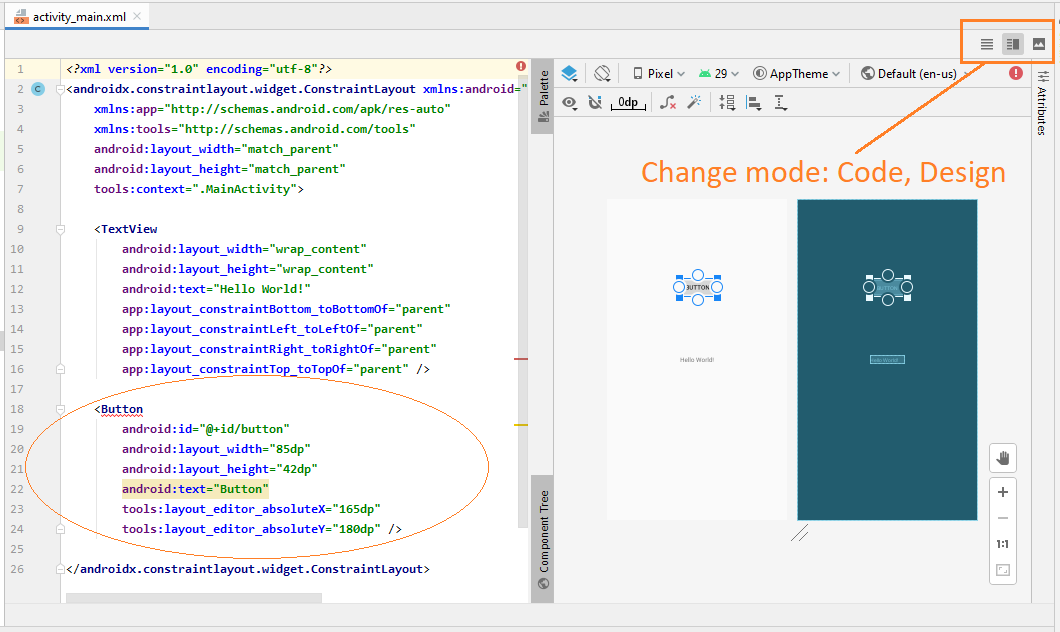
Back to activity_main.xml, you can easily design application interface:
The XML code is automatically generated:
Android Programming Tutorials
- Configure Android Emulator in Android Studio
- Android ToggleButton Tutorial with Examples
- Create a simple File Finder Dialog in Android
- Android TimePickerDialog Tutorial with Examples
- Android DatePickerDialog Tutorial with Examples
- What is needed to get started with Android?
- Install Android Studio on Windows
- Install Intel® HAXM for Android Studio
- Android AsyncTask Tutorial with Examples
- Android AsyncTaskLoader Tutorial with Examples
- Android Tutorial for Beginners - Basic examples
- How to know the phone number of Android Emulator and change it
- Android TextInputLayout Tutorial with Examples
- Android CardView Tutorial with Examples
- Android ViewPager2 Tutorial with Examples
- Get Phone Number in Android using TelephonyManager
- Android Phone Call Tutorial with Examples
- Android Wifi Scanning Tutorial with Examples
- Android 2D Game Tutorial for Beginners
- Android DialogFragment Tutorial with Examples
- Android CharacterPickerDialog Tutorial with Examples
- Android Tutorial for Beginners - Hello Android
- Using Android Device File Explorer
- Enable USB Debugging on Android Device
- Android UI Layouts Tutorial with Examples
- Android SMS Tutorial with Examples
- Android SQLite Database Tutorial with Examples
- Google Maps Android API Tutorial with Examples
- Android Text to Speech Tutorial with Examples
- Android Space Tutorial with Examples
- Android Toast Tutorial with Examples
- Create a custom Android Toast
- Android SnackBar Tutorial with Examples
- Android TextView Tutorial with Examples
- Android TextClock Tutorial with Examples
- Android EditText Tutorial with Examples
- Android TextWatcher Tutorial with Examples
- Format Credit Card Number with Android TextWatcher
- Android Clipboard Tutorial with Examples
- Create a simple File Chooser in Android
- Android AutoCompleteTextView and MultiAutoCompleteTextView Tutorial with Examples
- Android ImageView Tutorial with Examples
- Android ImageSwitcher Tutorial with Examples
- Android ScrollView and HorizontalScrollView Tutorial with Examples
- Android WebView Tutorial with Examples
- Android SeekBar Tutorial with Examples
- Android Dialog Tutorial with Examples
- Android AlertDialog Tutorial with Examples
- Android RatingBar Tutorial with Examples
- Android ProgressBar Tutorial with Examples
- Android Spinner Tutorial with Examples
- Android Button Tutorial with Examples
- Android Switch Tutorial with Examples
- Android ImageButton Tutorial with Examples
- Android FloatingActionButton Tutorial with Examples
- Android CheckBox Tutorial with Examples
- Android RadioGroup and RadioButton Tutorial with Examples
- Android Chip and ChipGroup Tutorial with Examples
- Using image assets and icon assets of Android Studio
- Setting SD Card for Android Emulator
- ChipGroup and Chip Entry Example
- How to add external libraries to Android Project in Android Studio?
- How to disable the permissions already granted to the Android application?
- How to remove applications from Android Emulator?
- Android LinearLayout Tutorial with Examples
- Android TableLayout Tutorial with Examples
- Android FrameLayout Tutorial with Examples
- Android QuickContactBadge Tutorial with Examples
- Android StackView Tutorial with Examples
- Android Camera Tutorial with Examples
- Android MediaPlayer Tutorial with Examples
- Android VideoView Tutorial with Examples
- Playing Sound effects in Android with SoundPool
- Android Networking Tutorial with Examples
- Android JSON Parser Tutorial with Examples
- Android SharedPreferences Tutorial with Examples
- Android Internal Storage Tutorial with Examples
- Android External Storage Tutorial with Examples
- Android Intents Tutorial with Examples
- Example of an explicit Android Intent, calling another Intent
- Example of implicit Android Intent, open a URL, send an email
- Android Services Tutorial with Examples
- Android Notifications Tutorial with Examples
- Android DatePicker Tutorial with Examples
- Android TimePicker Tutorial with Examples
- Android Chronometer Tutorial with Examples
- Android OptionMenu Tutorial with Examples
- Android ContextMenu Tutorial with Examples
- Android PopupMenu Tutorial with Examples
- Android Fragments Tutorial with Examples
- Android ListView Tutorial with Examples
- Android ListView with Checkbox using ArrayAdapter
- Android GridView Tutorial with Examples
Show More