Flutter Navigation and Routing Tutorial with Examples
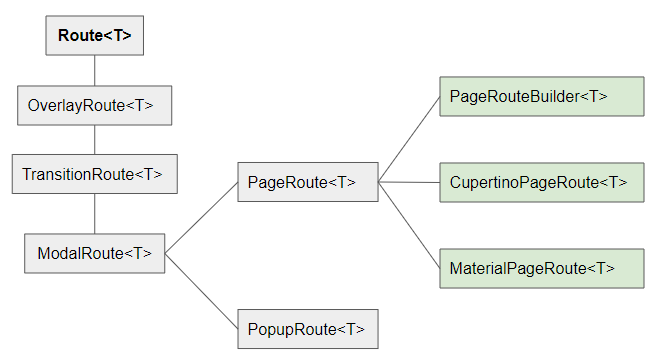
1. Route Transition
Flutter introduces the concept of "Route Transition" to describe the action of jumping from the first screen to the second. This transition may include an animation effect to offer a favorable feeling to the user. In this article, I'm going to cover a few ways to get there.
For simplicity, you can take a look at the illustration below, then we will analyze how to do it:

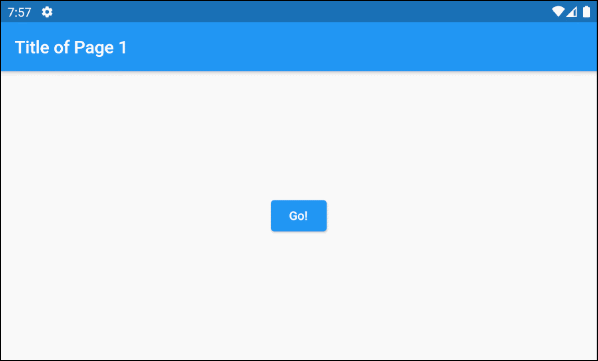
Initially, when the user stands on Page1 and performs an action, such as pressing a button to jump to Page2, an animation effect may appear during the transition process between two pages. However, I did not create an animation effect in this simple example.
main.dart (ex 1)
import 'package:flutter/material.dart';

main() {
  runApp(MyApp());
}

class MyApp extends StatelessWidget {
  @override
  Widget build(BuildContext context) {
    return MaterialApp(
      title: 'o7planning.org',
      debugShowCheckedModeBanner: false,
      theme: ThemeData(
        primarySwatch: Colors.blue,
        visualDensity: VisualDensity.adaptivePlatformDensity,
      ),
      home: Page1(),
    );
  }
}

class Page1 extends StatelessWidget {
  Widget build(BuildContext context) {
    return Scaffold(
      appBar: AppBar(
        title: Text("Title of Page 1"),
      ),
      body: Center(
        child: ElevatedButton(
          child: Text('Go!'),
          onPressed: () {
            Navigator.of(context).push(_createRoute());
          },
        ),
      ),
    );
  }
}

Route _createRoute() {
  return PageRouteBuilder(
    pageBuilder: (BuildContext context, Animation<double> animation,//
        Animation<double> secondaryAnimation) {
      return Page2();
    },
    transitionsBuilder: (BuildContext context, Animation<double> animation, //
        Animation<double> secondaryAnimation, Widget child) {
      return child;
    },
  );
}

class Page2 extends StatelessWidget {
  Widget build(BuildContext context) {
    return Scaffold(
      appBar: AppBar(
        title: Text("Title of Page 2"),
      ),
      body: Center(
        child: Text('Page 2'),
      ),
      backgroundColor: Colors.lightGreen[100],
    );
  }
}
The most important thing is to create a Route object that describes how the first page has been replaced by the second. The PageRouteBuilder class is a descendant class of the Route. It is used for the first example due to its ease of use.
_createRoute()
Route _createRoute() {
  return PageRouteBuilder(
    pageBuilder: (BuildContext context, Animation<double> animation,//
        Animation<double> secondaryAnimation) {
      return Page2();
    },
    transitionsBuilder: (BuildContext context, Animation<double> animation, //
        Animation<double> secondaryAnimation, Widget child) {
      return child;
    },
  );
}
After that, use the Navigator to execute the Route.
Navigator.of(context).push(_createRoute());Next, we add the SlideTransition animation in the middle of the transition from the first page to the second page:
(ex 1b)
Route _createRoute() {
  return PageRouteBuilder(
    pageBuilder: (BuildContext context, Animation<double> animation,//
        Animation<double> secondaryAnimation) {
      return Page2();
    },
    transitionsBuilder: (BuildContext context, Animation<double> animation, //
        Animation<double> secondaryAnimation, Widget child) {
      return SlideTransition(
        position: new Tween<Offset>(
          begin: const Offset(-1.0, 0.0),
          end: Offset.zero,
        ).animate(animation),
        child: new SlideTransition(
          position: new Tween<Offset>(
            begin: Offset.zero,
            end: const Offset(-1.0, 0.0),
          ).animate(secondaryAnimation),
          child: child,
        ),
      );
    },
  );
}
Finally, you get the result as follows:
Here is another example of ScaleTransition animation.

(ex 1c)
Route _createRoute() {
  return PageRouteBuilder(
    pageBuilder: (BuildContext context, Animation<double> animation,//
        Animation<double> secondaryAnimation) {
      return Page2();
    },
    transitionsBuilder: (BuildContext context, Animation<double> animation, //
        Animation<double> secondaryAnimation, Widget child) {
      return new ScaleTransition(
        scale: new Tween<double>(
          begin: 0.0,
          end: 1.0,
        ).animate(
          CurvedAnimation(
            parent: animation,
            curve: Interval(
              0.00,
              0.50,
              curve: Curves.easeInCirc,
            ),
          ),
        ),
        child: child
      );
    },
  );
}- Flutter SlideTransition
- Flutter ScaleTransition
2. Named Route
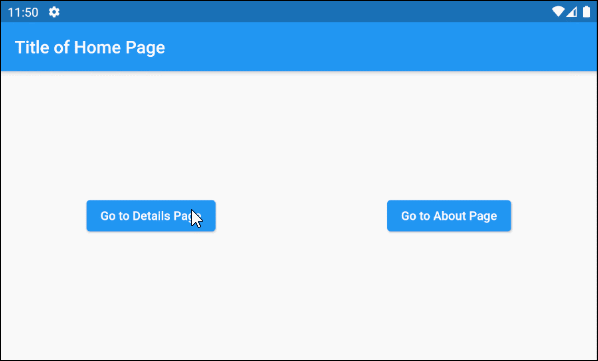
In Flutter you can also define a Map containing the main pages of the application and their corresponding names, then use the Navigator to move to different pages based on these names.
But first, let's preview the result of the example:
main.dart (ex 4)
import 'package:flutter/material.dart';

main() {
  runApp(MyApp());
}

class MyApp extends StatelessWidget {
  @override
  Widget build(BuildContext context) {
    return MaterialApp(
      title: 'o7planning.org',
      debugShowCheckedModeBanner: false,
      theme: ThemeData(
        primarySwatch: Colors.blue,
        visualDensity: VisualDensity.adaptivePlatformDensity,
      ),
      initialRoute: '/home',
      routes: <String, WidgetBuilder>{
        '/home': (BuildContext context) => Home(),
        '/details': (BuildContext context) => Details(),
        '/about': (BuildContext context) => About(),
      },
    );
  }
}

class Home extends StatelessWidget {
  Widget build(BuildContext context) {
    return Scaffold(
      appBar: AppBar(
        title: Text("Title of Home Page"),
      ),
      body: Center(

          child: Row (
            mainAxisAlignment: MainAxisAlignment.spaceAround,
            children: [
              ElevatedButton(
                child: Text('Go to Details Page'),
                onPressed: () {
                  Navigator.of(context).pushNamed('/details');
                },
              ),
              ElevatedButton(
                child: Text('Go to About Page'),
                onPressed: () {
                  Navigator.of(context).pushNamed('/about');
                },
              ),
            ],
          )
      ),
    );
  }
}

class Details extends StatelessWidget {
  Widget build(BuildContext context) {
    return Scaffold(
      appBar: AppBar(
        title: Text("Title of Details Page"),
      ),
      body: Center(
        child: ElevatedButton(
          child: Text('Close'),
          onPressed: () {
            // Close page and pass a value back to previous page
            Navigator.of(context).pop();
          },
        ),
      ),
      backgroundColor: Colors.lightGreen[100],
    );
  }
}

class About extends StatelessWidget {
  Widget build(BuildContext context) {
    return Scaffold(
      appBar: AppBar(
        title: Text("Title of About Page"),
      ),
      body: Center(
        child: ElevatedButton(
          child: Text('Close'),
          onPressed: () {
            // Close page
            Navigator.of(context).pop();
          },
        ),
      ),
      backgroundColor: Colors.cyan[100],
    );
  }
}
In this example we use the routes property of MaterialApp to define a route Map that contains the main pages of the application and their corresponding names.
// Map<String, WidgetBuilder> routes

MaterialApp(
  title: 'o7planning.org',
  debugShowCheckedModeBanner: false,
  theme: ThemeData(
    primarySwatch: Colors.blue,
    visualDensity: VisualDensity.adaptivePlatformDensity,
  ),
  initialRoute: '/home',
  routes: <String, WidgetBuilder>{
    '/home': (BuildContext context) => Home(),
    '/details': (BuildContext context) => Details(),
    '/about': (BuildContext context) => About(),
  },
);
Then jump to different pages based on the name of the route.
Navigator.of(context).pushNamed('/details');Or back to the previous page:
// Close page (Back to previous page)
Navigator.of(context).pop();

// Close page and pass a value back to previous page.
Navigator.of(context).pop("Some Value");
Flutter Programming Tutorials
- Flutter Column Tutorial with Examples
- Flutter Stack Tutorial with Examples
- Flutter IndexedStack Tutorial with Examples
- Flutter Spacer Tutorial with Examples
- Flutter Expanded Tutorial with Examples
- Flutter SizedBox Tutorial with Examples
- Flutter Tween Tutorial with Examples
- Install Flutter SDK on Windows
- Install Flutter Plugin for Android Studio
- Create your first Flutter app - Hello Flutter
- Flutter Scaffold Tutorial with Examples
- Flutter AppBar Tutorial with Examples
- Flutter BottomAppBar Tutorial with Examples
- Flutter TextButton Tutorial with Examples
- Flutter ElevatedButton Tutorial with Examples
- Flutter EdgeInsetsGeometry Tutorial with Examples
- Flutter EdgeInsets Tutorial with Examples
- Flutter CircularProgressIndicator Tutorial with Examples
- Flutter LinearProgressIndicator Tutorial with Examples
- Flutter Center Tutorial with Examples
- Flutter Align Tutorial with Examples
- Flutter Row Tutorial with Examples
- Flutter SplashScreen Tutorial with Examples
- Flutter Alignment Tutorial with Examples
- Flutter Positioned Tutorial with Examples
- Flutter SimpleDialog Tutorial with Examples
- Flutter AlertDialog Tutorial with Examples
- Flutter Navigation and Routing Tutorial with Examples
- Flutter TabBar Tutorial with Examples
- Flutter Banner Tutorial with Examples
- Flutter BottomNavigationBar Tutorial with Examples
- Flutter FancyBottomNavigation Tutorial with Examples
- Flutter Card Tutorial with Examples
- Flutter Border Tutorial with Examples
- Flutter ContinuousRectangleBorder Tutorial with Examples
- Flutter RoundedRectangleBorder Tutorial with Examples
- Flutter CircleBorder Tutorial with Examples
- Flutter StadiumBorder Tutorial with Examples
- Flutter Container Tutorial with Examples
- Flutter RotatedBox Tutorial with Examples
- Flutter CircleAvatar Tutorial with Examples
- Flutter IconButton Tutorial with Examples
- Flutter FlatButton Tutorial with Examples
- Flutter SnackBar Tutorial with Examples
Show More