- What is SplashScreen?
- SplashScreen Library
- Example: Time based
- Example: Time based + route Map
- Example: Time based + pageRoute
- Example: Time based + routeName
- Example: Future based
- Example: Future based + route Map
- loaderColor
- navigateAfterFuture
- seconds
- pageRoute
- onClick
- navigateAfterSeconds
- title
- backgroundColor
- styleTextUnderTheLoader
- image
- photoSize
- loadingText
- useLoader
- imageBackground
- gradientBackground
- routeName
Flutter SplashScreen Tutorial with Examples
1. What is SplashScreen?
Splash Screen is the first screen the user sees when an application is launched. It can also be the app's welcome screen that provides a simple initial experience when a mobile game or a program is launching. Splash Screen is sometimes used to show the user the state of an application being loaded into memory before it is ready to use.

Here are some basic features of Splash Screen:
- It is mainly used for branding or identity recognition of the application and puts the branding impression to users.
- It is also used to display the progress of an application being loaded into memory to present software to the user.
- When the loading of the Splash Screen completes, the user gets another functional screen that would be home screen or dashboard, then is forgotten. Once the loading completes, we cannot press the back button to return the Splash Screen.
2. SplashScreen Library
In this article I'm going to guide you to use the splashscreen library provided by the community. It is not available in the standard Flutter library, so if you want to use it, you must declare it in the project.
Open the pubspec.yaml file and declare the splashscreen library in the project:
pubspec.yaml
.....

dependencies:
  flutter:
    sdk: flutter
  splashscreen: ^1.3.5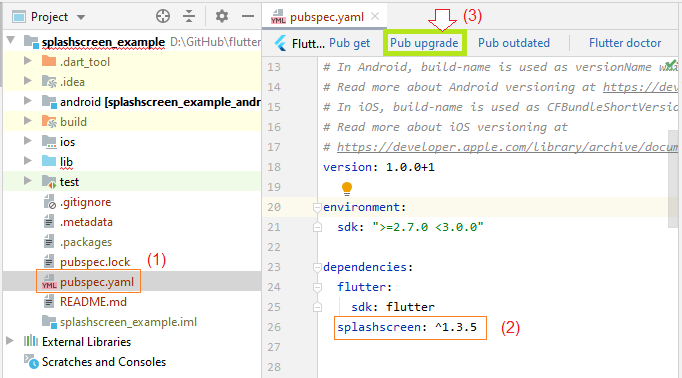
You will see other or latest versions of splashscreen library at the link below:
SplashScreen class offers three constructors:
SplashScreen Constructor
@protected
SplashScreen(

    {Color loaderColor,
    Future navigateAfterFuture,
    int seconds,
    double photoSize,
    Route pageRoute,
    dynamic onClick,
    dynamic navigateAfterSeconds,
    Text title: const Text(''),
    Color backgroundColor: Colors.white,
    TextStyle styleTextUnderTheLoader:
         const TextStyle(fontSize: 18.0, fontWeight: FontWeight.bold, color: Colors.black),
    Image image,
    Text loadingText: const Text(""),
    ImageProvider<Object> imageBackground,
    Gradient gradientBackground,
    bool useLoader: true,
    String routeName}
)
SplashScreen.network Constructor
SplashScreen.network(

    {@required Future navigateAfterFuture,
    Color loaderColor,
    Color backgroundColor,
    double photoSize,
    Text loadingText,
    Image image,
    Route pageRoute,
    dynamic onClick,
    dynamic navigateAfterSeconds,
    Text title,
    TextStyle styleTextUnderTheLoader,
    ImageProvider<Object> imageBackground,
    Gradient gradientBackground,
    bool useLoader,
    String routeName}

)
SplashScreen.timer Constructor
SplashScreen.timer(
{@required int seconds,
Color loaderColor,
Color backgroundColor,
double photoSize,
Text loadingText,
Image image,
Route pageRoute,
dynamic onClick,
dynamic navigateAfterSeconds,
Text title,
TextStyle styleTextUnderTheLoader,
ImageProvider<Object> imageBackground,
Gradient gradientBackground,
bool useLoader,
String routeName}
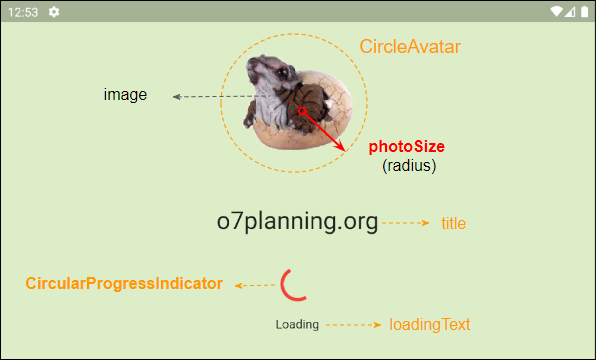
)Here is the SplashScreen layout:
3. Example: Time based
First, get started with a simple example, a Splash Screen displayed for a specified amount of time. Later, it will be replaced by the main application screen. Let's preview the result of the example:
First of all, you need to create a Flutter project and declare the splashscreen library in your project as mentioned above.
Next, open the main.dart file and replace its contents with the following code:
main.dart (ex1)
import 'dart:async';
import 'package:flutter/material.dart';
import 'package:splashscreen/splashscreen.dart';

void main() { runApp(MyApp()); }

class MyApp extends StatelessWidget {
  @override
  Widget build(BuildContext context) {
    return MaterialApp(
      theme: ThemeData(
        primarySwatch: Colors.blue,
      ),
      home: SplashScreenPage(),
      debugShowCheckedModeBanner: false,
    );
  }
}
class SplashScreenPage extends StatelessWidget {
  @override
  Widget build(BuildContext context) {
    return SplashScreen(
      seconds: 5,
      navigateAfterSeconds: new HomeScreen(),
      backgroundColor: Colors.green,
      title: new Text('o7planning.org',textScaleFactor: 2,),
      image: new Image.network(
          'https://s3.o7planning.com/images/triceratops/image1.png'
      ),
      loadingText: Text("Loading"),
      photoSize: 110.0,
      loaderColor: Colors.red,
    );
  }
}
class HomeScreen extends StatelessWidget {
  @override
  Widget build(BuildContext context) {
    return Scaffold(
      appBar: AppBar(
          title:Text("Flutter SplashScreen")
      ),
      body: Center(
          child:Text("Welcome to Home Page",
              style: TextStyle( color: Colors.black, fontSize: 30)
          )
      ),
    );
  }
}
The above code shows that the main screen of the application is initially generated by SplashScreenPage, whose the build() method returns a SplashScreen object.
The seconds parameter specifies how many seconds the Splash Screen is displayed. After running out of that time, it will be replaced by the HomeScreen (specified by a navigateAfterSeconds parameter).
4. Example: Time based + route Map
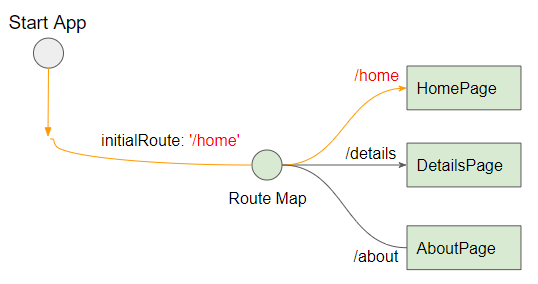
If your application uses the route Map to navigate the pages, you can place the SplashScreen before it like the illustration below:
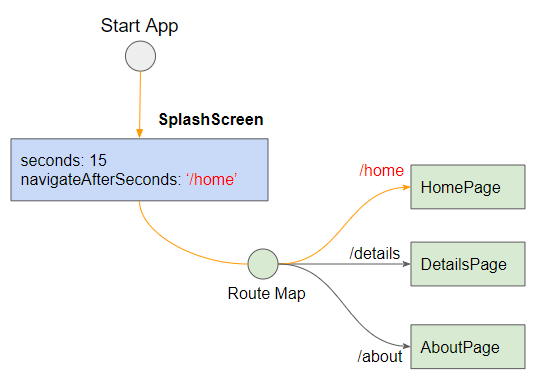
In this case, the navigateAfterSeconds parameter is of String type. It is named after the page that you want to go to.
main.dart (ex2)
import 'package:flutter/material.dart';
import 'package:splashscreen/splashscreen.dart';

void main(){
  runApp(MyApp());
}

class MyApp extends StatelessWidget {
  @override
  Widget build(BuildContext context) {
    return MaterialApp(
      title: 'o7planning.org',
      debugShowCheckedModeBanner: false,
      theme: ThemeData(
        primarySwatch: Colors.blue,
        visualDensity: VisualDensity.adaptivePlatformDensity,
      ),
      home: SplashScreenPage(),
      routes: <String, WidgetBuilder>{
        '/home': (BuildContext context) => HomePage(),
        '/details': (BuildContext context) => DetailsPage(),
        '/about': (BuildContext context) => AboutPage(),
      },
    );
  }
}

class SplashScreenPage extends StatelessWidget {

  @override
  Widget build(BuildContext context) {
    return SplashScreen(
      title: new Text('Welcome In SplashScreen' ),
      image: new Image.network(
          'https://s3.o7planning.com/images/triceratops/image1.png'
      ),
      backgroundColor: Colors.white,
      photoSize: 100.0,
      loaderColor: Colors.red,
      seconds: 15,
      navigateAfterSeconds: "/home"
    );
  }

}

class HomePage extends StatelessWidget {
  Widget build(BuildContext context) {
    return Scaffold(
      appBar: AppBar(
        title: Text("Title of Home Page"),
      ),
      body: Center(

          child: Row (
            mainAxisAlignment: MainAxisAlignment.spaceAround,
            children: [
              ElevatedButton(
                child: Text('Go to Details Page'),
                onPressed: () {
                  Navigator.of(context).pushNamed('/details');
                },
              ),
              ElevatedButton(
                child: Text('Go to About Page'),
                onPressed: () {
                  Navigator.of(context).pushNamed('/about');
                },
              ),
            ],
          )
      ),
    );
  }
}

class DetailsPage extends StatelessWidget {
  Widget build(BuildContext context) {
    return Scaffold(
      appBar: AppBar(
        title: Text("Title of Details Page"),
      ),
      body: Center(
        child: ElevatedButton(
          child: Text('Close'),
          onPressed: () {
            // Close page and pass a value back to previous page
            Navigator.of(context).pop();
          },
        ),
      ),
      backgroundColor: Colors.lightGreen[100],
    );
  }
}

class AboutPage extends StatelessWidget {
  Widget build(BuildContext context) {
    return Scaffold(
      appBar: AppBar(
        title: Text("Title of About Page"),
      ),
      body: Center(
        child: ElevatedButton(
          child: Text('Close'),
          onPressed: () {
            // Close page
            Navigator.of(context).pop();
          },
        ),
      ),
      backgroundColor: Colors.cyan[100],
    );
  }
}5. Example: Time based + pageRoute
In Flutter,byusing Navigator & Route you can jump from one page to another. This is a good idea for you to jump from Splash Screen to the main application screen. It is important that the SplashScreen class also supports the Route. Let's see an example:
main.dart (ex3)
import 'package:flutter/material.dart';
import 'package:splashscreen/splashscreen.dart';

void main(){
  runApp(MyApp());
}

class MyApp extends StatelessWidget {
  @override
  Widget build(BuildContext context) {
    return MaterialApp(
        title: 'o7planning.org',
        debugShowCheckedModeBanner: false,
        theme: ThemeData(
          primarySwatch: Colors.blue,
          visualDensity: VisualDensity.adaptivePlatformDensity,
        ),
        home: SplashScreenPage()
    );
  }
}

class SplashScreenPage extends StatefulWidget {
  @override
  _SplashScreenPageState createState() => _SplashScreenPageState();
}

class _SplashScreenPageState extends State<SplashScreenPage> {

  @override
  Widget build(BuildContext context) {
    return SplashScreen(
        title: new Text('Welcome In SplashScreen'),
        image: new Image.network(
            'https://s3.o7planning.com/images/triceratops/image1.png'
        ),
        backgroundColor: Colors.white,
        photoSize: 100.0,
        loaderColor: Colors.red,
        seconds: 10,
        navigateAfterSeconds: Text("Any Widget"), // Any not null widget.
        pageRoute: _createRoute()
    );
  }

  Route _createRoute() {
    return PageRouteBuilder(
      pageBuilder: (BuildContext context, Animation<double> animation,//
          Animation<double> secondaryAnimation) {
        return HomeScreen();
      },
      transitionsBuilder: (BuildContext context, Animation<double> animation, //
          Animation<double> secondaryAnimation, Widget child) {
        return child;
      },
    );
  }
}

class HomeScreen extends StatelessWidget {
  @override
  Widget build(BuildContext context) {
    return Scaffold(
      appBar: AppBar(
          title:Text("Flutter SplashScreen")
      ),
      body: Center(
          child:Text("Welcome to Home Page",
              style: TextStyle( color: Colors.black, fontSize: 30)
          )
      ),
      backgroundColor: Colors.green[100],
    );
  }
}
Note: In this example, you need set values of seconds, navigateAfterSeconds and pageRoute parameters.
- The pageRoute parameter will be used if not null.
- The navigateAfterSeconds parameter is any Widget and not null. Even though it is not used, you have to set a value to it.
SplashScreen(
    ...
    seconds: 10,
    navigateAfterSeconds: Text("Any Widget"), // Any not null widget.
    pageRoute: _createRoute()
);7. Example: Future based
In some cases, Splash Screen is used to indicate the state of an application being loaded into memory before it is ready to use. The amount of time that Splash Screen displayed depends on the power of the device. Once the Splash Screen fulfils its tasks, it will be replaced by the main application screen.
Technically, the main screen will be wrapped in a Future object which is ready to replace Splash Screen if necessary.
Let's preview this example:
In this example, you need a set value to the navigateAfterFuture parameter and not the seconds parameter.
main.dart (ex7)
import 'package:flutter/material.dart';
import 'package:splashscreen/splashscreen.dart';

void main(){
  runApp(MyApp());
}

class MyApp extends StatelessWidget {
  @override
  Widget build(BuildContext context) {
    return MaterialApp(
        title: 'o7planning.org',
        debugShowCheckedModeBanner: false,
        theme: ThemeData(
          primarySwatch: Colors.blue,
          visualDensity: VisualDensity.adaptivePlatformDensity,
        ),
        home: SplashScreenPage()
    );
  }
}

class SplashScreenPage extends StatefulWidget {
  @override
  _SplashScreenPageState createState() => _SplashScreenPageState();
}

class _SplashScreenPageState extends State<SplashScreenPage> {
  int loadingPercent = 0;

  Future<Widget> loadFromFuture() async {
    // <fetch data from server. ex. login>
    while(this.loadingPercent < 100)  {
      this.setState(() {
        this.loadingPercent++;
        print("Percent: " + this.loadingPercent.toString());
      });
      // Delay 100 millisecond.
      await Future.delayed(const Duration(milliseconds : 100));
    }
    // Show Main Screen (After Splash Screen)
    return Future.value(HomeScreen());
  }

  @override
  Widget build(BuildContext context) {
    return SplashScreen(
        navigateAfterFuture: loadFromFuture(),
        title: Text(
          'Welcome In SplashScreen',
          style: TextStyle(
              fontWeight: FontWeight.bold,
              fontSize: 20.0
          ),),
        image: Image.network(
            'https://s3.o7planning.com/images/triceratops/image1.png'
        ),
        backgroundColor: Colors.white,
        styleTextUnderTheLoader: TextStyle(),
        photoSize: 100.0,
        onClick: () => print("Flutter o7planning.org"),
        loadingText: Text("Loading " + this.loadingPercent.toString() +" %"),
        loaderColor: Colors.red
    );
  }
}

class HomeScreen extends StatelessWidget {
  @override
  Widget build(BuildContext context) {
    return Scaffold(
      appBar: AppBar(
          title: Text("Flutter SplashScreen Package"),
          automaticallyImplyLeading: false
      ),
      body: Center(
        child: Text(
          "Welcome To Home Page!",
          style: TextStyle(
              fontWeight: FontWeight.bold,
              fontSize: 30.0
          ),
        ),
      ),
    );
  }
}
8. Example: Future based + route Map
Next, we will move to a more complex example. Your application uses the route Map to navigate pages, and SplashScreen is used to indicate the state of the application being loaded into memory before the application is ready to use.

Let's preview:
main.dart (ex8)
import 'package:flutter/material.dart';
import 'package:splashscreen/splashscreen.dart';

void main(){
  runApp(MyApp());
}

class MyApp extends StatelessWidget {
  @override
  Widget build(BuildContext context) {
    return MaterialApp(
      title: 'o7planning.org',
      debugShowCheckedModeBanner: false,
      theme: ThemeData(
        primarySwatch: Colors.blue,
        visualDensity: VisualDensity.adaptivePlatformDensity,
      ),
      home: SplashScreenPage(),
      routes: <String, WidgetBuilder>{
        '/home': (BuildContext context) => HomePage(),
        '/details': (BuildContext context) => DetailsPage(),
        '/about': (BuildContext context) => AboutPage(),
      },
    );
  }
}

class SplashScreenPage extends StatefulWidget {
  @override
  _SplashScreenPageState createState() => _SplashScreenPageState();
}

class _SplashScreenPageState extends State<SplashScreenPage> {
  int loadingPercent = 0;

  Future<String> loadFromFuture() async {
    // <fetch data from server. ex. login>
    while(this.loadingPercent < 100)  {
      this.setState(() {
        this.loadingPercent++;
        print("Percent: " + this.loadingPercent.toString());
      });
      // Delay 100 millisecond.
      await Future.delayed(const Duration(milliseconds : 100));
    }
    // Show Main Screen (After Splash Screen)
    return Future.value('/home');
  }

  @override
  Widget build(BuildContext context) {
    return SplashScreen(
        navigateAfterFuture: loadFromFuture(),
        title: Text(
          'Welcome In SplashScreen',
          style: TextStyle(
              fontWeight: FontWeight.bold,
              fontSize: 20.0
          ),),
        image: Image.network(
            'https://s3.o7planning.com/images/triceratops/image1.png'
        ),
        backgroundColor: Colors.white,
        styleTextUnderTheLoader: TextStyle(),
        photoSize: 100.0,
        onClick: () => print("Flutter o7planning.org"),
        loadingText: Text("Loading " + this.loadingPercent.toString() +" %"),
        loaderColor: Colors.red
    );
  }
}

class HomePage extends StatelessWidget {
  Widget build(BuildContext context) {
    return Scaffold(
      appBar: AppBar(
        title: Text("Title of Home Page"),
      ),
      body: Center(

          child: Row (
            mainAxisAlignment: MainAxisAlignment.spaceAround,
            children: [
              ElevatedButton(
                child: Text('Go to Details Page'),
                onPressed: () {
                  Navigator.of(context).pushNamed('/details');
                },
              ),
              ElevatedButton(
                child: Text('Go to About Page'),
                onPressed: () {
                  Navigator.of(context).pushNamed('/about');
                },
              ),
            ],
          )
      ),
    );
  }
}

class DetailsPage extends StatelessWidget {
  Widget build(BuildContext context) {
    return Scaffold(
      appBar: AppBar(
        title: Text("Title of Details Page"),
      ),
      body: Center(
        child: ElevatedButton(
          child: Text('Close'),
          onPressed: () {
            // Close page and pass a value back to previous page
            Navigator.of(context).pop();
          },
        ),
      ),
      backgroundColor: Colors.lightGreen[100],
    );
  }
}

class AboutPage extends StatelessWidget {
  Widget build(BuildContext context) {
    return Scaffold(
      appBar: AppBar(
        title: Text("Title of About Page"),
      ),
      body: Center(
        child: ElevatedButton(
          child: Text('Close'),
          onPressed: () {
            // Close page
            Navigator.of(context).pop();
          },
        ),
      ),
      backgroundColor: Colors.cyan[100],
    );
  }
}
9. loaderColor
The loaderColor property is used to set the color of the loader (CircularProgressIndicator) that indicates the loading progress of the application.
Color loaderColor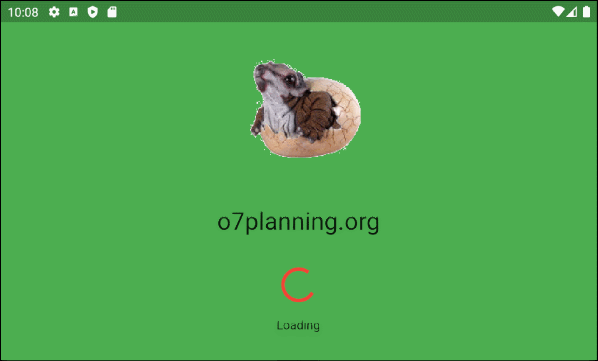
10. navigateAfterFuture
Future navigateAfterFutureSee the explanation of this property in the example above.
11. seconds
The seconds property is used to set the number of seconds the Splash Screen appears before being replaced by the main application screen.
int secondsIf you set the value of the seconds parameter, it means you choose to navigate it based on time. When that time is up, the Splash Screen will be replaced by the main application screen.
14. navigateAfterSeconds
dynamic navigateAfterSecondsSee the explanation of this property in the example above.
15. title
title is a widget located below the image. In most use cases, it is a Text object.
Text title: const Text('')
16. backgroundColor
The backgroundColor property is used to set the background color of the Splash Screen. Its default value is Colors.white.
Color backgroundColor: Colors.white17. styleTextUnderTheLoader
styleTextUnderTheLoader property is no longer in use.
TextStyle styleTextUnderTheLoader:
         const TextStyle(fontSize: 18.0, fontWeight: FontWeight.bold, color: Colors.black)
18. image
The image property is used to specify an image to appear in the Splash Screen. It is placed in a CircleAvatar with a radius of photoSize.
Image image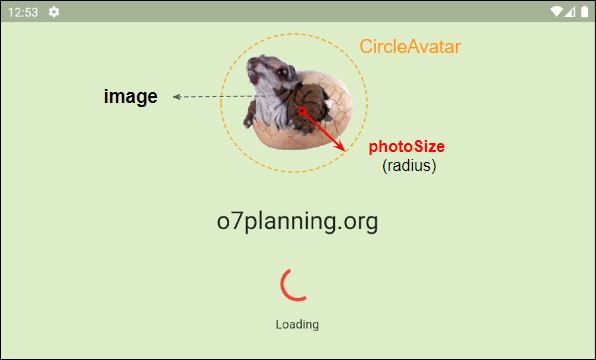
- Flutter Image
- Flutter CircleAvatar
19. photoSize
In terms of structure, the image of SplashScreen is placed in a CircleAvatar, and photoSize is its radius value.

double photoSize20. loadingText
loadingText is a widget located at the bottom of the loader (CircularProgressIndicator) that is usually used to display information regarding loading progress of the application.
Text loadingText: const Text("")21. useLoader
The useLoader property is used to display (or hide) the loader (CircularProgressIndicator) on the SplashScreen. By default, it is true, which means the loader will be displayed.
bool useLoader: trueFlutter Programming Tutorials
- Flutter Column Tutorial with Examples
- Flutter Stack Tutorial with Examples
- Flutter IndexedStack Tutorial with Examples
- Flutter Spacer Tutorial with Examples
- Flutter Expanded Tutorial with Examples
- Flutter SizedBox Tutorial with Examples
- Flutter Tween Tutorial with Examples
- Install Flutter SDK on Windows
- Install Flutter Plugin for Android Studio
- Create your first Flutter app - Hello Flutter
- Flutter Scaffold Tutorial with Examples
- Flutter AppBar Tutorial with Examples
- Flutter BottomAppBar Tutorial with Examples
- Flutter TextButton Tutorial with Examples
- Flutter ElevatedButton Tutorial with Examples
- Flutter EdgeInsetsGeometry Tutorial with Examples
- Flutter EdgeInsets Tutorial with Examples
- Flutter CircularProgressIndicator Tutorial with Examples
- Flutter LinearProgressIndicator Tutorial with Examples
- Flutter Center Tutorial with Examples
- Flutter Align Tutorial with Examples
- Flutter Row Tutorial with Examples
- Flutter SplashScreen Tutorial with Examples
- Flutter Alignment Tutorial with Examples
- Flutter Positioned Tutorial with Examples
- Flutter SimpleDialog Tutorial with Examples
- Flutter AlertDialog Tutorial with Examples
- Flutter Navigation and Routing Tutorial with Examples
- Flutter TabBar Tutorial with Examples
- Flutter Banner Tutorial with Examples
- Flutter BottomNavigationBar Tutorial with Examples
- Flutter FancyBottomNavigation Tutorial with Examples
- Flutter Card Tutorial with Examples
- Flutter Border Tutorial with Examples
- Flutter ContinuousRectangleBorder Tutorial with Examples
- Flutter RoundedRectangleBorder Tutorial with Examples
- Flutter CircleBorder Tutorial with Examples
- Flutter StadiumBorder Tutorial with Examples
- Flutter Container Tutorial with Examples
- Flutter RotatedBox Tutorial with Examples
- Flutter CircleAvatar Tutorial with Examples
- Flutter IconButton Tutorial with Examples
- Flutter FlatButton Tutorial with Examples
- Flutter SnackBar Tutorial with Examples
Show More