Spring Boot Tutorial for Beginners
1. What is Spring Boot?
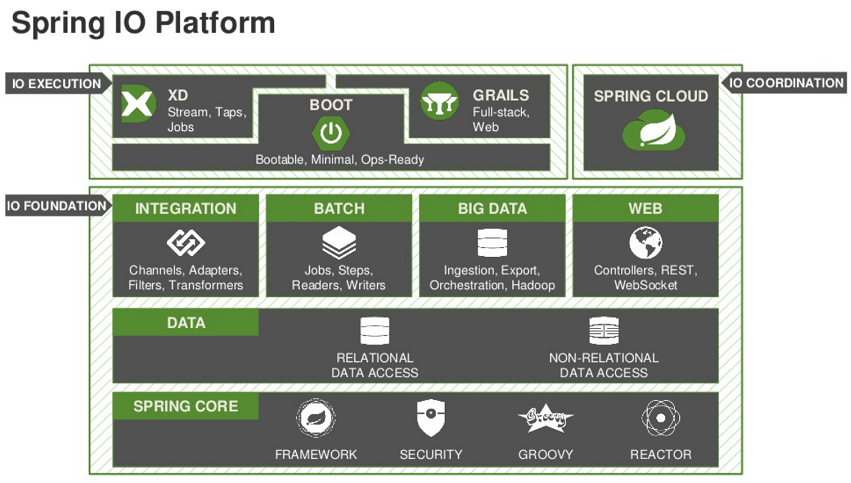
Spring Boot is a Project lying on the IO Execution layer of Spring IO Framework.
Spring Boot is the next step of Spring to make Spring easier in setting up and developing applications. For Spring Boot, Spring configuration are minimized. Spring Boot supports embedded containers in allowing web applications to be able to run independently without deploying on Web Server.
You can use spring boot to create Java Web application running via command line 'java -jar' or export to war file to deploy on Web Server as usual. Spring Boot supply you a "CLI Tool" to run spring scripts.
Spring Boot can be explained simply by the illustration below:

Below is the benefits of Spring Boot:
- It is very easy to develop Spring Based applications with Java or Groovy.
- It reduces lots of development time and increases productivity.
- It avoids writing lots of boilerplate Code, Annotations and XML Configuration.
- It is very easy to integrate Spring Boot Application with its Spring Ecosystem like Spring JDBC, Spring ORM, Spring Data, Spring Security etc.
- It follows “Opinionated Defaults Configuration” Approach to reduce Developer effort
- It provides Embedded HTTP servers like Tomcat, Jetty etc. to develop and test our web applications very easily.
- It provides CLI (Command Line Interface) tool to develop and test Spring Boot(Java or Groovy) Applications from command prompt very easily and quickly.
- It provides lots of plugins to develop and test Spring Boot Applications very easily using Build Tools like Maven and Gradle
- It provides lots of plugins to work with embedded and in-memory Databases very easily
2. The objective of the document
This post is based on:
- Eclipse 4.7 (Oxygen)
- Spring Boot 2.x
In the post, I will create a Hello Spring Boot application, it is a simple Web application using Spring Boot, and run this application independently without deploying on Web Server.
Spring Tool Suite (STS)To build Spring Boot applications on Eclipse IDE, you need to install Spring Tool Suite, this is an extended Plugin supporting Spring programming on Eclipse.
If you have not installed it, let's see the guideline here:
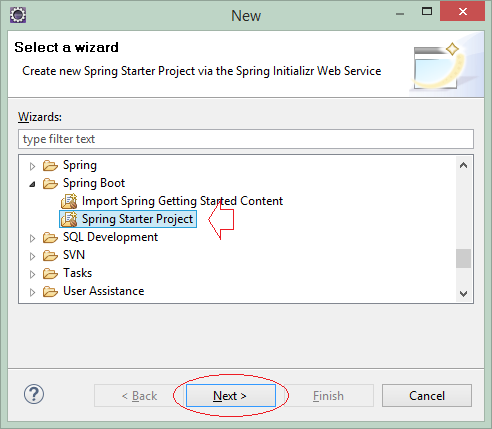
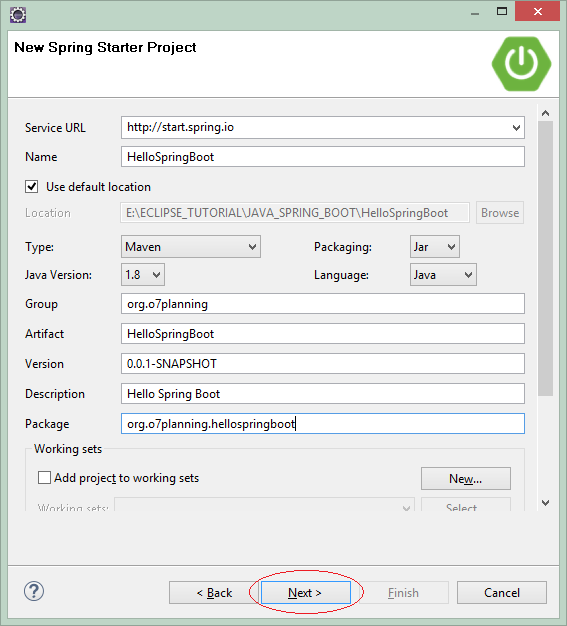
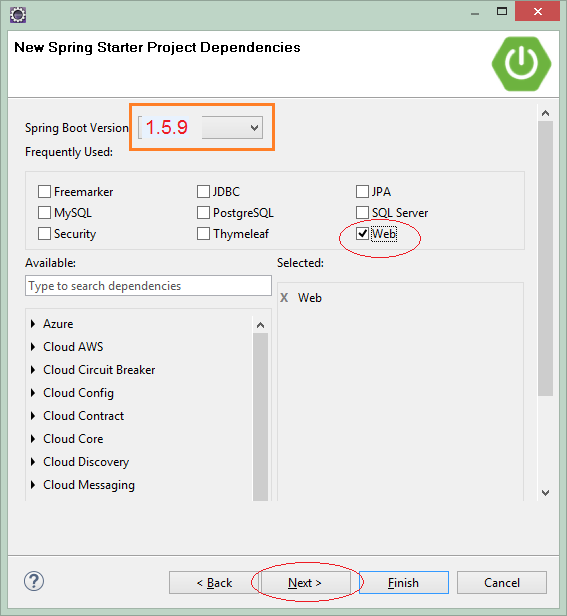
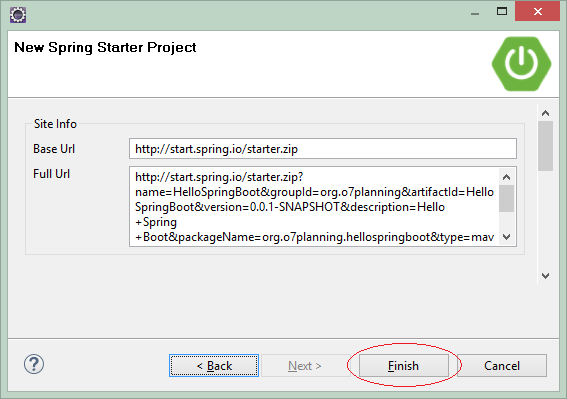
3. Create Spring Boot Project
On Eclipse, creating a project by using Spring Tool Suite (STS):
- File/New/Other...
- Name: HelloSpringBoot
- Group: org.o7planning
- Artifact: HelloSpringBoot
- Package: org.o7planning.hellospringboot
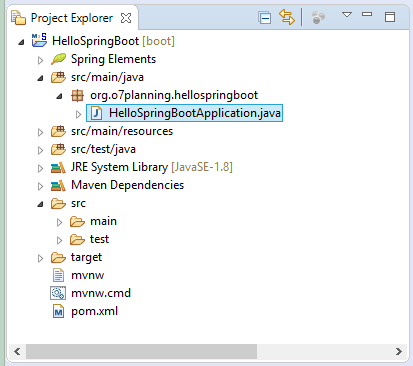
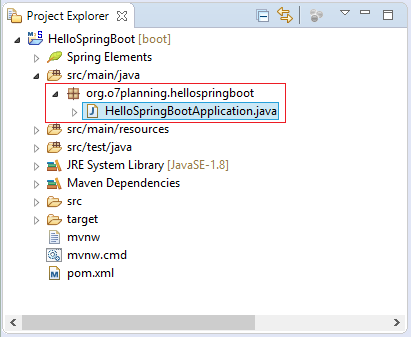
Project has already been created, below is the default structure of the Project.
pom.xml
<?xml version="1.0" encoding="UTF-8"?>
<project xmlns="http://maven.apache.org/POM/4.0.0" xmlns:xsi="http://www.w3.org/2001/XMLSchema-instance"
    xsi:schemaLocation="http://maven.apache.org/POM/4.0.0 http://maven.apache.org/xsd/maven-4.0.0.xsd">
    <modelVersion>4.0.0</modelVersion>

    <groupId>org.o7planning</groupId>
    <artifactId>HelloSpringBoot</artifactId>
    <version>0.0.1-SNAPSHOT</version>
    <packaging>jar</packaging>

    <name>HelloSpringBoot</name>
    <description>Hello Spring Boot</description>

    <parent>
        <groupId>org.springframework.boot</groupId>
        <artifactId>spring-boot-starter-parent</artifactId>
        <version>2.0.0.RELEASE</version>
        <relativePath/> <!-- lookup parent from repository -->
    </parent>

    <properties>
        <project.build.sourceEncoding>UTF-8</project.build.sourceEncoding>
        <project.reporting.outputEncoding>UTF-8</project.reporting.outputEncoding>
        <java.version>1.8</java.version>
    </properties>

    <dependencies>
        <dependency>
            <groupId>org.springframework.boot</groupId>
            <artifactId>spring-boot-starter-web</artifactId>
        </dependency>

        <dependency>
            <groupId>org.springframework.boot</groupId>
            <artifactId>spring-boot-starter-test</artifactId>
            <scope>test</scope>
        </dependency>
    </dependencies>

    <build>
        <plugins>
            <plugin>
                <groupId>org.springframework.boot</groupId>
                <artifactId>spring-boot-maven-plugin</artifactId>
            </plugin>
        </plugins>
    </build>

</project>
4. Some explanation of Spring Boot
In the above step, you have just created a Spring Boot Project, let's see pom.xml content:
pom.xml
There are 3 key points in pom.xml (1),(2), (3) as shown below, Spring Boot supports you in simplifing the declaration of Spring libraries.
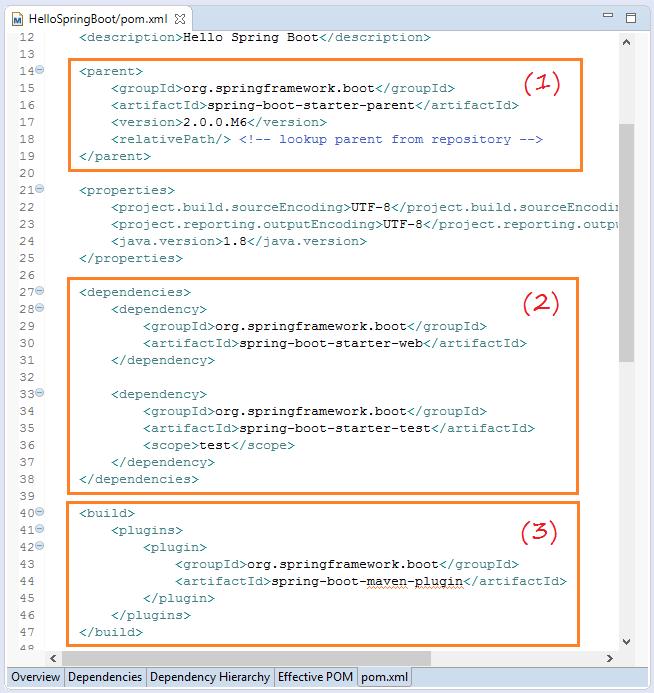
spring-boot-starter-parent
spring-boot-starter-parent is a available project in Spring Boot. The dependent libraries is declared in spring-boot-starter-parent, your project only inherit it. You only need to declare <parent> in file pom.xml of your project.
** spring-boot-starter-parent **
<!-- https://mvnrepository.com/artifact/org.springframework.boot/spring-boot-starter-parent -->

<parent>
    <groupId>org.springframework.boot</groupId>
    <artifactId>spring-boot-starter-parent</artifactId>
    <version>2.0.0.RELEASE</version>
    <relativePath/> <!-- lookup parent from repository -->
</parent>
You can overwrite the default dependence of Spring Boot. The topic will be cleared here:TODO
spring-boot-starter-web
Other “Starters” simply provide dependencies that you are likely to need when developing a specific type of application. Since we are developing a web application, we will add a spring-boot-starter-web dependency
<dependencies>

   <dependency>
       <groupId>org.springframework.boot</groupId>
       <artifactId>spring-boot-starter-web</artifactId>
   </dependency>

   <dependency>
       <groupId>org.springframework.boot</groupId>
       <artifactId>spring-boot-starter-test</artifactId>
       <scope>test</scope>
   </dependency>

</dependencies>
spring-boot-maven-plugin
Spring-boot-maven-plugin is the plugin providing necessary libraries that helps your project to be able to run directly without deploying on a Web Server. It helps to create a jar file that can be executable.
<plugins>

    <plugin>
        <groupId>org.springframework.boot</groupId>
        <artifactId>spring-boot-maven-plugin</artifactId>
    </plugin>

        <!-- ... -->

</plugins>
5. Running Spring Boot project
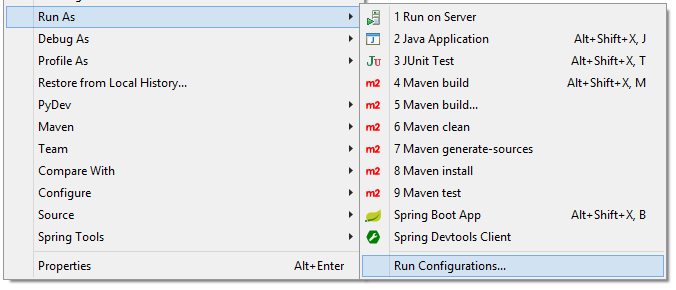
In the step above, you have created HelloSpringBoot project by Eclipse & Spring Tool Suite and there is no any changes. All things are created by default. Now you need some steps to run the application.
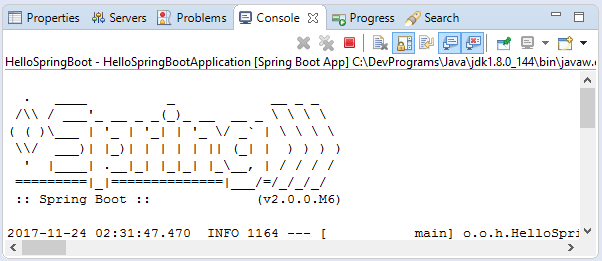
Your HelloSpringBoot application is running, you can try this link:
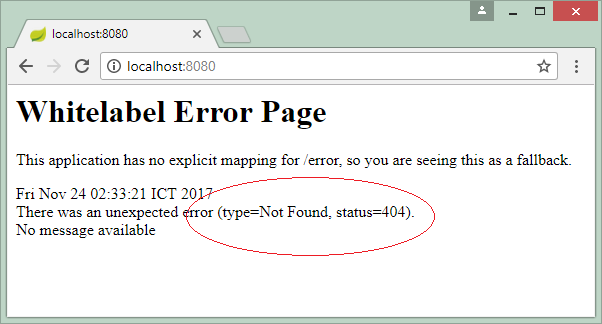
An error message "404 Not found" will appear when you run this link, but there are no any serious problems because your project has not any pages yet.
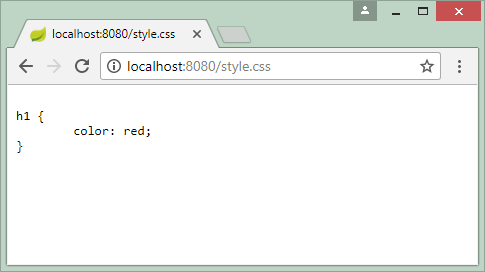
Creating style.css file in the static folder:
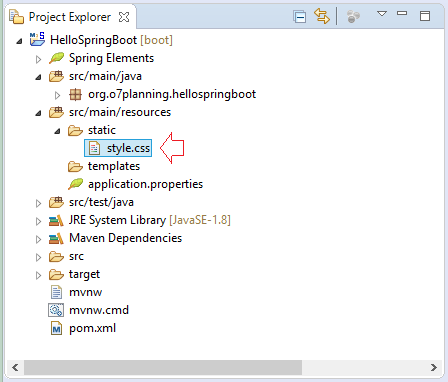
style.css
h1 {
    color: red;
}
And re-run the application with the link:
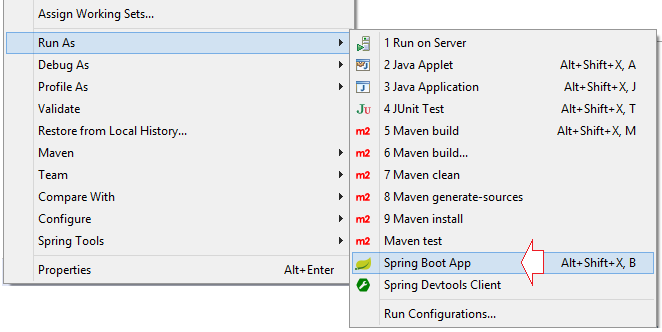
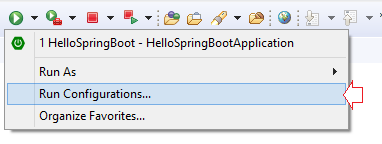
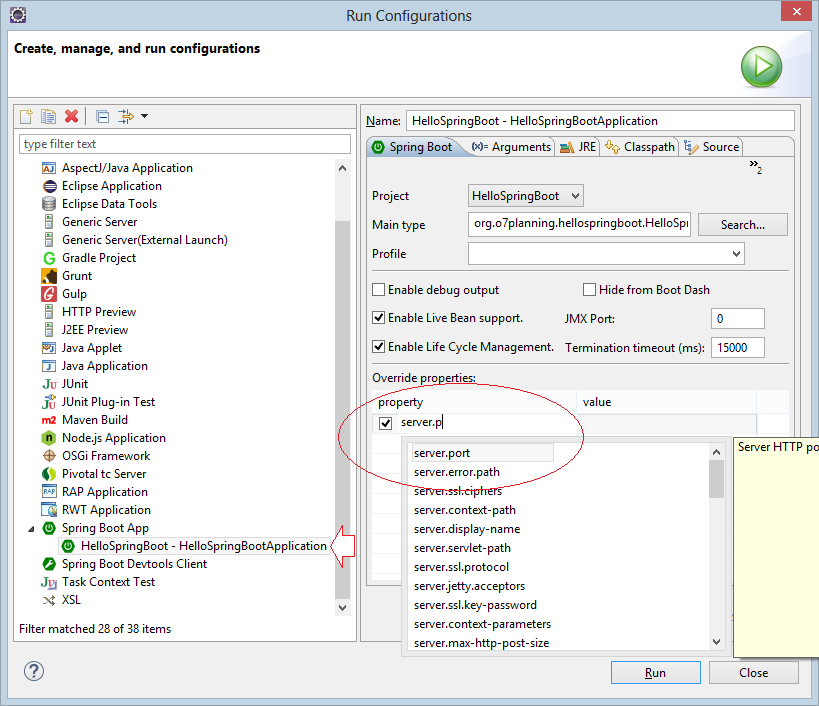
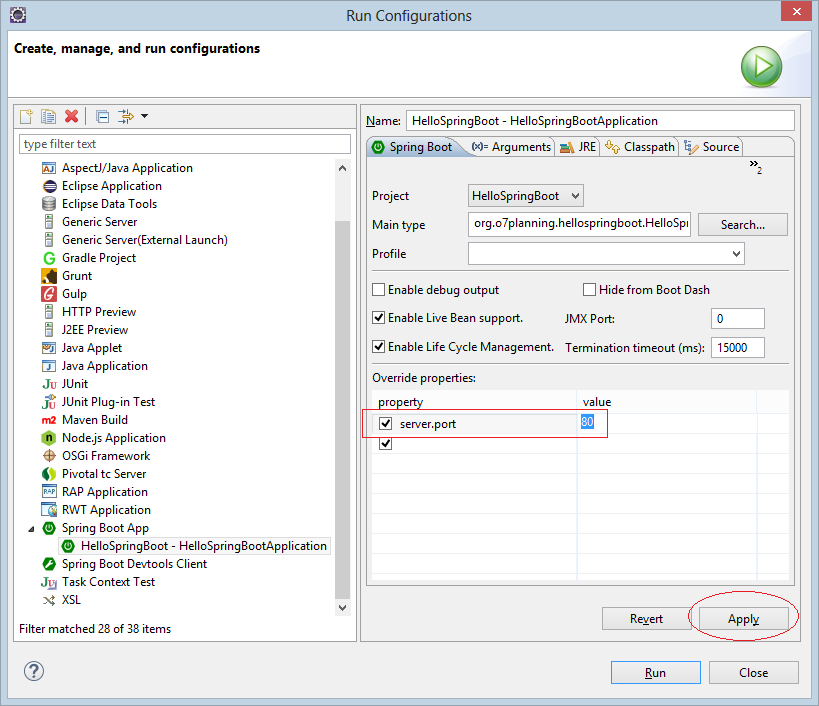
Run Configuration...You can change the parameters for Server such as port, contextPath,... These problems are mentioned in the appendix at the end of the post.
6. How Spring Boot run?
When you create a "Spring Boot Web Appp", there is 1 class generated by the tool "Spring Tool Suite":
- HelloSpringBootApplication
Your application is started by executing class HelloSpringBootApplication. The class is annotated by @SpringBootApplication.
HelloSpringBootApplication.java
package org.o7planning.hellospringboot;
import org.springframework.boot.SpringApplication;
import org.springframework.boot.autoconfigure.SpringBootApplication;
@SpringBootApplication
public class HelloSpringBootApplication {
public static void main(String[] args) {
SpringApplication.run(HelloSpringBootApplication.class, args);
}
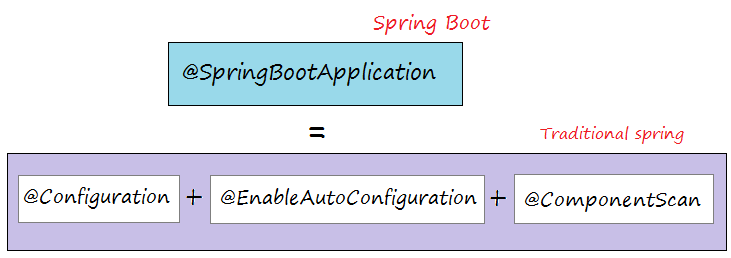
}The @SpringBootApplication annotation is equivalent to using @Configuration, @EnableAutoConfiguration and @ComponentScan with their default attributes:
Therefore, @SpringBootApplication supports you in automatically configuring Spring, and automatically scanning entire project in order to find out Spring components (Controller, Bean, Service,...)
Spring Boot Tutorials
- Install Spring Tool Suite for Eclipse
- Spring Tutorial for Beginners
- Spring Boot Tutorial for Beginners
- Spring Boot Common Properties
- Spring Boot and Thymeleaf Tutorial with Examples
- Spring Boot and FreeMarker Tutorial with Examples
- Spring Boot and Groovy Tutorial with Examples
- Spring Boot and Mustache Tutorial with Examples
- Spring Boot and JSP Tutorial with Examples
- Spring Boot, Apache Tiles, JSP Tutorial with Examples
- Use Logging in Spring Boot
- Application Monitoring with Spring Boot Actuator
- Create a Multi Language web application with Spring Boot
- Use multiple ViewResolvers in Spring Boot
- Use Twitter Bootstrap in Spring Boot
- Spring Boot Interceptors Tutorial with Examples
- Spring Boot, Spring JDBC and Spring Transaction Tutorial with Examples
- Spring JDBC Tutorial with Examples
- Spring Boot, JPA and Spring Transaction Tutorial with Examples
- Spring Boot and Spring Data JPA Tutorial with Examples
- Spring Boot, Hibernate and Spring Transaction Tutorial with Examples
- Integrating Spring Boot, JPA and H2 Database
- Spring Boot and MongoDB Tutorial with Examples
- Use Multiple DataSources with Spring Boot and JPA
- Use Multiple DataSources with Spring Boot and RoutingDataSource
- Create a Login Application with Spring Boot, Spring Security, Spring JDBC
- Create a Login Application with Spring Boot, Spring Security, JPA
- Create a User Registration Application with Spring Boot, Spring Form Validation
- Example of OAuth2 Social Login in Spring Boot
- Run background scheduled tasks in Spring
- CRUD Restful Web Service Example with Spring Boot
- Spring Boot Restful Client with RestTemplate Example
- CRUD Example with Spring Boot, REST and AngularJS
- Secure Spring Boot RESTful Service using Basic Authentication
- Secure Spring Boot RESTful Service using Auth0 JWT
- Spring Boot File Upload Example
- Spring Boot File Download Example
- Spring Boot File Upload with jQuery Ajax Example
- Spring Boot File Upload with AngularJS Example
- Create a Shopping Cart Web Application with Spring Boot, Hibernate
- Spring Email Tutorial with Examples
- Create a simple Chat application with Spring Boot and Websocket
- Deploy Spring Boot Application on Tomcat Server
- Deploy Spring Boot Application on Oracle WebLogic Server
- Install a free Let's Encrypt SSL certificate for Spring Boot
- Configure Spring Boot to redirect HTTP to HTTPS
- Fetch data with Spring Data JPA DTO Projections
Show More