Create a simple Chat application with Spring Boot and Websocket
1. What is WebSocket?
WebSocket is a communication protocol, which helps establish a two-way communication channel between client and server. A communication protocol that you are familiar with is HTTP, and now, we will compare the characteristics of these two protocols:
HTTP (Hypertext Transfer Protocol): a request-response protocol. When Client (Browser) wants something, it will send a request to the Server, and the Server responds such request. HTTP is a one-way communication protocol. The purpose herein is to solve "How do you do to create a request at the client, and how do you to respond the request of the client", and this is reason so that the HTTP shines.

WebSocket is not arequest-response protocol, where only Client can send a request to the Server. When a connection with WebSocket protocol is established, client & server can give data to each other, until the lower layer connection such asTCP is closed. The WebSocket is basically similar to the TCP Socket concept. The difference is that the WebSocket is created to use for Web applications.
STOMP
STOMP (Streaming Text Oriented Messaging Protocol): a communication protocol, a branch of the WebSocket. When the client and the server contact each other by this protocol, they will send each other text message data. The relationship between STOMP and WebSocket is also similar to the one between HTTP and TCP.
In addition, the STOMP also provides a specific way to solve the following functions:
Function | Description |
Connect | Provide ways so that the client and the server can connect to each other. |
Subscribe | Provide ways so that the client subscribes receipt of messages of a topic. |
Unsubscribe | Provide ways so that the client unsubscribes the receipt of messages of a topic. |
Send | How the client sends messages to the server. |
Message | How to send a message sent from the server to the client. |
Transaction management | Transaction management during data transfer (BEGIN, COMMIT, ROLLBACK,...) |
2. Objective of lesson
In this leson, I am going to guide you for creating a simple Chat application, using Spring Boot and WebSocket. The Chat application is perhaps a classic and easiest-to- understand application in order to learn about the WebSocket.
This is the preview of this application:
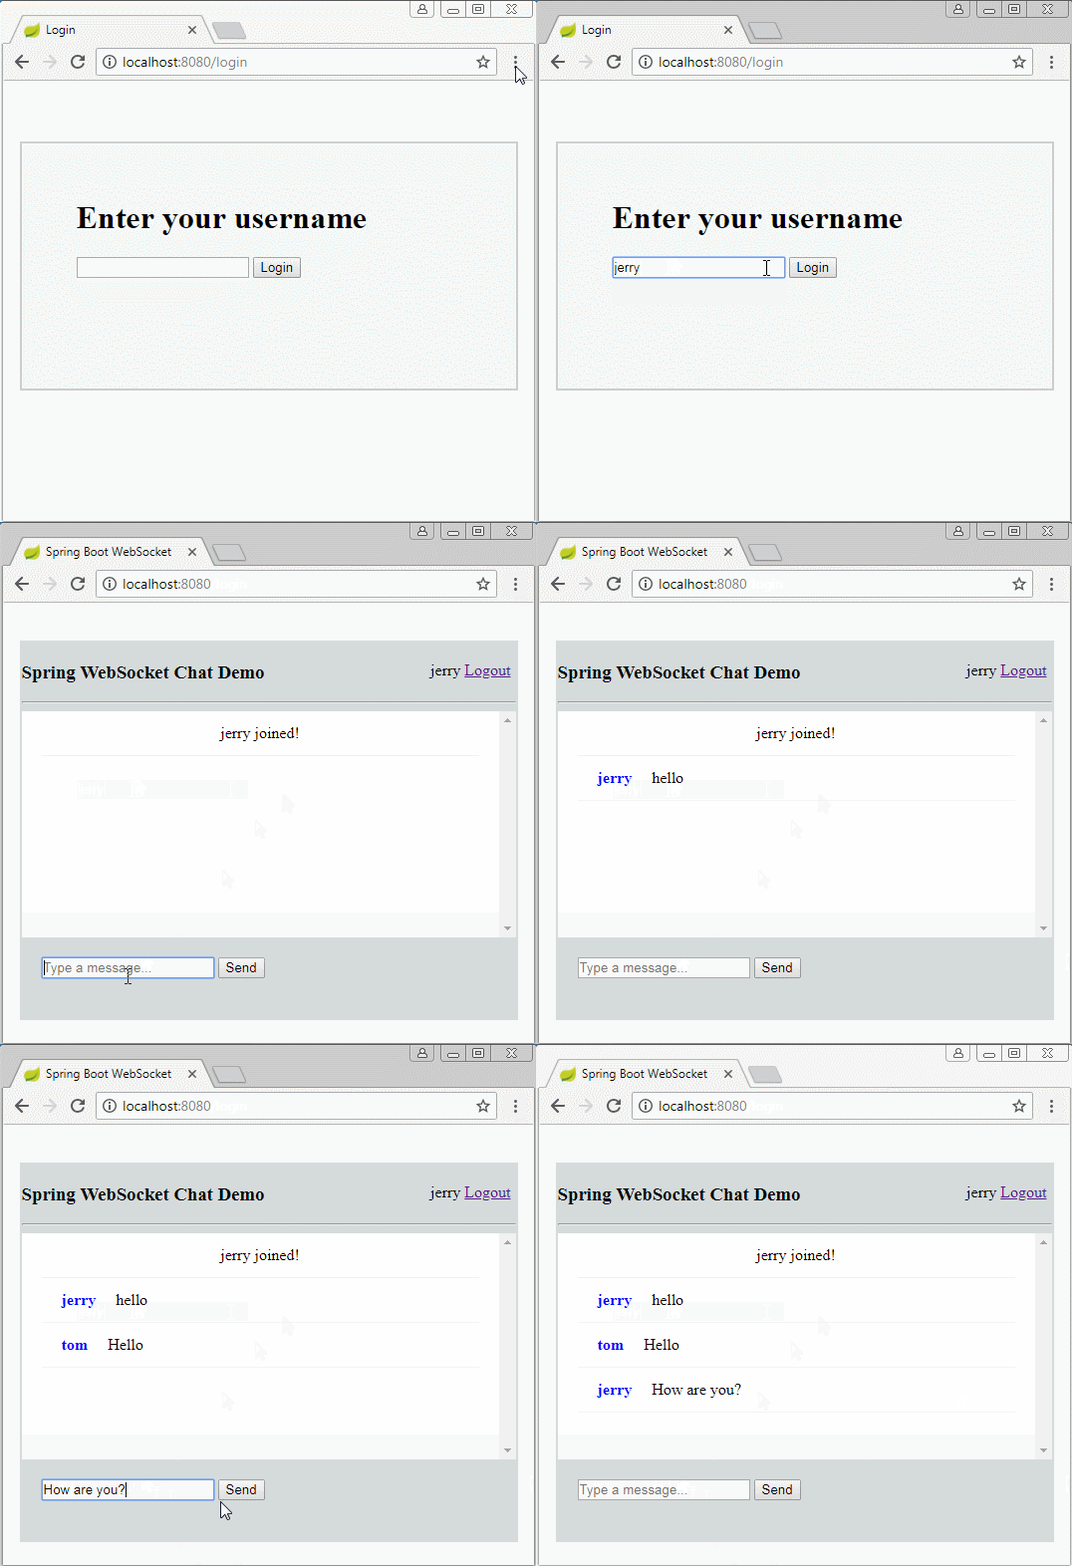
3. Create a Spring Boot project
On the Eclipse, create a Spring Boot project:
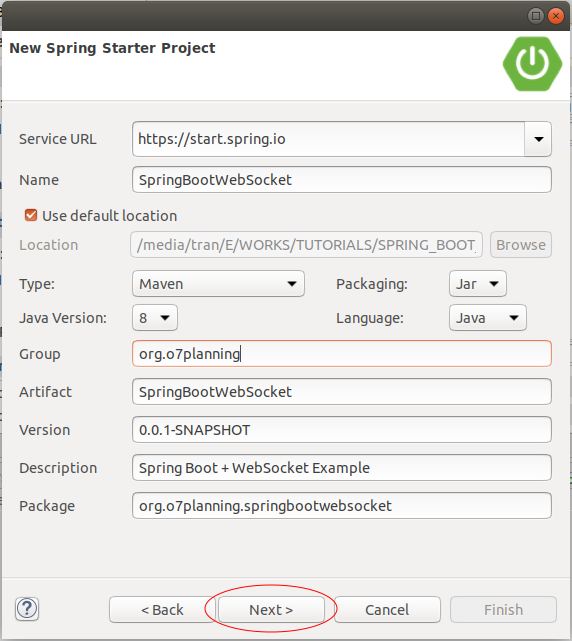
The full content of pom.xml file:
pom.xml
<?xml version="1.0" encoding="UTF-8"?>
<project xmlns="http://maven.apache.org/POM/4.0.0"
    xmlns:xsi="http://www.w3.org/2001/XMLSchema-instance"
    xsi:schemaLocation="http://maven.apache.org/POM/4.0.0
    http://maven.apache.org/xsd/maven-4.0.0.xsd">


    <modelVersion>4.0.0</modelVersion>

    <groupId>org.o7planning</groupId>
    <artifactId>SpringBootWebSocket</artifactId>
    <version>0.0.1-SNAPSHOT</version>
    <packaging>jar</packaging>

    <name>SpringBootWebSocket</name>
    <description>Spring Boot + WebSocket Example</description>

    <parent>
        <groupId>org.springframework.boot</groupId>
        <artifactId>spring-boot-starter-parent</artifactId>
        <version>2.0.2.RELEASE</version>
        <relativePath /> <!-- lookup parent from repository -->
    </parent>

    <properties>
        <project.build.sourceEncoding>UTF-8</project.build.sourceEncoding>
        <project.reporting.outputEncoding>UTF-8</project.reporting.outputEncoding>
        <java.version>1.8</java.version>
    </properties>

    <dependencies>
        <dependency>
            <groupId>org.springframework.boot</groupId>
            <artifactId>spring-boot-starter-web</artifactId>
        </dependency>

        <dependency>
            <groupId>org.springframework.boot</groupId>
            <artifactId>spring-boot-starter-thymeleaf</artifactId>
        </dependency>

        <dependency>
            <groupId>org.springframework.boot</groupId>
            <artifactId>spring-boot-starter-websocket</artifactId>
        </dependency>

        <dependency>
            <groupId>org.springframework.boot</groupId>
            <artifactId>spring-boot-starter-test</artifactId>
            <scope>test</scope>
        </dependency>

    </dependencies>

    <build>
        <plugins>
            <plugin>
                <groupId>org.springframework.boot</groupId>
                <artifactId>spring-boot-maven-plugin</artifactId>
            </plugin>
        </plugins>
    </build>

</project>
SpringBootWebSocketApplication.java
package org.o7planning.springbootwebsocket;

import org.springframework.boot.SpringApplication;
import org.springframework.boot.autoconfigure.SpringBootApplication;

@SpringBootApplication
public class SpringBootWebSocketApplication {

    public static void main(String[] args) {
        SpringApplication.run(SpringBootWebSocketApplication.class, args);
    }

}
4. Configure the WebSocket
There are several concepts related to the WebSocket that you need to understand.
MessageBroker
MessageBroker is an intermediate program, which receives messages sent prior to distribution to necessary addresses. Therefore, you need to tell Spring to enable this program to work.
The following figure describes the structure of MessageBroker:
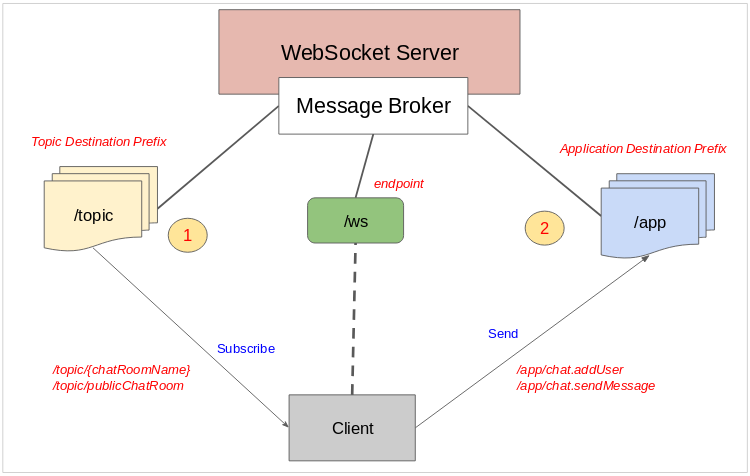
The MessageBroker exposes an endpoint so that the client can contact and form a connection. To contact, the client uses the SockJS library to do this.
** javascript code **
var socket = new SockJS('/ws');
stompClient = Stomp.over(socket);

stompClient.connect({}, onConnected, onError);

// See more in main.js file.
And the MessageBroker also exposes 2 kinds of destinations (1) & (2)
- Destination (1) means the topic that the client can subscribe, when a topic has messages. The messages will be sent to the clients which have subscribed this topic.
- Destination (2) means the places where the client can give messages to the WebSocket Server.
SockJS
Not all browsers support the WebSocket protocol. Therefore, the SockJS is a fallback option, which will be activated for the browsers not supporting the WebSocket. The SockJS is simply a JavaScript library.
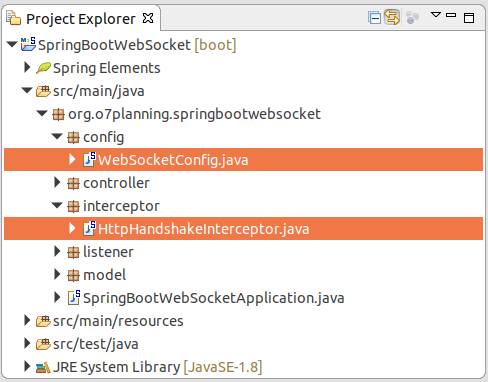
WebSocketConfig.java
package org.o7planning.springbootwebsocket.config;

import org.o7planning.springbootwebsocket.interceptor.HttpHandshakeInterceptor;
import org.springframework.beans.factory.annotation.Autowired;
import org.springframework.context.annotation.Configuration;
import org.springframework.messaging.simp.config.MessageBrokerRegistry;
import org.springframework.web.socket.config.annotation.EnableWebSocketMessageBroker;
import org.springframework.web.socket.config.annotation.StompEndpointRegistry;
import org.springframework.web.socket.config.annotation.WebSocketMessageBrokerConfigurer;

@Configuration
@EnableWebSocketMessageBroker
public class WebSocketConfig implements WebSocketMessageBrokerConfigurer {

    @Autowired
    private HttpHandshakeInterceptor handshakeInterceptor;

    @Override
    public void registerStompEndpoints(StompEndpointRegistry registry) {
        registry.addEndpoint("/ws").withSockJS().setInterceptors(handshakeInterceptor);
    }

    @Override
    public void configureMessageBroker(MessageBrokerRegistry registry) {
        registry.setApplicationDestinationPrefixes("/app");
        registry.enableSimpleBroker("/topic");
    }

}
@EnableWebSocketMessageBroker
This annotation tell with the Spring that "let's enable WebSocket Server".
HTTP Handshake
Existing infrastructure causes limitations for the deployment of the WebSocket. Normally, HTTP uses ports 80 & 443, therefore, the WebSocket has touse other ports, while most Firewalls which block the ports other than 80 & 443, using Proxies, also have many problems. So, to be able to deploy easily, the WebSocket uses HTTP Handshake to upgrade. That means that for the first time the client sends an HTTP-based request to the server, telling the server that it is not HTTP, upgrade to the WebSocket, and thus they form a connection.
HttpHandshakeInterceptor class is used to handle events immediately before and after WebSocket shakes hands with the HTTP. You can do something with this class.
HttpHandshakeInterceptor.java
package org.o7planning.springbootwebsocket.interceptor;

import java.util.Map;

import javax.servlet.http.HttpSession;

import org.slf4j.Logger;
import org.slf4j.LoggerFactory;
import org.springframework.http.server.ServerHttpRequest;
import org.springframework.http.server.ServerHttpResponse;
import org.springframework.http.server.ServletServerHttpRequest;
import org.springframework.stereotype.Component;
import org.springframework.web.socket.WebSocketHandler;
import org.springframework.web.socket.server.HandshakeInterceptor;

@Component
public class HttpHandshakeInterceptor implements HandshakeInterceptor {

    private static final Logger logger = LoggerFactory.getLogger(HttpHandshakeInterceptor.class);

    @Override
    public boolean beforeHandshake(ServerHttpRequest request, ServerHttpResponse response, WebSocketHandler wsHandler,
            Map<String, Object> attributes) throws Exception {

        logger.info("Call beforeHandshake");

        if (request instanceof ServletServerHttpRequest) {
            ServletServerHttpRequest servletRequest = (ServletServerHttpRequest) request;
            HttpSession session = servletRequest.getServletRequest().getSession();
            attributes.put("sessionId", session.getId());
        }
        return true;
    }

    public void afterHandshake(ServerHttpRequest request, ServerHttpResponse response, WebSocketHandler wsHandler,
            Exception ex) {
        logger.info("Call afterHandshake");
    }

}
5. Listener, Model, Controller
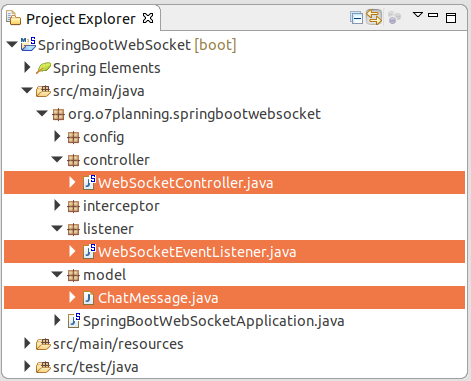
ChatMessage.java
package org.o7planning.springbootwebsocket.model;

public class ChatMessage {

    private MessageType type;
    private String content;
    private String sender;

    public enum MessageType {
        CHAT, JOIN, LEAVE
    }

    public MessageType getType() {
        return type;
    }

    public void setType(MessageType type) {
        this.type = type;
    }

    public String getContent() {
        return content;
    }

    public void setContent(String content) {
        this.content = content;
    }

    public String getSender() {
        return sender;
    }

    public void setSender(String sender) {
        this.sender = sender;
    }

}
WebSocketEventListener.java
package org.o7planning.springbootwebsocket.listener;

import org.o7planning.springbootwebsocket.model.ChatMessage;
import org.slf4j.Logger;
import org.slf4j.LoggerFactory;
import org.springframework.beans.factory.annotation.Autowired;
import org.springframework.context.event.EventListener;
import org.springframework.messaging.simp.SimpMessageSendingOperations;
import org.springframework.messaging.simp.stomp.StompHeaderAccessor;
import org.springframework.stereotype.Component;
import org.springframework.web.socket.messaging.SessionConnectedEvent;
import org.springframework.web.socket.messaging.SessionDisconnectEvent;

@Component
public class WebSocketEventListener {

    private static final Logger logger = LoggerFactory.getLogger(WebSocketEventListener.class);

    @Autowired
    private SimpMessageSendingOperations messagingTemplate;

    @EventListener
    public void handleWebSocketConnectListener(SessionConnectedEvent event) {
        logger.info("Received a new web socket connection");
    }

    @EventListener
    public void handleWebSocketDisconnectListener(SessionDisconnectEvent event) {
        StompHeaderAccessor headerAccessor = StompHeaderAccessor.wrap(event.getMessage());

        String username = (String) headerAccessor.getSessionAttributes().get("username");

        if(username != null) {
            logger.info("User Disconnected : " + username);

            ChatMessage chatMessage = new ChatMessage();
            chatMessage.setType(ChatMessage.MessageType.LEAVE);
            chatMessage.setSender(username);

            messagingTemplate.convertAndSend("/topic/publicChatRoom", chatMessage);
        }
    }

}
MainController.java
package org.o7planning.springbootwebsocket.controller;

import javax.servlet.http.HttpServletRequest;

import org.springframework.stereotype.Controller;
import org.springframework.ui.Model;
import org.springframework.web.bind.annotation.RequestMapping;
import org.springframework.web.bind.annotation.RequestMethod;
import org.springframework.web.bind.annotation.RequestParam;

@Controller
public class MainController {

    @RequestMapping("/")
    public String index(HttpServletRequest request, Model model) {
        String username = (String) request.getSession().getAttribute("username");

        if (username == null || username.isEmpty()) {
            return "redirect:/login";
        }
        model.addAttribute("username", username);

        return "chat";
    }

    @RequestMapping(path = "/login", method = RequestMethod.GET)
    public String showLoginPage() {
        return "login";
    }

    @RequestMapping(path = "/login", method = RequestMethod.POST)
    public String doLogin(HttpServletRequest request, @RequestParam(defaultValue = "") String username) {
        username = username.trim();

        if (username.isEmpty()) {
            return "login";
        }
        request.getSession().setAttribute("username", username);

        return "redirect:/";
    }

    @RequestMapping(path = "/logout")
    public String logout(HttpServletRequest request) {
        request.getSession(true).invalidate();

        return "redirect:/login";
    }

}
WebSocketController.java
package org.o7planning.springbootwebsocket.controller;

import org.o7planning.springbootwebsocket.model.ChatMessage;
import org.springframework.messaging.handler.annotation.MessageMapping;
import org.springframework.messaging.handler.annotation.Payload;
import org.springframework.messaging.handler.annotation.SendTo;
import org.springframework.messaging.simp.SimpMessageHeaderAccessor;
import org.springframework.stereotype.Controller;

@Controller
public class WebSocketController {


    @MessageMapping("/chat.sendMessage")
    @SendTo("/topic/publicChatRoom")
    public ChatMessage sendMessage(@Payload ChatMessage chatMessage) {
        return chatMessage;
    }

    @MessageMapping("/chat.addUser")
    @SendTo("/topic/publicChatRoom")
    public ChatMessage addUser(@Payload ChatMessage chatMessage, SimpMessageHeaderAccessor headerAccessor) {
        // Add username in web socket session
        headerAccessor.getSessionAttributes().put("username", chatMessage.getSender());
        return chatMessage;
    }

}
6. Html, Javascript, Css
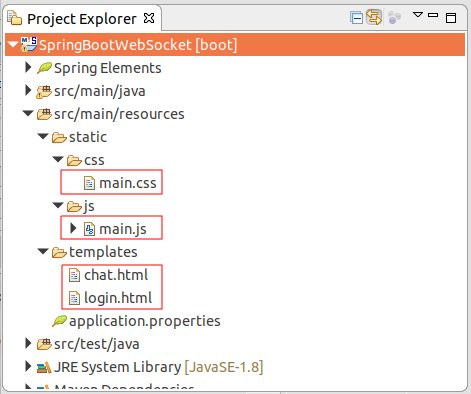
login.html
<!DOCTYPE html>
<html>
   <head>
      <title>Login</title>
      <link rel="stylesheet" href="/css/main.css" />
   </head>
   <body>
      <div id="login-container">
         <h1 class="title">Enter your username</h1>
         <form id="loginForm" name="loginForm" method="POST">
            <input type="text" name="username" />
            <button type="submit">Login</button>
         </form>
      </div>
   </body>
</html>
chat.html
<!DOCTYPE html>
<html xmlns:th="http://www.thymeleaf.org">
   <head>
      <title>Spring Boot WebSocket</title>
      <link rel="stylesheet" th:href="@{/css/main.css}" />

      <!-- https://cdnjs.com/libraries/sockjs-client -->
      <script src="https://cdnjs.cloudflare.com/ajax/libs/sockjs-client/1.1.4/sockjs.min.js"></script>
      <!-- https://cdnjs.com/libraries/stomp.js/ -->
      <script  src="https://cdnjs.cloudflare.com/ajax/libs/stomp.js/2.3.3/stomp.min.js"></script>

   </head>
   <body>
      <div id="chat-container">
         <div class="chat-header">
            <div class="user-container">
               <span id="username" th:utext="${username}"></span>
               <a th:href="@{/logout}">Logout</a>
            </div>
            <h3>Spring WebSocket Chat Demo</h3>
         </div>

         <hr/>

         <div id="connecting">Connecting...</div>
         <ul id="messageArea">
         </ul>
         <form id="messageForm" name="messageForm">
            <div class="input-message">
               <input type="text" id="message" autocomplete="off"
                  placeholder="Type a message..."/>
               <button type="submit">Send</button>
            </div>
         </form>
      </div>

      <script th:src="@{/js/main.js}"></script>

   </body>
</html>
main.css
* {
    -webkit-box-sizing: border-box;
    -moz-box-sizing: border-box;
    box-sizing: border-box;
}

html, body {
    height: 100%;
    overflow: hidden;
}

#login-page {
    text-align: center;
}

.nickname  {
    color:blue;margin-right:20px;
}
.hidden {
    display: none;
}

.user-container {
    float: right;
    margin-right:5px;
}

#login-container {
    background: #f4f6f6 ;
    border: 2px solid #ccc;
    width: 100%;
    max-width: 500px;
    display: inline-block;
    margin-top: 42px;
    vertical-align: middle;
    position: relative;
    padding: 35px 55px 35px;
    min-height: 250px;
    position: absolute;
    top: 50%;
    left: 0;
    right: 0;
    margin: 0 auto;
    margin-top: -160px;
}


#chat-container {
    position: relative;
    height: 100%;
}

#chat-container #messageForm {
    padding: 20px;
}

#chat-container {
    border: 2px solid #d5dbdb;
    background-color:  #d5dbdb ;
    max-width: 500px;
    margin-left: auto;
    margin-right: auto;

    margin-top: 30px;
    height: calc(100% - 60px);
    max-height: 600px;
    position: relative;

}

#chat-container ul {
    list-style-type: none;
    background-color: #fff;
    margin: 0;
    overflow: auto;
    overflow-y: scroll;
    padding: 0 20px 0px 20px;
    height: calc(100% - 150px);
}

#chat-container #messageForm {
    padding: 20px;
}

#chat-container ul li {
    line-height: 1.5rem;
    padding: 10px 20px;
    margin: 0;
    border-bottom: 1px solid #f4f4f4;
}

#chat-container ul li p {
    margin: 0;
}

#chat-container .event-message {
    width: 100%;
    text-align: center;
    clear: both;
}

#chat-container .event-message p {
    color: #777;
    font-size: 14px;
    word-wrap: break-word;
}

#chat-container .chat-message {
    position: relative;
}

#messageForm .input-message  {
    float: left;
    width: calc(100% - 85px);
}

.connecting {
    text-align: center;
    color: #777;
    width: 100%;
}
main.js
'use strict';


var messageForm = document.querySelector('#messageForm');
var messageInput = document.querySelector('#message');
var messageArea = document.querySelector('#messageArea');
var connectingElement = document.querySelector('#connecting');

var stompClient = null;
var username = null;


function connect() {
    username = document.querySelector('#username').innerText.trim();

    var socket = new SockJS('/ws');
    stompClient = Stomp.over(socket);

    stompClient.connect({}, onConnected, onError);
}

// Connect to WebSocket Server.
connect();

function onConnected() {
    // Subscribe to the Public Topic
    stompClient.subscribe('/topic/publicChatRoom', onMessageReceived);

    // Tell your username to the server
    stompClient.send("/app/chat.addUser",
        {},
        JSON.stringify({sender: username, type: 'JOIN'})
    )

    connectingElement.classList.add('hidden');
}


function onError(error) {
    connectingElement.textContent = 'Could not connect to WebSocket server. Please refresh this page to try again!';
    connectingElement.style.color = 'red';
}


function sendMessage(event) {
    var messageContent = messageInput.value.trim();
    if(messageContent && stompClient) {
        var chatMessage = {
            sender: username,
            content: messageInput.value,
            type: 'CHAT'
        };
        stompClient.send("/app/chat.sendMessage", {}, JSON.stringify(chatMessage));
        messageInput.value = '';
    }
    event.preventDefault();
}


function onMessageReceived(payload) {
    var message = JSON.parse(payload.body);

    var messageElement = document.createElement('li');

    if(message.type === 'JOIN') {
        messageElement.classList.add('event-message');
        message.content = message.sender + ' joined!';
    } else if (message.type === 'LEAVE') {
        messageElement.classList.add('event-message');
        message.content = message.sender + ' left!';
    } else {
        messageElement.classList.add('chat-message');
        var usernameElement = document.createElement('strong');
        usernameElement.classList.add('nickname');
        var usernameText = document.createTextNode(message.sender);
        var usernameText = document.createTextNode(message.sender);
        usernameElement.appendChild(usernameText);
        messageElement.appendChild(usernameElement);
    }

    var textElement = document.createElement('span');
    var messageText = document.createTextNode(message.content);
    textElement.appendChild(messageText);

    messageElement.appendChild(textElement);

    messageArea.appendChild(messageElement);
    messageArea.scrollTop = messageArea.scrollHeight;
}


messageForm.addEventListener('submit', sendMessage, true);
Spring Boot Tutorials
- Install Spring Tool Suite for Eclipse
- Spring Tutorial for Beginners
- Spring Boot Tutorial for Beginners
- Spring Boot Common Properties
- Spring Boot and Thymeleaf Tutorial with Examples
- Spring Boot and FreeMarker Tutorial with Examples
- Spring Boot and Groovy Tutorial with Examples
- Spring Boot and Mustache Tutorial with Examples
- Spring Boot and JSP Tutorial with Examples
- Spring Boot, Apache Tiles, JSP Tutorial with Examples
- Use Logging in Spring Boot
- Application Monitoring with Spring Boot Actuator
- Create a Multi Language web application with Spring Boot
- Use multiple ViewResolvers in Spring Boot
- Use Twitter Bootstrap in Spring Boot
- Spring Boot Interceptors Tutorial with Examples
- Spring Boot, Spring JDBC and Spring Transaction Tutorial with Examples
- Spring JDBC Tutorial with Examples
- Spring Boot, JPA and Spring Transaction Tutorial with Examples
- Spring Boot and Spring Data JPA Tutorial with Examples
- Spring Boot, Hibernate and Spring Transaction Tutorial with Examples
- Integrating Spring Boot, JPA and H2 Database
- Spring Boot and MongoDB Tutorial with Examples
- Use Multiple DataSources with Spring Boot and JPA
- Use Multiple DataSources with Spring Boot and RoutingDataSource
- Create a Login Application with Spring Boot, Spring Security, Spring JDBC
- Create a Login Application with Spring Boot, Spring Security, JPA
- Create a User Registration Application with Spring Boot, Spring Form Validation
- Example of OAuth2 Social Login in Spring Boot
- Run background scheduled tasks in Spring
- CRUD Restful Web Service Example with Spring Boot
- Spring Boot Restful Client with RestTemplate Example
- CRUD Example with Spring Boot, REST and AngularJS
- Secure Spring Boot RESTful Service using Basic Authentication
- Secure Spring Boot RESTful Service using Auth0 JWT
- Spring Boot File Upload Example
- Spring Boot File Download Example
- Spring Boot File Upload with jQuery Ajax Example
- Spring Boot File Upload with AngularJS Example
- Create a Shopping Cart Web Application with Spring Boot, Hibernate
- Spring Email Tutorial with Examples
- Create a simple Chat application with Spring Boot and Websocket
- Deploy Spring Boot Application on Tomcat Server
- Deploy Spring Boot Application on Oracle WebLogic Server
- Install a free Let's Encrypt SSL certificate for Spring Boot
- Configure Spring Boot to redirect HTTP to HTTPS
- Fetch data with Spring Data JPA DTO Projections
Show More