JavaFX Effects Tutorial with Examples
1. Effects overview
An effect is any action on a graphic image to create another graphic image. One of effects that you usually meet is motion blur effect, drop shadow effect, etc.
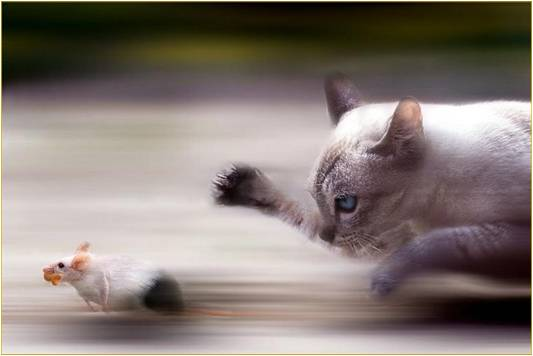
Motion Blur Effect:
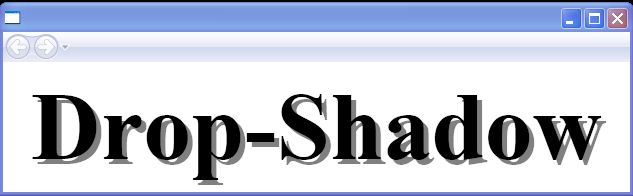
Drop Shadow Effect:
In JavaFX, an effect can be used for an object is of Node type through Node.setEffect(effect) method.
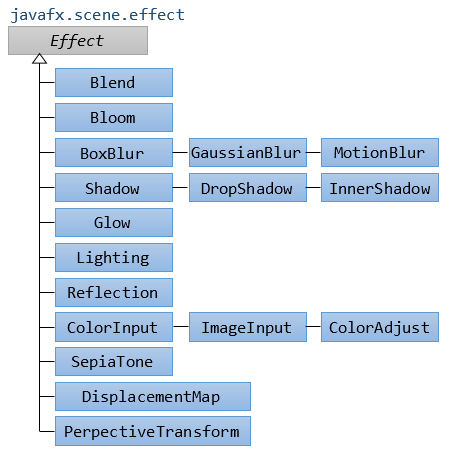
The JavaFX has built a few classes of effects, for different effects, all of which are in the javafx.scene.effect package. Below are some classes in this package.
- Blend
- Bloom
- BoxBlur
- ColorAdjust
- ColorInput
- DropShadow
- GaussianBlur
- Glow
- ImageInput
- InnerShadow
- Lighting
- MotionBlur
- PerspectiveTransform
- Reflection
- SepiaTone
- Shadow
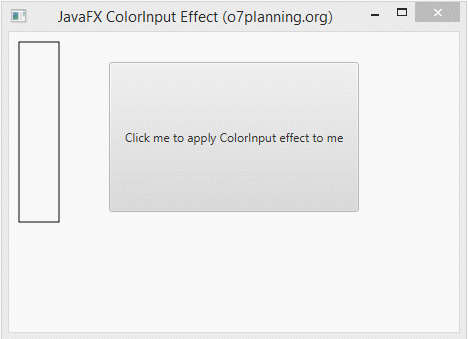
2. ColorInput
ColorInput is an effect used for rendering an a rectangle filled by color on an affected object.This effect will hide the affected object completely.
ColorInput is usually used with other effects to create a mixed effect and applies to a background.
Example:
In the following example, an Button is set ColorInput effect. It is hided completely. You see only a colourful rectangle.
ColorInputEffectExample.java
package org.o7planning.javafx.effect;
import javafx.application.Application;
import javafx.event.ActionEvent;
import javafx.event.EventHandler;
import javafx.scene.Group;
import javafx.scene.Scene;
import javafx.scene.control.Button;
import javafx.scene.effect.ColorInput;
import javafx.scene.paint.Color;
import javafx.scene.shape.Rectangle;
import javafx.stage.Stage;
public class ColorInputEffectExample extends Application {
@Override
public void start(Stage stage) {
double x = 10;
double y = 10;
double w = 40;
double h = 180;
// Rectangle
Rectangle rect = new Rectangle(x, y, w, h);
rect.setFill(Color.WHITE);
rect.setStrokeWidth(1);
rect.setStroke(Color.BLACK);
// Button
Button button = new Button("Click me to apply ColorInput effect to me");
button.setLayoutX(100);
button.setLayoutY(30);
button.setPrefSize(250, 150);
button.setOnAction(new EventHandler<ActionEvent>() {
@Override
public void handle(ActionEvent event) {
ColorInput colorInput = new ColorInput();
colorInput.setPaint(Color.STEELBLUE);
colorInput.setX(x);
colorInput.setY(y);
colorInput.setWidth(w);
colorInput.setHeight(h);
// Setting ColorInput effect
button.setEffect(colorInput);
}
});
Group root = new Group();
root.getChildren().addAll(button, rect);
Scene scene = new Scene(root, 450, 300);
stage.setTitle("JavaFX ColorInput Effect (o7planning.org)");
stage.setScene(scene);
stage.show();
}
public static void main(String args[]) {
launch(args);
}
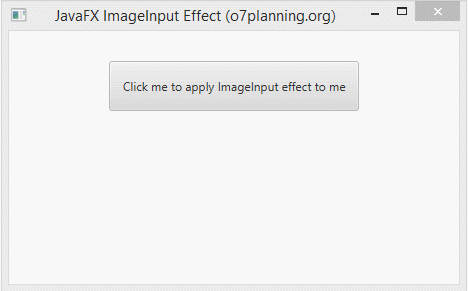
}3. ImageInput
ImageInput is an effect used for rendering an image on an affected object. This effect will hide the affected object completely.
The ImageInput is usually used with other effects to create a mixed effect and applies to an background.
For example:
In the following example, a Button is set the ImageInput effect. It will be hided completely, you see only an image.
ImageInputEffectExample.java
package org.o7planning.javafx.effect;

import javafx.application.Application;
import javafx.event.ActionEvent;
import javafx.event.EventHandler;
import javafx.scene.Group;
import javafx.scene.Scene;
import javafx.scene.control.Button;
import javafx.scene.effect.ImageInput;
import javafx.scene.image.Image;
import javafx.stage.Stage;

public class ImageInputEffectExample extends Application {

   @Override
   public void start(Stage stage) {

      double x = 10;
      double y = 10;

      // Button
      Button button = new Button("Click me to apply ImageInput effect to me");

      button.setLayoutX(100);
      button.setLayoutY(30);

      button.setPrefSize(250, 50);

      button.setOnAction(new EventHandler<ActionEvent>() {

         @Override
         public void handle(ActionEvent event) {
            String imageUrl= "http://o7planning.org/templates/o7planning/resources/images/favi.png";
            Image image = new Image(imageUrl);

            ImageInput imageInput = new ImageInput();
            imageInput.setSource(image);
            imageInput.setX(x);
            imageInput.setY(y);

            // Setting ColorInput effect
            button.setEffect(imageInput);
         }
      });

      Group root = new Group();

      root.getChildren().addAll(button );

      Scene scene = new Scene(root, 450, 250);
      stage.setTitle("JavaFX ImageInput Effect (o7planning.org)");
      stage.setScene(scene);

      stage.show();

   }

   public static void main(String args[]) {
      launch(args);
   }

}
4. BoxBlur
For example:
BoxBlurEffectExample.java
package org.o7planning.javafx.effect;

import javafx.application.Application;
import javafx.scene.Group;
import javafx.scene.Scene;
import javafx.scene.effect.BoxBlur;
import javafx.scene.paint.Color;
import javafx.scene.text.Font;
import javafx.scene.text.FontWeight;
import javafx.scene.text.Text;
import javafx.stage.Stage;

public class BoxBlurEffectExample extends Application {

    @Override
    public void start(Stage stage) {

        double x = 10;
        double y = 150;

        Text text = new Text();
        text.setText("Blurry Text!");
        text.setFill(Color.web("0x3b596d"));
        text.setFont(Font.font(null, FontWeight.BOLD, 70));
        text.setX(x);
        text.setY(y);

        BoxBlur boxBlur = new BoxBlur();

        // Min: 0.0 Max: 255.0
        boxBlur.setWidth(10);

        // Min: 0.0 Max: 255.0
        boxBlur.setHeight(5);

        // Min: 0 Max: 3
        boxBlur.setIterations(3);
        text.setEffect(boxBlur);

        Group root = new Group();

        root.getChildren().addAll(text);

        Scene scene = new Scene(root, 450, 250);
        stage.setTitle("JavaFX BoxBlur Effect (o7planning.org)");
        stage.setScene(scene);

        stage.show();

    }

    public static void main(String args[]) {
        launch(args);
    }

}
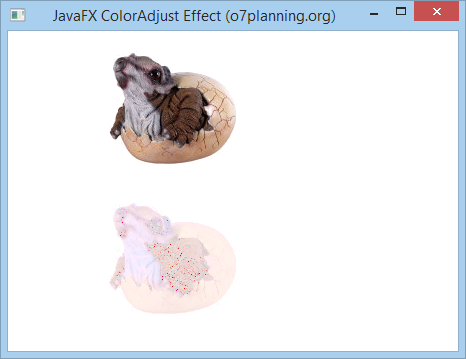
5. ColorAdjust
You may adjust color of an image by applying a color adjust efffect. To adjust the color of image, you have to adjust the five following properties:
- hue
- saturation
- brightness
- contrast
All the above properties can apply to each different pixel (decomposition point).
Property | Description |
hue | hue is a property with double type, of which values are within the range of -1..1. It represents for values of adjusting hue for this effect . |
saturation | saturation is a property with double type, of which values are within the range of -1..1. It represents for values of adjustingsaturation for this effect. |
brightness | brightness is a property with double type, of which values are within the range of -1..1. It represents for brightness for this effect. |
contrast | contrast is a property with double type, of which values are within the range of-1..1. It represents for contrast for this effect. |
For example:
ColorAdjustEffectExample.java
package org.o7planning.javafx.effect;

import javafx.application.Application;
import javafx.scene.Group;
import javafx.scene.Scene;
import javafx.scene.effect.ColorAdjust;
import javafx.scene.image.Image;
import javafx.scene.image.ImageView;
import javafx.stage.Stage;

public class ColorAdjustEffectExample extends Application {

   @Override
   public void start(Stage stage) {

      String imageUrl = "http://o7planning.org/templates/o7planning/resources/images/favi.png";
      Image image = new Image(imageUrl);

      ImageView imageView1 = new ImageView(image);
      imageView1.setX(100);
      imageView1.setY(20);

      ImageView imageView2 = new ImageView(image);

      imageView2.setX(100);
      imageView2.setY(170);

      // Create the ColorAdjust
      ColorAdjust colorAdjust = new ColorAdjust();

      // Setting the contrast value
      colorAdjust.setContrast(0.3);

      // Setting the hue value
      colorAdjust.setHue(-0.05);

      // Setting the brightness value
      colorAdjust.setBrightness(0.9);

      // Setting the saturation value
      colorAdjust.setSaturation(0.7);

      // Applying ColorAdjust effect to the ImageView node
      imageView2.setEffect(colorAdjust);

      Group root = new Group(imageView1, imageView2);

      Scene scene = new Scene(root, 450, 320);
      stage.setTitle("JavaFX ColorAdjust Effect (o7planning.org)");
      stage.setScene(scene);
      stage.show();
   }

   public static void main(String args[]) {
      launch(args);
   }

}
Run the example:
Example 2:
Another example allows you to adjust the properties of hue, saturation, brightness and contrast through Sliders:
ColorAdjustEffectExample2.java
package org.o7planning.javafx.effect;
import javafx.application.Application;
import javafx.beans.value.ChangeListener;
import javafx.beans.value.ObservableValue;
import javafx.geometry.Insets;
import javafx.scene.Scene;
import javafx.scene.control.Label;
import javafx.scene.control.Slider;
import javafx.scene.effect.ColorAdjust;
import javafx.scene.image.Image;
import javafx.scene.image.ImageView;
import javafx.scene.layout.VBox;
import javafx.stage.Stage;
public class ColorAdjustEffectExample2 extends Application {
private static final int ADJUST_TYPE_HUE = 1;
private static final int ADJUST_TYPE_CONTRAST = 2;
private static final int ADJUST_TYPE_SATURATION = 3;
private static final int ADJUST_TYPE_BRIGHTNESS = 4;
private ColorAdjust colorAdjust;
@Override
public void start(Stage stage) {
Label contrastLabel = new Label("Contrast:");
Label hueLabel = new Label("Hue:");
Label saturationLabel = new Label("Saturation:");
Label brightnessLabel = new Label("Brightness:");
Slider contrastSlider = this.createSlider(ADJUST_TYPE_CONTRAST);
Slider hueSlider = this.createSlider(ADJUST_TYPE_HUE);
Slider saturationSlider = this.createSlider(ADJUST_TYPE_SATURATION);
Slider brightnessSlider = this.createSlider(ADJUST_TYPE_BRIGHTNESS);
String imageUrl = "http://o7planning.org/templates/o7planning/resources/images/favi.png";
Image image = new Image(imageUrl);
ImageView imageView = new ImageView(image);
// Create the ColorAdjust
colorAdjust = new ColorAdjust();
// Applying ColorAdjust effect to the ImageView node
imageView.setEffect(colorAdjust);
VBox root = new VBox();
root.setPadding(new Insets(10));
root.getChildren().addAll(contrastLabel, contrastSlider, //
hueLabel, hueSlider, //
saturationLabel, saturationSlider, //
brightnessLabel, brightnessSlider, imageView);
Scene scene = new Scene(root, 450, 320);
stage.setTitle("JavaFX ColorAdjust Effect (o7planning.org)");
stage.setScene(scene);
stage.show();
}
// Create Slider to Adjust Color
private Slider createSlider(final int adjustType) {
Slider slider = new Slider();
slider.setMin(-1);
slider.setMax(1);
slider.setBlockIncrement(0.1);
slider.setValue(0);
slider.valueProperty().addListener(new ChangeListener<Number>() {
@Override
public void changed(ObservableValue<? extends Number> observable, //
Number oldValue, Number newValue) {
switch (adjustType) {
case ADJUST_TYPE_HUE:
colorAdjust.setHue(newValue.doubleValue());
break;
case ADJUST_TYPE_CONTRAST:
colorAdjust.setContrast(newValue.doubleValue());
break;
case ADJUST_TYPE_SATURATION:
colorAdjust.setSaturation(newValue.doubleValue());
break;
case ADJUST_TYPE_BRIGHTNESS:
colorAdjust.setBrightness(newValue.doubleValue());
break;
}
}
});
return slider;
}
public static void main(String args[]) {
launch(args);
}
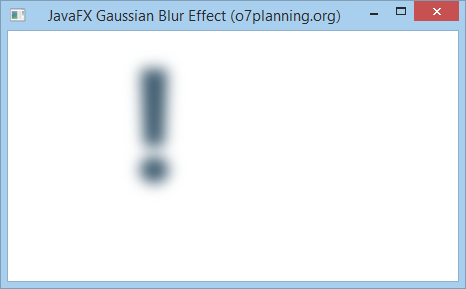
}6. Gaussian Blur
Gaussian Blur effect uses a Gaussian algorithm to produce a blur effect, which allows configurating the radius property.
- The radius property is the radius of the blur circle surrounding each point of the geometric object which is set this this effect.
For example:
GaussianBlurEffectExample.java
package org.o7planning.javafx.effect;

import javafx.animation.KeyFrame;
import javafx.animation.KeyValue;
import javafx.animation.Timeline;
import javafx.application.Application;
import javafx.scene.Group;
import javafx.scene.Node;
import javafx.scene.Scene;
import javafx.scene.effect.GaussianBlur;
import javafx.scene.paint.Color;
import javafx.scene.text.Font;
import javafx.scene.text.FontWeight;
import javafx.scene.text.Text;
import javafx.stage.Stage;
import javafx.util.Duration;

public class GaussianBlurEffectExample extends Application {

	// 30 millisencond.
	private static final int UI_ANIMATION_TIME_MSEC = 30000;

	private static final double MIN_RADIUS = 0.0;
	private static final double MAX_RADIUS = 70.0;

	private void applyEffect(Node node) {
		// Create Gaussian Blur effect with radius = 0
		GaussianBlur blur = new GaussianBlur(MIN_RADIUS);
		node.setEffect(blur);

		// Create animation effect
		Timeline timeline = new Timeline();
		KeyValue kv = new KeyValue(blur.radiusProperty(), MAX_RADIUS);
		KeyFrame kf = new KeyFrame(Duration.millis(UI_ANIMATION_TIME_MSEC), kv);
		timeline.getKeyFrames().add(kf);
		timeline.play();
	}

	@Override
	public void start(Stage stage) {

		Text text = new Text();
		text.setX(120.0);
		text.setY(150.0);
		text.setText("!");
		text.setFill(Color.web("0x3b596d"));
		text.setFont(Font.font(null, FontWeight.BOLD, 160));

		this.applyEffect(text);

		Group root = new Group();

		root.getChildren().addAll(text);

		Scene scene = new Scene(root, 450, 250);
		stage.setTitle("JavaFX Gaussian Blur Effect (o7planning.org)");
		stage.setScene(scene);

		stage.show();

	}

	public static void main(String args[]) {
		launch(args);
	}

}
Run the example:
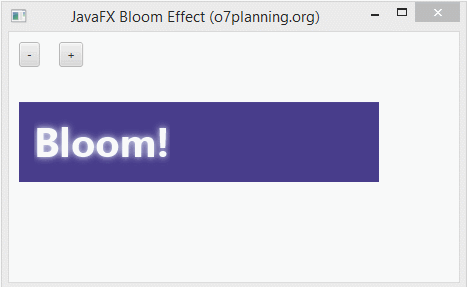
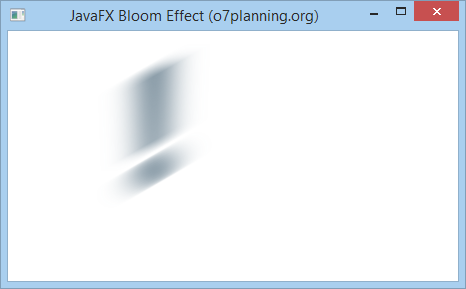
7. Bloom Effect
Bloom is an effect, which is like the feeling when you are looking at a strong light source. You can set a threshold for the bloom of the effect which is a number in the range of 0..1.
For example:
In the following example, a Text objectis set theBloom effect.
BloomEffectExample.java
package org.o7planning.javafx.effect;

import javafx.application.Application;
import javafx.event.ActionEvent;
import javafx.event.EventHandler;
import javafx.scene.Group;
import javafx.scene.Scene;
import javafx.scene.control.Button;
import javafx.scene.control.Label;
import javafx.scene.effect.Bloom;
import javafx.scene.paint.Color;
import javafx.scene.shape.Rectangle;
import javafx.scene.text.Font;
import javafx.scene.text.FontWeight;
import javafx.scene.text.Text;
import javafx.stage.Stage;

public class BloomEffectExample extends Application {

   @Override
   public void start(Stage stage) {

      Label label = new Label();
      label.setLayoutX(10);
      label.setLayoutY(50);

      Rectangle rect = new Rectangle();
      rect.setX(10);
      rect.setY(70);
      rect.setWidth(360);
      rect.setHeight(80);
      rect.setFill(Color.DARKSLATEBLUE);

      Text text = new Text();
      text.setText("Bloom!");
      text.setFill(Color.ALICEBLUE);
      text.setFont(Font.font(null, FontWeight.BOLD, 40));
      text.setX(25);
      text.setY(125);

      // Create Bloom Effect
      Bloom bloom = new Bloom();
      // Setting Threshold
      bloom.setThreshold(0.8);
      text.setEffect(bloom);

      Button plusButton = new Button("+");
      plusButton.setLayoutX(50);
      plusButton.setLayoutY(10);
      plusButton.setOnAction(new EventHandler<ActionEvent>() {

         @Override
         public void handle(ActionEvent event) {
            double threshold = bloom.getThreshold();
            threshold += 0.1;
            if (threshold > 1) {
               threshold = 1;
            }
            bloom.setThreshold(threshold);
            label.setText("Threshold: " + threshold);
         }
      });

      Button minusButton = new Button("-");
      minusButton.setLayoutX(10);
      minusButton.setLayoutY(10);
      minusButton.setOnAction(new EventHandler<ActionEvent>() {

         @Override
         public void handle(ActionEvent event) {
            double threshold = bloom.getThreshold();
            threshold -= 0.1;
            if (threshold < 0) {
               threshold = 0;
            }
            bloom.setThreshold(threshold);
            label.setText("Threshold: " + threshold);
         }
      });
      Group root = new Group();

      root.getChildren().addAll(rect, text, label, minusButton, plusButton);

      Scene scene = new Scene(root, 450, 250);
      stage.setTitle("JavaFX Bloom Effect (o7planning.org)");
      stage.setScene(scene);

      stage.show();

   }

   public static void main(String args[]) {
      launch(args);
   }

}
8. Drop Shadow
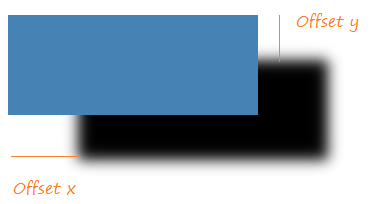
Drop Shadow is ahight level effect, which creates a shadow for a geometric object.

Drop Shadow Effect has 3 important properties to be established by you which are:
- Offset (Offset x, Offset y)
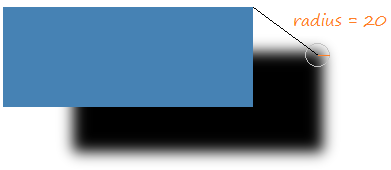
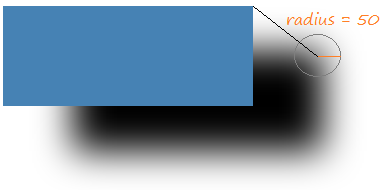
- Radius (Radius of blur circle)
- Color (color of drop shadow)
Offset
Radius
Each point on the object will create its shadow point. This shadow point is the center of a blur circle. You can set up radius for this circle.
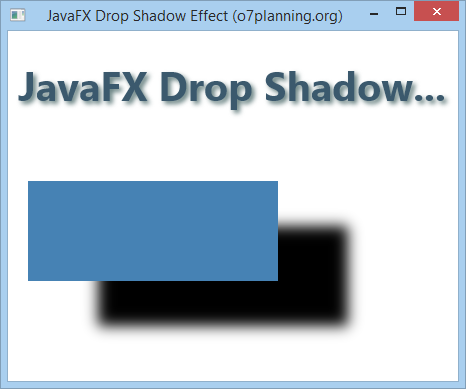
For example:
DropShadowEffectExample.java
package org.o7planning.javafx.effect;

import javafx.application.Application;
import javafx.scene.Group;
import javafx.scene.Scene;
import javafx.scene.effect.DropShadow;
import javafx.scene.paint.Color;
import javafx.scene.shape.Rectangle;
import javafx.scene.text.Font;
import javafx.scene.text.FontWeight;
import javafx.scene.text.Text;
import javafx.stage.Stage;

public class DropShadowEffectExample extends Application {

    @Override
    public void start(Stage stage) {

        DropShadow dropShadow = new DropShadow();
        dropShadow.setRadius(5.0);
        dropShadow.setOffsetX(3.0);
        dropShadow.setOffsetY(3.0);
        dropShadow.setColor(Color.color(0.4, 0.5, 0.5));

        Text text = new Text();
        text.setCache(true);
        text.setX(10.0);
        text.setY(70.0);
        text.setFill(Color.web("0x3b596d"));
        text.setText("JavaFX Drop Shadow...");
        text.setFont(Font.font(null, FontWeight.BOLD, 40));

        text.setEffect(dropShadow);

        DropShadow dropShadow2 = new DropShadow();
        dropShadow2.setOffsetX(70.0);
        dropShadow2.setOffsetY(45.0);
        dropShadow2.setRadius(20);

        Rectangle rect = new Rectangle(20, 150, 250, 100);
        rect.setFill(Color.STEELBLUE);
        rect.setCache(true);

        rect.setEffect(dropShadow2);

        Group root = new Group();

        root.getChildren().addAll(rect, text);

        Scene scene = new Scene(root, 450, 350);
        stage.setTitle("JavaFX Drop Shadow Effect (o7planning.org)");
        stage.setScene(scene);

        stage.show();

    }

    public static void main(String args[]) {
        launch(args);
    }

}
Run the example:
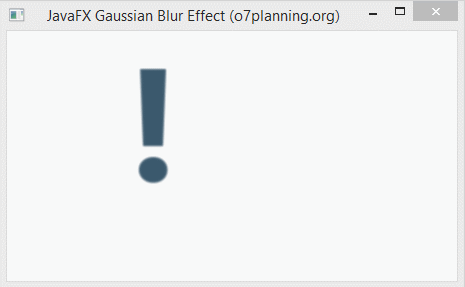
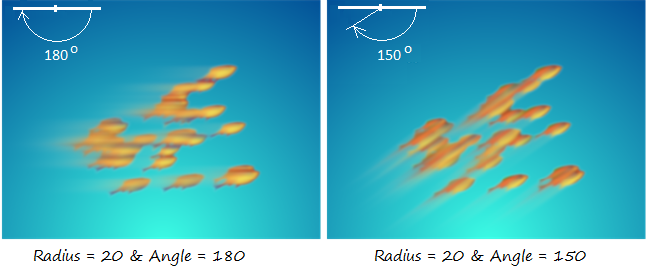
9. Motion Blur
Motion Blur effect uses the kernel that is Gaussian algorithm to create a blur effect, and allows configurating the properties such as radius and angle.
- The property of angle helps define the motion direction of the object which is moving.
- The property of radius is radius of blur circle surrounding each point of the object which is moving.
Example 1:
MotionBlurEffectExample.java
package org.o7planning.javafx.effect;

import javafx.application.Application;
import javafx.scene.Group;
import javafx.scene.Scene;
import javafx.scene.effect.MotionBlur;
import javafx.scene.paint.Color;
import javafx.scene.text.Font;
import javafx.scene.text.FontWeight;
import javafx.scene.text.Text;
import javafx.stage.Stage;

public class MotionBlurEffectExample extends Application {

    @Override
    public void start(Stage stage) {

        MotionBlur motionBlur = new MotionBlur();
        motionBlur.setRadius(55);
        motionBlur.setAngle(150.0);

        Text text = new Text();
        text.setX(120.0);
        text.setY(150.0);
        text.setText("!");
        text.setFill(Color.web("0x3b596d"));
        text.setFont(Font.font(null, FontWeight.BOLD, 160));
        text.setEffect(motionBlur);

        Group root = new Group();

        root.getChildren().addAll(text);

        Scene scene = new Scene(root, 450, 250);
        stage.setTitle("JavaFX Motion Blur Effect (o7planning.org)");
        stage.setScene(scene);

        stage.show();

    }

    public static void main(String args[]) {
        launch(args);
    }

}
Run the example:
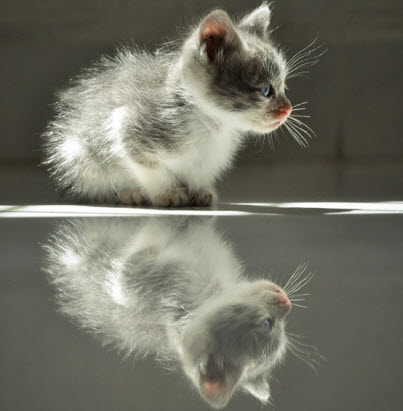
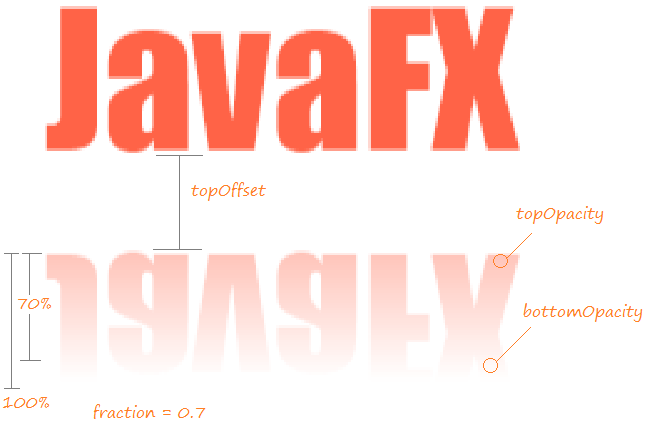
10. Reflection
Reflection is an effect that creates an reflection image of input object like you are standing in front of a mirror.
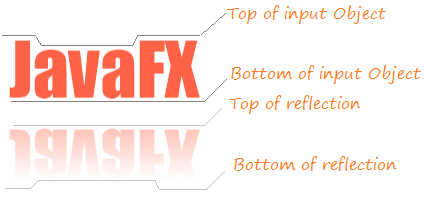
There are four important properties for the reflection effect:
- topOpacity
- bottomOpacity
- topOffset
- fraction
- input
Property | Description |
topOpacity | topOpacity is the property withdouble type, and values within the arange of 0..1, defaulted to be 0. This value represents the opacity of the reflection image at the top of it. |
bottomOpacity | bottomOpacity is the property with double type, and values within the arange of 0..1, defaulted to be 0. This value represents the opacity of the reflection image at the bottom of it. |
topOffset | topOffset is the property with double type. It is distance between the bottom point of the object and top one of the reflection image. |
fraction | fraction is the property with double type, and values within the arange of 0..1, defaulted to be 0.75 (75%). If this value moves to 1 (100%), the points near the top points of the object will have reflection image . (See the illustration below). |
input |
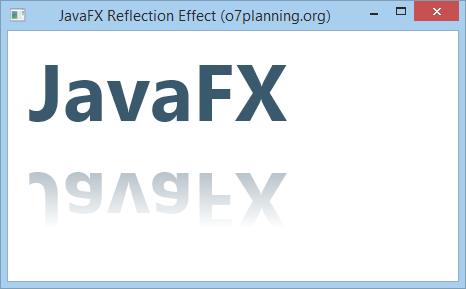
For example:
ReflectionEffectExample.java
package org.o7planning.javafx.effect;

import javafx.application.Application;
import javafx.scene.Group;
import javafx.scene.Scene;
import javafx.scene.effect.Reflection;
import javafx.scene.paint.Color;
import javafx.scene.text.Font;
import javafx.scene.text.FontWeight;
import javafx.scene.text.Text;
import javafx.stage.Stage;

public class ReflectionEffectExample extends Application {

   @Override
   public void start(Stage stage) {

      Reflection reflection = new Reflection();

      // Setting the bottom opacity of the reflection
      reflection.setBottomOpacity(0.0);

      // Setting the top opacity of the reflection
      reflection.setTopOpacity(0.5);

      // Setting the top offset of the reflection
      reflection.setTopOffset(10);

      // Setting the fraction of the reflection
      reflection.setFraction(0.7);

      Text text = new Text();
      text.setX(20.0);
      text.setY(90.0);

      text.setCache(true);
      text.setText("JavaFX");
      text.setFill(Color.web("0x3b596d"));
      text.setFont(Font.font(null, FontWeight.BOLD, 80));

      text.setEffect(reflection);

      Group root = new Group();

      root.getChildren().addAll(text);

      Scene scene = new Scene(root, 450, 250);
      stage.setTitle("JavaFX Reflection Effect (o7planning.org)");
      stage.setScene(scene);

      stage.show();

   }

   public static void main(String args[]) {
      launch(args);
   }
}
Run the example:
JavaFX Tutorials
- Open a new Window in JavaFX
- JavaFX ChoiceDialog Tutorial with Examples
- JavaFX Alert Dialogs Tutorial with Examples
- JavaFX TextInputDialog Tutorial with Examples
- Install e(fx)clipse for Eclipse (JavaFX Tooling)
- Install JavaFX Scene Builder for Eclipse
- JavaFX Tutorial for Beginners - Hello JavaFX
- JavaFX FlowPane Layout Tutorial with Examples
- JavaFX TilePane Layout Tutorial with Examples
- JavaFX HBox, VBox Layout Tutorial with Examples
- JavaFX BorderPane Layout Tutorial with Examples
- JavaFX AnchorPane Layout Tutorial with Examples
- JavaFX TitledPane Tutorial with Examples
- JavaFX Accordion Tutorial with Examples
- JavaFX ListView Tutorial with Examples
- JavaFX Group Tutorial with Examples
- JavaFX ComboBox Tutorial with Examples
- JavaFX Transformations Tutorial with Examples
- JavaFX Effects Tutorial with Examples
- JavaFX GridPane Layout Tutorial with Examples
- JavaFX StackPane Layout Tutorial with Examples
- JavaFX ScrollPane Tutorial with Examples
- JavaFX WebView and WebEngine Tutorial with Examples
- JavaFX HTMLEditor Tutorial with Examples
- JavaFX TableView Tutorial with Examples
- JavaFX TreeView Tutorial with Examples
- JavaFX TreeTableView Tutorial with Examples
- JavaFX Menu Tutorial with Examples
- JavaFX ContextMenu Tutorial with Examples
- JavaFX Image and ImageView Tutorial with Examples
- JavaFX Label Tutorial with Examples
- JavaFX Hyperlink Tutorial with Examples
- JavaFX Button Tutorial with Examples
- JavaFX ToggleButton Tutorial with Examples
- JavaFX RadioButton Tutorial with Examples
- JavaFX MenuButton and SplitMenuButton Tutorial with Examples
- JavaFX TextField Tutorial with Examples
- JavaFX PasswordField Tutorial with Examples
- JavaFX TextArea Tutorial with Examples
- JavaFX Slider Tutorial with Examples
- JavaFX Spinner Tutorial with Examples
- JavaFX ProgressBar and ProgressIndicator Tutorial with Examples
- JavaFX ChoiceBox Tutorial with Examples
- JavaFX Tooltip Tutorial with Examples
- JavaFX DatePicker Tutorial with Examples
- JavaFX ColorPicker Tutorial with Examples
- JavaFX FileChooser and DirectoryChooser Tutorial with Examples
- JavaFX PieChart Tutorial with Examples
- JavaFX AreaChart and StackedAreaChart Tutorial with Examples
- JavaFX BarChart and StackedBarChart Tutorial with Examples
- JavaFX Line Tutorial with Examples
- JavaFX Rectangle and Ellipse Tutorial with Examples
Show More