JavaFX Button Tutorial with Examples
1. JavaFX Button
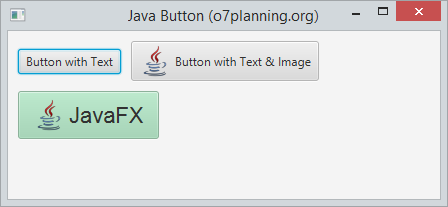
JavaFX Button enables developers to process an action when a user clicks a button. The Button class is an extension of the Labeled class. It can display text, an image, or both.
2. Button example
Create a Button with Text or Image, or both.
InputStream input =
       getClass().getResourceAsStream("/org/o7planning/javafx/icon/java-32.png");

Image image = new Image(input);
ImageView imageView = new ImageView(image);

// Create a Button with Text & Image from Constructor
Button button2 = new Button("Button with Text & Image", imageView);

// Or
Button button2 = new Button("Button with Text & Image");
button2.setGraphic(imageView);
View full example:
ButtonDemo.java
package org.o7planning.javafx.button;

import java.io.InputStream;

import javafx.application.Application;
import javafx.geometry.Insets;
import javafx.scene.Scene;
import javafx.scene.control.Button;
import javafx.scene.image.Image;
import javafx.scene.image.ImageView;
import javafx.scene.layout.FlowPane;
import javafx.stage.Stage;

public class ButtonDemo extends Application {

    @Override
    public void start(Stage primaryStage) throws Exception {

        FlowPane root = new FlowPane();
        root.setPadding(new Insets(10));
        root.setHgap(10);
        root.setVgap(10);

        // Button 1
        Button button1 = new Button("Button with Text");

        InputStream input = //
                getClass().getResourceAsStream("/org/o7planning/javafx/icon/java-32.png");

        Image image = new Image(input);
        ImageView imageView = new ImageView(image);

        Button button2 = new Button("Button with Text & Image");
        button2.setGraphic(imageView);

        root.getChildren().addAll(button1, button2);

        primaryStage.setTitle("Java Button (o7planning.org)");

        Scene scene = new Scene(root, 350, 150);
        primaryStage.setScene(scene);
        primaryStage.show();

    }

    public static void main(String[] args) {
        Application.launch(args);
    }

}
3. Button and events
The primary function of each button is to produce an action when it is clicked. Use the setOnAction method of the Button class to define what will happen when a user clicks the button.
button.setOnAction(new EventHandler<ActionEvent>() {

    @Override
    public void handle(ActionEvent event) {
        label.setText(new Date().toString());
    }
});
In addition, Button is a Node, it inherits all of event handling methods from class Node.
** Node **
public final void setOnDragEntered(EventHandler<? super DragEvent> value)
public final void setOnDragExited(EventHandler<? super DragEvent> value)
public final void setOnDragOver(EventHandler<? super DragEvent> value)
public final void setOnDragDropped(EventHandler<? super DragEvent> value)
public final void setOnDragDone(EventHandler<? super DragEvent> value)
public final void setOnContextMenuRequested(EventHandler<? super ContextMenuEvent> value)
public final void setOnMouseClicked(EventHandler<? super MouseEvent> value)
public final void setOnMouseDragged(EventHandler<? super MouseEvent> value)
public final void setOnMouseEntered(EventHandler<? super MouseEvent> value)
public final void setOnMouseExited(EventHandler<? super MouseEvent> value)
public final void setOnMouseMoved(EventHandler<? super MouseEvent> value)
public final void setOnMousePressed(EventHandler<? super MouseEvent> value)
public final void setOnMouseReleased(EventHandler<? super MouseEvent> value)
public final void setOnDragDetected(EventHandler<? super MouseEvent> value)
public final void setOnMouseDragOver(EventHandler<? super MouseDragEvent> value)
public final void setOnMouseDragReleased(EventHandler<? super MouseDragEvent> value)
public final void setOnMouseDragEntered(EventHandler<? super MouseDragEvent> value)
public final void setOnMouseDragExited(EventHandler<? super MouseDragEvent> value)
public final void setOnScrollStarted(EventHandler<? super ScrollEvent> value)
public final void setOnScroll(EventHandler<? super ScrollEvent> value)
public final void setOnScrollFinished(EventHandler<? super ScrollEvent> value)
public final void setOnRotationStarted(EventHandler<? super RotateEvent> value)
public final void setOnRotate(EventHandler<? super RotateEvent> value)
public final void setOnRotationFinished(EventHandler<? super RotateEvent> value)
public final void setOnZoomStarted(EventHandler<? super ZoomEvent> value)
public final void setOnZoom(EventHandler<? super ZoomEvent> value)
public final void setOnZoomFinished(EventHandler<? super ZoomEvent> value)
public final void setOnSwipeUp(EventHandler<? super SwipeEvent> value)
public final void setOnSwipeDown(EventHandler<? super SwipeEvent> value)
public final void setOnSwipeLeft(EventHandler<? super SwipeEvent> value)
public final void setOnSwipeRight(EventHandler<? super SwipeEvent> value)
public final void setOnTouchPressed(EventHandler<? super TouchEvent> value)
public final void setOnTouchMoved(EventHandler<? super TouchEvent> value)
public final void setOnTouchReleased(EventHandler<? super TouchEvent> value)
public final void setOnTouchStationary(EventHandler<? super TouchEvent> value)
public final void setOnKeyPressed(EventHandler<? super KeyEvent> value)
public final void setOnKeyReleased(EventHandler<? super KeyEvent> value)
public final void setOnKeyTyped(EventHandler<? super KeyEvent> value
public final void setOnInputMethodTextChanged(EventHandler<? super InputMethodEvent> value)
For example, an action handling occurs with Button.
ButtonEventDemo.java
package org.o7planning.javafx.button;

import java.util.Date;

import javafx.application.Application;
import javafx.event.ActionEvent;
import javafx.event.EventHandler;
import javafx.geometry.Insets;
import javafx.scene.Scene;
import javafx.scene.control.Button;
import javafx.scene.control.Label;
import javafx.scene.layout.FlowPane;
import javafx.stage.Stage;

public class ButtonEventDemo extends Application {

    @Override
    public void start(Stage primaryStage) throws Exception {

        FlowPane root = new FlowPane();
        root.setPadding(new Insets(10));
        root.setHgap(10);
        root.setVgap(10);

        // Button
        Button button = new Button("Show Time");
        Label label = new Label("");

        button.setOnAction(new EventHandler<ActionEvent>() {

            @Override
            public void handle(ActionEvent event) {
                label.setText(new Date().toString());
            }
        });

        root.getChildren().addAll(button,label);

        primaryStage.setTitle("Java Button (o7planning.org)");

        Scene scene = new Scene(root, 350, 150);
        primaryStage.setScene(scene);
        primaryStage.show();

    }

    public static void main(String[] args) {
        Application.launch(args);
    }

}
Running the example:
4. Apply effects to Button
Because the Button is a class extends from class Node, you can also apply effects to Button like Drop Shadow effect,... There are lot of classes related to effects you can find out in javafx.scene.effect package.
The example below illustrates the Drop Shadow and Motion Blur effects for Button when the mouse moves on the surface of Button.
ButtonEffectDemo.java
package org.o7planning.javafx.button;

import javafx.application.Application;
import javafx.event.EventHandler;
import javafx.geometry.Insets;
import javafx.scene.Scene;
import javafx.scene.control.Button;
import javafx.scene.effect.DropShadow;
import javafx.scene.effect.MotionBlur;
import javafx.scene.input.MouseEvent;
import javafx.scene.layout.FlowPane;
import javafx.stage.Stage;

public class ButtonEffectDemo extends Application {

    @Override
    public void start(Stage primaryStage) throws Exception {

        FlowPane root = new FlowPane();
        root.setPadding(new Insets(10));
        root.setHgap(10);
        root.setVgap(10);

        // --- Button 1 ------------
        Button button1 = new Button("Drop Shadow effect");

        DropShadow shadow = new DropShadow();

        // Adding the shadow when the mouse cursor is on
        button1.addEventHandler(MouseEvent.MOUSE_ENTERED, new EventHandler<MouseEvent>() {
            @Override
            public void handle(MouseEvent e) {
                button1.setEffect(shadow);
            }
        });

        // Removing the shadow when the mouse cursor is off
        button1.addEventHandler(MouseEvent.MOUSE_EXITED, new EventHandler<MouseEvent>() {
            @Override
            public void handle(MouseEvent e) {
                button1.setEffect(null);
            }
        });

        // --- Button 2 ------------
        Button button2 = new Button("Motion Blur effect");

        MotionBlur motionBlur = new MotionBlur();

        // Adding the Motion Blur effect when the mouse cursor is on
        button2.addEventHandler(MouseEvent.MOUSE_ENTERED, new EventHandler<MouseEvent>() {
            @Override
            public void handle(MouseEvent e) {
                button2.setEffect(motionBlur);
            }
        });

        // Removing the Motion Blur effect when the mouse cursor is off
        button2.addEventHandler(MouseEvent.MOUSE_EXITED, new EventHandler<MouseEvent>() {
            @Override
            public void handle(MouseEvent e) {
                button2.setEffect(null);
            }
        });

        root.getChildren().addAll(  button1, button2);

        primaryStage.setTitle("Java Button (o7planning.org)");

        Scene scene = new Scene(root, 350, 150);
        primaryStage.setScene(scene);
        primaryStage.show();

    }

    public static void main(String[] args) {
        Application.launch(args);
    }

}
5. Styling a Button
You can also use CSS of JavaFX and apply it for Button, the CSS of JavaFX is very similar to the CSS of HTML. You can define the styles in the CSS files, and add it to the application. And you can apply style classes you have defined by using setStyleClass method.
Alternatively, you can define the style of a button directly in the code by using the setStyle method
button1.setStyle("-fx-font: 22 arial; -fx-base: #b6e7c9;");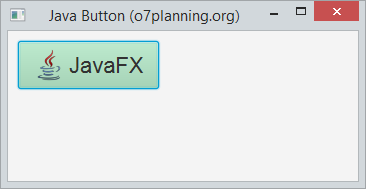
See also JavaFX Css:
- JavaFX Css Style
View full example:
ButtonCssDemo.java
package org.o7planning.javafx.button;

import java.io.InputStream;

import javafx.application.Application;
import javafx.geometry.Insets;
import javafx.scene.Scene;
import javafx.scene.control.Button;
import javafx.scene.image.Image;
import javafx.scene.image.ImageView;
import javafx.scene.layout.FlowPane;
import javafx.stage.Stage;

public class ButtonCssDemo extends Application {

    @Override
    public void start(Stage primaryStage) throws Exception {

        FlowPane root = new FlowPane();
        root.setPadding(new Insets(10));
        root.setHgap(10);
        root.setVgap(10);


        InputStream input = //
                getClass().getResourceAsStream("/org/o7planning/javafx/icon/java-32.png");

        Image image = new Image(input);
        ImageView imageView = new ImageView(image);

        // Button 1
        Button button1 = new Button("JavaFX", imageView);

        // Set Style
        button1.setStyle("-fx-font: 22 arial; -fx-base: #b6e7c9;");

        root.getChildren().add (button1 );

        primaryStage.setTitle("Java Button (o7planning.org)");

        Scene scene = new Scene(root, 350, 150);
        primaryStage.setScene(scene);
        primaryStage.show();

    }

    public static void main(String[] args) {
        Application.launch(args);
    }

}
JavaFX Tutorials
- Open a new Window in JavaFX
- JavaFX ChoiceDialog Tutorial with Examples
- JavaFX Alert Dialogs Tutorial with Examples
- JavaFX TextInputDialog Tutorial with Examples
- Install e(fx)clipse for Eclipse (JavaFX Tooling)
- Install JavaFX Scene Builder for Eclipse
- JavaFX Tutorial for Beginners - Hello JavaFX
- JavaFX FlowPane Layout Tutorial with Examples
- JavaFX TilePane Layout Tutorial with Examples
- JavaFX HBox, VBox Layout Tutorial with Examples
- JavaFX BorderPane Layout Tutorial with Examples
- JavaFX AnchorPane Layout Tutorial with Examples
- JavaFX TitledPane Tutorial with Examples
- JavaFX Accordion Tutorial with Examples
- JavaFX ListView Tutorial with Examples
- JavaFX Group Tutorial with Examples
- JavaFX ComboBox Tutorial with Examples
- JavaFX Transformations Tutorial with Examples
- JavaFX Effects Tutorial with Examples
- JavaFX GridPane Layout Tutorial with Examples
- JavaFX StackPane Layout Tutorial with Examples
- JavaFX ScrollPane Tutorial with Examples
- JavaFX WebView and WebEngine Tutorial with Examples
- JavaFX HTMLEditor Tutorial with Examples
- JavaFX TableView Tutorial with Examples
- JavaFX TreeView Tutorial with Examples
- JavaFX TreeTableView Tutorial with Examples
- JavaFX Menu Tutorial with Examples
- JavaFX ContextMenu Tutorial with Examples
- JavaFX Image and ImageView Tutorial with Examples
- JavaFX Label Tutorial with Examples
- JavaFX Hyperlink Tutorial with Examples
- JavaFX Button Tutorial with Examples
- JavaFX ToggleButton Tutorial with Examples
- JavaFX RadioButton Tutorial with Examples
- JavaFX MenuButton and SplitMenuButton Tutorial with Examples
- JavaFX TextField Tutorial with Examples
- JavaFX PasswordField Tutorial with Examples
- JavaFX TextArea Tutorial with Examples
- JavaFX Slider Tutorial with Examples
- JavaFX Spinner Tutorial with Examples
- JavaFX ProgressBar and ProgressIndicator Tutorial with Examples
- JavaFX ChoiceBox Tutorial with Examples
- JavaFX Tooltip Tutorial with Examples
- JavaFX DatePicker Tutorial with Examples
- JavaFX ColorPicker Tutorial with Examples
- JavaFX FileChooser and DirectoryChooser Tutorial with Examples
- JavaFX PieChart Tutorial with Examples
- JavaFX AreaChart and StackedAreaChart Tutorial with Examples
- JavaFX BarChart and StackedBarChart Tutorial with Examples
- JavaFX Line Tutorial with Examples
- JavaFX Rectangle and Ellipse Tutorial with Examples
Show More