Quick Learning Java for beginners
2. Create new Project
First we create a new Project, it will be used in this tutorial.

Enter the name of the project:
- BasicJavaTutorial
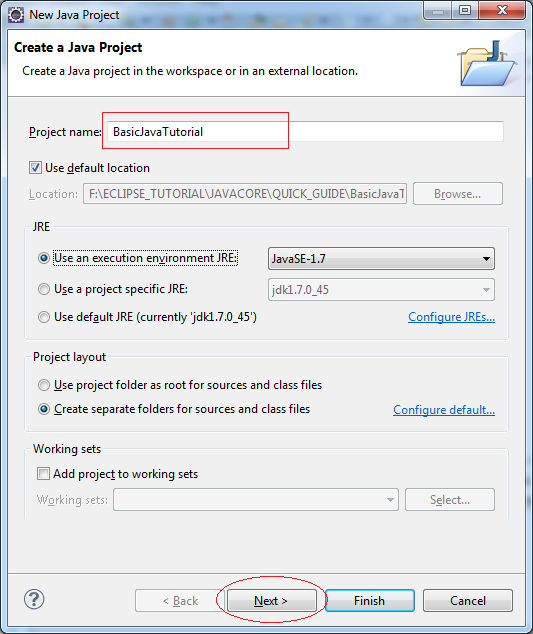
Project has been created:

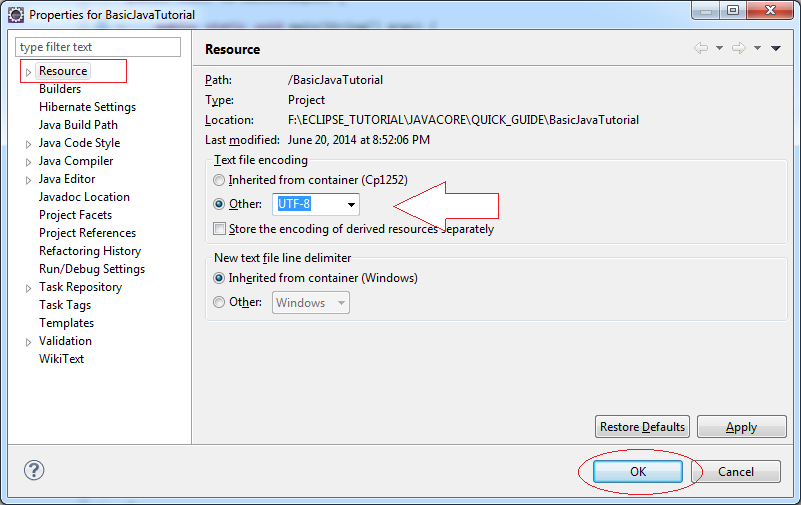
Note: To be able to write in languages other than English in the Project, you should switch to UTF8 encoding.
Right-click the Project and select Properties:

3. Primitive Data Types
There are eight primitive types in JAVA
- For integer has 4 types: byte, short, int, long
- Real data type we have: float, double
- Character type: char
- Boolean: returns true or false value (true or false)
Type | Description | bit | Min value | Max value |
byte | 8 bit integer number | 8 | -128 (-2^7) | 127 (2^7-1) |
short | 16 bit integer number | 16 | -32,768 (-2^15) | 32,767 (2^15 -1) |
int | 32 bit integer number | 32 | - 2,147,483,648
(-2^31) | 2,147,483,647
(2^31 -1) |
long | 64 bit integer number | 64 | -9,223,372,036,854,775,808
(-2^63) | 9,223,372,036,854,775,807
(2^63 -1) |
float | 32 bit real number | 32 | -3.4028235 x 10^38 | 3.4028235 x 10^38 |
double | 64 bit real number | 64 | -1.7976931348623157 x 10^308 | 1.7976931348623157 x 10^308 |
boolean | Logic type | false | true | |
char | Character type | 16 | '\u0000' (0) | '\uffff' (65,535). |
See more details:
4. Variable
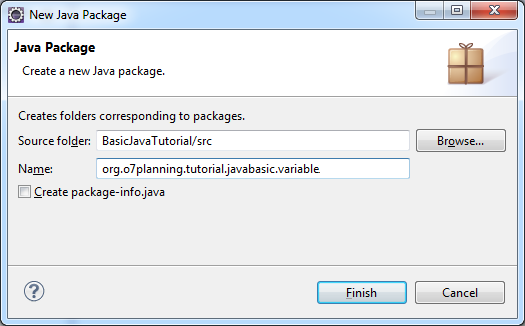
Right-click the src select "New/Package":

Name the package are:
- org.o7planning.tutorial.javabasic.variable

Enter the name of the class:
- VariableExample1
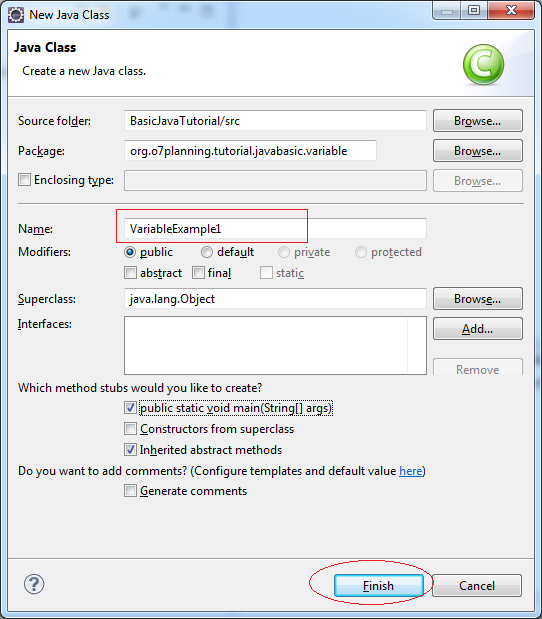
VariableExample1 class is created:

Edit VariableExample1 class:
VariableExample1.java
package org.o7planning.tutorial.javabasic.variable;

public class VariableExample1 {

	public static void main(String[] args) {

		// Declare a variable of type int (32bit Integer)
		int firstNumber;

		// Assigning value to firstNumber
		firstNumber = 10;

		System.out.println("First Number =" + firstNumber);

		// Declare a variable type of float (32-bit real number)
		// This number is assigned a value of 10.2
		// The 'f' character at the end makes java understand that this is a float.
		float secondNumber = 10.2f;

		System.out.println("Second Number =" + secondNumber);

		// Declare a number type of double (64-bit real number).
		// This number is assigned a value of 10.2
		// Character 'd' at the end to tell with Java this is the type double.
		// Distinguished from a float 'f'.
		double thirdNumber = 10.2d;

		System.out.println("Third Number =" + thirdNumber);

		// Declare a character
		char ch = 'a';

		System.out.println("Char ch= " + ch);

	}

}
Run class VariableExample1:
Right-click on the class VariableExample1 select "Run As/Java Application":

Results of running the class to see on the Console:

You can also declare multiple variables at once, the next example illustrates this:
Create a new class VariableExample2
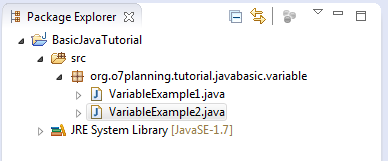
VariableExample2.java
package org.o7planning.tutorial.javabasic.variable;

public class VariableExample2 {

	public static void main(String[] args) {

		// Declare 3 numbers type of long (64-bit Integer)
		long firstNumber, secondNumber, thirdNumber;

		// Assign value to firstNumber
		// Character 'L' at the end to tell java a long type,
		// distinguished from type int.
		firstNumber = 100L;

		// Assign values to secondNumber
		secondNumber = 200L;

		// Assign values to thirdNumber
		thirdNumber = firstNumber + secondNumber;

		System.out.println("First Number = " + firstNumber);
		System.out.println("Second Number = " + secondNumber);
		System.out.println("Third Number = " + thirdNumber);
	}

}
Results of running the class VariableExample2:
First Number = 100
Second Number = 200
Third Number = 300
5. Control flow
if-else statement
The structure of an if-else statement is:
if(condition 1)  {
   // Do something here
}else if(condition 2) {
   // Do something here
}else if(condition 3) {
   // Do something here
}
// Else
else  {
   // Do something here
}
Create class ElseIfExample1:
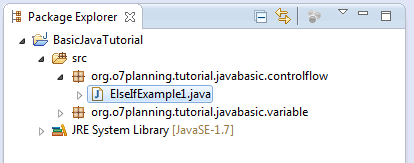
ElseIfExample1.java
package org.o7planning.tutorial.javabasic.controlflow;

public class ElseIfExample1 {

	public static void main(String[] args) {

		// Declaring a varible of type int (32 bit integer)
		// Represent your test scores.
		int score = 20;

		System.out.println("Your score =" + score);

		// If the score is less than 50
		if (score < 50) {
			System.out.println("You are not pass");
		}
		// Else if the score more than or equal to 50 and less than 80.
		else if (score >= 50 && score < 80) {
			System.out.println("You are pass");
		}
		// Remaining cases (that is greater than or equal to 80)
		else {
			System.out.println("You are pass, good student!");
		}

	}
}
Results of running the class ElseIfExample1:
Your score =20
You are not pass
Change the value of the variable "score" in the above example and rerun the class ElseIfExample1:
int score = 60;Your score =60
You are passThe normal operator
- > Greater Than
- < Less Than
- >= Greater Than or Equal To
- <= Less Than or Equal To
- && AND
- || OR
- == HAS A VALUE OF
- != Not Equal To
- ! NOT
Create class ElseIfExample2
ElseIfExample2.java
package org.o7planning.tutorial.javabasic.controlflow;

public class ElseIfExample2 {

	public static void main(String[] args) {

		// Declare a variable of type int, represents your age.
		int age = 20;

		// Test if age less than or equal 17
		if (age <= 17) {
			System.out.println("You are 17 or younger");
		}

		// Test age equals 18
		else if (age == 18) {
			System.out.println("You are 18 year old");
		}
		// Test if age greater than 18 and less than 40
		else if (age > 18 && age < 40) {
			System.out.println("You are between 19 and 39");
		}
		// Remaining cases (Greater than or equal to 40)
		else {
			// Nested if statements
			// Test age not equals 50.
			if (age != 50) {
				System.out.println("You are not 50 year old");
			}

			// Negative statements
			if (!(age == 50)) {
				System.out.println("You are not 50 year old");
			}

			// If age is 60 or 70
			if (age == 60 || age == 70) {
				System.out.println("You are 60 or 70 year old");
			}

		}

	}
}
You can change the value of "age" and rerun ElseIfExample2 class and see the results
Boolean value
boolean is a data type, it only has two values true or false.
Create class BooleanExample:
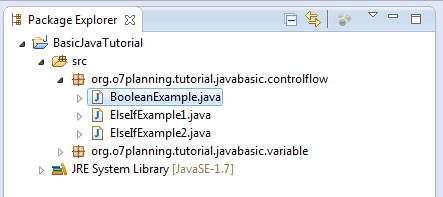
BooleanExample.java
package org.o7planning.tutorial.javabasic.controlflow;

public class BooleanExample {

	public static void main(String[] args) {

		// Declare a variable of type boolean
		boolean value = true;

		// If value is true
		if (value == true) {
			System.out.println("It's true");
		}
		// Else
		else {
			System.out.println("It's false");
		}


		if (value) {
			System.out.println("It's true");
		}
		// Else
		else {
			System.out.println("It's false");
		}
	}
}
switch- case -default statement
This is also a branch statement similar to the if-else is introduced above
// variable_to_test: A varible to test.
switch ( variable_to_test ) {
  case value1:
   // Do something here ...
   break;
  case value2:
   // Do something here ...
   break;
  default:
   // Do something here ...
}
SwitchExample1.java
package org.o7planning.tutorial.javabasic.controlflow;

public class SwitchExample1 {

	public static void main(String[] args) {

		// Declare a variable age
		int age = 20;

		// Check the value of age
		switch (age) {
		// Case age = 18
		case 18:
			System.out.println("You are 18 year old");
			break;
		// Case age = 20
		case 20:
			System.out.println("You are 20 year old");
			break;
		// Remaining cases
		default:
			System.out.println("You are not 18 or 20 year old");
		}

	}

}
The results of running the class SwitchExample1:
You are 20 year oldNote that the case statement is a specific value you can not do the following:
// This is not allowed !!
case (age < 18) :

// case only accept a specific value, eg:
case 18:
  // Do something here ..
  break;
See an example:
SwitchExample2.java
package org.o7planning.tutorial.javabasic.controlflow;

public class SwitchExample2 {

	public static void main(String[] args) {

		// Declare a variable age.
		int age = 30;

		// Check the value of age.
		switch (age) {
		// Case age = 18
		case 18:
			System.out.println("You are 18 year old");
			break;
		// Case age in 20, 30, 40
		case 20:
		case 30:
		case 40:
			System.out.println("You are " + age);
			break;
		// Remaining case:
		default:
			System.out.println("Other age");
		}

	}

}
The results run:
You are 30for Loop
Syntax:
// start_value: Start Value
// end_value: End Value
// increment_number: Added value after each iteration.
for ( start_value; end_value; increment_number ) {
   // Do something here
}
Consider an illustration:
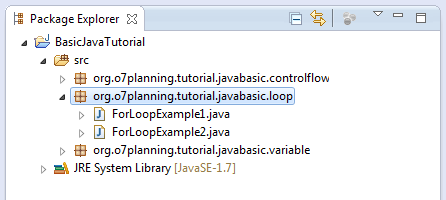
ForLoopExample1.java
package org.o7planning.tutorial.javabasic.loop;

public class ForLoopExample1 {

	public static void main(String[] args) {

		// Declare a variable 'step', step in loop
		int step = 1;

		// Declare a variable value with the start value is 0
		// After each iteration, value will increase 3
		// And the loop will end when the value greater than or equal to 10
		for (int value = 0; value < 10; value = value + 3) {

			System.out.println("Step =" + step + "  value = " + value);

			// Increase 1
			step = step + 1;

		}

	}

}
Results of running the class ForLoopExample1:
Step =1  value = 0
Step =2  value = 3
Step =3  value = 6
Step =4  value = 9
See another example, sum the numbers from 1 to 100:
ForLoopExample2.java
package org.o7planning.tutorial.javabasic.loop;

public class ForLoopExample2 {

	// This is an example to sum the numbers from 1 to 100,
	// and print out the results to the console.
	public static void main(String[] args) {

		// Declare a variable
		int total = 0;

		// Declare a variable value
		// Initial value is 1
		// After each iteration increases the 'value' by adding 1
		// Note: value++ equivalent to the statement: value = value + 1;
		// value-- equivalent to the statement: value = value - 1;
		for (int value = 1; value <= 100; value++) {

			// Increase 'total' by adding 'value'.
			total = total + value;
		}

		System.out.println("Total = " + total);

	}

}
Result:
Total = 5050while Loop
This is while loop structure:
// While condition is true then do something.
while ( condition ) {
   // Do something here...
}
See illustration
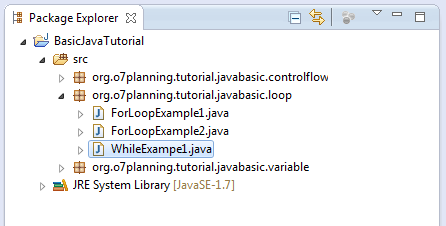
WhileExample1.java
package org.o7planning.tutorial.javabasic.loop;

public class WhileExampe1 {

	public static void main(String[] args) {

		int value = 3;

		// While the 'value' is still less than 10, the loop still works.
		while (value < 10) {

			System.out.println("Value = " + value);

			// Increase 'value' by adding 2
			value = value + 2;
		}
	}

}
Value = 3
Value = 5
Value = 7
Value = 9do-while Loop
This is the structure do-while loop:
// The do-while loop performs at least one iteration.
// And while the condition is true, it continues to work
do {
   // Do something here.
}
while (condition);
Example:
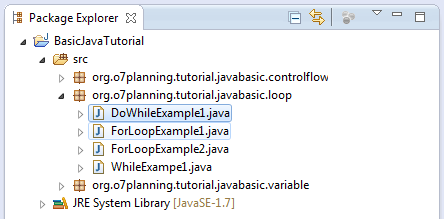
DoWhileExample1.java
package org.o7planning.tutorial.javabasic.loop;

public class DoWhileExample1 {

	public static void main(String[] args) {

		int value = 3;

		// do-while loop will execute at least once
		do {

			System.out.println("Value = " + value);

			// Increase by 3
			value = value + 3;

		} while (value < 10);

	}
}
Result:
Value = 3
Value = 6
Value = 9
6. Array in Java
What is Array?
An array is a list of the elements are arranged adjacent to each other in memory.
Let's see, a array with 5 elements, int type.
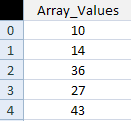
Working with arrays
How to declare an array in Java.
// Declare an array, not a specified number of elements.
int[] array1;

// Initialize the array with 100 elements
// The elements has not been assigned a specific value
array1 = new int[100];

// Declare an array specifies the number of elements
// The elements has not been assigned a specific value
double[] array2 = new double[10];

// Declare an array with elements assigned a specific values.
// This array has 4 elements
long[] array3= {10L, 23L, 30L, 11L};
Let's look at an example:
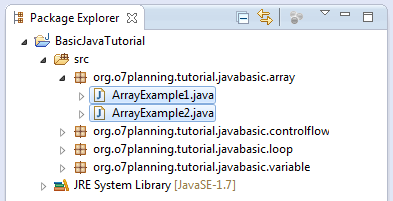
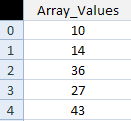
ArrayExample1.java
package org.o7planning.tutorial.javabasic.array;

public class ArrayExample1 {

	public static void main(String[] args) {

		// Declare an array with 5 elements
		int[] myArray = new int[5];

		// Note: the first element of the array index is 0:
		// Assigning values to the first element (index 0)
		myArray[0] = 10;

		// Assigning value to the second element (index 1)
		myArray[1] = 14;

		myArray[2] = 36;
		myArray[3] = 27;

		// Assigning value to the 5th element (the last element in the array)
		myArray[4] = 18;

		// Print out element count.
		System.out.println("Array Length=" + myArray.length);

		// Print to Console element at index 3 (4th element in the array)
		System.out.println("myArray[3]=" + myArray[3]);

		// Use a for loop to print out the elements in the array.
		for (int index = 0; index < myArray.length; index++) {
			System.out.println("Element " + index + " = " + myArray[index]);
		}
	}

}
Result:
Array Length=5
myArray[3]=27
Element 0 = 10
Element 1 = 14
Element 2 = 36
Element 3 = 27
Element 4 = 18
An illustrative example to use a for loop to assign values to the elements:
ArrayExample2.java
package org.o7planning.tutorial.javabasic.array;

public class ArrayExample2 {

	public static void main(String[] args) {

		// Declare an array with 5 elements
		int[] myArray = new int[5];

		// Print out element count
		System.out.println("Array Length=" + myArray.length);

		// Using loop assign values to elements of the array.
		for (int index = 0; index < myArray.length; index++) {
			myArray[index] = 100 * index * index + 3;
		}

		// Print out the element at index 3
		System.out.println("myArray[3] = " + myArray[3]);
	}

}
Result:
Array Length=5
myArray[3] = 903
7. Class, Instance, Constructor
You need to have a distinction between three concepts:
- Class
- Constructor
- Instance
When we talk about the tree, it is something abstract, it is a class. But when we pointed to a specific tree, it was clear, and that is the instance
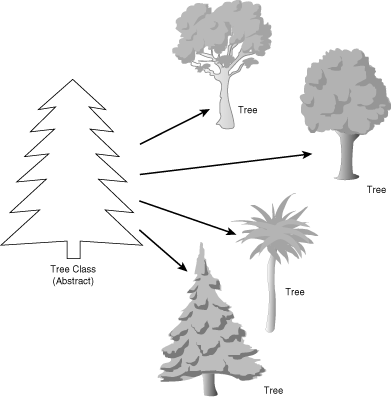
Or when we talk about the Person, that's abstract, it is a class. But when pointed at you or me, it is two different instances, the same class of People.

Person.java
package org.o7planning.tutorial.javabasic.javastructure;

public class Person {

	// This is field
	// The name of Person
	public String name;

	// This is a Constructor
	// Use it to initialize the object (Create new object)
	// This constructor has one parameter
	// The constructor always has the same name as the class name.
	public Person(String persionName) {
		// Assign the value of the parameter into the 'name' field.
		this.name = persionName;
	}

	// This method returns a String ..
	public String getName() {
		return this.name;
	}

}
Person class has no main method. TestPerson class is initialized instance of the Person object via the constructor
PersonTest.java
package org.o7planning.tutorial.javabasic.javastructure;

public class PersonTest {

	public static void main(String[] args) {

		// Create an object of class Person
		// Initialize this object via constructor of class Person
		Person edison = new Person("Edison");

		// Class Person has the getName() method.
		// Use the object to call getName():
		String name = edison.getName();
		System.out.println("Person 1: " + name);

		// Create an object of class Person
		// Initialize this object via constructor of class Person
		Person billGate = new Person("Bill Gates");

		// Class Person has field name, that is public.
		// Use objects to refer to it.
		String name2 = billGate.name;
		System.out.println("Person 2: " + name2);

	}

}
Results of running the example:
Person 1: Edison
Person 2: Bill Gates
8. Field
In this section we will discuss some of the concepts:
Field
- Normal field
- static Field
- final Field
- static final Field
See an example with the field and static fields.
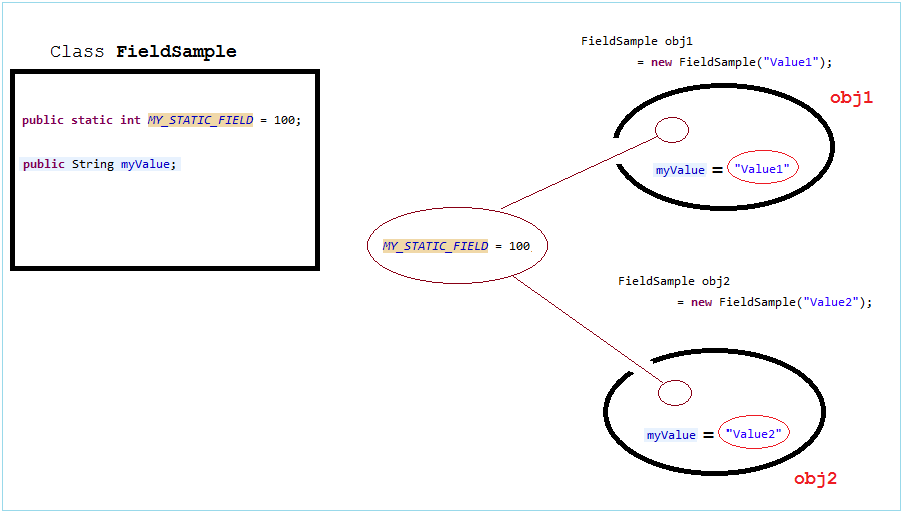
FieldSample.java
package org.o7planning.tutorial.javabasic.javastructure;

public class FieldSample {

	// This is static field.
	public static int MY_STATIC_FIELD = 100;

	// This is normal field.
	public String myValue;

	// Constructor to initialize the FieldSample object.
	public FieldSample(String myValue) {
		this.myValue = myValue;
	}

}
FieldSampleTest.java
package org.o7planning.tutorial.javabasic.javastructure;

public class FieldSampleTest {

	public static void main(String[] args) {

		// Create the first object.
		FieldSample obj1 = new FieldSample("Value1");

		System.out.println("obj1.myValue= " + obj1.myValue);

		// Print out static value - MY_STATIC_FIELD
		// Access via instance of class (an object)(Not recommended)
		System.out.println("obj1.MY_STATIC_FIELD= " + obj1.MY_STATIC_FIELD);

		// Print out static value - MY_STATIC_FIELD
		// Access via class (Recommended)
		System.out.println("FieldSample.MY_STATIC_FIELD= " + FieldSample.MY_STATIC_FIELD);

		// Create second object:
		FieldSample obj2 = new FieldSample("Value2");

		System.out.println("obj2.myValue= " + obj2.myValue);

		System.out.println("obj2.MY_STATIC_FIELD= " + obj2.MY_STATIC_FIELD);

		System.out.println(" ------------- ");

		// Set new value for static field.
		// (Or using: FieldSample.MY_STATIC_FIELD = 200)
		obj1.MY_STATIC_FIELD = 200;

		// It will print out the value 200.
		System.out.println("obj2.MY_STATIC_FIELD= " + obj2.MY_STATIC_FIELD);
	}

}
Results of running the example:
obj1.myValue= Value1
obj1.MY_STATIC_FIELD= 100
FieldSample.MY_STATIC_FIELD= 100
obj2.myValue= Value2
obj2.MY_STATIC_FIELD= 100
 -------------
obj2.MY_STATIC_FIELD= 200
The final field is the field that can not assign a new value to it, it's like a constant.
FinalFieldExample.java
package org.o7planning.tutorial.javabasic.javastructure;

public class FinalFieldExample {

	// A final field.
	// Final Field does not allow to assign new values.
	public final int myValue = 100;

	// A static final field.
	// Final field does not allow to assign new values.
	public static final long MY_LONG_VALUE = 1234L;

}
9. Method
Method
- Method.
- static Method
- final Method. (Will be mentioned in the inheritance of the class).
MethodSample.java
package org.o7planning.tutorial.javabasic.javastructure;

public class MethodSample {

	public String text = "Some text";

	// Default Constructor
	public MethodSample() {

	}

	// This method return a String.
	// And has no parameter.
	public String getText() {
		return this.text;
	}

	// This is a method with one parameter String.
	// This method returns void (not return anything)
	public void setText(String text) {
		// this.text reference to the text field.
		// Distinguish the text parameter.
		this.text = text;
	}

	// This is a static method.
	// return type of int, has 3 parameters.
	public static int sum(int a, int b, int c) {
		int d = a + b + c;
		return d;
	}
}
MethodSampleTest.java
package org.o7planning.tutorial.javabasic.javastructure;

public class MethodSampleTest {

	public static void main(String[] args) {

		// Create instance of MethodSample
		MethodSample obj = new MethodSample();

		// Call getText() method
		String text = obj.getText();

		System.out.println("Text = " + text);

		// Call setText(String) method
		obj.setText("New Text");

		System.out.println("Text = " + obj.getText());

		// Static method can be called through the class.
		// This way is recommended. (**)
		int sum = MethodSample.sum(10, 20, 30);

		System.out.println("Sum  10,20,30= " + sum);

		// Or call through object.
		// This way is not recommended. (**)
		int sum2 = obj.sum(20, 30, 40);

		System.out.println("Sum  20,30,40= " + sum2);
	}

}
Text = Some text
Text = New Text
Sum 10,20,30= 60
Sum 20,30,40= 9010. Inheritance in Java
Java allows classes which extend from other class. Class extends another class called subclasses. Subclasses have the ability to inherit the fields and methods from the parent class.
Animal.java
package org.o7planning.tutorial.javabasic.inheritance;

public class Animal {

	public Animal() {

	}

	public void move() {
		System.out.println("Move ...!");
	}

	// The cry of this animal.
	public void say() {
		System.out.println("<nothing>");
	}

}
Cat.java
package org.o7planning.tutorial.javabasic.inheritance;

public class Cat extends Animal {

	// Override method of the Animal class.
	public void say() {
		System.out.println("Meo");
	}

}
Dog.java
package org.o7planning.tutorial.javabasic.inheritance;

public class Dog extends Animal {

	// Override method of the Animal class.
	public void say() {
		System.out.println("Go");
	}

}
Ant.java
package org.o7planning.tutorial.javabasic.inheritance;

// Ant
public class Ant extends Animal {

}
AnimalTest.java
package org.o7planning.tutorial.javabasic.inheritance;

public class AnimalTest {

	public static void main(String[] args) {

		// Declaring a Cat object.
		Cat cat = new Cat();

		// Check 'cat' instance of Animal.
		// The result is clearly true.
		boolean isAnimal = cat instanceof Animal;
		System.out.println("cat instanceof Animal?" + isAnimal);

		// ==> Meo
		// Call the method say() of the Cat.
		cat.say();

		// Declare an object of type Animal
		// Initialize the object through the Constructor of the Cat.
		Animal cat2 = new Cat();

		// ==> Meo
		// say() method of Cat is called (Not Animal)
		cat2.say();

		// Create the object Animal.
		// Through the Constructor of the subclass, Ant.
		Animal ant = new Ant();

		// Ant has no say() method.
		// ==> It call to say() method,
		// that inherited from the parent class (Animal)
		ant.say();
	}
}
Results of running the example:
cat instanceof Animal?true
Meo
Meo
<nothing>Java Basic
- Customize java compiler processing your Annotation (Annotation Processing Tool)
- Java Programming for team using Eclipse and SVN
- Java WeakReference Tutorial with Examples
- Java PhantomReference Tutorial with Examples
- Java Compression and Decompression Tutorial with Examples
- Configuring Eclipse to use the JDK instead of JRE
- Java String.format() and printf() methods
- Syntax and new features in Java 8
- Java Regular Expressions Tutorial with Examples
- Java Multithreading Programming Tutorial with Examples
- JDBC Driver Libraries for different types of database in Java
- Java JDBC Tutorial with Examples
- Get the values of the columns automatically increment when Insert a record using JDBC
- Java Stream Tutorial with Examples
- Java Functional Interface Tutorial with Examples
- Introduction to the Raspberry Pi
- Java Predicate Tutorial with Examples
- Abstract class and Interface in Java
- Access modifiers in Java
- Java Enums Tutorial with Examples
- Java Annotations Tutorial with Examples
- Comparing and Sorting in Java
- Java String, StringBuffer and StringBuilder Tutorial with Examples
- Java Exception Handling Tutorial with Examples
- Java Generics Tutorial with Examples
- Manipulating files and directories in Java
- Java BiPredicate Tutorial with Examples
- Java Consumer Tutorial with Examples
- Java BiConsumer Tutorial with Examples
- What is needed to get started with Java?
- History of Java and the difference between Oracle JDK and OpenJDK
- Install Java on Windows
- Install Java on Ubuntu
- Install OpenJDK on Ubuntu
- Install Eclipse
- Install Eclipse on Ubuntu
- Quick Learning Java for beginners
- History of bits and bytes in computer science
- Data Types in java
- Bitwise Operations
- if else statement in java
- Switch Statement in Java
- Loops in Java
- Arrays in Java
- JDK Javadoc in CHM format
- Inheritance and polymorphism in Java
- Java Function Tutorial with Examples
- Java BiFunction Tutorial with Examples
- Example of Java encoding and decoding using Apache Base64
- Java Reflection Tutorial with Examples
- Java remote method invocation - Java RMI Tutorial with Examples
- Java Socket Programming Tutorial with Examples
- Which Platform Should You Choose for Developing Java Desktop Applications?
- Java Commons IO Tutorial with Examples
- Java Commons Email Tutorial with Examples
- Java Commons Logging Tutorial with Examples
- Understanding Java System.identityHashCode, Object.hashCode and Object.equals
- Java SoftReference Tutorial with Examples
- Java Supplier Tutorial with Examples
- Java Aspect Oriented Programming with AspectJ (AOP)
Show More
- Java Servlet/Jsp Tutorials
- Java Collections Framework Tutorials
- Java API for HTML & XML
- Java IO Tutorials
- Java Date Time Tutorials
- Spring Boot Tutorials
- Maven Tutorials
- Gradle Tutorials
- Java Web Services Tutorials
- Java SWT Tutorials
- JavaFX Tutorials
- Java Oracle ADF Tutorials
- Struts2 Framework Tutorials
- Spring Cloud Tutorials

