Programming Java Desktop Application Using SWT
1. Instroduction
This document is based on:
Eclipse 4.6, 47 (NEON, OXYGEN)
In this document, I will introduce you to the Desktop application programming with SWT.
2. RCP (Rich Client Platform)
RCP (Rich Client Platform) - As a platform based on SWT, used for programming Desktop applications, so far it has built a platform that allows you to develop desktop-style applications Workbench, like Eclipse IDE, or programmers can integrate the plugin to Eclipse IDE.
But even if you want to use SWT to programming, and do not need to use those provided by the RCP you should also create an RCP application.
But even if you want to use SWT to programming, and do not need to use those provided by the RCP you should also create an RCP application.
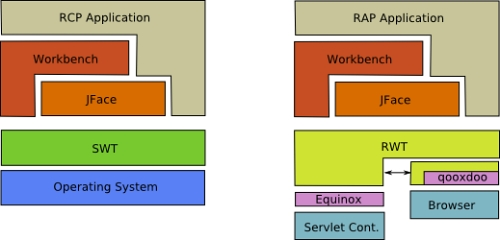
SWT:
Workbench Application:
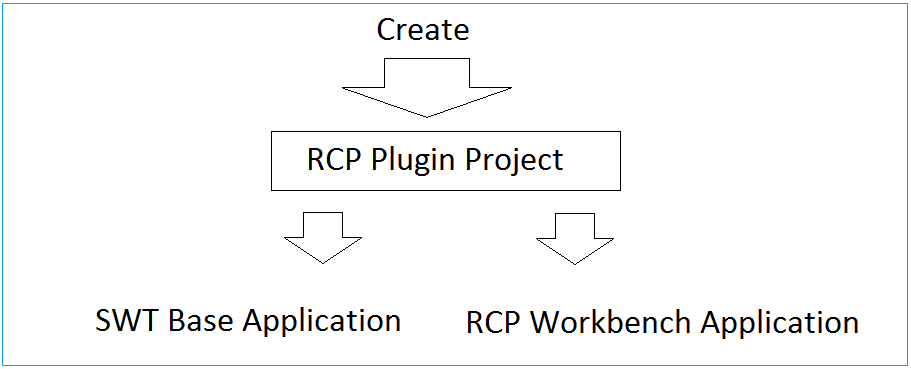
To create a desktop application using SWT. On the Eclipse, we will create an RCP Plugin Project. You have 2 options.
- Only use the features of the SWT
- Using the platform provided by the RCP to RCP Application Workbench programming
In this document, I will guide you to become familiar with basic programming SWT, using WindowBuilder to drag and drop components into the interface.
3. The settings required before starting
Some required settings before you start:
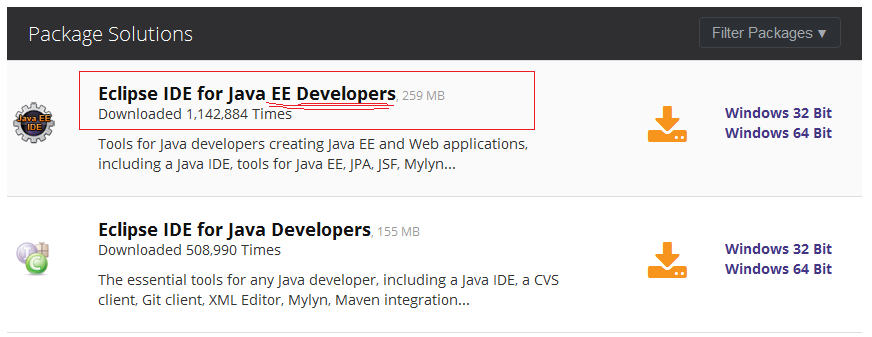
You need the latest version of Eclipse. There currently is Eclipse 4.7 (Codes OXYGEN).
You need the latest version of Eclipse. There currently is Eclipse 4.7 (Codes OXYGEN).
In my opinion you to download package: "Eclipse IDE for Java EE Developers". The only different is number of Plugins, for the purpose of different programming. You can install additional plugins for other purposes if desired.
WindowBuilder, this is a plugin that allows you to design SWT GUI applications using drag and drop convenience.
See installation instructions at:
See installation instructions at:
4. Some concepts of SWT.
Display & Shell
The Display and Shell classes are key components of SWT applications.
- org.eclipse.swt.widgets.Shell class represents a window.
- org.eclipse.swt.widgets.Display class is responsible for managing event loops, fonts, colors and for controlling the communication between the UI thread and other threads. Display is the base for all SWT capabilities.
Every SWT application requires at least one Display and one or more Shell instances. The main Shell gets, as a default parameter, a Display as a constructor argument. Each Shell is constructed with a Display and if none is provided during construction it will use either the Display which is currently used or a default one.
Example:
Display display = new Display();
Shell shell = new Shell(display);
shell.open();

// run the event loop as long as the window is open
while (!shell.isDisposed()) {
   // read the next OS event queue and transfer it to a SWT event
 if (!display.readAndDispatch())
  {
 // if there are currently no other OS event to process
 // sleep until the next OS event is available
   display.sleep();
  }
}

// disposes all associated windows and their components
display.dispose();
SWT Widgets
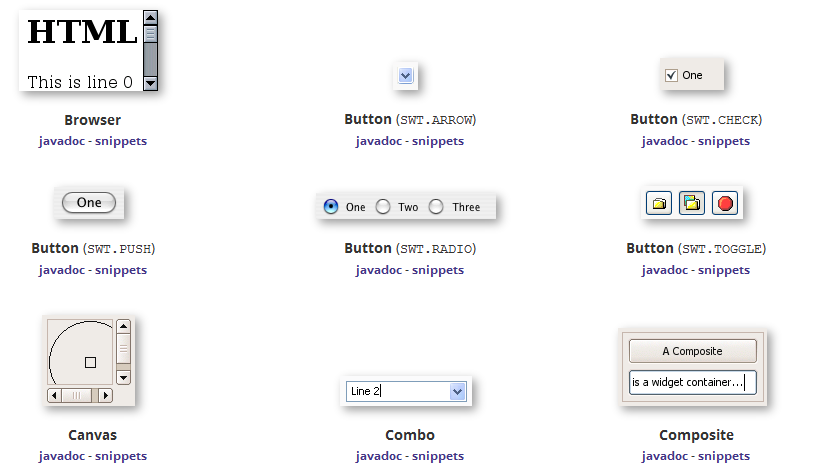
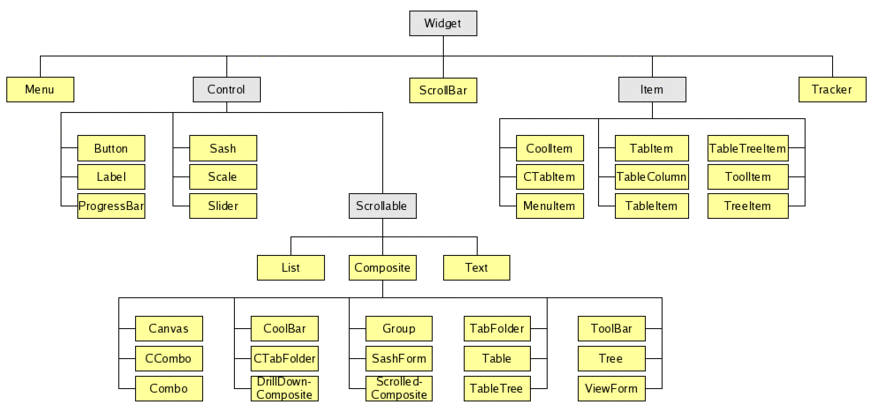
SWT widgets are located in the packages org.eclipse.swt.widgets and org.eclipse.swt.custom. Widgets extend either the Widget or the Control class. Several of these widgets are depicted in the following graphic.
This graphic is a screenshot of the SWT widget homepage.
5. Create RCP Plugin Project
In Eclipse select:
- File/New/Other...
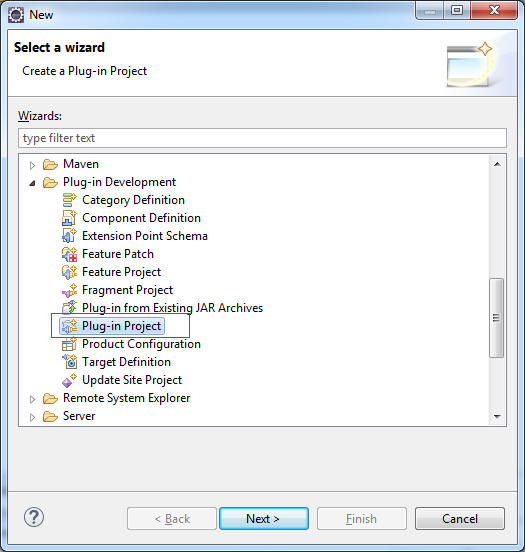
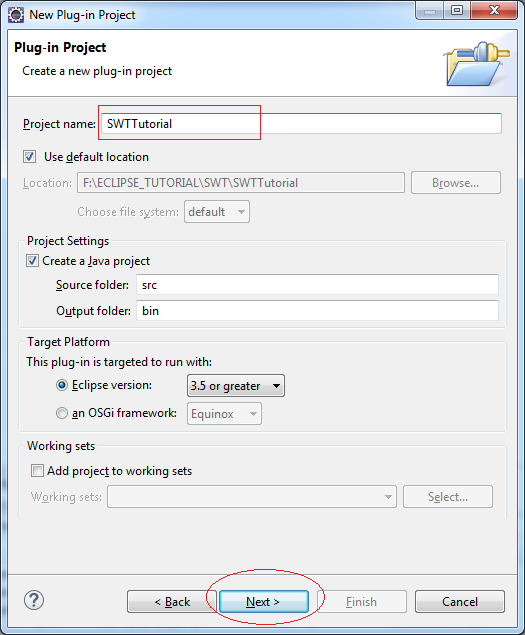
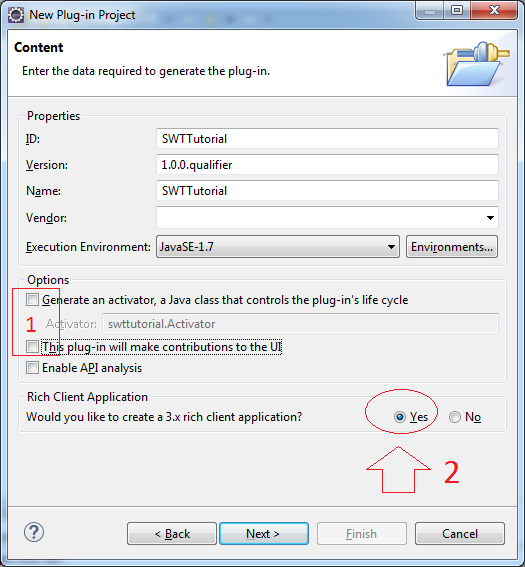
- So there is no need to create a Workbench application so we can not check in (1) as shown below.
- Select 'Yes' in the region (2) to Eclipse RCP Application created (Run on the Desktop), otherwise it will create RAP Application (Running on Web).
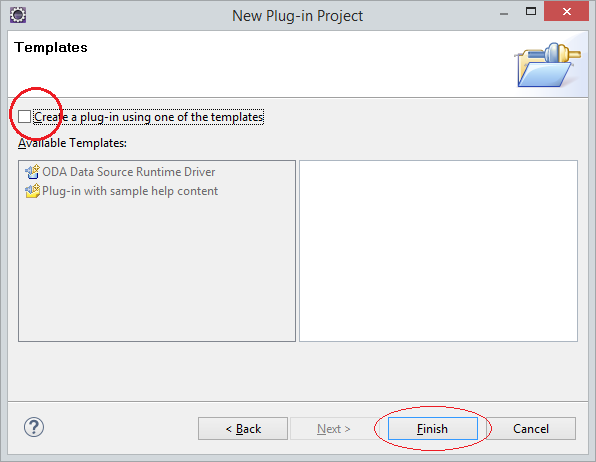
Created Project:
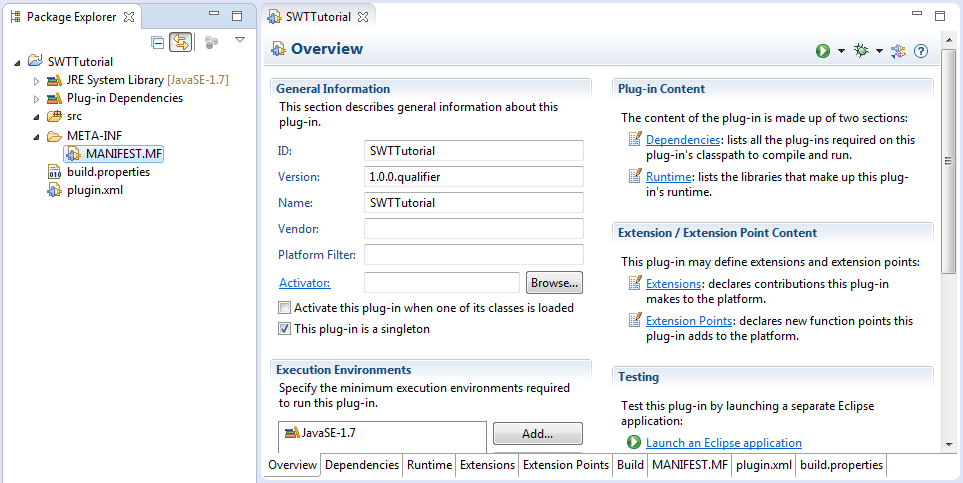
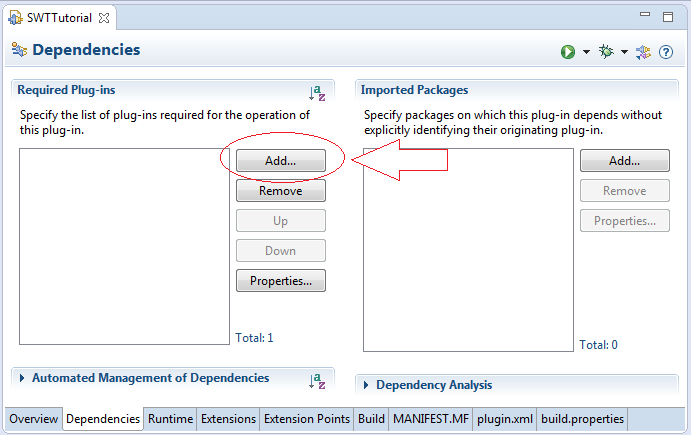
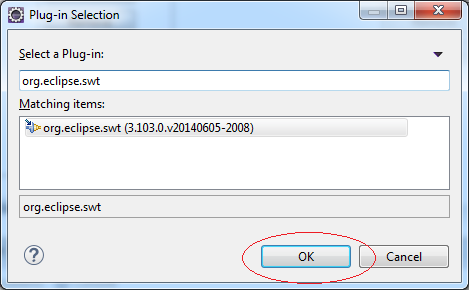
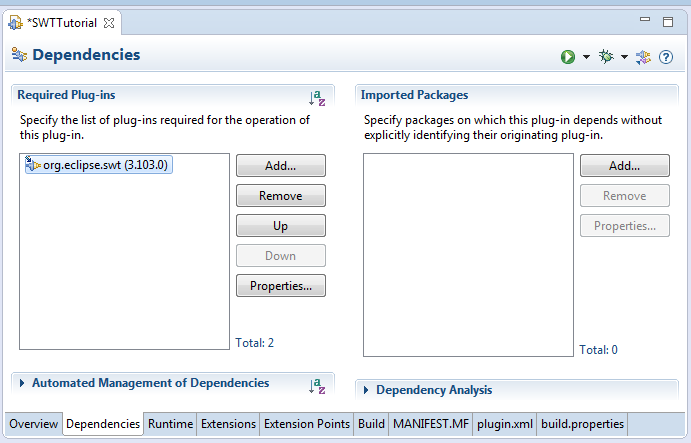
Add swt libary: org.eclipse.swt
If you develop RAP, using org.eclipse.rap.rwt
6. First Example
This is a simple example, not using the drag and drop tools WindowBuilder.
HelloSWT.java
package org.o7planning.tutorial.swt.helloswt;

import org.eclipse.swt.widgets.Display;
import org.eclipse.swt.widgets.Shell;

public class HelloSWT {

  public static void main(String[] args) {
      // Create Display
      Display display = new Display();
      // Create Shell (Window) from diplay
      Shell shell = new Shell(display);

      shell.open();

      while (!shell.isDisposed()) {
          if (!display.readAndDispatch())
              display.sleep();
      }
      display.dispose();
  }
}
Right-click on the class HelloSWT, and select Run As/Java Application.

Result:
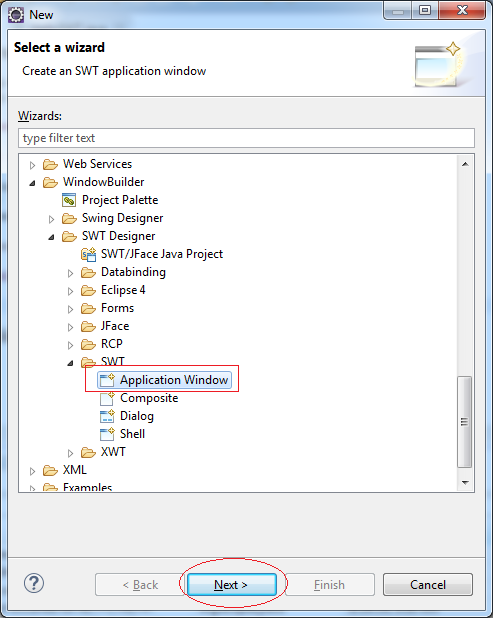
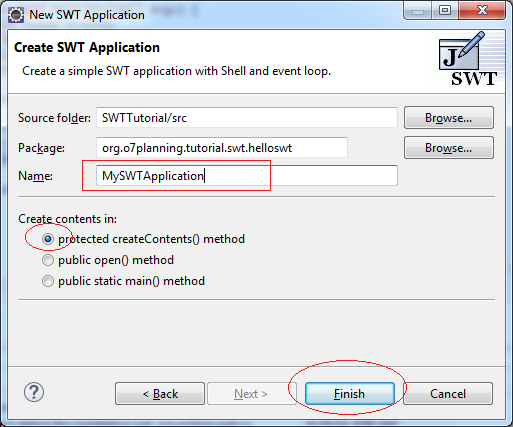
7. Using WindowBuilder
Next we will create an example for drag and drop with WindowBuilder.
- File/New/Other ..
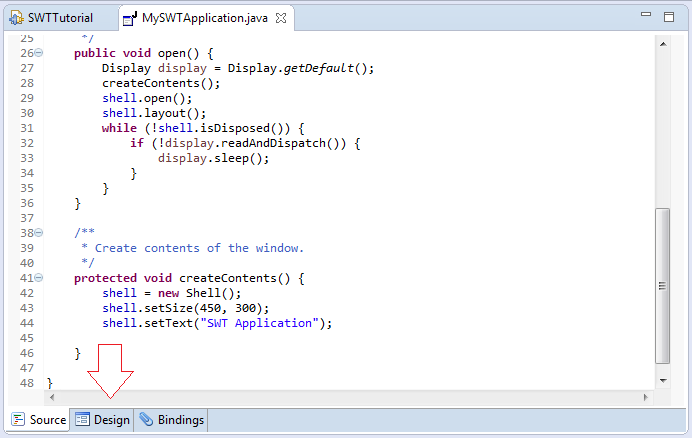
This is the window of WindowBuilder design. It allows you to drag and drop the widgets easily.
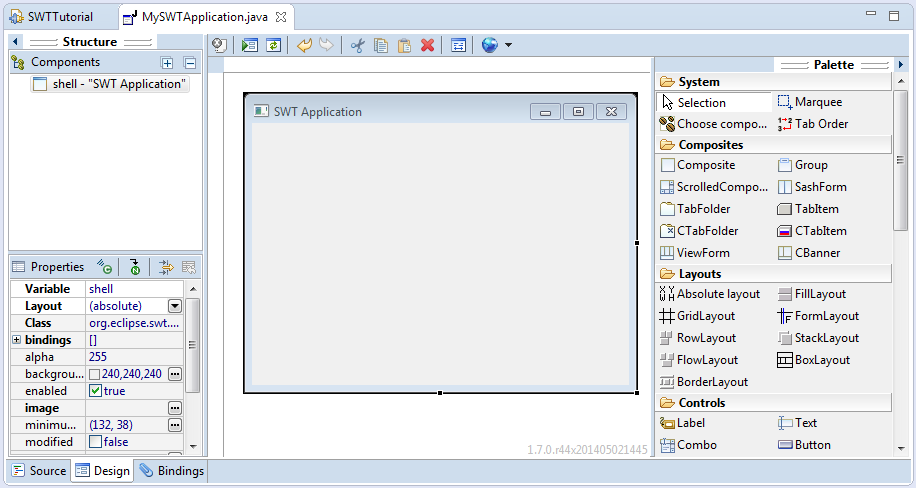
You can watch the video below:
8. SWT Widget
Overview
This is the hierarchy of widgets in SWT.
You can view the demo of the Control at the link below, it's RWT Control, but they are essentially the same as SWT control.
Demo:
Widgets can contain other widgets (Container)

Controls

9. SWT Layout
What is Layout?
Put simply, Layout is how to arrange the components on the interface.
The standard layout classes in the SWT library are:
- FillLayout – lays out equal-sized widgets in a single row or column
- RowLayout – lays out widgets in a row or rows, with fill, wrap, and spacing options
- GridLayout – lays out widgets in a grid
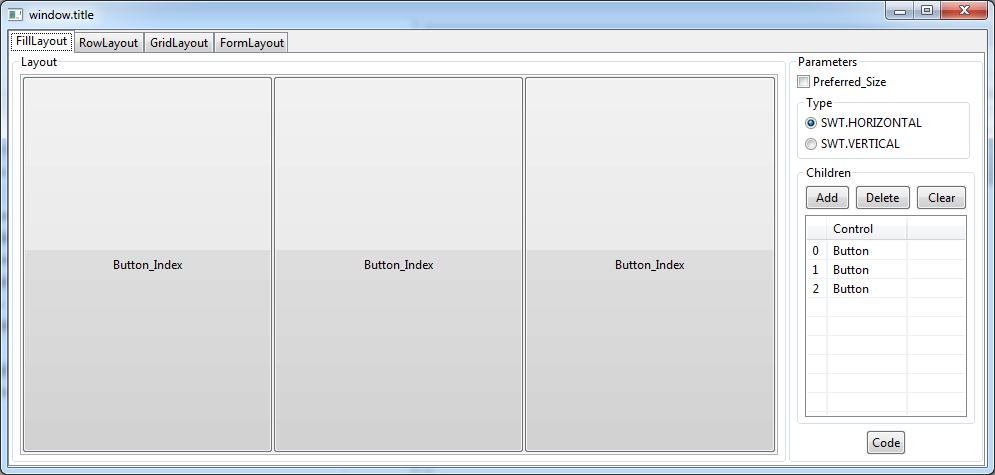
Online Example
This is an example online, allowing you to see how the exercise of the Layout.
- TODO Link?
FillLayout
FillLayout is the simplest layout class. It lays out widgets in a single row or column, forcing them to be the same size. Initially, the widgets will all be as tall as the tallest widget, and as wide as the widest. FillLayout does not wrap, and you cannot specify margins or spacing.
FillLayout fillLayout = new FillLayout();
fillLayout.type = SWT.VERTICAL;
shell.setLayout(fillLayout);
Initial | After resize | |
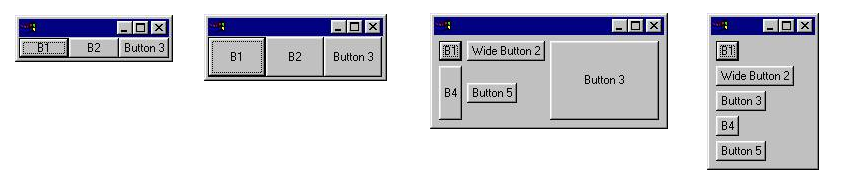
fillLayout.type = SWT.HORIZONTAL (default) | 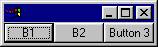 | 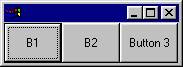 |
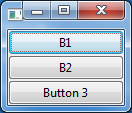
fillLayout.type = SWT.VERTICAL |  | 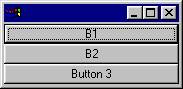 |
Video:
FillLayoutExample.java
package org.o7planning.tutorial.swt.layout;

import org.eclipse.swt.SWT;
import org.eclipse.swt.layout.FillLayout;
import org.eclipse.swt.layout.RowLayout;
import org.eclipse.swt.widgets.Button;
import org.eclipse.swt.widgets.Composite;
import org.eclipse.swt.widgets.Display;
import org.eclipse.swt.widgets.Shell;

public class FillLayoutExample {

  public static void main(String[] args) {
      Display display = new Display();
      final Shell shell = new Shell(display);
      shell.setLayout(new FillLayout());

      //
      Composite parent = new Composite(shell, SWT.NONE);

      FillLayout fillLayout= new FillLayout();
      fillLayout.type= SWT.VERTICAL;

      parent.setLayout(fillLayout);

      Button b1 = new Button(parent, SWT.NONE);
      b1.setText("B1");

      Button b2 = new Button(parent, SWT.NONE);
      b2.setText("B2");

      Button button3 = new Button(parent, SWT.NONE);
      button3.setText("Button 3");

      // Windows back to natural size.
      shell.pack();
      //
      shell.open();
      while (!shell.isDisposed()) {
          if (!display.readAndDispatch())
              display.sleep();
      }
      // tear down the SWT window
      display.dispose();
  }
}
Run result:
RowLayout
RowLayout is more commonly used than FillLayout because of its ability to wrap, and because it provides configurable margins and spacing. RowLayout has a number of configuration fields. In addition, the height and width of each widget in a RowLayout can be specified by setting a RowData object into the widget using setLayoutData.
The field configuration:
Wrap, Pack, Justify:
Initial | After resize | |
wrap = true pack = true justify = false (defaults) | 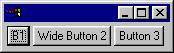 | 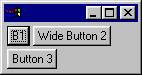 |
wrap = false (clips if not enough space) |  | 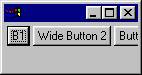 |
pack = false (all widgets are the same size) | 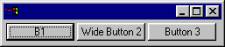 | 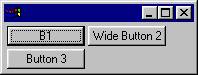 |
justify = true (widgets are spread across the available space) |  | 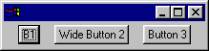 |
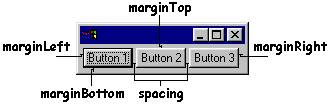
MarginLeft, MarginTop, MarginRight, MarginBottom, Spacing:
These fields control the number of pixels between widgets (spacing) and the number of pixels between a widget and the side of the parent Composite (margin). By default, RowLayouts leave 3 pixels for margin and spacing. The margin and spacing fields are shown in the following diagram.
Video:
GridLayout
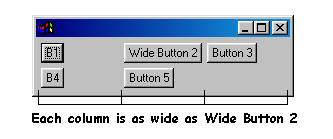
GridLayout is the most useful and powerful of the standard layouts, but it is also the most complicated. With a GridLayout, the widget children of a Composite are laid out in a grid. GridLayout has a number of configuration fields, and, like RowLayout, the widgets it lays out can have an associated layout data object, called GridData. The power of GridLayout lies in the ability to configure GridData for each widget controlled by the GridLayout.
The configuration of the GridLayout:
- NumColumns
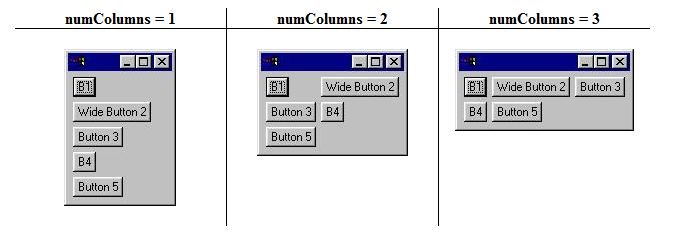
- MakeColumnsEqualWidth
Video GridLayout:
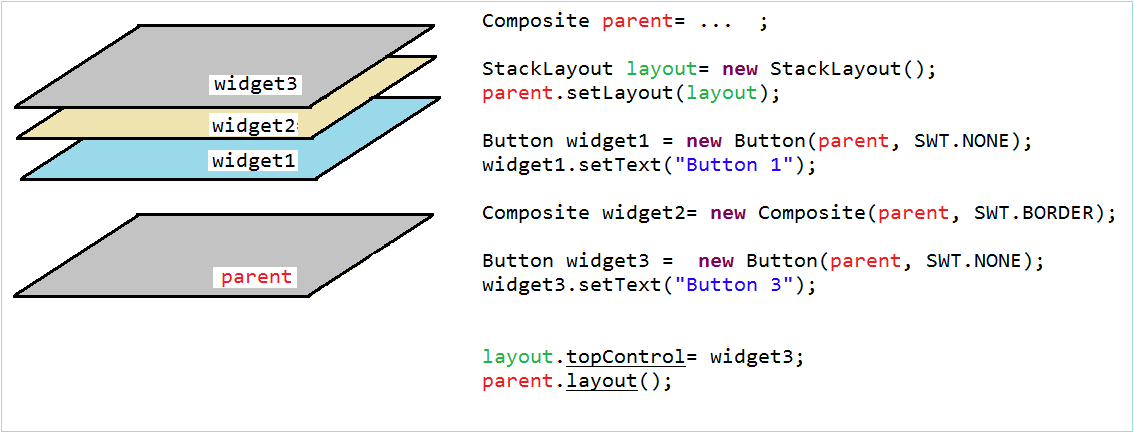
StackLayout
This Layout stacks all the controls one on top of the other and resizes all controls to have the same size and location. The control specified in topControl is visible and all other controls are not visible. Users must set the topControl value to flip between the visible items and then call layout() method on the composite which has the StackLayout.
Video StackLayout:
Combine Layout
Above, we have become familiar with the standard layout. Combining different layout, and the other container (Composite, TabFolder, SashForm, ..) will create the desired interface.
- TODO
10. Write the class extending from the SWT widget
Sometimes you need to write a class extending from available widget class of SWT. It is perfectly normal, but there is a small note, you need to override the method checkSubclass() without having to do anything in that method.
MyButton.java
package org.o7planning.tutorial.swt.swtsubclass;

import org.eclipse.swt.widgets.Button;
import org.eclipse.swt.widgets.Composite;

public class MyButton extends Button {

   public MyButton(Composite parent, int style) {
       super(parent, style);
   }

   // You have to override this method.
   @Override
   protected void checkSubclass() {
       // No need to do anything.
   }


}
11. Modular component interfaces
In case you have designed a complex interface. The splitting of designs is necessary and then put together, this will be easier if designing on Window Builder.
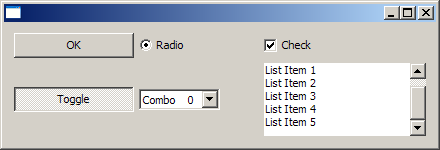
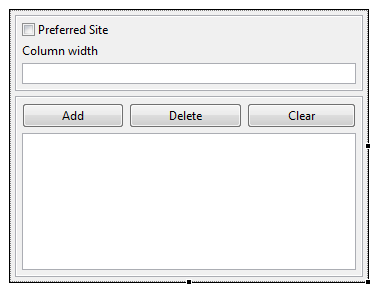
Please see the following interface, and we will try to split it up.
Please see the following interface, and we will try to split it up.
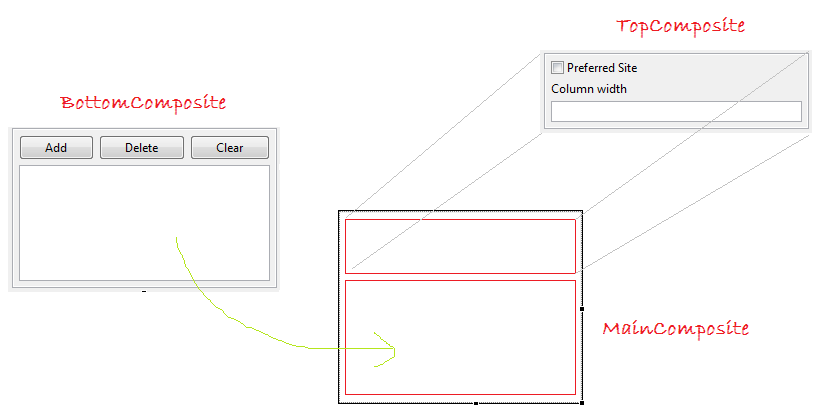
Suppose that you want to design an interface like the illustration below. (It is not complicated to split the design, but this is an example to illustrate how to split interface design)
We can design two separate Composite and graft it on MainComposite.
TopComposite
- File/New/Other...
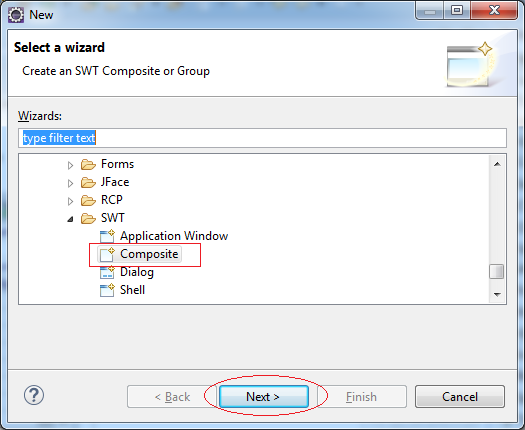
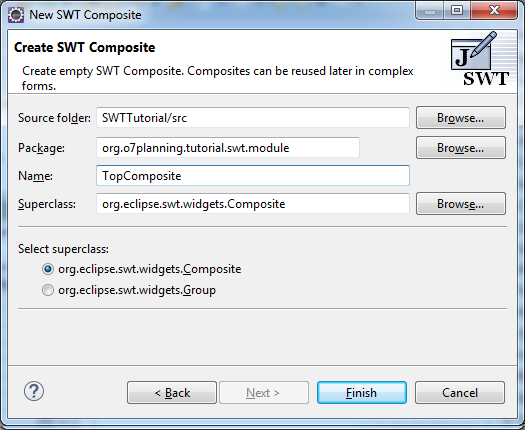
Interface Design for TopComposite.
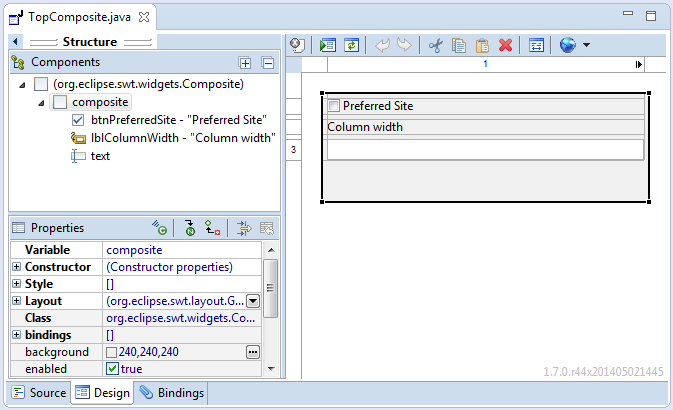
TopComposite.java
package org.o7planning.tutorial.swt.module;
import org.eclipse.swt.widgets.Composite;
public class TopComposite extends Composite {
private Text text;
/**
* Create the composite.
* @param parent
* @param style
*/
public TopComposite(Composite parent, int style) {
super(parent, style);
setLayout(new FillLayout(SWT.HORIZONTAL));
Composite composite = new Composite(this, SWT.NONE);
composite.setLayout(new GridLayout(1, false));
Button btnPreferredSite = new Button(composite, SWT.CHECK);
btnPreferredSite.setText("Preferred Site");
Label lblColumnWidth = new Label(composite, SWT.NONE);
lblColumnWidth.setText("Column width");
text = new Text(composite, SWT.BORDER);
text.setLayoutData(new GridData(SWT.FILL, SWT.CENTER, true, false, 1, 1));
}
@Override
protected void checkSubclass() {
}
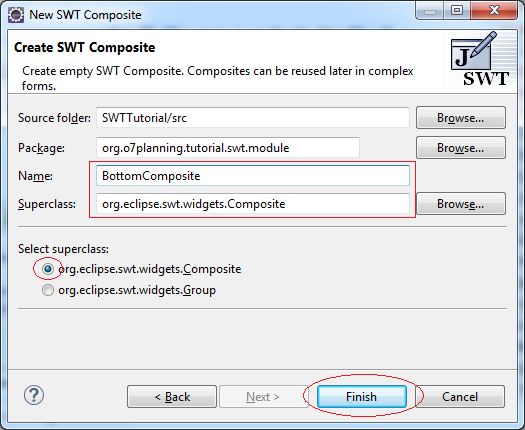
}BottomComposite
Similarly, create class BottomComposite
Interface Design for BottomComposite:
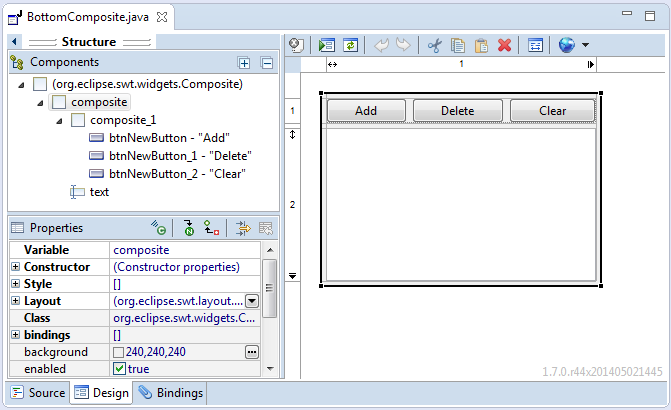
BottomComposite.java
package org.o7planning.tutorial.swt.module;
import org.eclipse.swt.SWT;
public class BottomComposite extends Composite {
private Text text;
/**
* Create the composite.
* @param parent
* @param style
*/
public BottomComposite(Composite parent, int style) {
super(parent, style);
setLayout(new FillLayout(SWT.HORIZONTAL));
Composite composite = new Composite(this, SWT.NONE);
composite.setLayout(new GridLayout(1, false));
Composite composite_1 = new Composite(composite, SWT.NONE);
GridLayout gl_composite_1 = new GridLayout(3, false);
gl_composite_1.marginHeight = 0;
gl_composite_1.marginWidth = 0;
composite_1.setLayout(gl_composite_1);
composite_1.setLayoutData(new GridData(SWT.FILL, SWT.CENTER, true, false, 1, 1));
Button btnNewButton = new Button(composite_1, SWT.NONE);
btnNewButton.setLayoutData(new GridData(SWT.FILL, SWT.CENTER, true, false, 1, 1));
btnNewButton.setText("Add");
Button btnNewButton_1 = new Button(composite_1, SWT.NONE);
btnNewButton_1.setLayoutData(new GridData(SWT.FILL, SWT.CENTER, true, false, 1, 1));
btnNewButton_1.setText("Delete");
Button btnNewButton_2 = new Button(composite_1, SWT.NONE);
btnNewButton_2.setLayoutData(new GridData(SWT.FILL, SWT.CENTER, true, false, 1, 1));
btnNewButton_2.setText("Clear");
text = new Text(composite, SWT.BORDER | SWT.MULTI);
text.setLayoutData(new GridData(SWT.FILL, SWT.FILL, true, true, 1, 1));
}
@Override
protected void checkSubclass() {
// Disable the check that prevents subclassing of SWT components
}
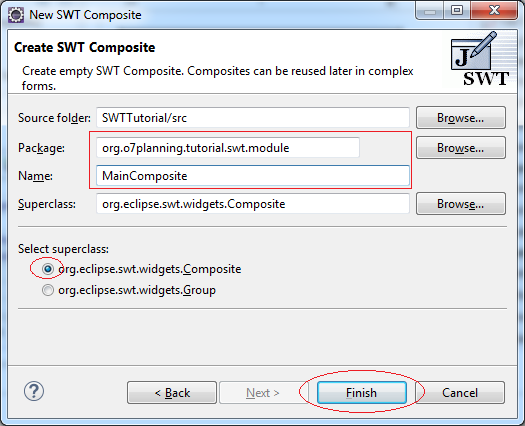
}MainComposite
Similarly create class MainComposite:
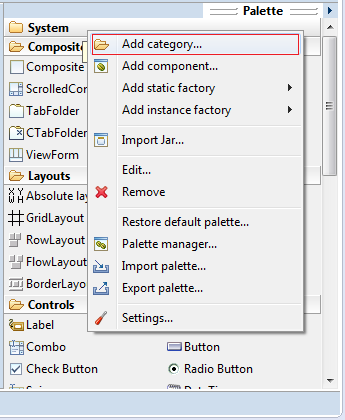
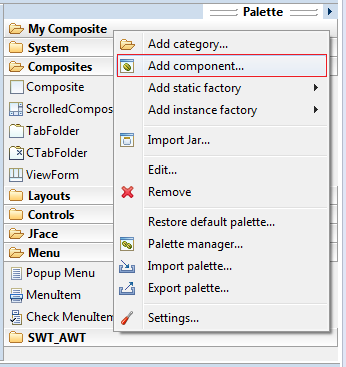
Register TopComposite & BottomComposite into Palette
Right-click the Palette and choose Add category ...
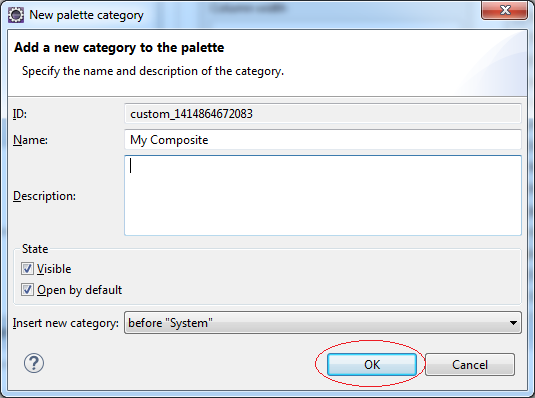
Named Pallete Category:
- My Composite
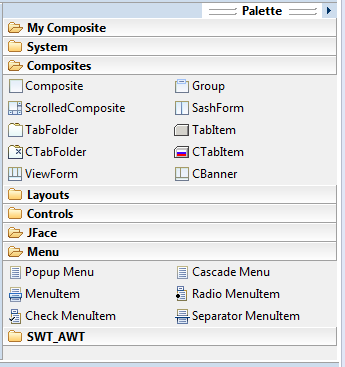
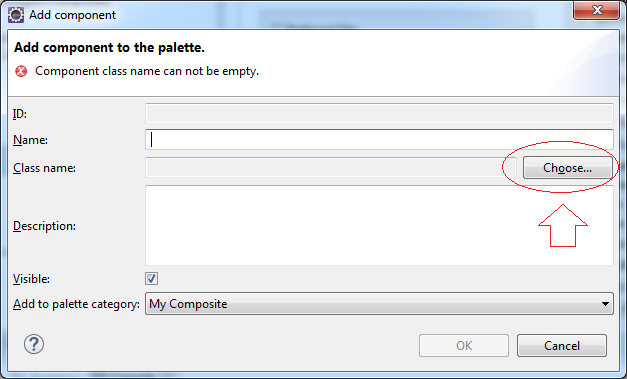
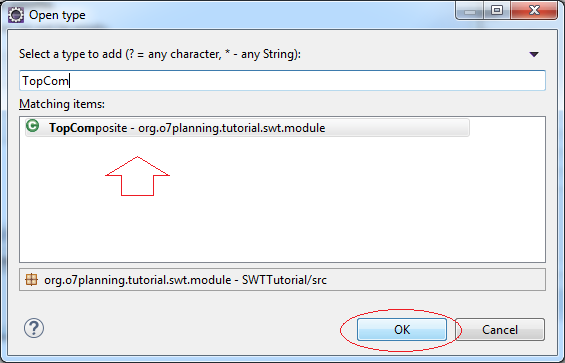
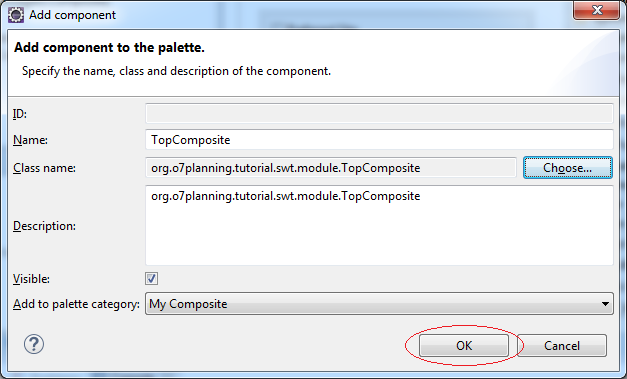
Right-click on the Category Pallette "My Composite" to add TopComposite & BottomComposite.
Similarly add BottomComposite to "My Composite" catalog.
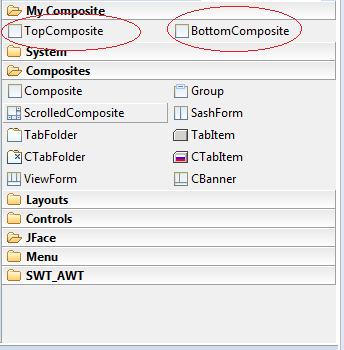
Now TopComposite & BottomComposite are easily drag and drop on the other Composite.
MainComposite.java
package org.o7planning.tutorial.swt.module;

import org.eclipse.swt.SWT;
import org.eclipse.swt.layout.FillLayout;
import org.eclipse.swt.layout.GridData;
import org.eclipse.swt.layout.GridLayout;
import org.eclipse.swt.widgets.Composite;

public class MainComposite extends Composite {

  /**
   * Create the composite.
   * @param parent
   * @param style
   */
  public MainComposite(Composite parent, int style) {
      super(parent, style);
      setLayout(new FillLayout(SWT.HORIZONTAL));

      Composite composite = new Composite(this, SWT.NONE);
      composite.setLayout(new GridLayout(1, false));

      TopComposite topComposite = new TopComposite(composite, SWT.BORDER);
      topComposite.setLayoutData(new GridData(SWT.FILL, SWT.CENTER, true, false, 1, 1));

      BottomComposite bottomComposite = new BottomComposite(composite, SWT.BORDER);
      bottomComposite.setLayoutData(new GridData(SWT.FILL, SWT.FILL, true, true, 1, 1));

  }

  @Override
  protected void checkSubclass() {
  }

}
12. Using event handlers
SWT event handling is very simple with the support of WindowBuilder.
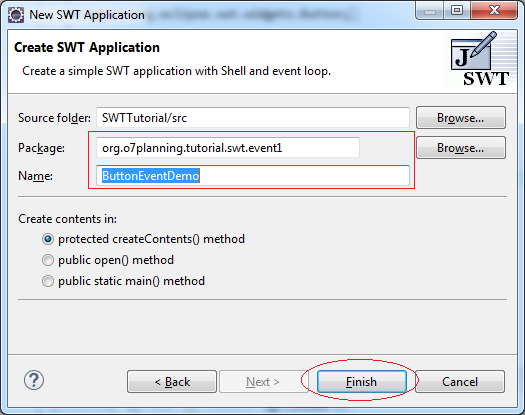
Examples:
- File/New/Other...
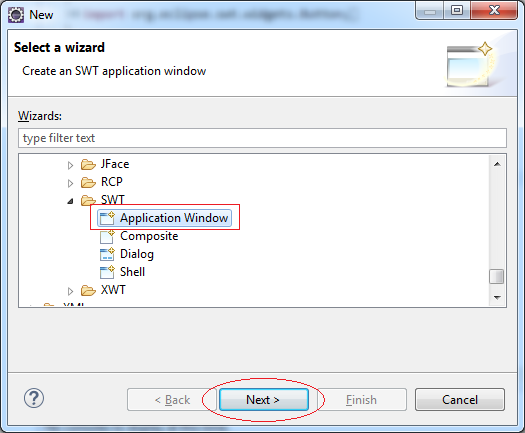
- Package: org.o7planning.tutorial.swt.event1
- Name: ButtonEventDemo
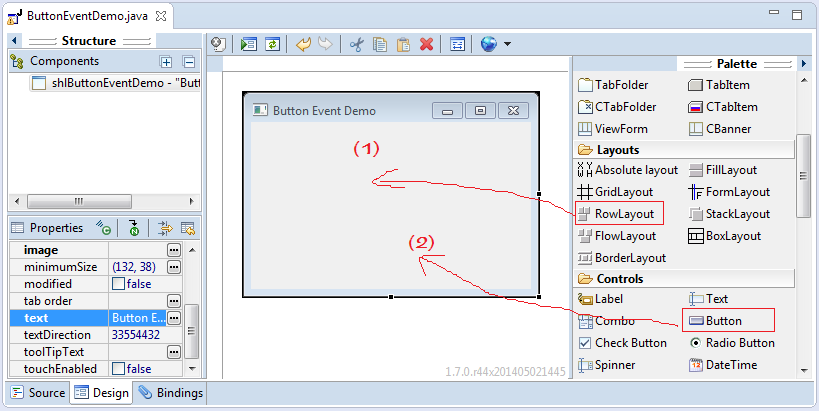
Right-click the Button, select Add event handler, a series of events for Button displayed.
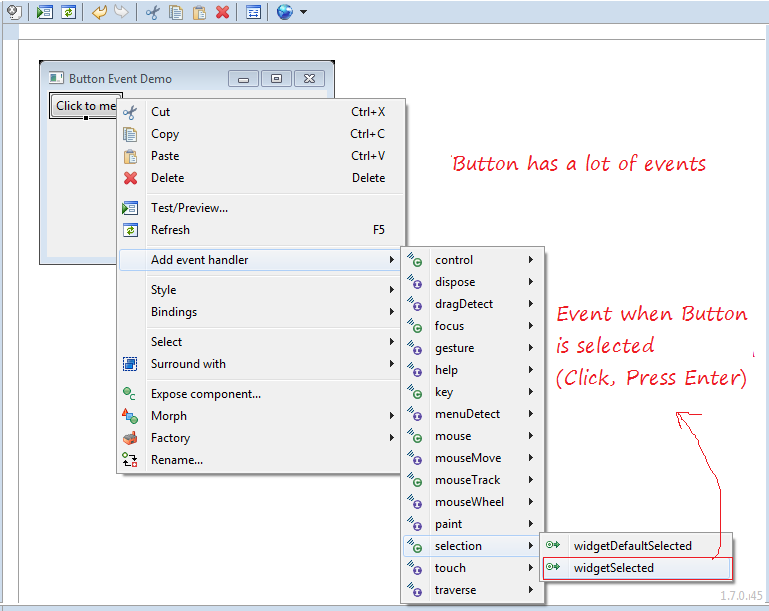
WindowBuilder will automatically generate code for you:
btnClickToMe.addSelectionListener(new SelectionAdapter() {
    @Override
    public void widgetSelected(SelectionEvent e) {
        // Sử lý sự kiện Button được chọn tại đây.
        System.out.println("Button selected!");
    }
});
ButtonEventDemo.java
package org.o7planning.tutorial.swt.event1;

import org.eclipse.swt.SWT;
import org.eclipse.swt.events.SelectionAdapter;
import org.eclipse.swt.events.SelectionEvent;
import org.eclipse.swt.layout.RowLayout;
import org.eclipse.swt.widgets.Button;
import org.eclipse.swt.widgets.Display;
import org.eclipse.swt.widgets.Shell;

public class ButtonEventDemo {

  protected Shell shlButtonEventDemo;

  public static void main(String[] args) {
      try {
          ButtonEventDemo window = new ButtonEventDemo();
          window.open();
      } catch (Exception e) {
          e.printStackTrace();
      }
  }

  public void open() {
      Display display = Display.getDefault();
      createContents();
      shlButtonEventDemo.open();
      shlButtonEventDemo.layout();
      while (!shlButtonEventDemo.isDisposed()) {
          if (!display.readAndDispatch()) {
              display.sleep();
          }
      }
  }

  protected void createContents() {
      shlButtonEventDemo = new Shell();
      shlButtonEventDemo.setSize(296, 205);
      shlButtonEventDemo.setText("Button Event Demo");
      shlButtonEventDemo.setLayout(new RowLayout(SWT.HORIZONTAL));

      Button btnClickToMe = new Button(shlButtonEventDemo, SWT.NONE);
      btnClickToMe.addSelectionListener(new SelectionAdapter() {
          @Override
          public void widgetSelected(SelectionEvent e) {
              // Handle Button selected here!
              System.out.println("Button selected!");
          }
      });
      btnClickToMe.setText("Click to me");

  }

}
Eclipse RCP
- Which Platform Should You Choose for Developing Java Desktop Applications?
- Programming Java Desktop Application Using SWT
- Eclipse RCP 4 Tutorial for Beginners - e4 Workbench Application
- Package and Deploy Desktop Application SWT/RCP
- Eclipse RCP 3 Tutorial for Beginners - Workbench Application
- Install e4 Tools Developer Resources for Eclipse
- Simple Eclipse RCP 3 Application - View and Editor integration
Show More
Eclipse Technology
- How to get the open source Java libraries as OSGi(s)
- Install Tycho for Eclipse
- Java OSGi Tutorial for Beginners
- Create Java OSGi project with Maven and Tycho
- Install WindowBuilder for Eclipse
- Which Platform Should You Choose for Developing Java Desktop Applications?
- Programming Java Desktop Application Using SWT
- Eclipse JFace Tutorial with Examples
- Install e4 Tools Developer Resources for Eclipse
- Package and Deploy Desktop Application SWT/RCP
- Install Eclipse RAP Target Platform
- Install EMF for Eclipse
- Install RAP e4 Tooling for Eclipse
- Create Eclipse RAP Widget from ClientScripting-based widget
- Install GEF for Eclipse
- Eclipse RAP Tutorial for Beginners - Workbench Application (OLD)
- Eclipse RCP 3 Tutorial for Beginners - Workbench Application
- Simple Eclipse RCP 3 Application - View and Editor integration
- Eclipse RCP 4 Tutorial for Beginners - e4 Workbench Application
- Install RAP Tools for Eclipse
- Eclipse RAP Tutorial for Beginners - Basic Application
- Eclipse RAP Tutorial for Beginners - e4 Workbench Application
- Package and deploy Eclipse RAP application
Show More
Java SWT Tutorials
- Java SWT FillLayout Tutorial with Examples
- Java SWT RowLayout Tutorial with Examples
- Java SWT SashForm Tutorial with Examples
- Java SWT Label Tutorial with Examples
- Java SWT Button Tutorial with Examples
- Java SWT Toggle Button Tutorial with Examples
- Java SWT Radio Button Tutorial with Examples
- Java SWT Text Tutorial with Examples
- Java SWT Password Field Tutorial with Examples
- Java SWT Link Tutorial with Examples
- Programming Java Desktop Application Using SWT
- Java SWT Combo Tutorial with Examples
- Java SWT Spinner Tutorial with Examples
- Java SWT Slider Tutorial with Examples
- Java SWT Scale Tutorial with Examples
- Java SWT ProgressBar Tutorial with Examples
- Java SWT TabFolder and CTabFolder Tutorial with Examples
- Java SWT List Tutorial with Examples
Show More