Java SWT SashForm Tutorial with Examples
1. SWT SashForm
SashForm is a class extended from Composite, it lays out child components on a row or a column. And it sets a Sash lying between 2 side-by-side child-components. The user can use mouse to change the position of Sash.
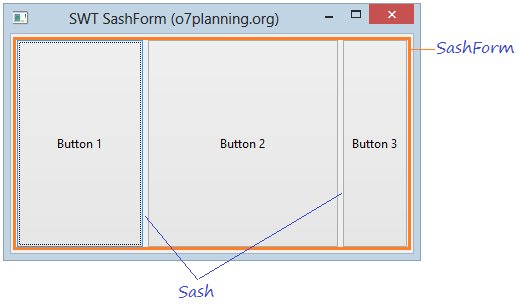
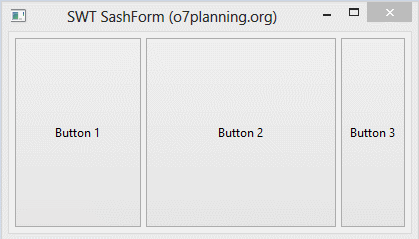
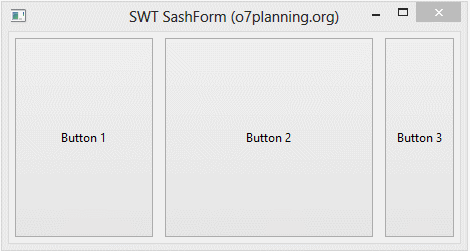
The example below is a horizontal SashForm with 3 child-compents, the user can use mouse to move the Sashes.
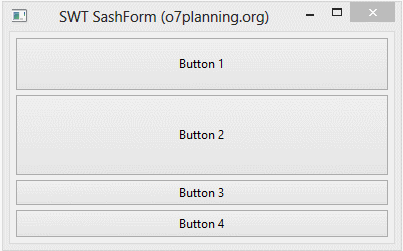
For example, a vertical SashForm with 4 children.
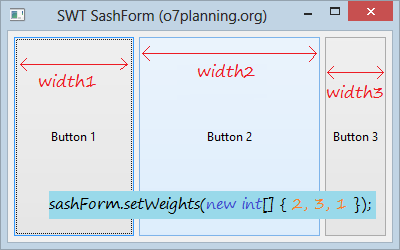
For horizontal SashForm, the width of subcomponents is directly proportional to their weight. For vertical SashForm, the height of subcomponents is directly proportional to their weight.
// Create horizontal SashForm:
SashForm sashForm = new SashForm(shell, SWT.HORIZONTAL);

// Create Vertical SashForm.
SashForm sashForm = new SashForm(shell, SWT.VERTICAL);
2. SashForm Example
SashFormDemo.java
package org.o7planning.swt.sashform;

import org.eclipse.swt.SWT;
import org.eclipse.swt.custom.SashForm;
import org.eclipse.swt.layout.FillLayout;
import org.eclipse.swt.widgets.Button;
import org.eclipse.swt.widgets.Display;
import org.eclipse.swt.widgets.Shell;

public class SashFormDemo {

    public static void main(String[] args) {
        Display display = new Display();
        Shell shell = new Shell(display);
        shell.setText("SWT SashForm (o7planning.org)");
        FillLayout fillLayout = new FillLayout();
        fillLayout.marginHeight= 5;
        fillLayout.marginWidth = 5;
        shell.setLayout(fillLayout);

        SashForm sashForm = new SashForm(shell, SWT.HORIZONTAL);

        Button button1 = new Button(sashForm, SWT.NONE);
        button1.setText("Button 1");
        Button button2 = new Button(sashForm, SWT.NONE);
        button2.setText("Button 2");
        Button button3 = new Button(sashForm, SWT.NONE);
        button3.setText("Button 3");
        sashForm.setWeights(new int[] { 2, 3, 1 });
        sashForm.setSashWidth(10);

        shell.setSize(400, 250);
        shell.open();
        while (!shell.isDisposed()) {
            if (!display.readAndDispatch())
                display.sleep();
        }
        display.dispose();
    }
}
Running the example:
Java SWT Tutorials
- Java SWT FillLayout Tutorial with Examples
- Java SWT RowLayout Tutorial with Examples
- Java SWT SashForm Tutorial with Examples
- Java SWT Label Tutorial with Examples
- Java SWT Button Tutorial with Examples
- Java SWT Toggle Button Tutorial with Examples
- Java SWT Radio Button Tutorial with Examples
- Java SWT Text Tutorial with Examples
- Java SWT Password Field Tutorial with Examples
- Java SWT Link Tutorial with Examples
- Programming Java Desktop Application Using SWT
- Java SWT Combo Tutorial with Examples
- Java SWT Spinner Tutorial with Examples
- Java SWT Slider Tutorial with Examples
- Java SWT Scale Tutorial with Examples
- Java SWT ProgressBar Tutorial with Examples
- Java SWT TabFolder and CTabFolder Tutorial with Examples
- Java SWT List Tutorial with Examples
Show More