Java SWT Button Tutorial with Examples
1. SWT Button
SWT Button enables developers to process an action when a user clicks a button. The Button class is an extension of the Control class. It can display text, an image, or both.
2. Button example
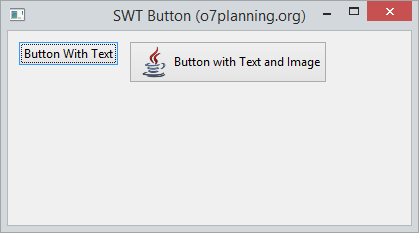
Create a Button with Text or Image, or both.
// Button 1
final Button button1 = new Button(shell, SWT.NONE);
button1.setText("Button With Text");
// Button 2
final Button button2 = new Button(shell, SWT.NONE);
button2.setText("Button with Text and Image");
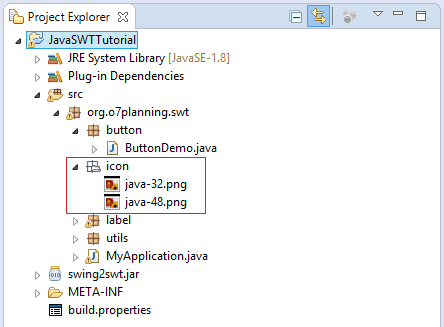
InputStream input = ButtonDemo.class.getResourceAsStream("/org/o7planning/swt/icon/java-32.png");
Image image = new Image(null, input);
button2.setImage(image);View full example:

ButtonDemo.java
package org.o7planning.swt.button;

import java.io.InputStream;

import org.eclipse.swt.SWT;
import org.eclipse.swt.graphics.Image;
import org.eclipse.swt.layout.RowLayout;
import org.eclipse.swt.widgets.Button;
import org.eclipse.swt.widgets.Display;
import org.eclipse.swt.widgets.Shell;

public class ButtonDemo {
   public static void main(String[] args) {
       Display display = new Display();
       Shell shell = new Shell(display);
       shell.setText("SWT Button (o7planning.org)");
       shell.setSize(400, 250);

       RowLayout rowLayout = new RowLayout();
       rowLayout.spacing = 10;
       rowLayout.marginLeft = 10;
       rowLayout.marginTop = 10;
       shell.setLayout(rowLayout);

       // Button 1
       final Button button1 = new Button(shell, SWT.NONE);
       button1.setText("Button With Text");
       // Button 2
       final Button button2 = new Button(shell, SWT.NONE);
       button2.setText("Button with Text and Image");

       InputStream input
          = ButtonDemo.class.getResourceAsStream("/org/o7planning/swt/icon/java-32.png");
       Image image = new Image(null, input);
       button2.setImage(image);
       shell.open();
       while (!shell.isDisposed()) {
           if (!display.readAndDispatch())
               display.sleep();
       }
       display.dispose();
   }
}
3. Button and events
The primary function of each button is to produce an action when it is clicked. Use the addSelectionListener method of the Button class to define what will happen when a user clicks the button.
// Handling when users click the button.
button.addSelectionListener(new SelectionAdapter() {
@Override
public void widgetSelected(SelectionEvent arg0) {
Date now = new Date();
label.setText(now.toString());
// Causes the receiver to be resized to its preferred size.
label.pack();
}
});
// OR
// Handling when users click the button.
button.addSelectionListener(new SelectionListener() {
@Override
public void widgetSelected(SelectionEvent arg0) {
Date now = new Date();
label.setText(now.toString());
label.pack();
}
@Override
public void widgetDefaultSelected(SelectionEvent arg0) {
System.out.println("Ignore this method!");
}
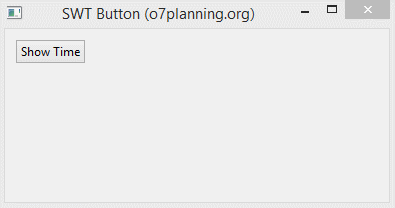
});For example, an action handling occurs with Button.
ButtonEventDemo.java
package org.o7planning.swt.button;

import java.util.Date;
import org.eclipse.swt.SWT;
import org.eclipse.swt.events.SelectionAdapter;
import org.eclipse.swt.events.SelectionEvent;
import org.eclipse.swt.layout.RowLayout;
import org.eclipse.swt.widgets.Button;
import org.eclipse.swt.widgets.Display;
import org.eclipse.swt.widgets.Label;
import org.eclipse.swt.widgets.Shell;

public class ButtonEventDemo {
    public static void main(String[] args) {
        Display display = new Display();
        Shell shell = new Shell(display);
        shell.setText("SWT Button (o7planning.org)");
        shell.setSize(400, 250);

        RowLayout rowLayout = new RowLayout();
        rowLayout.spacing = 10;
        rowLayout.marginLeft = 10;
        rowLayout.marginTop = 10;
        shell.setLayout(rowLayout);

        // Button
        final Button button = new Button(shell, SWT.NONE);
        button.setText("Show Time");
        // Label
        final Label label = new Label(shell, SWT.NONE);
        label.setText("");
        // Handling when users click the button.
        button.addSelectionListener(new SelectionAdapter() {
            @Override
            public void widgetSelected(SelectionEvent arg0) {
                Date now = new Date();
                label.setText(now.toString());
                // Causes the receiver to be resized to its preferred size.
                label.pack();
            }
        });
        shell.open();
        while (!shell.isDisposed()) {
            if (!display.readAndDispatch())
                display.sleep();
        }
        display.dispose();
    }
}
Running the example:
4. Button Style
When creating a button you can specify the style for it:
Sample
// Style for Button
int style = SWT.PUSH | SWT.LEFT;
int sytle = SWT.ARROW | SWT.LEFT;

// Create a Button with style.
Button button = new Button(parent, style);
Here is the style can be applied to the Button:
- Use one of the constants: SWT.LEFT, SWT.CENTER, or SWT.RIGHT
- Use one of the constants: SWT.ARROW, SWT.CHECK, SWT.PUSH, SWT.RADIO, or SWT.TOGGLE..
- If you use SWT.ARROW you can combine with one of the constants SWT.UP, SWT.DOWN, SWT.LEFT, or SWT.RIGHT to determine the direction of the arrow.
Style | Description |
SWT.CHECK
 | Creates a checkbox. |
SWT.PUSH
 | Creates a push button. |
SWT.RADIO
 | Creates a radio button. |
SWT.TOGGLE
 | Creates a push button that preserves its pushed or nonpushed state. |
SWT.FLAT
 | Creates a push button that appears flat. |
SWT.ARROW | Creates a push button that displays an arrow. |
SWT.UP | When combined with SWT.ARROW, displays an upward-pointing arrow. |
SWT.DOWN | When combined with SWT.ARROW, displays a downward-pointing arrow. |
SWT.CENTER | Centers the associated text. |
SWT.LEFT | Left-aligns the associated text. When combined with SWT.ARROW, displays a leftward-pointing arrow. |
SWT.RIGHT | Right-aligns the associated text. When combined with SWT.ARROW, displays a rightward-pointing arrow. |
Java SWT Tutorials
- Java SWT FillLayout Tutorial with Examples
- Java SWT RowLayout Tutorial with Examples
- Java SWT SashForm Tutorial with Examples
- Java SWT Label Tutorial with Examples
- Java SWT Button Tutorial with Examples
- Java SWT Toggle Button Tutorial with Examples
- Java SWT Radio Button Tutorial with Examples
- Java SWT Text Tutorial with Examples
- Java SWT Password Field Tutorial with Examples
- Java SWT Link Tutorial with Examples
- Programming Java Desktop Application Using SWT
- Java SWT Combo Tutorial with Examples
- Java SWT Spinner Tutorial with Examples
- Java SWT Slider Tutorial with Examples
- Java SWT Scale Tutorial with Examples
- Java SWT ProgressBar Tutorial with Examples
- Java SWT TabFolder and CTabFolder Tutorial with Examples
- Java SWT List Tutorial with Examples
Show More