- Instroduction
- The settings required before starting
- What is RCP Workbench application?
- Create Project
- Run Project
- Structure RCP applications, and configure RCP
- Project Target Component
- Create a few Command used in applications
- Design Interface
- Packing and Deploying Eclipse RCP Application
- View and Editor Integration
Eclipse RCP 3 Tutorial for Beginners - Workbench Application
1. Instroduction
This document is based on:
- Eclipse 4.4 (LUNA) (or Eclipse 4.5 MARS create RCP 3 application, not Eclipse e4 RCP)
- RCP 3
History:
- 27-08-2014: Eclipse 4.4 LUNA + RCP3
Note:
The current version of Eclipse RCP is 4.0, you can see the instructions at:
2. The settings required before starting
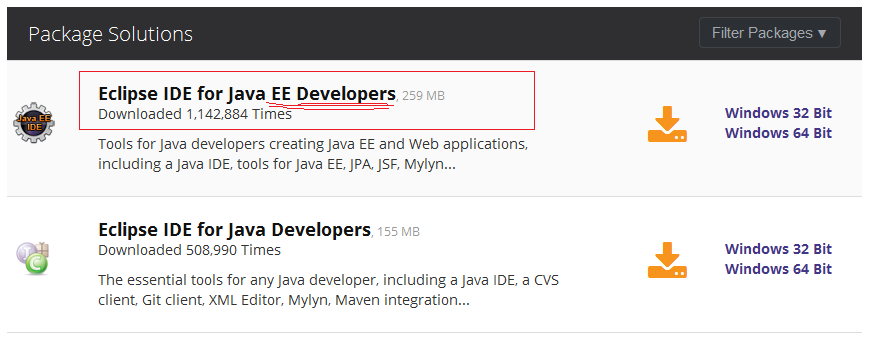
You need the latest version of Eclipse. There currently is Eclipse 4.4 (Codes LUNA).
In my opinion you to download package: "Eclipse IDE for Java EE Developers". The only different package quantities Plugin, for the purpose of different programming. During the programming process can install the plugin for other purposes.
Install WindowBuilder plugin, there is a plugin that allows you to design SWT GUI applications using drag and drop convenience.
See installation instructions at:
See installation instructions at:
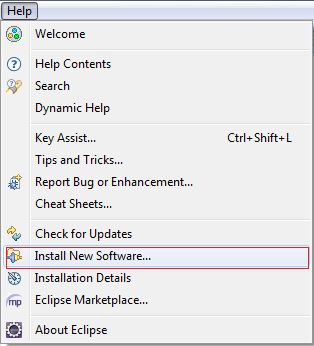
Install RCP Components.

3. What is RCP Workbench application?
RCP (Rich Client Platform): As a platform it based on SWT, SWT which is a programming library for desktop applications. RCP provides a platform to help you write applications like Eclipse IDE.
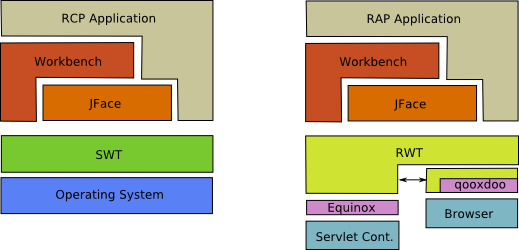
RCP allows Workbench application programming interface similar to the interface of the Eclipse IDE. Programming the Eclipse Plugin integrates into the IDE.
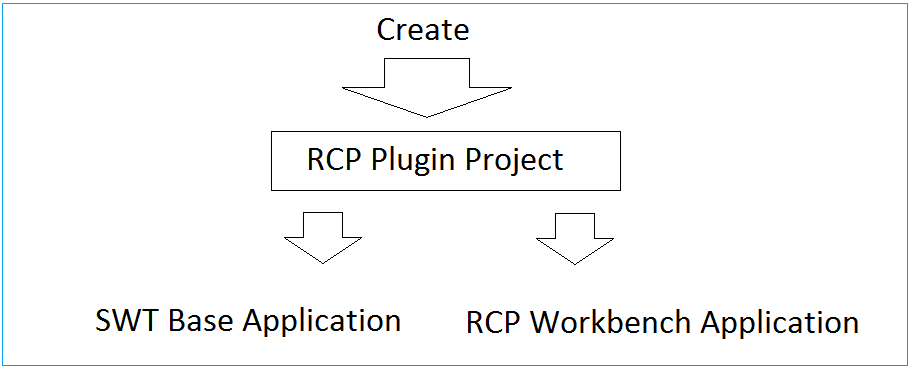
To create a desktop application using SWT. On the Eclipse, we will create an RCP Plugin Project. You have 2 options.
Only use the features of the SWT
Using the platform provided by the RCP to RCP Application Workbench programming.
Only use the features of the SWT
Using the platform provided by the RCP to RCP Application Workbench programming.
You can see SWT programming tutorial here:
4. Create Project
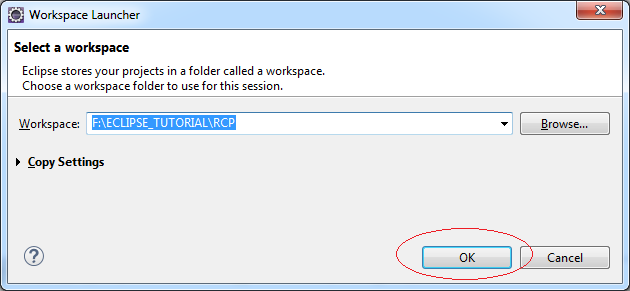
First of all you have to create a new workspace to get started:
On Eclipse select: File/Switch Workspace/Other ...
On Eclipse select: File/Switch Workspace/Other ...

Enter your workspace directory:
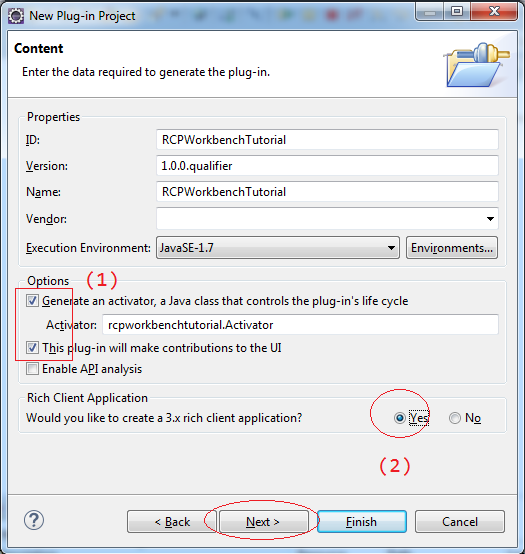
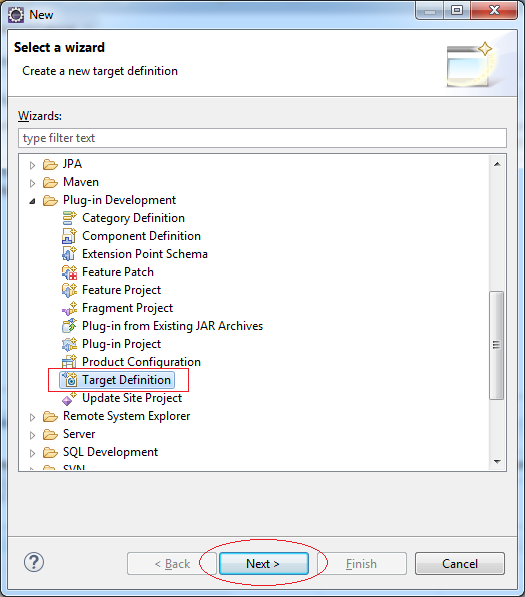
In Eclipse select: File/New/Other...

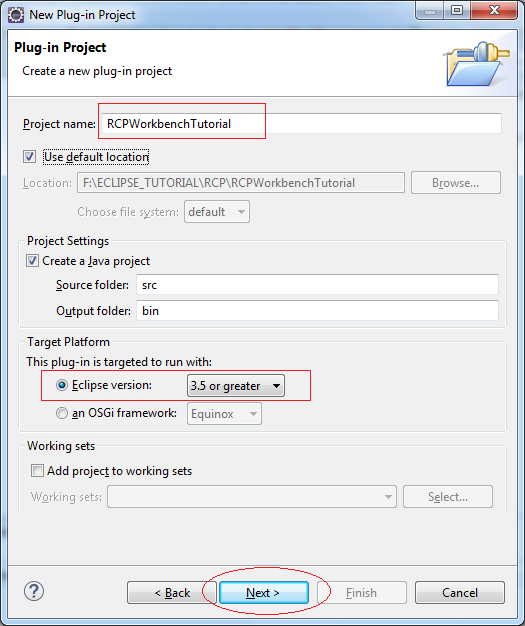
- Check selected on (1)
- On the (2) select "Yes" to create Eclipse RCP Project (Running on Desktop), otherwise it will create RAP Project (Running on the Web).
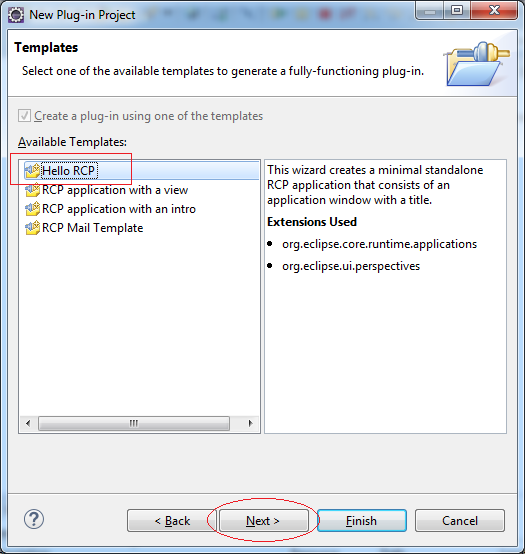
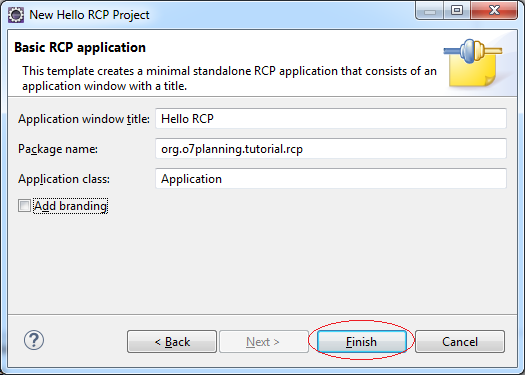
Project was created:
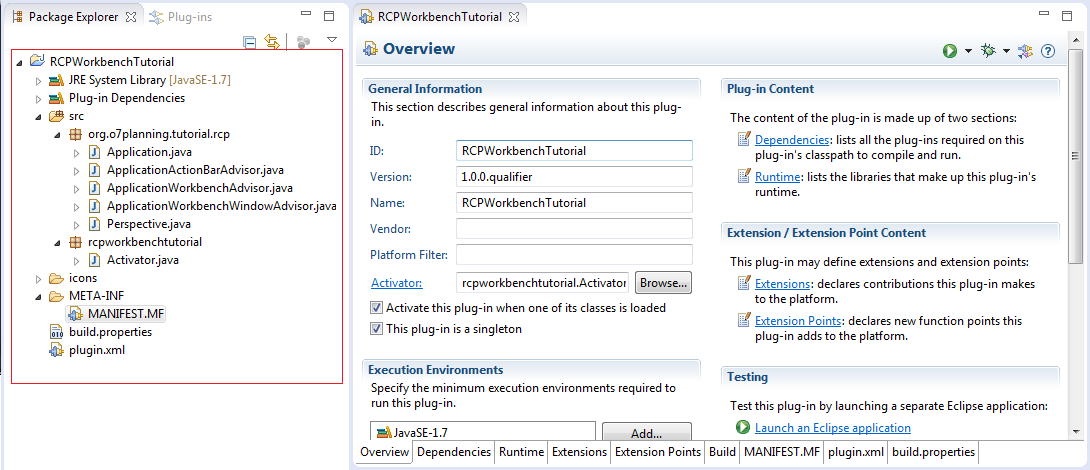
5. Run Project
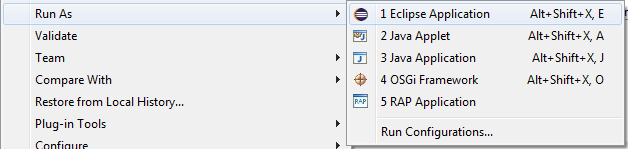
We will test this Project Hello RCP immediately after it has been created.
Right-click on the Project: RCPWorkbenchTutorial choose RunAs/Eclipse Application
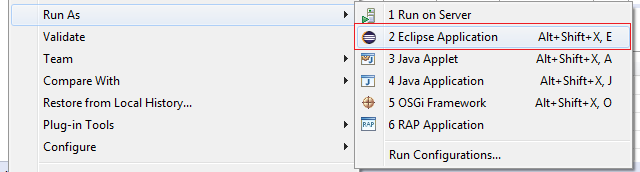
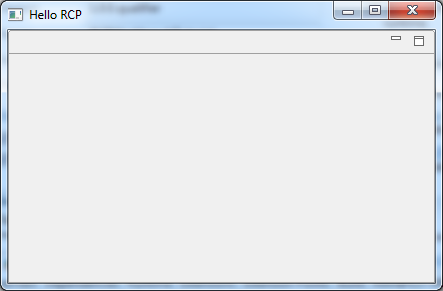
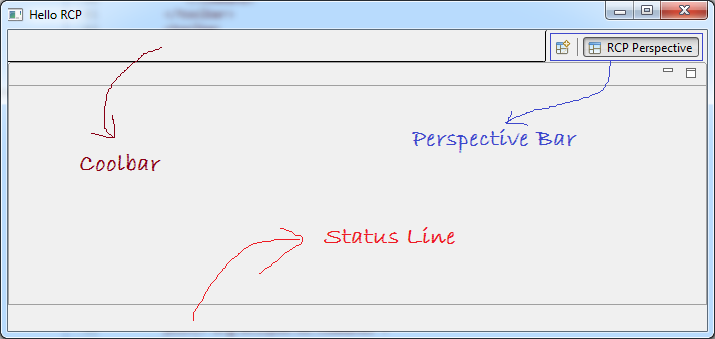
Result:
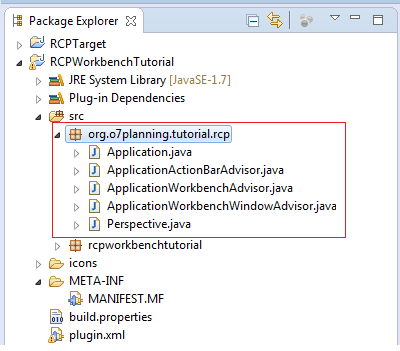
6. Structure RCP applications, and configure RCP
This is an image of the class is created by default when you create RCP Project from template "Hello RCP":
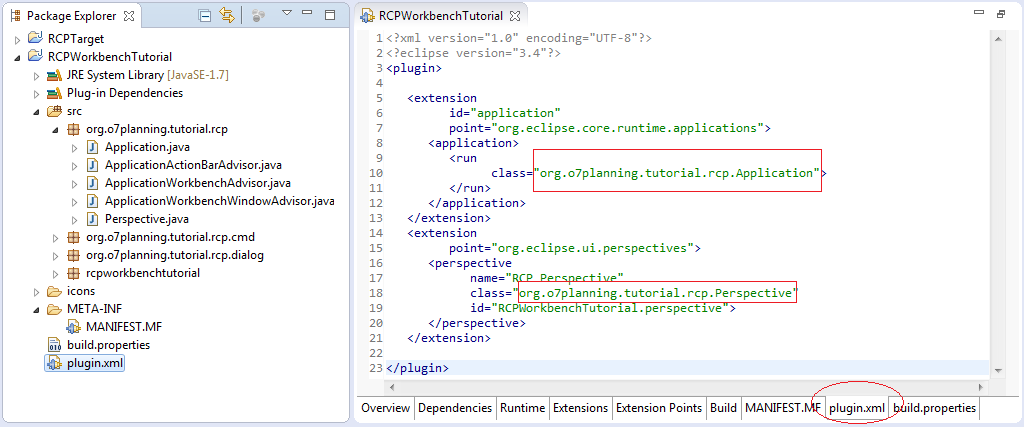
Application Configuration:
Change the code in the class ApplicationWorkbenchWindowAdvisor, to ensure Coolbar bar, PerspectiveBar, .. will be displayed on the Workbench:
ApplicationWorkbenchWindowAdvisor.java
package org.o7planning.tutorial.rcp;

import org.eclipse.swt.graphics.Point;
import org.eclipse.ui.application.ActionBarAdvisor;
import org.eclipse.ui.application.IActionBarConfigurer;
import org.eclipse.ui.application.IWorkbenchWindowConfigurer;
import org.eclipse.ui.application.WorkbenchWindowAdvisor;

public class ApplicationWorkbenchWindowAdvisor extends WorkbenchWindowAdvisor {

   public ApplicationWorkbenchWindowAdvisor(IWorkbenchWindowConfigurer configurer) {
       super(configurer);
   }

   public ActionBarAdvisor createActionBarAdvisor(IActionBarConfigurer configurer) {
       return new ApplicationActionBarAdvisor(configurer);
   }

   public void preWindowOpen() {
       IWorkbenchWindowConfigurer configurer = getWindowConfigurer();
       configurer.setInitialSize(new Point(400, 300));

       // Show MenuBar
       configurer.setShowMenuBar(true);
       // Show CoolBar.
       configurer.setShowCoolBar(true);
       // Show Status Line.
       configurer.setShowStatusLine(true);
       // Show PerspectiveBar
       configurer.setShowPerspectiveBar(true);
       // Show FastViewBars
       configurer.setShowFastViewBars(true);
       // Show ProgressIndicator
       configurer.setShowProgressIndicator(true);

       configurer.setTitle("Hello RCP"); //$NON-NLS-1$
   }
}
Rerun Application:
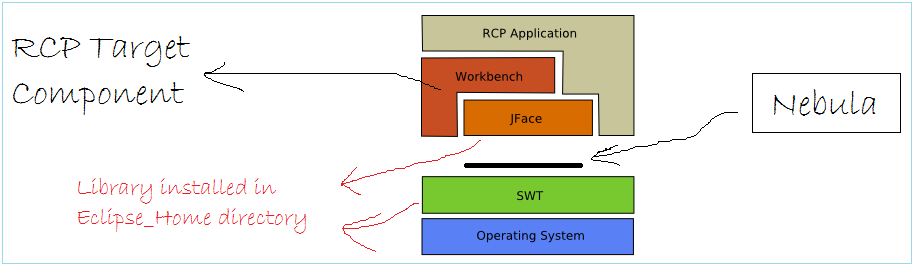
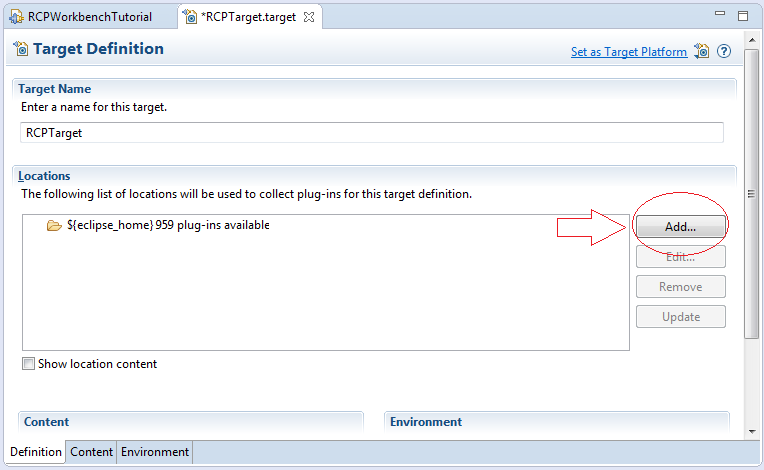
7. Project Target Component
RCP is Platform based on:
- SWT
- JFace
- RCP Component.
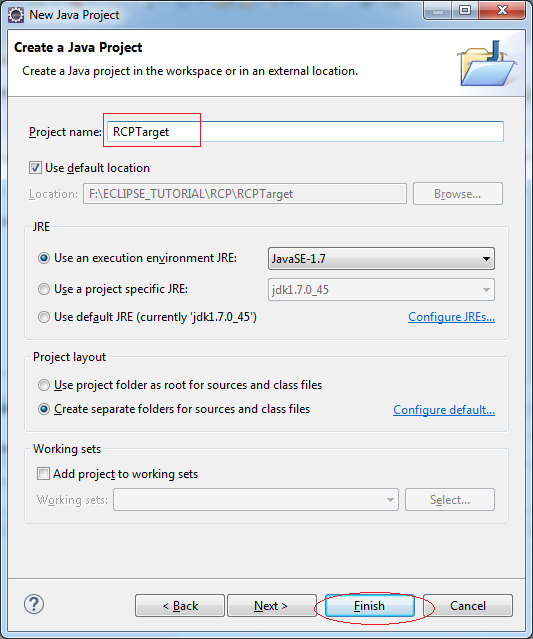
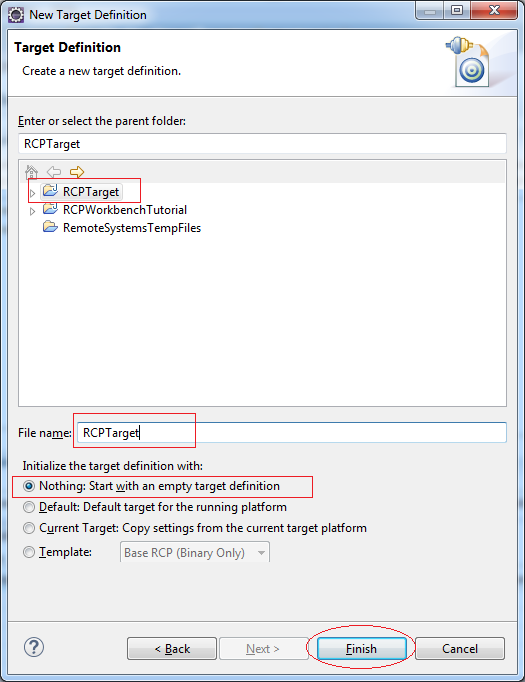
Create a Java Project, to declare the file "Define Target" in it..
First of all, declare SWT libraries, it available on the Eclipse folder.
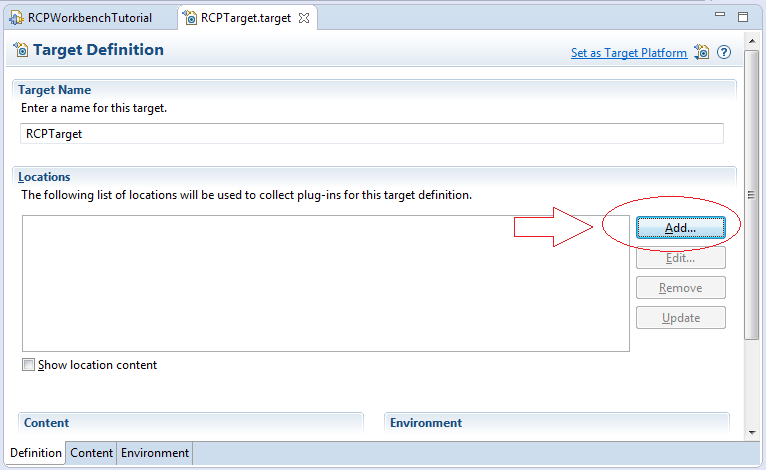
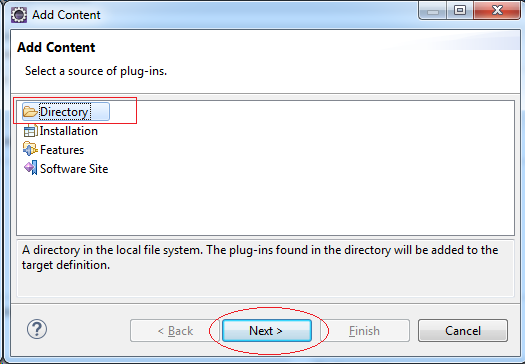
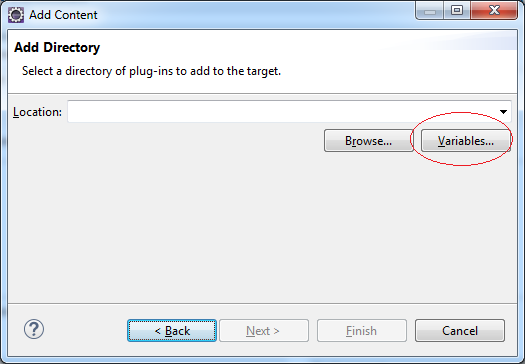
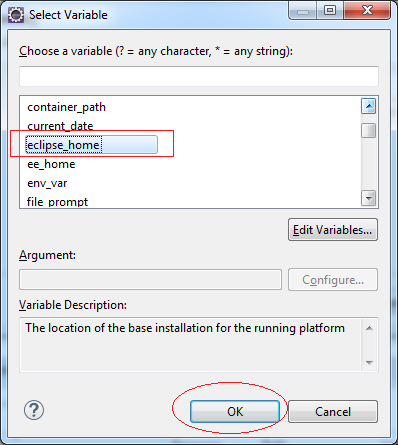
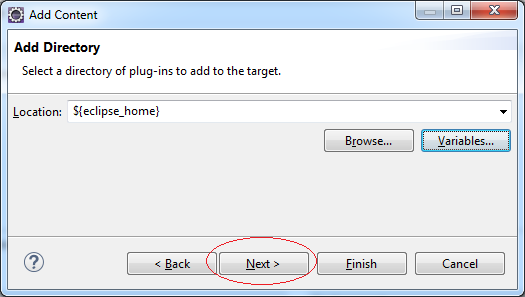
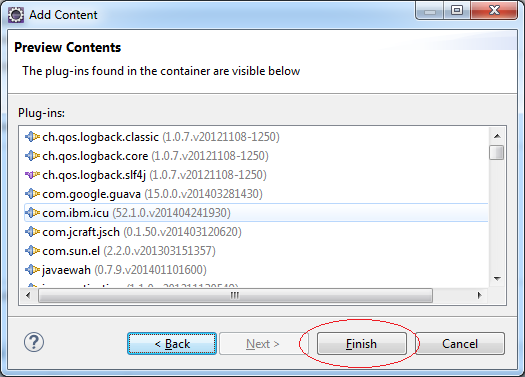
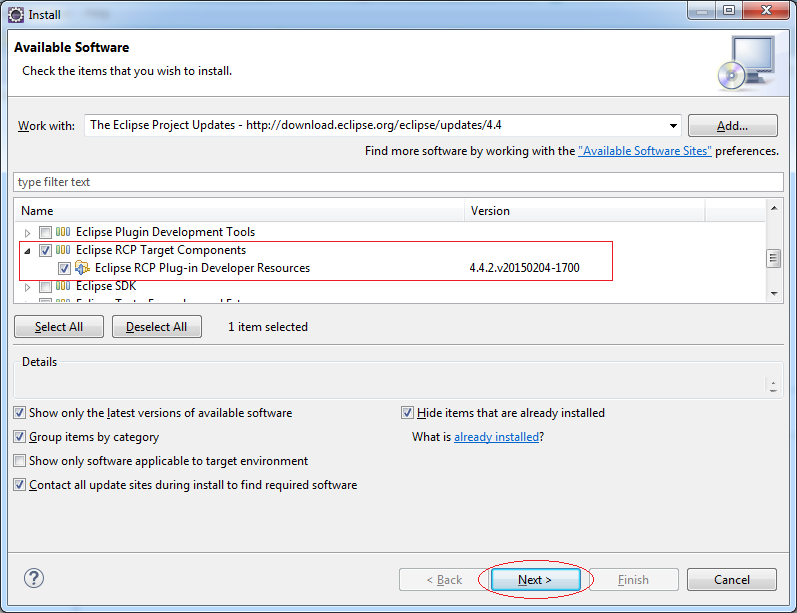
Next declare "RCP Target Component". It is the library component of the RCP.
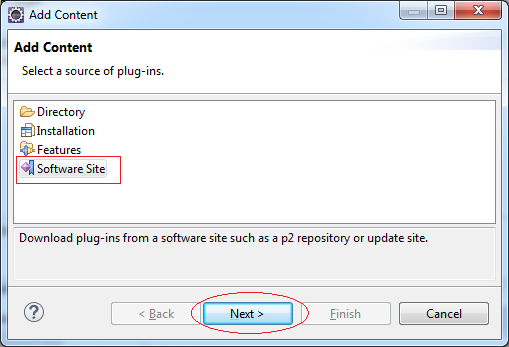
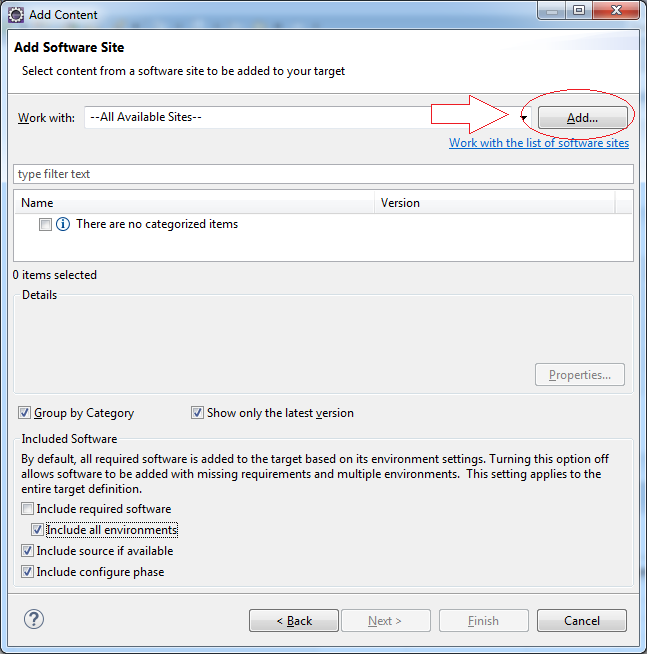
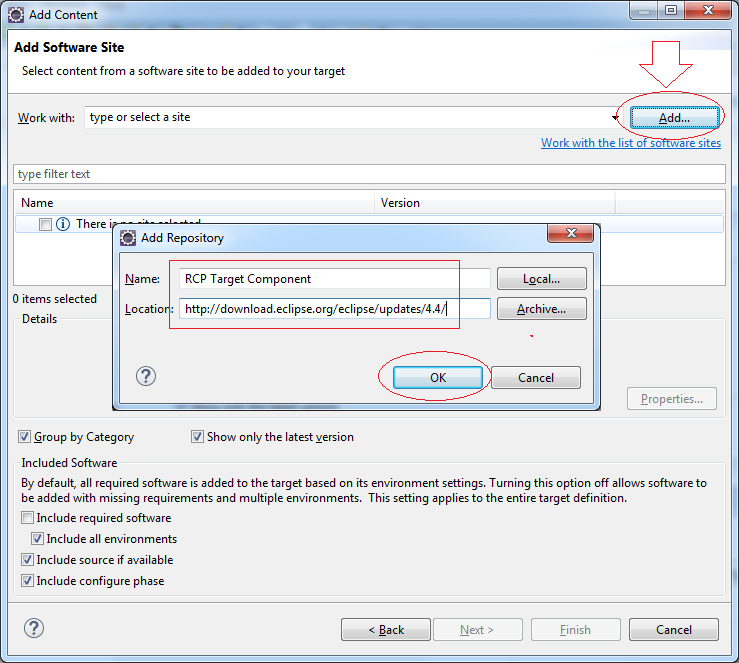
Enter:
- Name: RCP Target Component
- Location: http://download.eclipse.org/eclipse/updates/4.4/
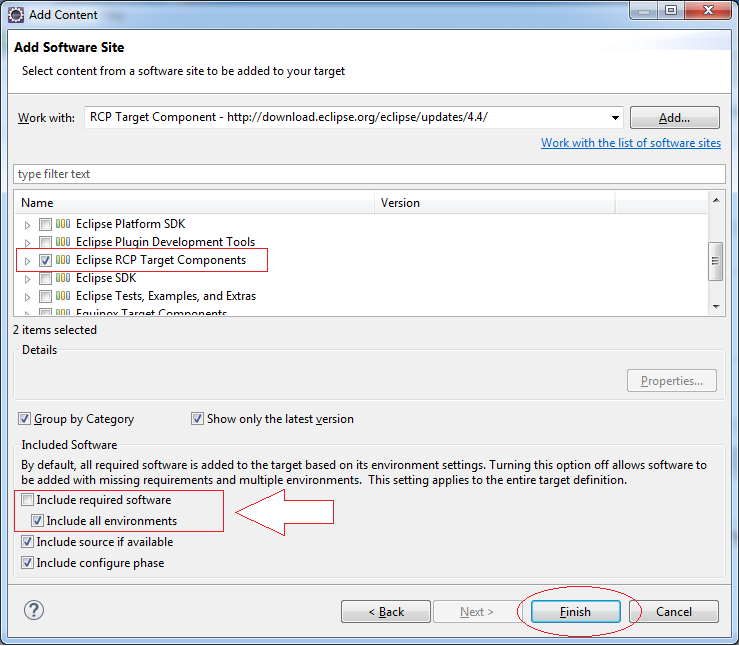
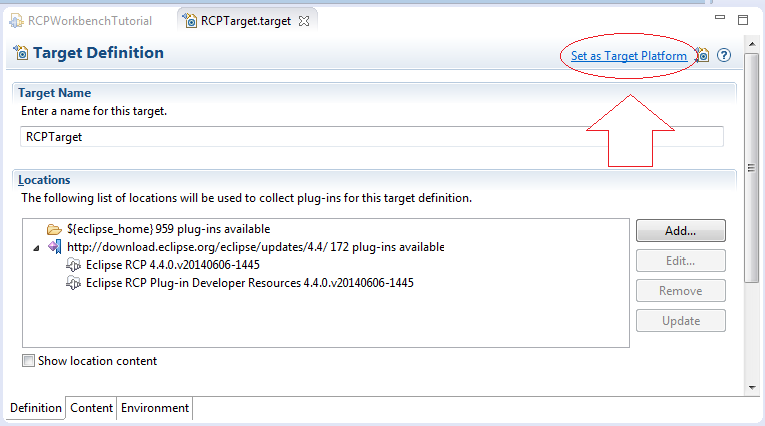
Click on "Set As Target Component", the library will be running environment for RCP applications.
You can also declare other libraries such as Nebula, ... on "Define Target".
See more Nabula widget at:
8. Create a few Command used in applications
You can create the class command to control a certain event, such as:
- Open the file
- Exit the application
- Open AboutDialog
- ....
AboutDialog.java
package org.o7planning.tutorial.rcp.dialog;

import org.eclipse.swt.SWT;

public class AboutDialog extends Dialog {

   protected Object result;
   protected Shell shlAbout;

   /**
    * Create the dialog.
    * @param parent
    * @param style
    */
   public AboutDialog(Shell parent, int style) {
       super(parent, style);
       setText("SWT Dialog");
   }

   /**
    * Open the dialog.
    * @return the result
    */
   public Object open() {
       createContents();
       shlAbout.open();
       shlAbout.layout();
       Display display = getParent().getDisplay();
       while (!shlAbout.isDisposed()) {
           if (!display.readAndDispatch()) {
               display.sleep();
           }
       }
       return result;
   }

   /**
    * Create contents of the dialog.
    */
   private void createContents() {
       shlAbout = new Shell(getParent(), getStyle());
       shlAbout.setSize(418, 145);
       shlAbout.setText("About");
       shlAbout.setLayout(new GridLayout(1, false));

       Label lblNewLabel = new Label(shlAbout, SWT.NONE);
       lblNewLabel.setLayoutData(new GridData(SWT.CENTER, SWT.CENTER, true, true, 1, 1));
       lblNewLabel.setText("RCP Tutorial");

   }

}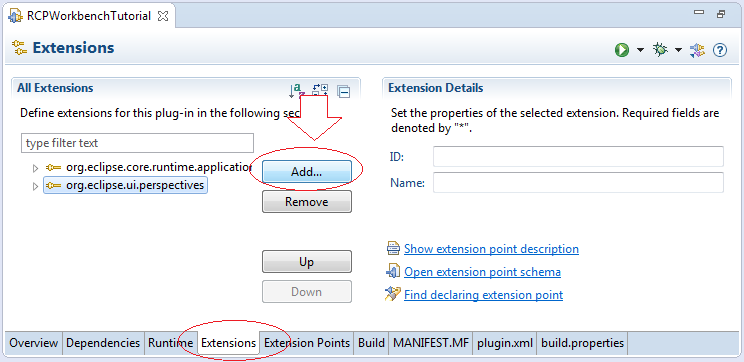
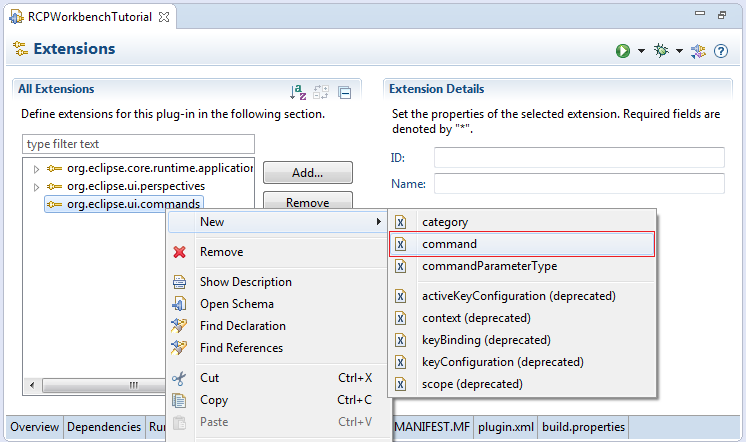
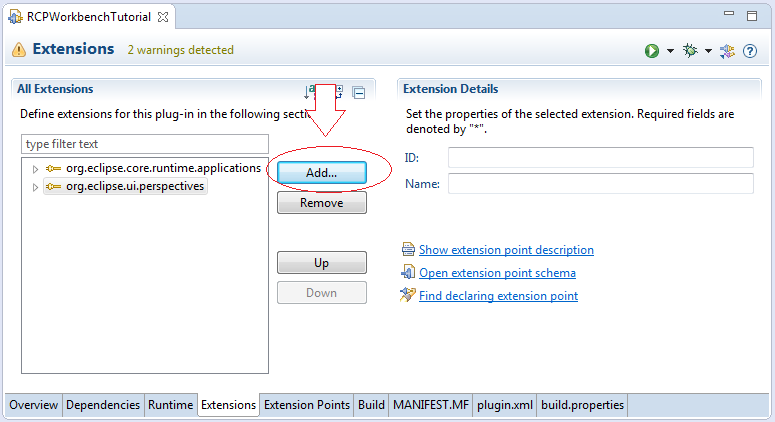
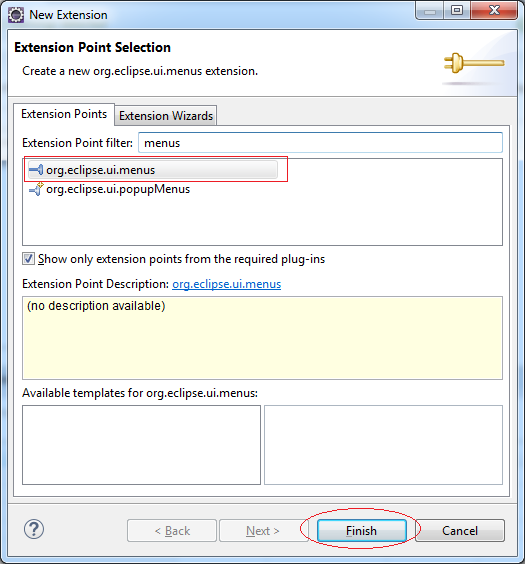
Create Extension Point:
- org.eclipse.ui.commands
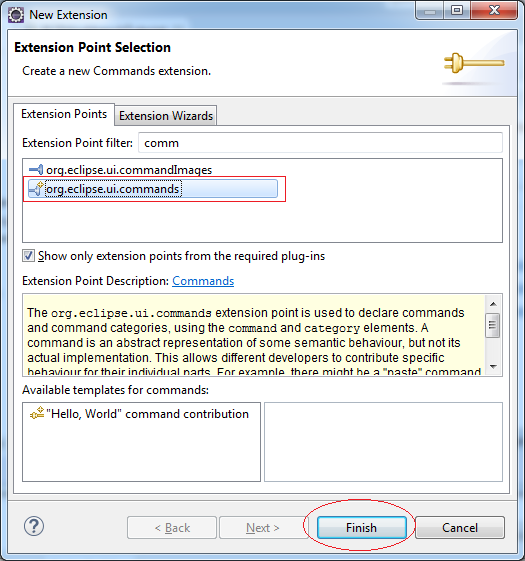
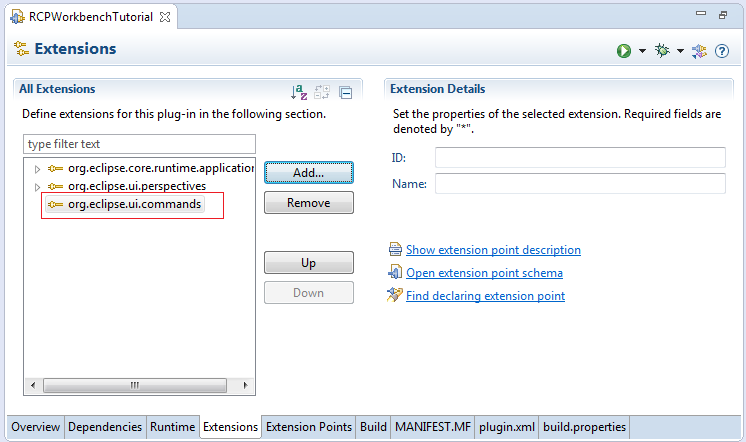
Next we will create a Command class with ID:
- org.o7planning.tutorial.rcp.cmd.about
Enter:
- id: org.o7planning.tutorial.rcp.cmd.about
- defaultHandler: org.o7planning.tutorial.rcp.cmd.AboutCommand
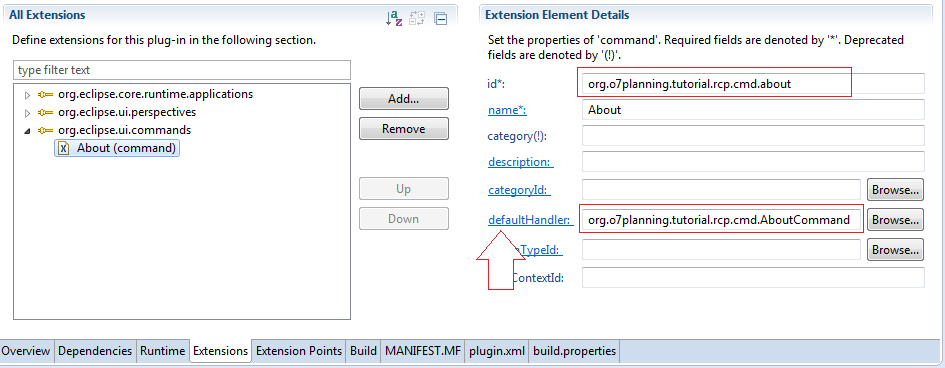
You should write AboutCommand extends from the class:
- org.eclipse.core.commands.AbstractHandler.
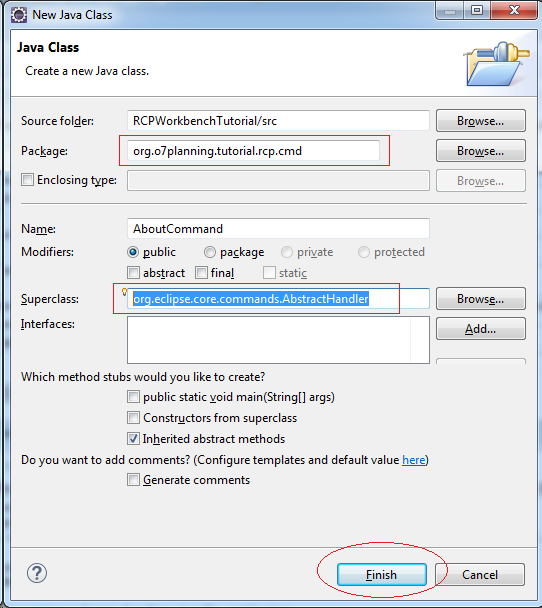
AboutCommand.java
package org.o7planning.tutorial.rcp.cmd;

import org.eclipse.core.commands.AbstractHandler;
import org.eclipse.core.commands.ExecutionEvent;
import org.eclipse.core.commands.ExecutionException;
import org.eclipse.swt.SWT;
import org.eclipse.swt.widgets.Shell;
import org.eclipse.ui.handlers.HandlerUtil;
import org.o7planning.tutorial.rcp.dialog.AboutDialog;

public class AboutCommand extends AbstractHandler {

  @Override
  public Object execute(ExecutionEvent event) throws ExecutionException {
      Shell shell = HandlerUtil.getActiveWorkbenchWindow(event).getShell();
      AboutDialog dialog = new AboutDialog(shell, SWT.DIALOG_TRIM
              | SWT.APPLICATION_MODAL);
      dialog.open();
      return null;
  }

}
9. Design Interface
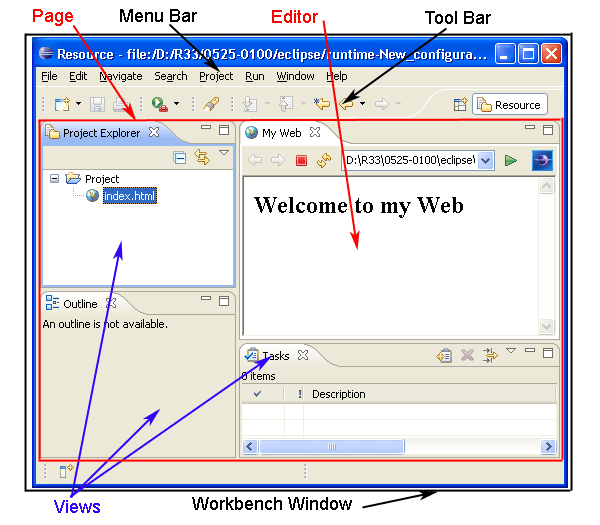
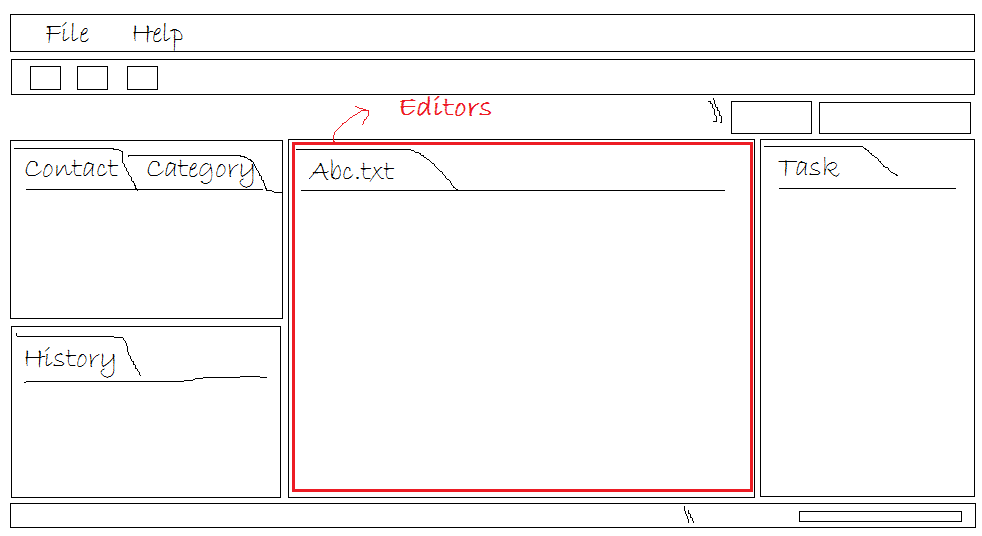
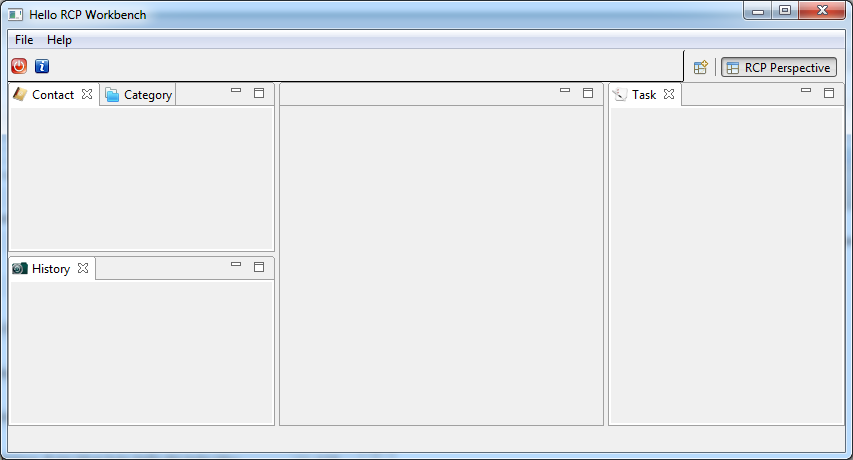
Interface
Below is a Workbench picture that we would design.
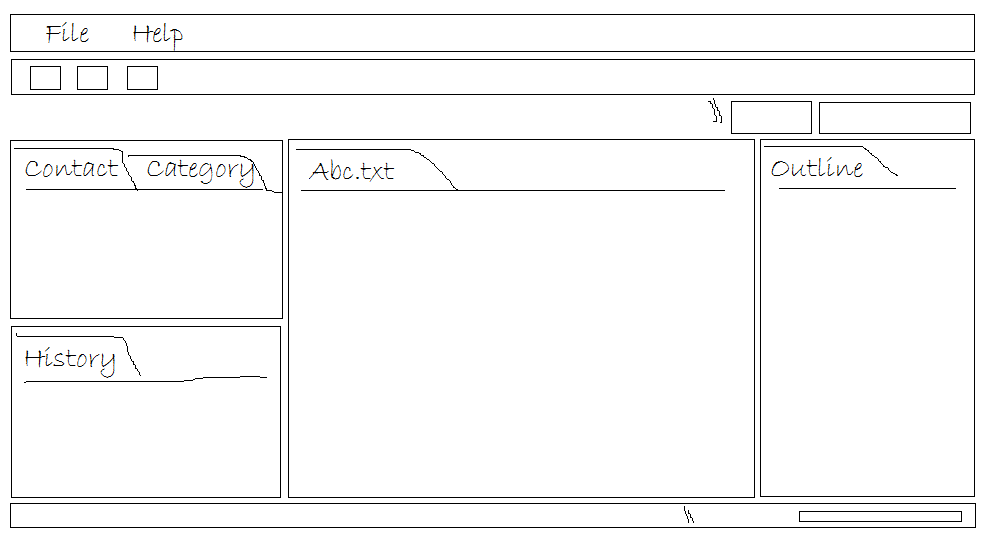
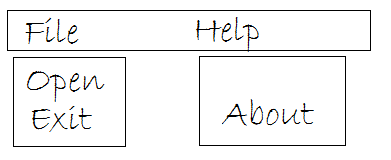
Menu
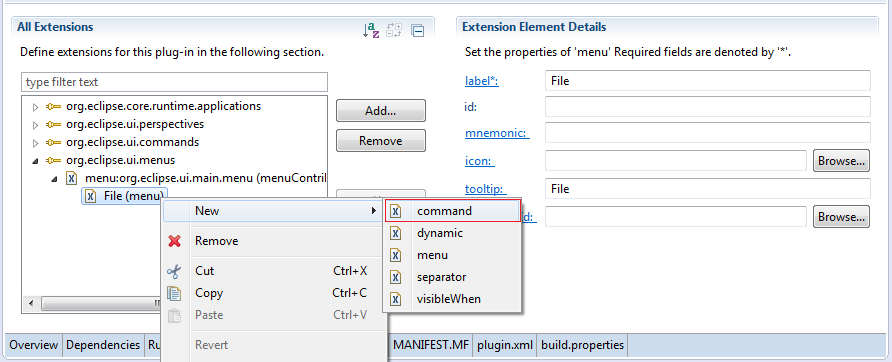
We will design the menu as shown below:
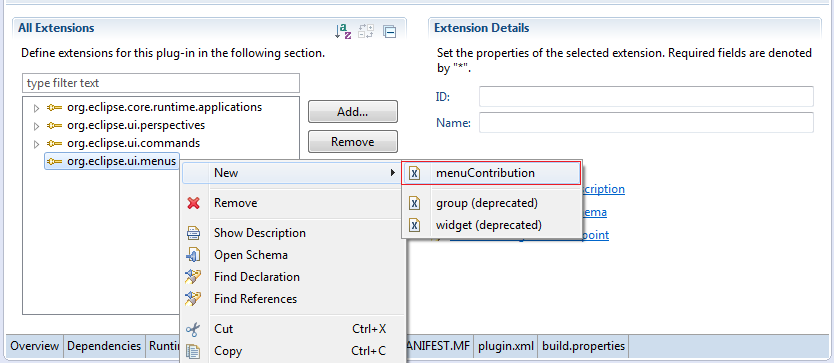
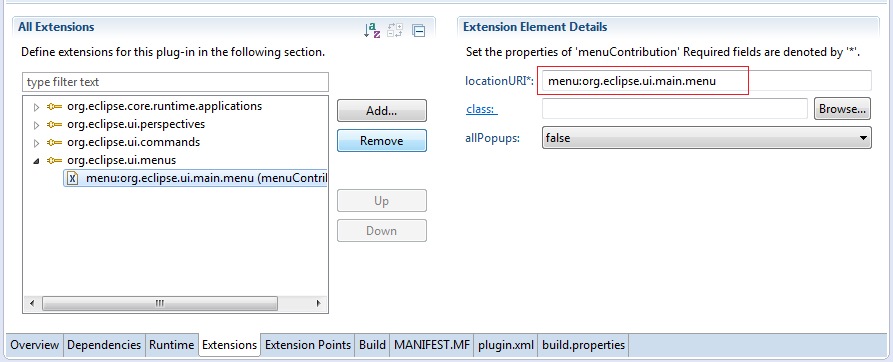
Enter:
- locationURI: menu:org.eclipse.ui.main.menu
menu:org.eclipse.ui.main.menu ==> ID to Locate of the menu, it is a constant of the RCP workbench available. You can also create locationURI to define the position display MENU.
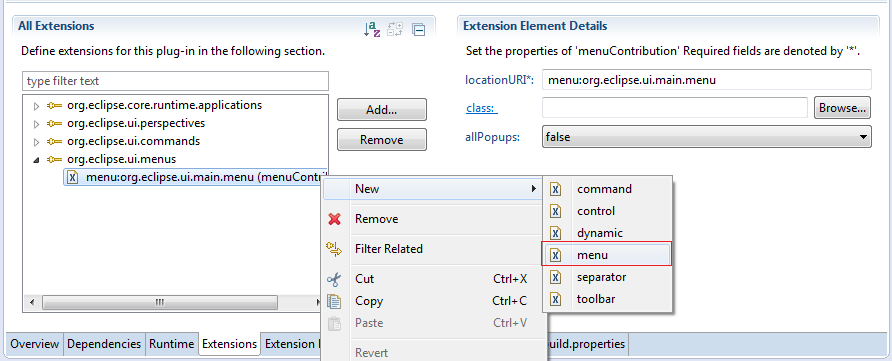
Next create Menu "File".
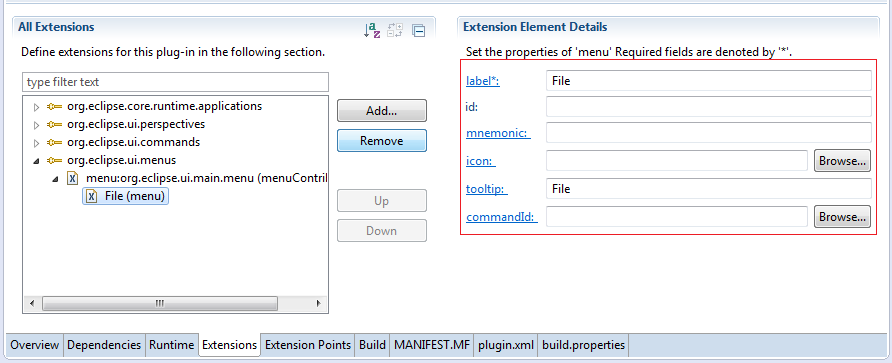
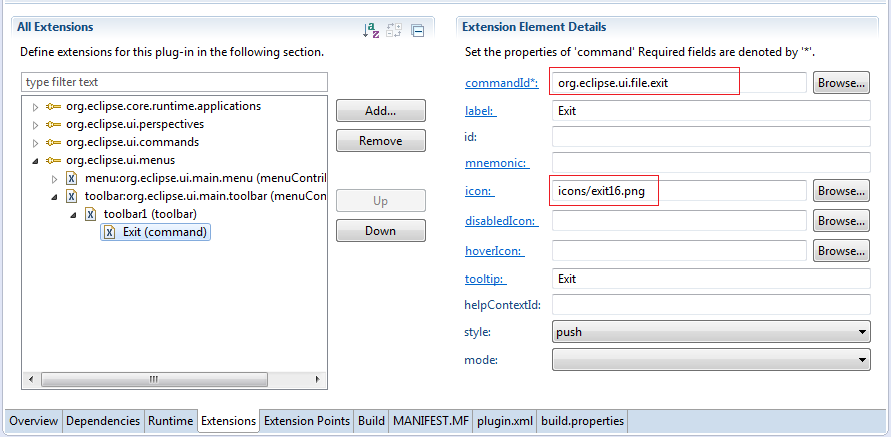
And add Command "Exit" in the menu "File".
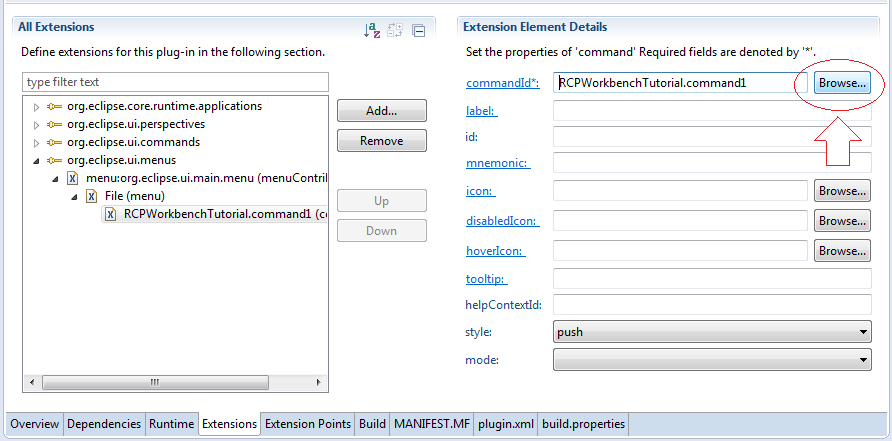
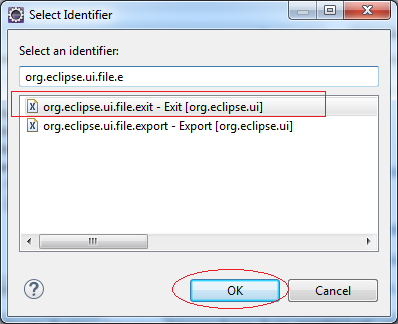
Enter Command ID:
- org.eclipse.ui.file.exit
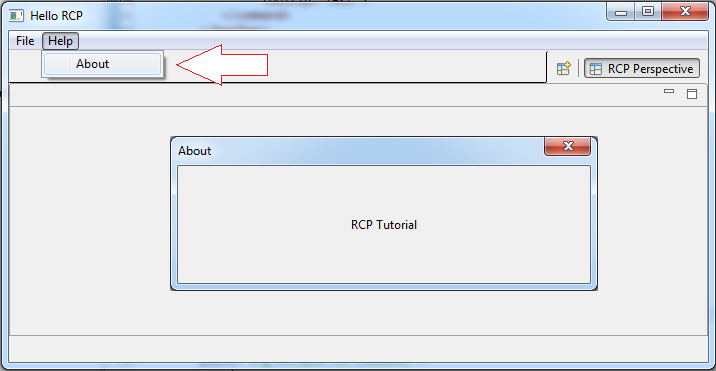
Similarly we create menu "Help".
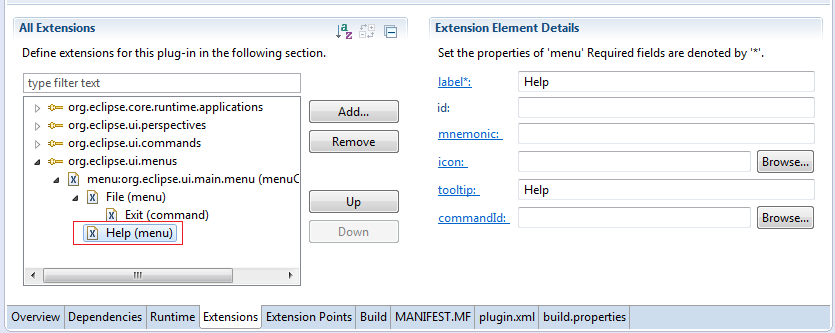
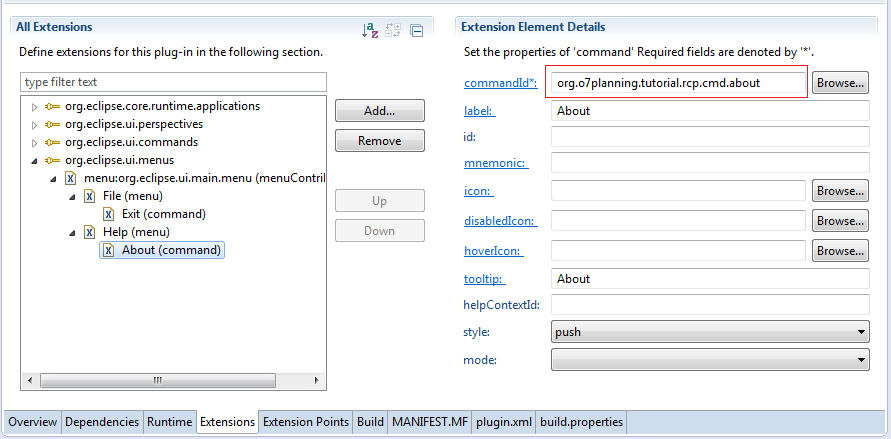
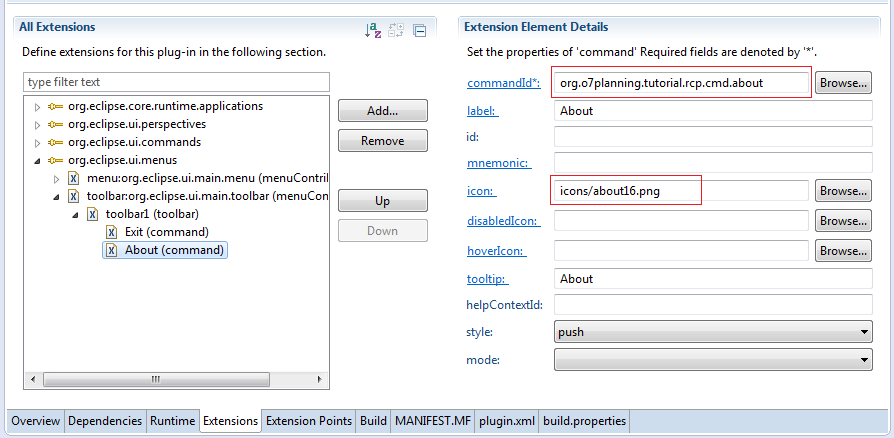
And create Command "About" child of Menu "Help".
Enter ID of command will call to:
- org.o7planning.tutorial.rcp.cmd.about
Class AboutCommand with ID: org.o7planning.tutorial.rcp.cmd.about was created above.
Rerun:
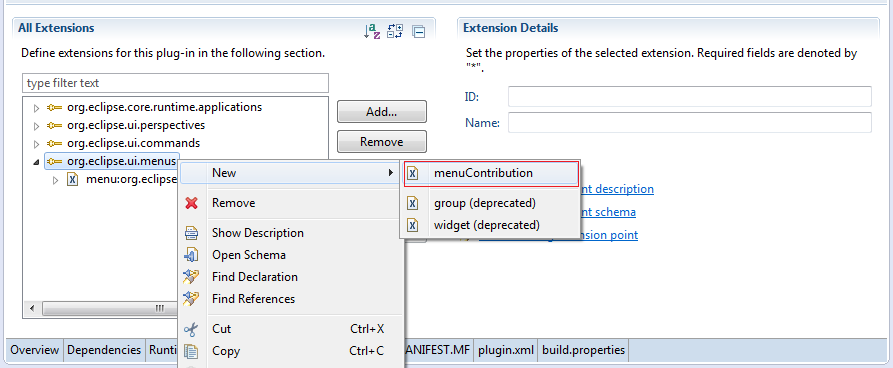
Toolbar
This is the toolbar structure seen on the Eclipse IDE.
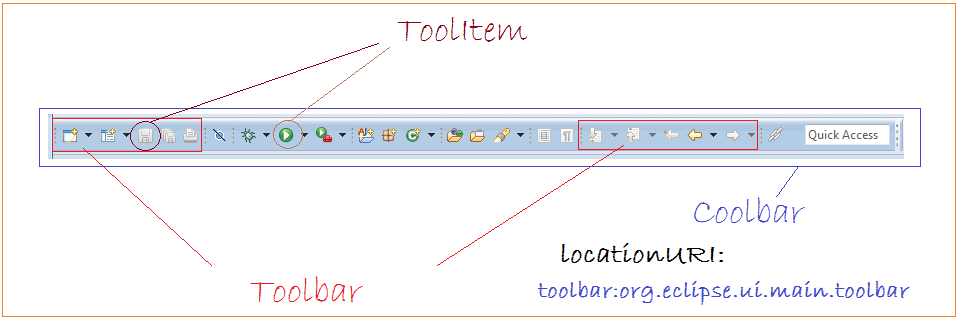
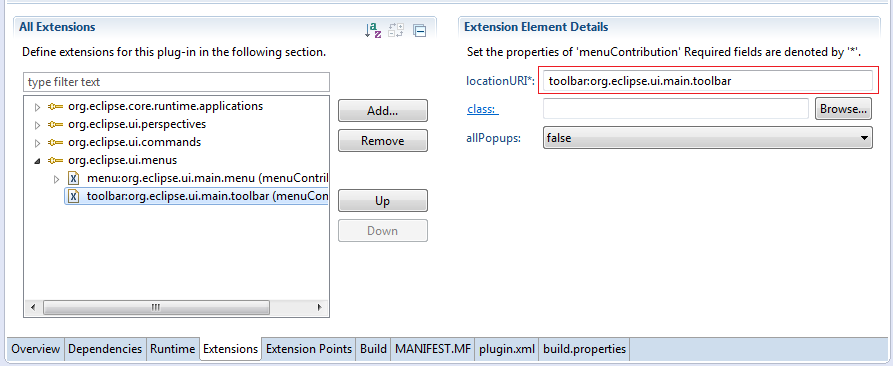
Create Coolbar:
Enter
- locationURI: toolbar:org.eclipse.ui.main.toolbar
locationURI: ID- defines the position of the Coolbar.
toolbar:org.eclipse.ui.main.toolbar an ID has been declared available by RCP Platform. You can also create locationURI to define certain location..
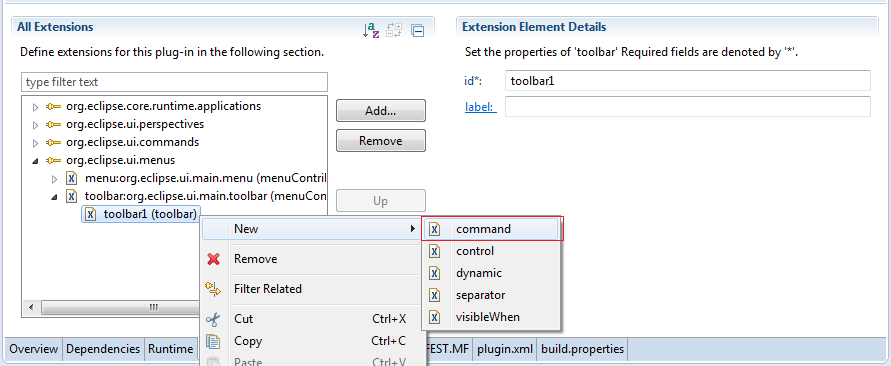
Enter commandID:
- org.eclipse.ui.file.exit
Similarly to create ToolItem (Type Command) to call Command ID:
- org.o7planning.tutorial.rcp.cmd.about
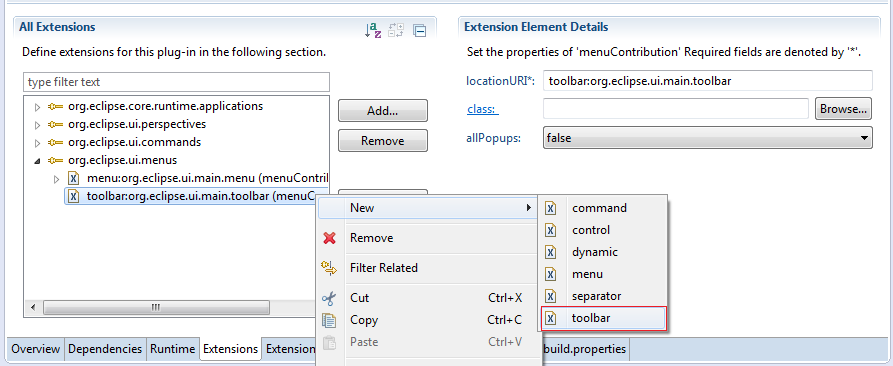
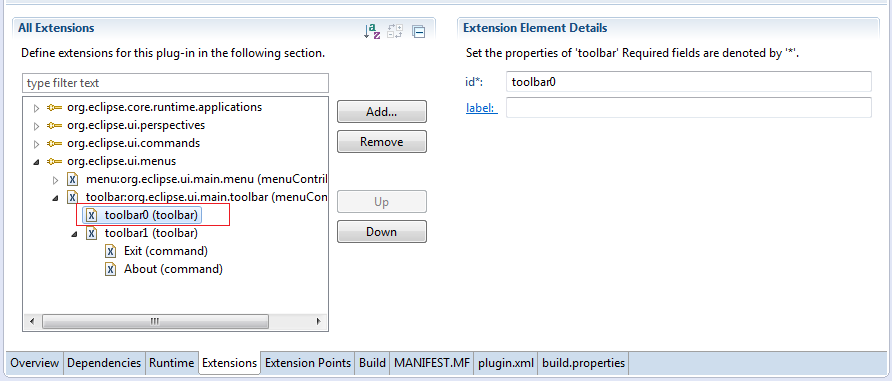
Similar create Toolbar with id: toolbar0
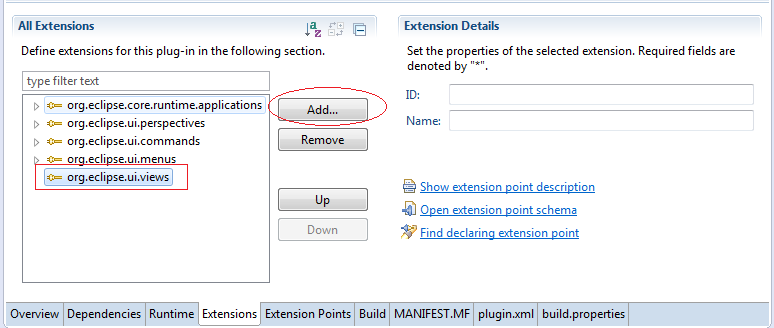
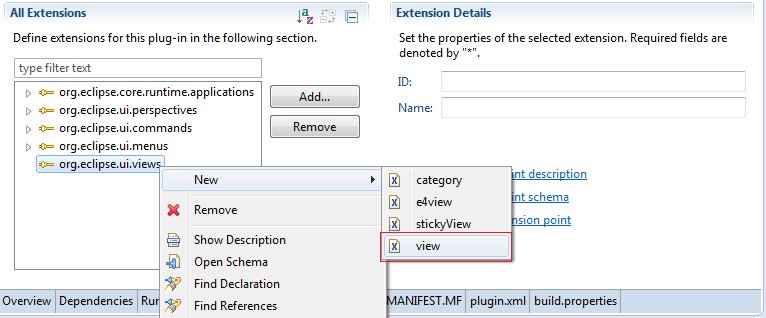
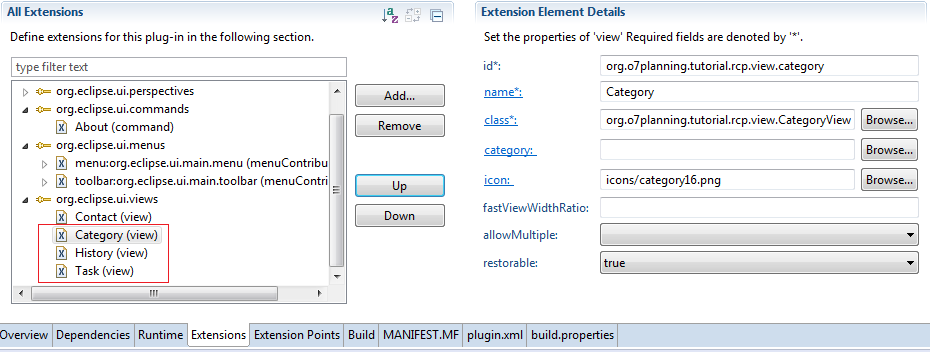
View
Add "Extension Point"
- org.eclipse.ui.views
Enter:
- id: org.o7planning.tutorial.rcp.view.contact
- class: org.o7planning.tutorial.rcp.view.ContactView
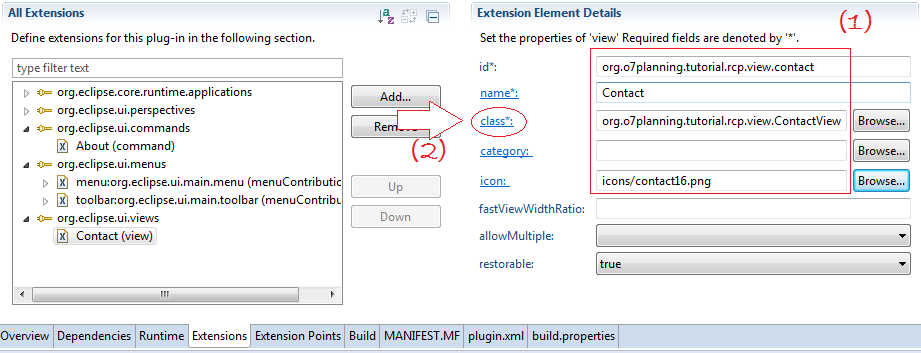
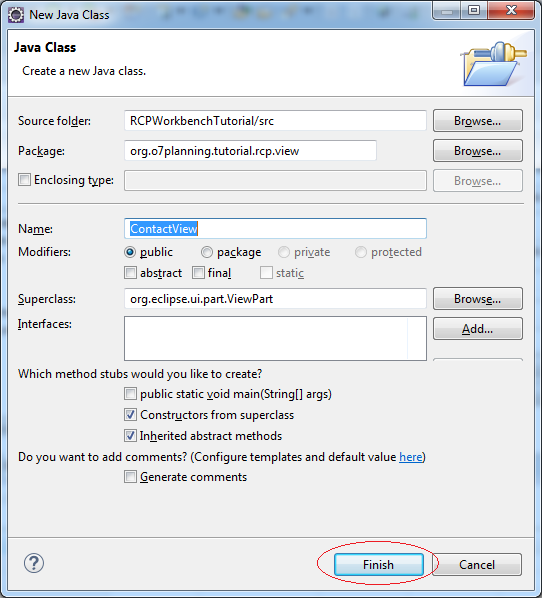
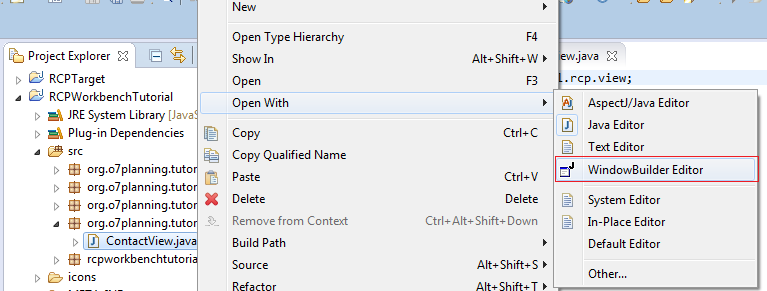
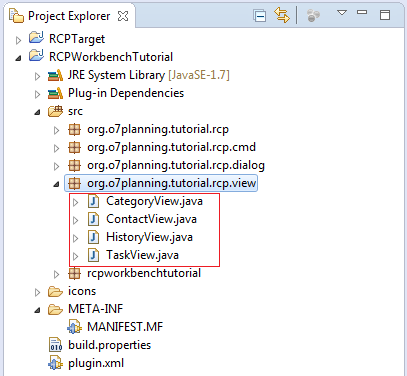
Class ContactView is created you can easily design it with WindowBuilder. Click on the class and open with WindowBuilder.
Similarly create another view.
CategoryView
HistoryView
TaskView
- name: Category
- id: org.o7planning.tutorial.rcp.view.category
- class: org.o7planning.tutorial.rcp.view.CategoryView
- icon: icons/category16.png
HistoryView
- name: History
- id: org.o7planning.tutorial.rcp.view.history
- class: org.o7planning.tutorial.rcp.view.HistoryView
- icon: icons/history16.png
TaskView
- name: Task
- id: org.o7planning.tutorial.rcp.view.task
- class: org.o7planning.tutorial.rcp.view.TaskView
- icon: icons/task16.png
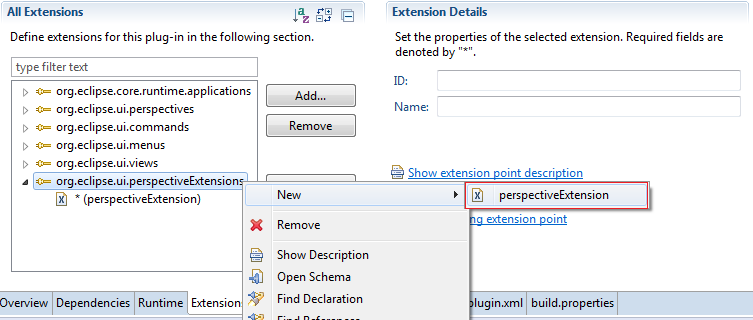
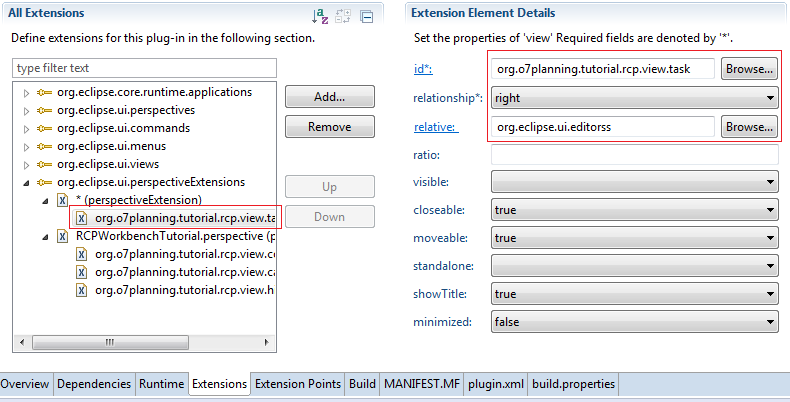
Registry Views to the Perspective
Add "Extension Point":
- org.eclipse.ui.perspectiveExtensions
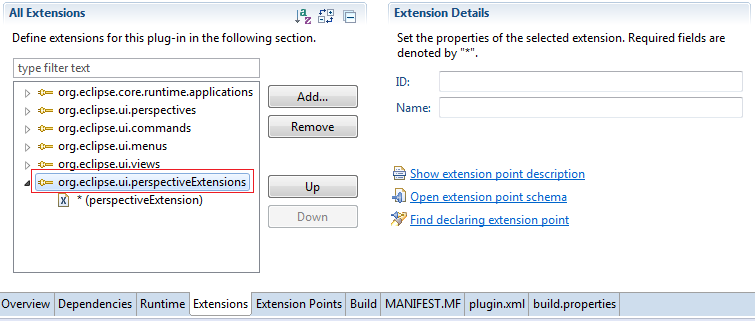
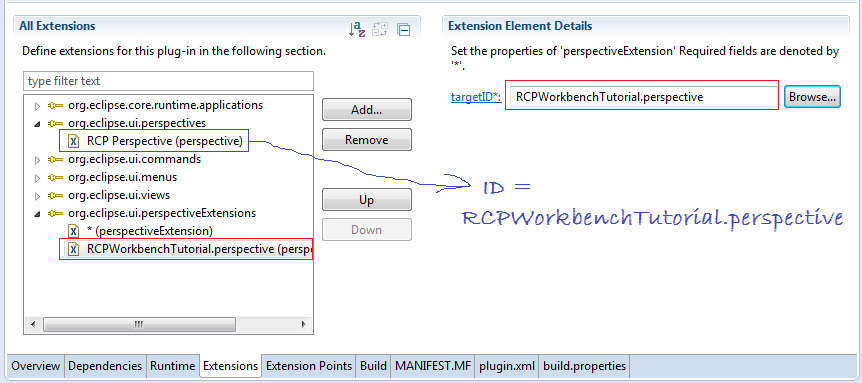
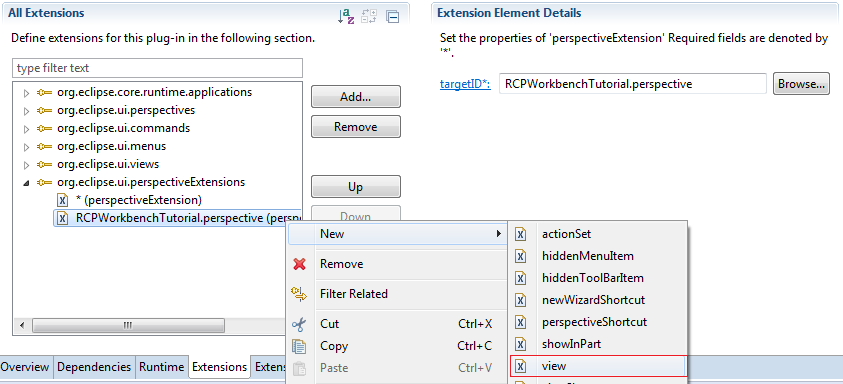
We define View: ContactView on the left compared with Editor.
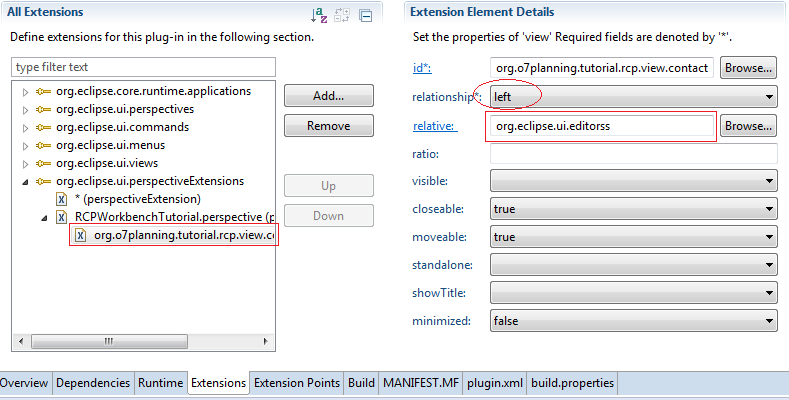
Next CategoryView stack up compared to ContactView.
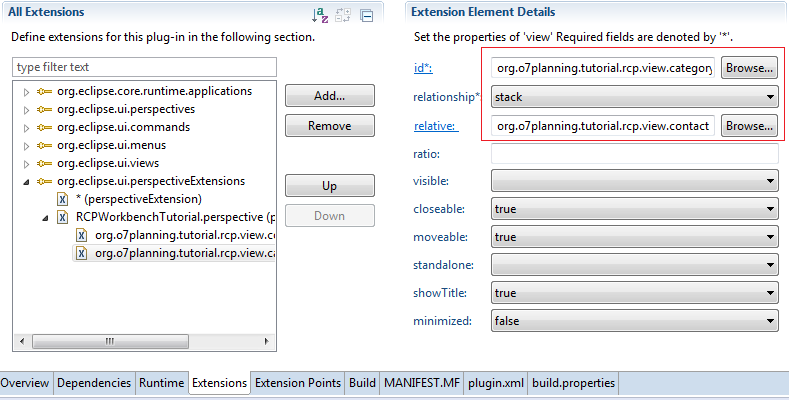
Next HistoryView below than ContactView
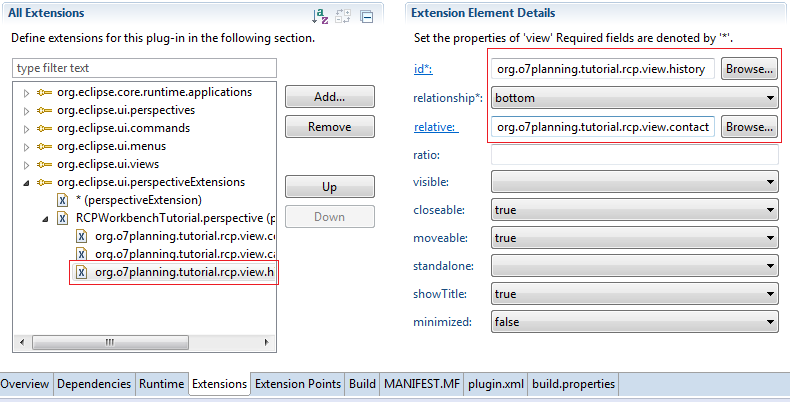
Finally TaskView declared displayed on the Perspective id is *, which means it will show up on any Perspective. Right position compared with the Editors.
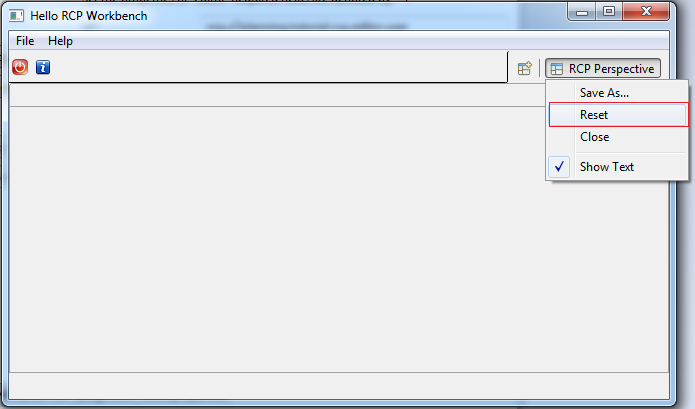
Rerun Application:
If Workbench does not display the View, right-click on the "RCP Perspective" and select reset.
Perspective
A workbench application has one or more Perspective.
Editor
Add Extension Point:
- org.eclipse.ui.editors
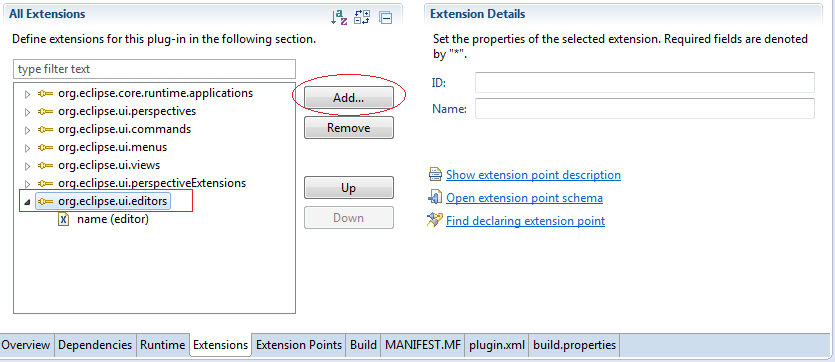
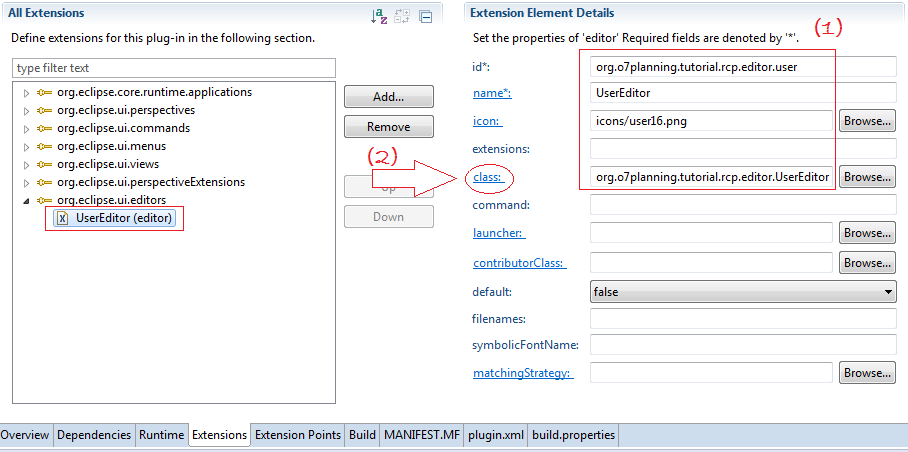
Enter:
- id: org.o7planning.tutorial.rcp.editor.user
- name: UserEditor
- icon: icons/user16.png
- class: org.o7planning.tutorial.rcp.editor.UserEditor
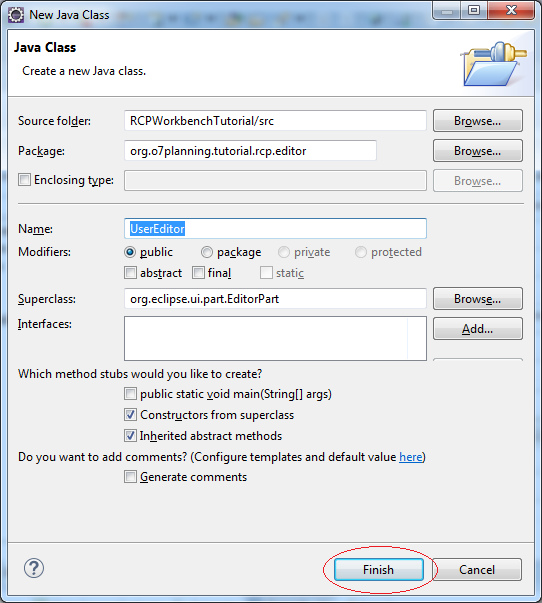
Class UserEditor was created. Next we create a class UserEditorInput
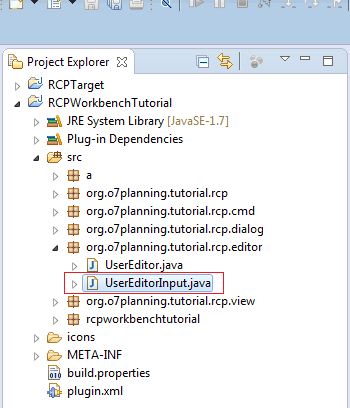
UserEditorInput.java
package org.o7planning.tutorial.rcp.editor;

import org.eclipse.jface.resource.ImageDescriptor;
import org.eclipse.ui.IEditorInput;
import org.eclipse.ui.IPersistableElement;

public class UserEditorInput implements IEditorInput {

   @Override
   public Object getAdapter(Class adapter) {
       return null;
   }

   @Override
   public boolean exists() {
       return false;
   }

   @Override
   public ImageDescriptor getImageDescriptor() {
       return null;
   }

   @Override
   public String getName() {
       return "User Editor";
   }

   @Override
   public IPersistableElement getPersistable() {
       return null;
   }

   @Override
   public String getToolTipText() {
       return "User Editor";
   }

}
And edit UserEditor
UserEditorInput.java
package org.o7planning.tutorial.rcp.editor;

import org.eclipse.core.runtime.IProgressMonitor;
import org.eclipse.swt.SWT;
import org.eclipse.swt.layout.FillLayout;
import org.eclipse.swt.widgets.Composite;
import org.eclipse.ui.IEditorInput;
import org.eclipse.ui.IEditorSite;
import org.eclipse.ui.PartInitException;
import org.eclipse.ui.part.EditorPart;

public class UserEditor extends EditorPart {

 public static final String ID = "org.o7planning.tutorial.rcp.editor.user";

 public UserEditor() {

 }

 @Override
 public void doSave(IProgressMonitor monitor) {

 }

 @Override
 public void doSaveAs() {

 }

 /**
  * Important!!!
  */
 @Override
 public void init(IEditorSite site, IEditorInput input)
         throws PartInitException {
     if (!(input instanceof UserEditorInput)) {
         throw new PartInitException("Invalid Input: Must be "
                 + UserEditorInput.class.getName());
     }
     setSite(site);
     setInput(input);
 }

 @Override
 public boolean isDirty() {
     return false;
 }

 @Override
 public boolean isSaveAsAllowed() {
     return false;
 }

 @Override
 public void createPartControl(Composite parent) {
     // Add Code.
     // If you want to design with WindowBuilder Designer
     // Change code like:  (Important!!!)
     parent.setLayout(new FillLayout());
     Composite body = new Composite(parent, SWT.NONE);
 }

 @Override
 public void setFocus() {

 }

}
You can open UserEditor with WindowBuilder to design.
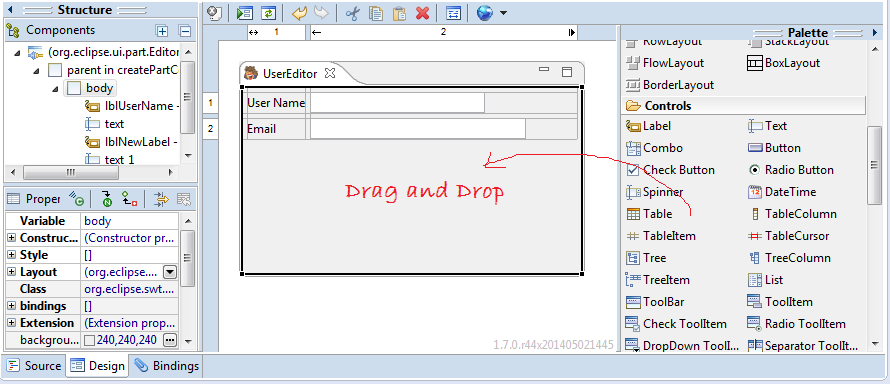
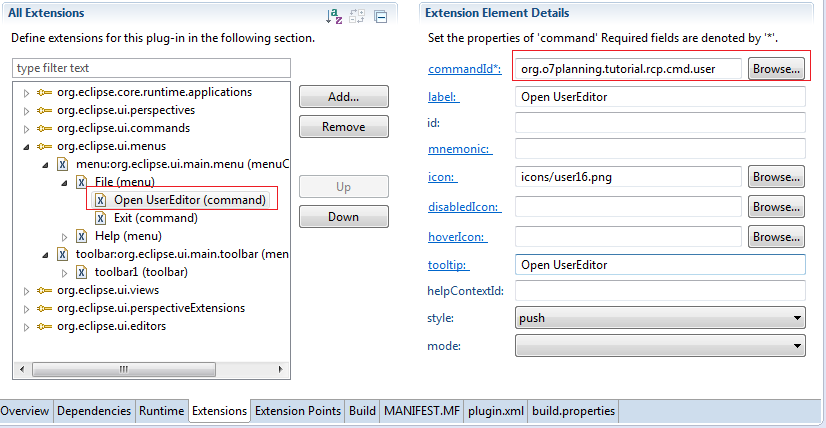
Next we create a Command to call UserEditor.
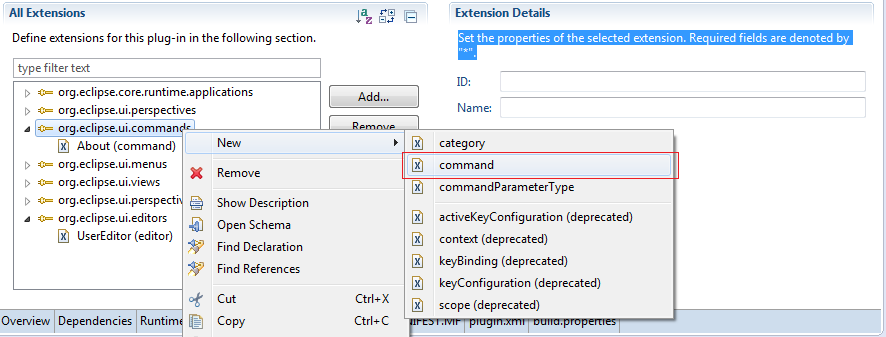
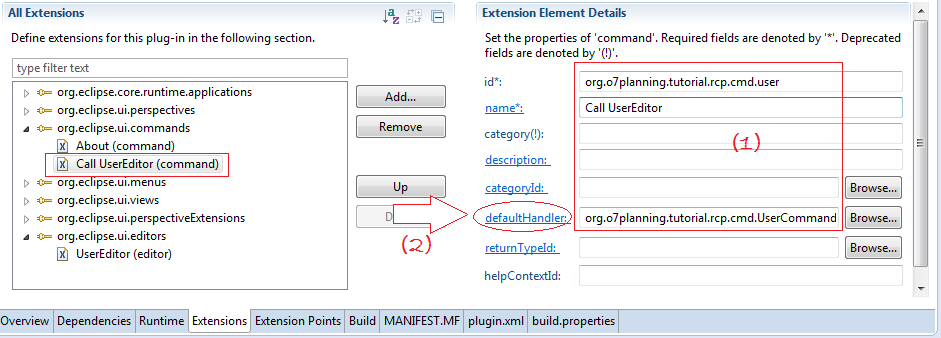
Enter:
- id: org.o7planning.tutorial.rcp.cmd.user
- name: Call UserEditor
- defaultHandler: org.o7planning.tutorial.rcp.cmd.UserCommand
UserCommand.java
package org.o7planning.tutorial.rcp.cmd;

import org.eclipse.core.commands.AbstractHandler;
import org.eclipse.core.commands.ExecutionEvent;
import org.eclipse.core.commands.ExecutionException;
import org.eclipse.ui.IWorkbenchPage;
import org.eclipse.ui.IWorkbenchWindow;
import org.eclipse.ui.PartInitException;
import org.eclipse.ui.handlers.HandlerUtil;
import org.o7planning.tutorial.rcp.editor.UserEditor;
import org.o7planning.tutorial.rcp.editor.UserEditorInput;

public class UserCommand extends AbstractHandler {

   public static final String ID = "org.o7planning.tutorial.rcp.cmd.user";

   @Override
   public Object execute(ExecutionEvent event) throws ExecutionException {
       IWorkbenchWindow window = HandlerUtil.getActiveWorkbenchWindow(event);
       IWorkbenchPage page = window.getActivePage();

       UserEditorInput input = new UserEditorInput();
       try {
           page.openEditor(input, UserEditor.ID);
       } catch (PartInitException e) {
           System.out.println("Error:" + this.getClass().getName() + ":" + e);
           e.printStackTrace();
           throw new ExecutionException("Error open UserEditor");
       }
       return null;
   }

}
Next you to make a MenuItem (Command):
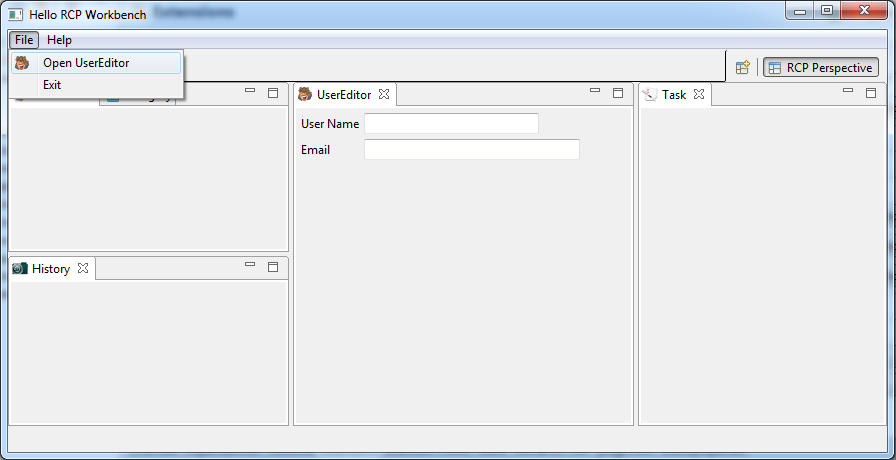
Rerun Application:
Eclipse RCP
- Which Platform Should You Choose for Developing Java Desktop Applications?
- Programming Java Desktop Application Using SWT
- Eclipse RCP 4 Tutorial for Beginners - e4 Workbench Application
- Package and Deploy Desktop Application SWT/RCP
- Eclipse RCP 3 Tutorial for Beginners - Workbench Application
- Install e4 Tools Developer Resources for Eclipse
- Simple Eclipse RCP 3 Application - View and Editor integration
Show More
Eclipse Technology
- How to get the open source Java libraries as OSGi(s)
- Install Tycho for Eclipse
- Java OSGi Tutorial for Beginners
- Create Java OSGi project with Maven and Tycho
- Install WindowBuilder for Eclipse
- Which Platform Should You Choose for Developing Java Desktop Applications?
- Programming Java Desktop Application Using SWT
- Eclipse JFace Tutorial with Examples
- Install e4 Tools Developer Resources for Eclipse
- Package and Deploy Desktop Application SWT/RCP
- Install Eclipse RAP Target Platform
- Install EMF for Eclipse
- Install RAP e4 Tooling for Eclipse
- Create Eclipse RAP Widget from ClientScripting-based widget
- Install GEF for Eclipse
- Eclipse RAP Tutorial for Beginners - Workbench Application (OLD)
- Eclipse RCP 3 Tutorial for Beginners - Workbench Application
- Simple Eclipse RCP 3 Application - View and Editor integration
- Eclipse RCP 4 Tutorial for Beginners - e4 Workbench Application
- Install RAP Tools for Eclipse
- Eclipse RAP Tutorial for Beginners - Basic Application
- Eclipse RAP Tutorial for Beginners - e4 Workbench Application
- Package and deploy Eclipse RAP application
Show More