Java SWT RowLayout Tutorial with Examples
1. SWT RowLayout
RowLayout determine the size and position of the children of a Composite by placing them either in horizontal rows or vertical columns within the parent Composite.
Horizontal RowLayout:
Horizontal RowLayout allows to put child components on a line, and it can wrap these child components to line below if the current line is not enough space.
// Create horizontal RowLayout

RowLayout rowLayout = new RowLayout();

// Or
RowLayout rowLayout = new RowLayout(SWT.HORIZONTAL);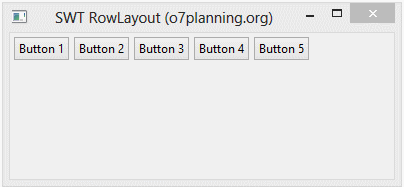
Vertical RowLayout:
Vertical RowLayout arranges the child components on a same column, and it will push these child components to the next column if the current one is not enough space.
// Create Vertical RowLayout

RowLayout rowLayout = new RowLayout(SWT.VERTICAL);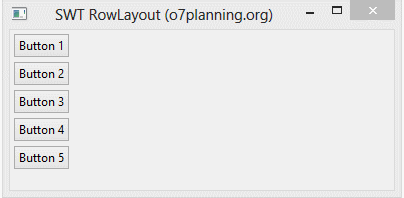
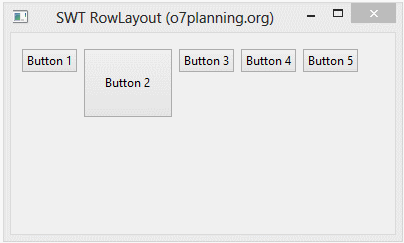
In addition, the height and width of each control in a RowLayout can be specified by setting a RowData object into the control using setLayoutData().
RowData rowData= new RowData();

rowData.height=80;
rowData.width=110;

button2.setLayoutData(rowData);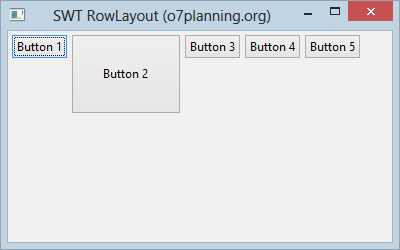
2. RowLayout Properties
RowLayout rowLayout = new RowLayout();
rowLayout.wrap = false;
rowLayout.pack = false;
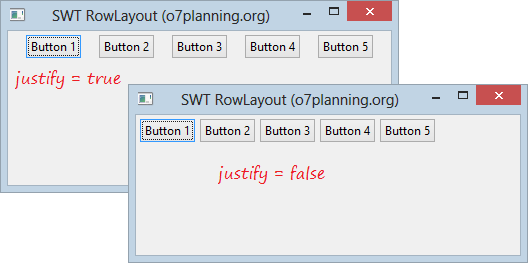
rowLayout.justify = true;
rowLayout.type = SWT.VERTICAL;
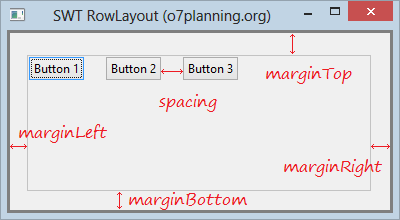
rowLayout.marginLeft = 5;
rowLayout.marginTop = 5;
rowLayout.marginRight = 5;
rowLayout.marginBottom = 5;
rowLayout.spacing = 0;
parent.setLayout(rowLayout);wrap specifies whether a control will be wrapped to the next row if there is insufficient space on the current row.
- rowLayout.wrap = false;
- rowLayout.justify = true;
- margin & spacing
3. RowLayout Example
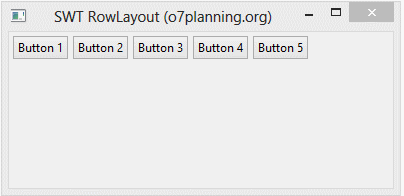
HorizontalRowLayoutDemo.java
package org.o7planning.swt.rowlayout;
import org.eclipse.swt.SWT;
import org.eclipse.swt.layout.RowData;
import org.eclipse.swt.layout.RowLayout;
import org.eclipse.swt.widgets.Button;
import org.eclipse.swt.widgets.Display;
import org.eclipse.swt.widgets.Shell;
public class HorizontalRowLayoutDemo {
public static void main(String[] args) {
Display display = new Display();
Shell shell = new Shell(display);
shell.setText("SWT RowLayout (o7planning.org)");
// Create a Horizontal RowLayout.
RowLayout rowLayout = new RowLayout(SWT.HORIZONTAL);
rowLayout.marginLeft = 10;
rowLayout.marginTop = 15;
rowLayout.marginRight = 15;
rowLayout.marginBottom = 25;
rowLayout.spacing = 5;
shell.setLayout(rowLayout);
// Button 1
Button button1 = new Button(shell, SWT.NONE);
button1.setText("Button 1");
// Button 2
Button button2 = new Button(shell, SWT.NONE);
button2.setText("Button 2");
RowData rowData = new RowData();
rowData.height = 70;
rowData.width = 90;
button2.setLayoutData(rowData);
// Button 3
Button button3 = new Button(shell, SWT.NONE);
button3.setText("Button 3");
// Button 4
Button button4 = new Button(shell, SWT.NONE);
button4.setText("Button 4");
// Button 5
Button button5 = new Button(shell, SWT.NONE);
button5.setText("Button 5");
shell.setSize(400, 250);
shell.open();
while (!shell.isDisposed()) {
if (!display.readAndDispatch())
display.sleep();
}
display.dispose();
}
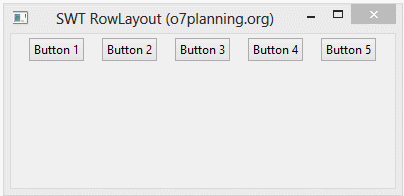
}Running the example:
Java SWT Tutorials
- Java SWT FillLayout Tutorial with Examples
- Java SWT RowLayout Tutorial with Examples
- Java SWT SashForm Tutorial with Examples
- Java SWT Label Tutorial with Examples
- Java SWT Button Tutorial with Examples
- Java SWT Toggle Button Tutorial with Examples
- Java SWT Radio Button Tutorial with Examples
- Java SWT Text Tutorial with Examples
- Java SWT Password Field Tutorial with Examples
- Java SWT Link Tutorial with Examples
- Programming Java Desktop Application Using SWT
- Java SWT Combo Tutorial with Examples
- Java SWT Spinner Tutorial with Examples
- Java SWT Slider Tutorial with Examples
- Java SWT Scale Tutorial with Examples
- Java SWT ProgressBar Tutorial with Examples
- Java SWT TabFolder and CTabFolder Tutorial with Examples
- Java SWT List Tutorial with Examples
Show More