CSS Float and Clear Tutorial with Examples
1. CSS float
CSS {float: left | right | inline-start | inline-end} makes an element float to the left or the right of the element containing it. It allows text contents and inline contents to surround it.
Syntax
/* Keyword values */
float: left;
float: right;
float: none;
float: inline-start;
float: inline-end;

/* Global values */
float: inherit;
float: initial;
float: unset;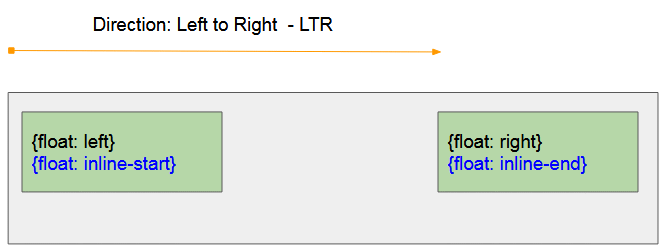
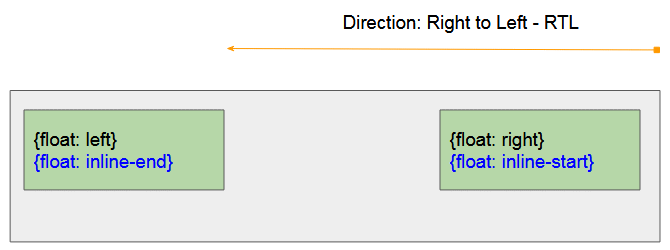
CSS {float: left}
Make an element float to the left side of the element containing it.
CSS {float: right}
Make an element float at the right side of the eelement containing it.
CSS {float: inline-start}
- CSS {float: inline-start} operates like CSS {float: left} if the father element has Left to Right - LTR direction
- CSS {float: inline-start} operates like CSS {float: right} if the father element has Right to Left - RTL direction
CSS {float: inline-end}
- CSS {float: inline-end} operates like CSS {float: right} if the father element has Left to Right - LTR direction
- CSS {float: inline-end} operates like CSS {float: left} if the father element has Right to Left - RTL direction
CSS {float: none}
Reject the float status of element.
Example with CSS {float: left | right}:
float-example.html
<!DOCTYPE html>
<html>
   <head>
      <title>CSS float</title>
      <meta charset="UTF-8"/>
      <style>
          .container {
            background-color: #eee;
            min-height: 135px;
            padding: 5px;
            text-align: left;
          }
          .container span {
            background-color: yellow;
          }
          #myElement {
            background-color: lightgreen;
            color: red;
            font-weight: bold;
            width: 180px;
            height: 50px;
            padding: 5px;
            margin: 5px;
          }
      </style>
      <script>
          function changeFloat(event)  {
             var floatValue = event.target.value;
             var myElement = document.getElementById("myElement");
             myElement.style.float = floatValue;
             myElement.innerHTML = "{float: "+ floatValue+"}";
          }
      </script>
   </head>
   <body>
       <h1>CSS float</h1>
       <input type="radio" name="my-radio" value="none" onclick="changeFloat(event)" checked/> None<br>
       <input type="radio" name="my-radio" value="left" onclick="changeFloat(event)"/> Left<br>
       <input type="radio" name="my-radio" value="right" onclick="changeFloat(event)"/> Right
       <hr/>
       <div class = "container">
             <div id = "myElement">
                {float: none} (Default)
             </div>
             Apollo 11 was the spaceflight that landed the first humans,
             Americans <span>Neil Armstrong</span> and <span>Buzz Aldrin</span>,
             on the Moon on July 20, 1969, at 20:18 UTC.
             <span>Armstrong</span> became the first to step onto the lunar
             surface 6 hours later on July 21 at 02:56 UTC.

             <span>Armstrong</span> spent about three and a half two
             and a half hours outside the spacecraft,
             <span>Aldrin</span> slightly less; and together they
             collected 47.5 pounds (21.5 kg) of lunar material
             for return to Earth. A third member of the mission,...
       </div>
   </body>
</html>
If you apply CSS {float: left | right | inline-start | inline-end} to an inline element, the browser will automatically turn this element into a block element. Specifically CSS {display:inline} will turn into CSS {display:block}. It can also convert other values of CSS display.
{display:inline} | {display:block} |
{display:inline-block} | {display:block} |
{display:inline-table} | {display:table} |
{display:table-row} | {display:block} |
{display:table-row-group} | {display:block} |
{display:table-column} | {display:block} |
{display:table-column-group} | {display:block} |
{display:table-cell} | {display:block} |
{display:table-caption} | {display:block} |
{display:table-header-group} | {display:block} |
{display:table-footer-group} | {display:block} |
{display:inline-flex} | {display:flex} |
{display:inline-grid} | {display:grid} |
other | unchanged |
See also:
Below is an example. The <span> inline element will be treated as a block element when you apply CSS {float: left | right | inline-start | inline-end} to it.
float-example2.html
<!DOCTYPE html>
<html>
   <head>
      <title>CSS float</title>
      <meta charset="UTF-8"/>
      <style>
         .container {
           background-color: #eee;
           min-height: 135px;
           padding: 5px;
           text-align: left;
         }
         .container span {
           background-color: yellow;
         }
         #myElement {
           background-color: lightgreen;
           color: red;
           font-weight: bold;
           width: 180px;
           height: 50px;
           padding: 5px;
           margin: 5px;
         }
      </style>
      <script>
         function changeFloat(event)  {
            var floatValue = event.target.value;
            var myElement = document.getElementById("myElement");
            myElement.style.float = floatValue;
         }
      </script>
   </head>
   <body>
      <h1>CSS float with Inline Element</h1>
      <input type="radio" name="my-radio" value="none" onclick="changeFloat(event)" checked/> None<br>
      <input type="radio" name="my-radio" value="left" onclick="changeFloat(event)"/> Left<br>
      <input type="radio" name="my-radio" value="right" onclick="changeFloat(event)"/> Right
      <hr/>
      <div class = "container">
         <span id = "myElement">
           I am a Span Element.
           {width: 180px; height: 50px;}
         </span>

         Apollo 11 was the spaceflight that landed the first humans,
         Americans <span>Neil Armstrong</span> and <span>Buzz Aldrin</span>,
         on the Moon on July 20, 1969, at 20:18 UTC.
         <span>Armstrong</span> became the first to step onto the lunar
         surface 6 hours later on July 21 at 02:56 UTC.
         <span>Armstrong</span> spent about three and a half two
         and a half hours outside the spacecraft,
         <span>Aldrin</span> slightly less; and together they
         collected 47.5 pounds (21.5 kg) of lunar material
         for return to Earth. A third member of the mission,...
      </div>
   </body>
</html>
2. Example with CSS float
When an element is floated, it will get out of the normal layout rules of document. It will be moved to the left (Or to the right) until it touches the side of the parent element, or another floating element.
float-example3.html
<!DOCTYPE html>
<html>
   <head>
      <title>CSS float</title>
      <meta charset="UTF-8"/>
      <style>
         .container {
           background-color: #eee;
           min-height: 135px;
           padding: 5px;
         }
         .container span {
           background-color: yellow;
         }
         .float-left {
           background-color: lightgreen;
           float: left;
           width: 70px;
           height: 50px;
           padding: 5px;
           margin: 5px;
         }
         .float-right {
           background-color: lightblue;
           float: right;
           width: 100px;
           height: 70px;
           padding: 5px;
           margin: 5px;
         }
      </style>
   </head>
   <body>
      <h1>CSS float</h1>
      <div class = "container">
         Apollo 11 was the spaceflight that landed the first humans,
         Americans <span>Neil Armstrong</span> and <span>Buzz Aldrin</span>,
         on the Moon on July 20, 1969, at 20:18 UTC.
         <div class = "float-left">
              Float left
         </div>
         <div class = "float-right">
              Float right
         </div>
         <div class = "float-left">
              Float left
         </div>
         <span>Armstrong</span> became the first to step onto the lunar
         surface 6 hours later on July 21 at 02:56 UTC.
         <span>Armstrong</span> spent about three and a half two
         and a half hours outside the spacecraft,
         <span>Aldrin</span> slightly less; and together they
         collected 47.5 pounds (21.5 kg) of lunar material
         for return to Earth. A third member of the mission,...
      </div>
   </body>
</html>
Image example with CSS float:
img-float-example.html
<!DOCTYPE html>
<html>
   <head>
      <title>CSS float Image</title>
      <meta charset="UTF-8"/>
      <style>
         .container {
           background-color: #eee;
           min-height: 135px;
           padding: 5px;
         }
         .img-left {
           float: left;
           margin: 5px;
         }
      </style>
   </head>
   <body>
      <h1>CSS float Image</h1>
      <div class = "container">
         Apollo 11 was the spaceflight that landed the first humans,
         Americans Neil Armstrong and Buzz Aldrin,
         on the Moon on July 20, 1969, at 20:18 UTC.
         <img src="../images/flower.png" class = "img-left"/>

         Armstrong became the first to step onto the lunar
         surface 6 hours later on July 21 at 02:56 UTC.
         Armstrong spent about three and a half two
         and a half hours outside the spacecraft,
         Aldrin slightly less; and together they
         collected 47.5 pounds (21.5 kg) of lunar material
         for return to Earth. A third member of the mission,...
      </div>
   </body>
</html>
3. CSS Clear
CSS {clear: left | right} applies to an element so as not to allow another element to float to its left or right. CSS clear only works if the following conditions are met:
- In code, current element (<current-element>) must be written after floating element (<floating-element>).
- Current element must be a floating element or a block element.
<floating-element>
<current-element>
Note: If CSS {clear: left | right} works, it will push the current element down to the next line.
Syntax
/* Keyword values */
clear: none;
clear: left;
clear: right;
clear: both;
clear: inline-start;
clear: inline-end;

/* Global values */
clear: inherit;
clear: initial;
clear: unset;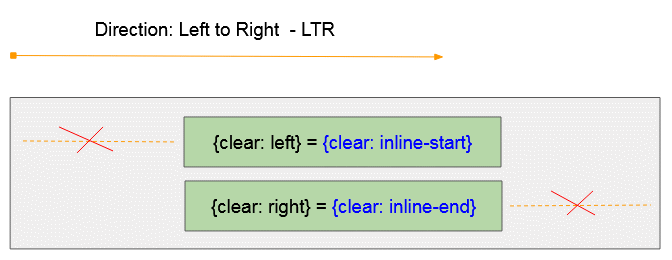
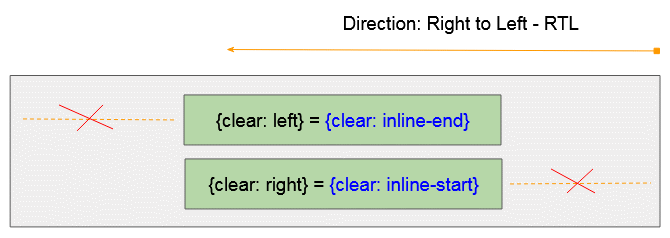
CSS {clear: inline-start}
- CSS {clear: inline-start} works like CSS {clear: left} If the parent element has Left to Right - LTR direction
- CSS {clear: inline-start} works like CSS {clear: right} If the parent element has Right to Left - RTL direction
CSS {clear: inline-end}
- CSS {float: clear-end} works like CSS {clear: right} If the parent element has Left to Right - LTR direction
- CSS {clear: inline-end} works like CSS {clear: left} If the parent element has Right to Left - RTL direction
CSS {clear: both}

CSS {clear: both} = {clear: left} + {clear: right}.
CSS {clear: none}
Removes CSS Clear from an element
4. CSS Clear for Floating Element
CSS {clear: left | right} may apply to a floating element - {float: left | right | inline-start | inline-end | both}, to prevent an element to float to its left or to the right.
<floating-element>
<current-element>
The following are illustrations of possible situations:
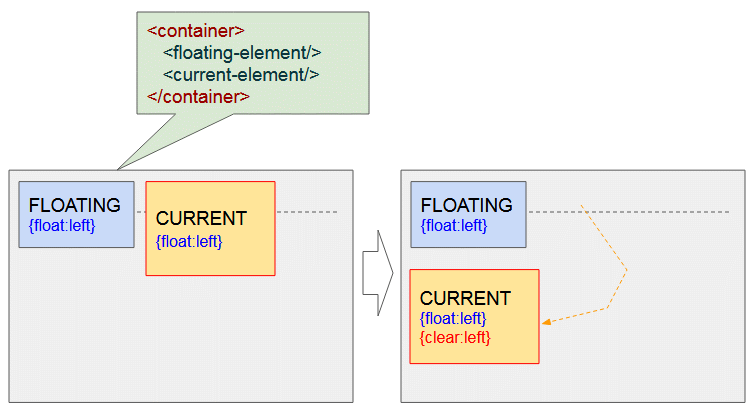
Both elements are float:left - {float:left}. Applying CSS {clear: left} to the second element will push it down to next line to ensure that the first element no longer floats to its left .
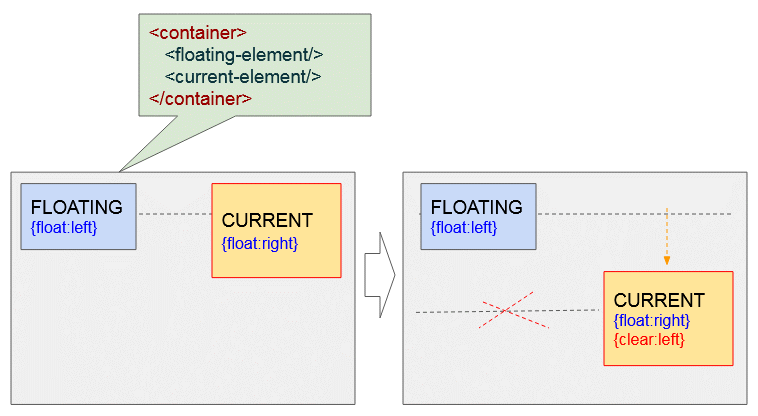
Current element is float:right - {float:right}, and other is float:left - {float:left}. Applying CSS {clear: left} to current element will push it down to next line to ensure that the other element no longer floats to its left.
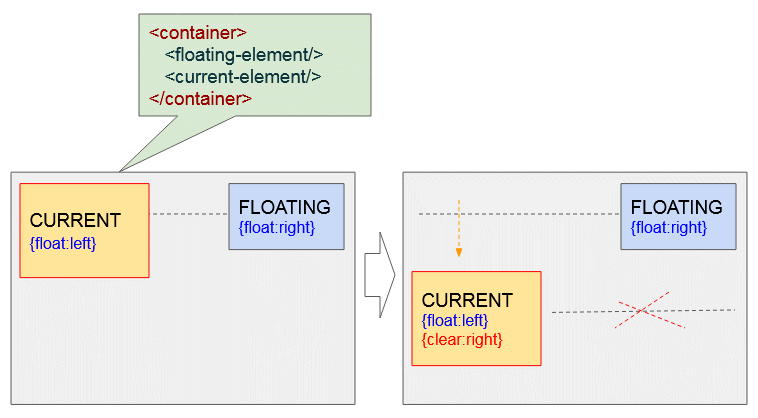
Current element is float:left- {float:left}, and other element is float:right- {float:right}. Applying CSS {clear: right} to current element will push it down to next line to ensure that the other element no longer floats to its right.
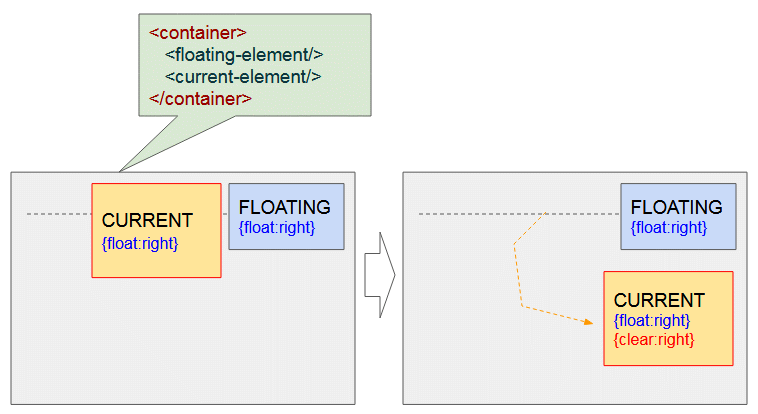
Both elements are float:right - {float:right}. Applying CSS {clear: right} to current element will push it down to next line to ensure that the other element no longer floats to its right.
Example:
clear-example1.html
<!DOCTYPE html>
<html>
   <head>
      <title>CSS Clear</title>
      <meta charset="UTF-8"/>
      <link rel="stylesheet" href="clear-example1.css" />
      <script src="clear-example1.js"> </script>
   </head>
   <body>
       <h1>CSS Clear</h1>
       <div class="option">
         #floating-element <br/><br/>
         <input type="radio" name="f-radio" value="left" onclick="changeFloat1(event)" checked/> float:left <br/>
         <input type="radio" name="f-radio" value="right" onclick="changeFloat1(event)"/> float:right
       </div>
       <div class="option">
         #current-element <br/><br/>
         <input type="radio" name="c1-radio" value="left" onclick="changeFloat2(event)" checked/> float:left <br/>
         <input type="radio" name="c1-radio" value="right" onclick="changeFloat2(event)"/> float:right
       </div>
       <div class="option">
         #current-element <br/><br/>
         <input type="radio" name="c2-radio" value="none" onclick="changeClear2(event)" checked/> clear:none <br/>
         <input type="radio" name="c2-radio" value="left" onclick="changeClear2(event)"/> clear:left <br/>
         <input type="radio" name="c2-radio" value="right" onclick="changeClear2(event)"/> clear:right
       </div>
       <hr/>
       <p style="color:blue;">
          CASE: #current-element is a Floating Element.
       </p>
       <div class = "container">
            <div id = "floating-element">
              FLOATING-ELEMENT <br/>
              {float: left}
            </div>
            <div id = "current-element">
              CURRENT-ELEMENT <br/>
              {float: left}
            </div>
       </div>
   </body>
</html>
clear-example1.css
.option {
  display: inline-block;
  width: 130px;
  margin-right: 5px;
  padding: 5px;
  border: 1px solid black;
}
.container {
  background-color: #eee;
  padding: 15px;
  height: 200px;
}
.container div {
   margin: 5px;
   padding:10px;
}
#current-element {
    float: left;
    width: 170px;
    height: 100px;
    background: yellow;
    border: 1px solid red;
}
#floating-element {
   float: left;
   width: 160px;
   height: 80px;
   background: lightgreen;
}
clear-example1.js
var floatValue1 = "left"; // FLOATING-LEMENT
var floatValue2 = "left"; // CURRENT-LEMENT
var clearValue2 = "none"; // CURRENT-LEMENT

function changeFloat1(event)  {
   floatValue1 = event.target.value;
   var myElement1 = document.getElementById("floating-element");
   myElement1.style.float = floatValue1;
   myElement1.innerHTML = "FLOATING-ELEMENT<br/>{float: "+ floatValue1+"}";
}
function changeFloat2(event)  {
   floatValue2 = event.target.value;
   var myElement2 = document.getElementById("current-element");
   myElement2.style.float = floatValue2;
   myElement2.innerHTML = "CURRENT-ELEMENT<br/>"
                         +"{float: "+ floatValue2+"}<br/>"
                         +"{clear: "+ clearValue2+"}";
}
function changeClear2(event)  {
   clearValue2 = event.target.value;
   var myElement2 = document.getElementById("current-element");
   myElement2.style.clear = clearValue2;
   myElement2.innerHTML = "CURRENT-ELEMENT<br/>"
                         +"{float: "+ floatValue2+"}<br/>"
                         +"{clear: "+ clearValue2+"}";
}
5. CSS Clear for Block Element
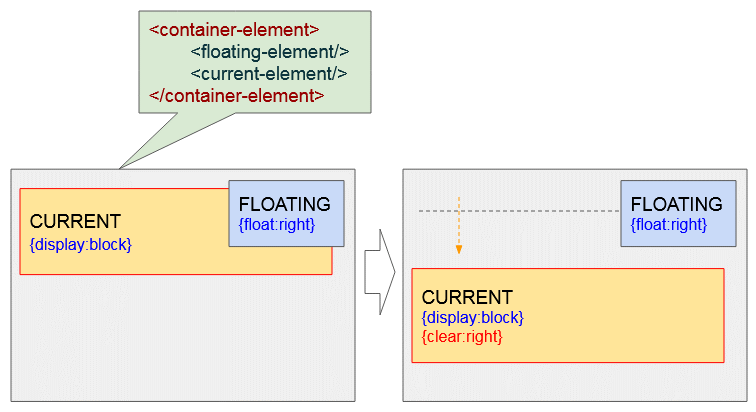
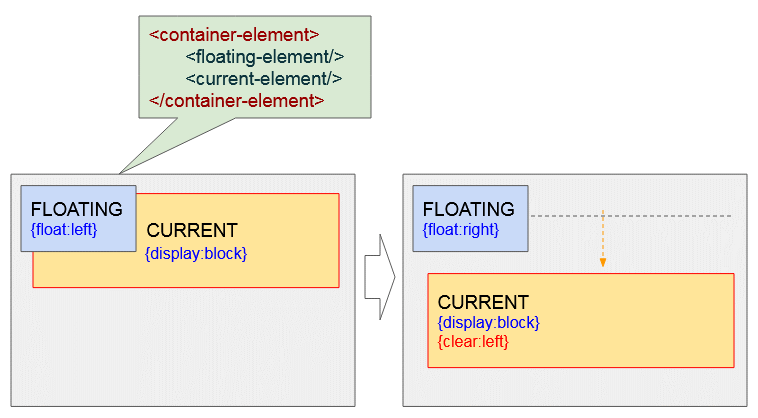
CSS {clear: left | right} may apply to a block element - {display:block}, to prevent an element to float to its left or to the right.
Note: In code, the block element using CSS {clear: left | right} must be written after Floating element.
<floating-element>
<current-element>
If current element (#current-element) is a block element. The following are illustrations of possible situations:
clear-example2.html
<!DOCTYPE html>
<html>
   <head>
      <title>CSS Clear</title>
      <meta charset="UTF-8"/>
      <link rel="stylesheet" href="clear-example2.css" />
      <script src="clear-example2.js"> </script>
   </head>
   <body>
       <h1>CSS Clear</h1>
       <div class="option">
         #floating-element <br/><br/>
         <input type="radio" name="f-radio" value="left" onclick="changeFloat1(event)" checked/> float:left <br/>
         <input type="radio" name="f-radio" value="right" onclick="changeFloat1(event)"/> float:right
       </div>
       <div class="option">
         #current-element <br/><br/>
         <input type="radio" name="c2-radio" value="none" onclick="changeClear2(event)" checked/> clear:none <br/>
         <input type="radio" name="c2-radio" value="left" onclick="changeClear2(event)"/> clear:left <br/>
         <input type="radio" name="c2-radio" value="right" onclick="changeClear2(event)"/> clear:right
       </div>
       <hr/>
       <p style="color:blue;">
          CASE: #current-element is a Block Element.
       </p>
       <div class = "container">
            <div id = "floating-element">
              FLOATING-ELEMENT <br/>
              {float: left}
            </div>
            <div id = "current-element">
              CURRENT-ELEMENT
            </div>
       </div>
   </body>
</html>
clear-example2.css
.option {
  display: inline-block;
  width: 130px;
  margin-right: 5px;
  padding: 5px;
  border: 1px solid black;
}
.container {
  background-color: #eee;
  padding: 15px;
  height: 200px;
}
.container div {
   margin: 5px;
   padding:10px;
}
#current-element {
    height: 120px;
    margin: 10px;
    background: yellow;
    border: 1px solid red;
}
#floating-element {
   float: left;
   width: 160px;
   height: 80px;
   background: lightgreen;
}
clear-example2.js
var floatValue1 = "left"; // FLOATING-LEMENT
var clearValue2 = "none"; // CURRENT-LEMENT

function changeFloat1(event)  {
   floatValue1 = event.target.value;
   var myElement1 = document.getElementById("floating-element");
   myElement1.style.float = floatValue1;
   myElement1.innerHTML = "FLOATING-ELEMENT<br/>{float: "+ floatValue1+"}";
}
function changeClear2(event)  {
   clearValue2 = event.target.value;
   var myElement2 = document.getElementById("current-element");
   myElement2.style.clear = clearValue2;
   myElement2.innerHTML = "CURRENT-ELEMENT<br/>"
                         +"{clear: "+ clearValue2+"}";
}
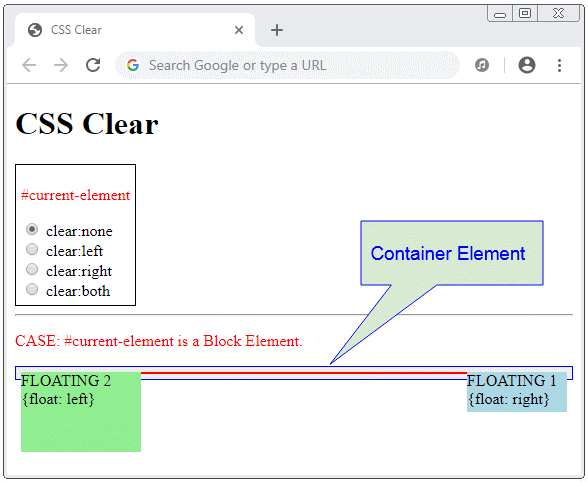
Floating elements doesn't sometimes participate in increasing the height of the parent element, so you will see a situation like the following illustration:
Add a block element with CSS {clear:both} as the last child element of the parent element, the parent element will be of sufficient height to contain all child elements.
<div class = "container">
    <div id = "floating-element1">
      ...
    </div>
    <div id = "floating-element2">
      ...
    </div>
    <div style="clear:both;"></div>
</div>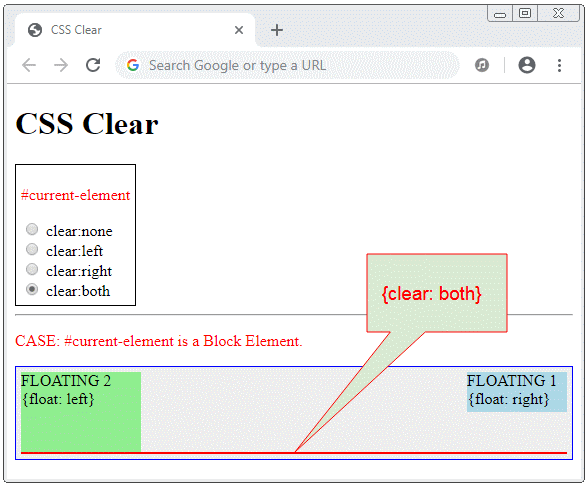
clear-example3.html
<!DOCTYPE html>
<html>
   <head>
      <title>CSS Clear</title>
      <meta charset="UTF-8"/>
      <link rel="stylesheet" href="clear-example3.css" />
      <script src="clear-example3.js"> </script>
   </head>
   <body>
       <h1>CSS Clear</h1>
       <div class="option">
         <p style="color:red">#current-element</p>
         <input type="radio" name="c2-radio" value="none" onclick="changeClear(event)" checked/> clear:none <br/>
         <input type="radio" name="c2-radio" value="left" onclick="changeClear(event)"/> clear:left <br/>
         <input type="radio" name="c2-radio" value="right" onclick="changeClear(event)"/> clear:right <br/>
         <input type="radio" name="c2-radio" value="both" onclick="changeClear(event)"/> clear:both
       </div>
       <hr/>
       <p style="color:red;">
          CASE: #current-element is a Block Element.
       </p>
       <div class = "container">
            <div id = "floating-element1">
              FLOATING 1 <br/>
              {float: right}
            </div>
            <div id = "floating-element2">
              FLOATING 2 <br/>
              {float: left}
            </div>
            <div id= "current-element">
            </div>
       </div>
   </body>
</html>
clear-example3.css
.option {
  display: inline-block;
  margin-right: 5px;
  padding: 5px;
  border: 1px solid black;
}
.container {
  background-color: #eee;
  padding: 5px;
  border: 1px solid blue;
}
#floating-element1 {
   float: right;
   width: 100px;
   height: 40px;
   background: lightblue;
}
#floating-element2 {
   float: left;
   width: 120px;
   height: 80px;
   background: lightgreen;
}
#current-element {
   border: 1px solid red;
}
clear-example3.js
// Change CSS Clear for #current-element.
function changeClear(event)  {
   var clearValue = event.target.value;
   var myElement = document.getElementById("current-element");
   myElement.style.clear = clearValue;
}
Note: CSS {clear: left | right} will not work if you apply it to an inline (inline) element or inline-block
Example, CSS clear doesn't work when you apply it to inline element:
clear-not-work-example1.html
<!DOCTYPE html>
<html>
   <head>
      <title>CSS Clear</title>
      <meta charset="UTF-8"/>
      <link rel="stylesheet" href="clear-not-work-example1.css" />
   </head>
   <body>
       <h3>CSS Clear does not work with Inline and Inline-block elements</h3>
       <div class = "container">
            <div id = "floating-element">
              FLOATING <br/>
              {float: left}
            </div>
            <div id = "current-element">
              (Inline Element) - {clear: left} -
              Apollo 11 was the spaceflight that landed the first humans,
              Americans Neil Armstrong and Buzz Aldrin,
              on the Moon on July 20, 1969, at 20:18 UTC.
              Armstrong became the first to step onto the lunar
              surface 6 hours later on July 21 at 02:56 UTC.

              Armstrong spent about three and a half two
              and a half hours outside the spacecraft,
              Aldrin slightly less; and together they
              collected 47.5 pounds (21.5 kg) of lunar material
              for return to Earth. A third member of the mission,...
            </div>
       </div>
   </body>
</html>
clear-not-work-example1.css
.container {
  background-color: #eee;
  padding: 15px;
  height: 200px;
}
#floating-element {
   float: left;
   width: 150px;
   height: 80px;
   background: lightgreen;
   padding:5px;
   margin: 5px;
}
#current-element {
   border: 1px solid lightblue;
   padding: 5px;
   display: inline;
   clear: left; /** Not work with Inline, Inline-Block Element */
}
Example, CSS clear doesn't work when you apply it to inline-block element:
clear-not-work-example2.html
<!DOCTYPE html>
<html>
   <head>
      <title>CSS Clear</title>
      <meta charset="UTF-8"/>
      <link rel="stylesheet" href="clear-not-work-example2.css" />
   </head>
   <body>
       <h3>CSS Clear does not work with Inline and Inline-block elements</h3>
       <div class = "container">
            <div id = "floating-element">
              FLOATING <br/>
              {float: left}
            </div>
            <div id = "current-element">
              (Inline-Block Element)  - {clear: left} -
              Apollo 11 was the spaceflight that landed the first humans,
              Americans Neil Armstrong and Buzz Aldrin,
              on the Moon on July 20, 1969, at 20:18 UTC.
              Armstrong became the first to step onto the lunar
              surface 6 hours later on July 21 at 02:56 UTC.
            </div>
       </div>
   </body>
</html>
clear-not-work-example2.css
.container {
  background-color: #eee;
  padding: 15px;
  height: 200px;
}
#floating-element {
   float: left;
   width: 140px;
   height: 80px;
   background: lightgreen;
   padding:5px;
   margin: 5px;
}
#current-element {
   border: 1px solid lightblue;
   padding: 5px;
   width: 200px;
   display: inline-block;
   clear: left; /** Not work with Inline, Inline-Block Element */
}
CSS Tutorials
- Units in CSS
- Basic CSS Selectors Tutorial with Examples
- CSS Attribute Selector Tutorial with Examples
- CSS combinator Selectors Tutorial with Examples
- CSS Backgrounds Tutorial with Examples
- CSS Opacity Tutorial with Examples
- CSS Padding Tutorial with Examples
- CSS Margins Tutorial with Examples
- CSS Borders Tutorial with Examples
- CSS Outline Tutorial with Examples
- CSS box-sizing Tutorial with Examples
- CSS max-width and min-width Tutorial with Examples
- The keywords min-content, max-content, fit-content, stretch in CSS
- CSS Links Tutorial with Examples
- CSS Fonts Tutorial with Examples
- Understanding Generic Font Family Names in CSS
- CSS @font-face Tutorial with Examples
- CSS Align Tutorial with Examples
- CSS Cursors Tutorial with Examples
- CSS Overflow Tutorial with Examples
- CSS Lists Tutorial with Examples
- CSS Tables Tutorial with Examples
- CSS visibility Tutorial with Examples
- CSS Display Tutorial with Examples
- CSS Grid Layout Tutorial with Examples
- CSS Float and Clear Tutorial with Examples
- CSS Position Tutorial with Examples
- CSS line-height Tutorial with Examples
- CSS text-align Tutorial with Examples
- CSS text-decoration Tutorial with Examples
Show More