React-Transition-Group Transition Example (NodeJS)
1. The objective of the lesson
The react-transition-group library provides you with components so that you create animation effects in the React application. The following post details this library, its components, APIs, etc.

In this lesson, I am going to show you to practise some examples with the Transition & TransitionGroup components provided by react-transition-group library.
Other similar component is CSSTransition helping you work more easily with CSS transition:
2. Create a project and install library
Create a React project with the transition-app name by performing the following commands:
# Install 'create-react-app' tool (If it has never been installed)

npm install -g create-react-app

# Create project with 'create-react-app' tool:

create-react-app transition-app
Install the react-transition-group library:
# CD to your project

cd transition-app

# Install 'react-transition-group':

npm install react-transition-group --save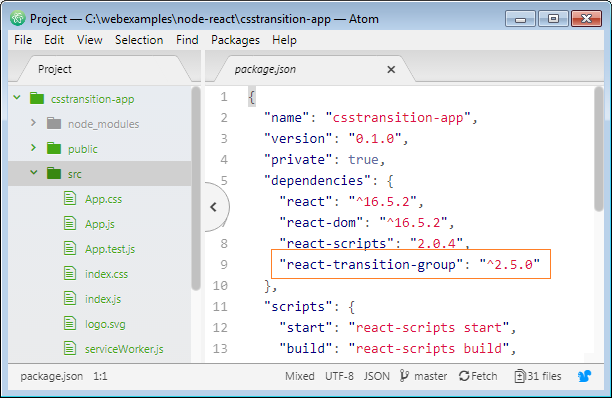
Run your application:
# Run app:

npm start
3. Example of simple Transition
Below is the preview of this example:
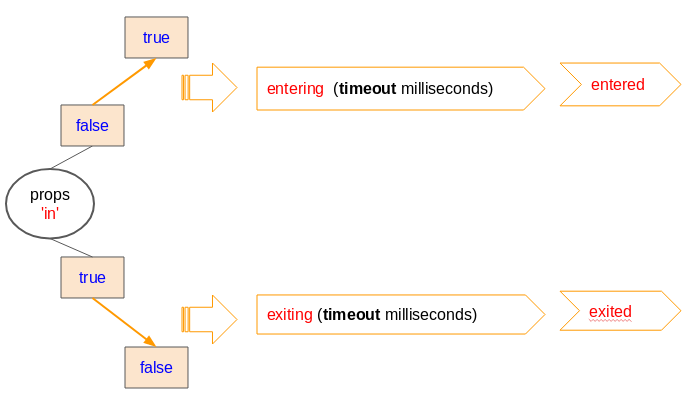
- When the value of 'in' changes from false to true, the <Transition> will change into the 'entering' status, and keeps in this status in 'timout' miliseconds, then it changes into the 'entered' status.
- When the value of 'in' changes from true to false, the <Transition> component will change to the 'exiting' status, and keep in this status in 'timout' miliseconds, then it changes into the 'exited' status.
OK, Return to the above project. Delete all the contents of App.js & App.css file:
App.css
.my-msg {
   color: blue;
}

.my-msg-entering {
    color: blue;
    font-size: 150%;
    transition-duration: 1s;
 }

 .my-msg-entered {
    font-size: 150%;
    color: red;
 }

.my-msg-exiting {
    font-size: 100%;
    color: black;
    transition-duration: 1s;
}

.my-highlight  {
  color: red;
}
App.js
import React, { Component } from "react";
import logo from "./logo.svg";
import "./App.css";
import {
TransitionGroup,
CSSTransition,
Transition
} from "react-transition-group";
class App extends React.Component {
render() {
return (
<div>
<MyComponent />
</div>
);
}
}
class MyComponent extends React.Component {
constructor(props) {
super(props);
this.state = {
stateOfIn: false,
message: ""
};
}
// Begin Enter: Do something here!
onEnterHandler() {
console.log("Begin Enter");
this.setState({ message: "Begin Enter..." });
}
onEnteringHandler() {
console.log("Entering... (Wait timeout!)");
this.setState({ message: "Entering... (Wait timeout!)" });
}
onEnteredHandler() {
console.log("OK Entered!");
this.setState({ message: "OK Entered!" });
}
// Begin Exit: Do something here!
onExitHandler() {
console.log("Begin Exit");
this.setState({ message: "Begin Exit..." });
}
onExitingHandler() {
console.log("Exiting... (Wait timeout!)");
this.setState({ message: "Exiting... (Wait timeout!)" });
}
onExitedHandler() {
console.log("OK Exited!");
this.setState({ message: "OK Exited!" });
}
render() {
return (
<div>
<h3><Transition in={"{this.state.stateOfIn}"} ></h3>
<b>{"\u2728"} Focus on Textfield and see the effects:</b>
<ul>
<li className="my-highlight">
Now 'in' = {String(this.state.stateOfIn)}
</li>
<li> false --> true (Enter)</li>
<li> true --> false (Exit)</li>
</ul>
<div className="my-highlight">{this.state.message}</div>
<br />
<input
type="text"
onFocus={() => {
this.setState({ stateOfIn: true });
}}
onBlur={() => {
this.setState({ stateOfIn: false });
}}
/>
<br />
<Transition
in={this.state.stateOfIn}
timeout={{ enter: 1500, exit: 2500 }}
onEnter={() => this.onEnterHandler()}
onEntering={() => this.onEnteringHandler()}
onEntered={() => this.onEnteredHandler()}
onExit={() => this.onExitHandler()}
onExiting={() => this.onExitingHandler()}
onExited={() => this.onExitedHandler()}
>
{(statusName) => (
<div className={`my-msg my-msg-${statusName}`} >User name 2-20 characters</div>
)}
</Transition>
</div>
);
}
}
export default App;It is not necessary to change the contents of index.js & index.html file:
index.js
import React from 'react';
import ReactDOM from 'react-dom';
import './index.css';
import App from './App';
import * as serviceWorker from './serviceWorker';

ReactDOM.render(<App />, document.getElementById('root'));

// If you want your app to work offline and load faster, you can change
// unregister() to register() below. Note this comes with some pitfalls.
// Learn more about service workers: http://bit.ly/CRA-PWA
serviceWorker.unregister();
index.html
<!DOCTYPE html>
<html lang="en">
  <head>
    <meta charset="utf-8">
    <link rel="shortcut icon" href="%PUBLIC_URL%/favicon.ico">
    <meta name="viewport" content="width=device-width, initial-scale=1, shrink-to-fit=no">
    <meta name="theme-color" content="#000000">
    <link rel="manifest" href="%PUBLIC_URL%/manifest.json">
    <title>React CssTransition</title>
  </head>
  <body>
    <noscript>
      You need to enable JavaScript to run this app.
    </noscript>
    <div id="root"></div>
  </body>
</html>
Example 2:
Also with the above example, we change the contents of App.css like below to get a more complex effect:

App.css (Edited) (2)
.my-msg {
   color: blue;
   margin-left: 300px;
   opacity: 0;
}

 .my-msg-entering {
    color: blue;
    margin-left: 0px;
    opacity: 1;
    font-size: 150%;
    transition-duration: 1s;
 }

 .my-msg-entered {
    opacity: 1;
    margin-left: 0px;
    font-size: 150%;
    color: red;
 }

.my-msg-exiting {
    opacity: 0;
    font-size: 100%;
    margin-left: 300px;
    color: black;
    transition-duration: 1s;
}

.my-highlight  {
  color: red;
}
4. Example of Transition (unmountOnExit)
<ReactTransitionGroup.Transition  unmountOnExit = {true/false} mountOnEnter = {true/false}>

    <!-- Child Component -->
    <MySingleElement>
       <MyOtherElements />
    </MySingleElement>

</ReactTransitionGroup.Transition>
The preview of this example:
App3.css
.my-msg-entering {
    color: blue;
 }

 .my-msg-entered {
    color: red;
 }

.my-highlight  {
  color: red;
}
App3.js
import React, { Component } from "react";
import logo from "./logo.svg";
import "./App3.css";
import {
TransitionGroup,
CSSTransition,
Transition
} from "react-transition-group";
class App extends React.Component {
render() {
return (
<div>
<MyComponent />
</div>
);
}
}
class MyComponent extends React.Component {
constructor(props) {
super(props);
this.state = {
stateOfIn: false,
message: ""
};
}
// Begin Enter: Do anything!
onEnterHandler() {
console.log("Begin Enter");
this.setState({ message: "Begin Enter..." });
}
onEnteringHandler() {
console.log("Entering... (Wait timeout!)");
this.setState({ message: "Entering... (Wait timeout!)" });
}
onEnteredHandler() {
console.log("OK Entered!");
this.setState({ message: "OK Entered!" });
}
// Begin Exit: Do anything!
onExitHandler() {
console.log("Begin Exit");
this.setState({ message: "Begin Exit..." });
}
onExitingHandler() {
console.log("Exiting... (Wait timeout!)");
this.setState({ message: "Exiting... (Wait timeout!)" });
}
onExitedHandler() {
console.log("OK Exited!");
this.setState({ message: "OK Exited!" });
}
render() {
return (
<div>
<h3><Transition in={"{this.state.stateOfIn}"} ></h3>
<b>{"\u2728"} Click the buttons and see the effects:</b>
<ul>
<li className="my-highlight">
Now 'in' = {String(this.state.stateOfIn)}
</li>
<li> false --> true (Enter)</li>
<li> true --> false (Exit)</li>
</ul>
<div className="my-highlight">{this.state.message}</div>
<br />
<input
type="text"
onFocus={() => {
this.setState({ stateOfIn: true });
}}
onBlur={() => {
this.setState({ stateOfIn: false });
}}
/>
<br />
<Transition
in={this.state.stateOfIn}
unmountOnExit
timeout={{ enter: 1500, exit: 2500 }}
onEnter={() => this.onEnterHandler()}
onEntering={() => this.onEnteringHandler()}
onEntered={() => this.onEnteredHandler()}
onExit={() => this.onExitHandler()}
onExiting={() => this.onExitingHandler()}
onExited={() => this.onExitedHandler()}
>
{stateName => {
// stateName: 'entering', 'enterd', 'exiting', 'exited'
switch (stateName) {
case "entering":
return (
<b className="my-msg-entering">
⭐ Note: User name 2-20 characters
</b>
);
case "entered":
return (
<b className="my-msg-entered">
⭐ Note: User name 2-20 characters
</b>
);
case "exiting":
return <div>(User Name)</div>;
case "exited":
return <b>(User Name)</b>;
default:
return <div>??</div>;
}
}}
</Transition>
</div>
);
}
}
export default App;Change the content of the index.js file:
index.js
import React from 'react';
import ReactDOM from 'react-dom';
import './index.css';

import App from './App3'; // IMPORTANT!
import * as serviceWorker from './serviceWorker';

ReactDOM.render(<App />, document.getElementById('root'));

serviceWorker.unregister();
ReactJS Tutorials
- ReactJS props and state Tutorial with Examples
- ReactJS Events Tutorial with Examples
- ReactJS Component API Tutorial with Examples
- ReactJs component Lifecycle methods
- ReactJS Refs Tutorial with Examples
- ReactJS Lists and Keys Tutorial with Examples
- ReactJS Forms Tutorial with Examples
- Undertanding ReactJS Router with example on the client side
- Introduction to Redux
- Simple example with React and Redux on the client side
- React-Transition-Group API Tutorial with Examples
- Quickstart with ReactJS in NodeJS Environment
- Undertanding ReactJS Router with a basic example (NodeJS)
- React-Transition-Group Transition Example (NodeJS)
- React-Transition-Group CSSTransition Example (NodeJS)
- Introduction to ReactJS
- Install React Plugin for Atom Editor
- Create a Simple HTTP Server with NodeJS
- Quickstart with ReactJS - Hello ReactJS
Show More