Spring MVC Tutorial for Beginners - Hello Spring 4 MVC

1. Introduction
This guide was written based on:
- Eclipse 4.6 (NEON)
- Spring 4.0.3.RELEASE
Hint: You should see the document about the structure of the Spring Framework, and what does the Spring do, with HelloWorld Spring example at:
(Objective: Introduction to Spring, explaining @Service, @Component, @Repository, ... and HelloWorld example)
Preview example:
2. Create Maven Project
Create a Maven Project type. Maven is best way helps us manage a library.
In Eclipse, select:
- File/New/Other...
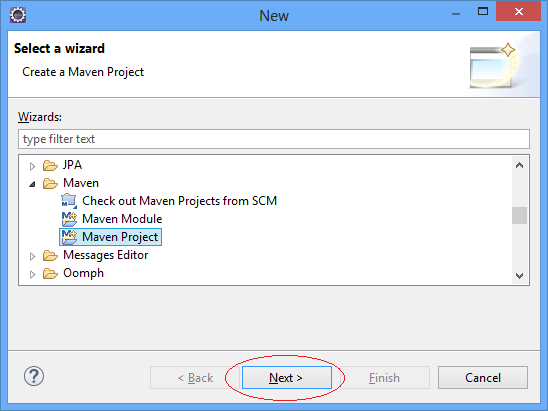
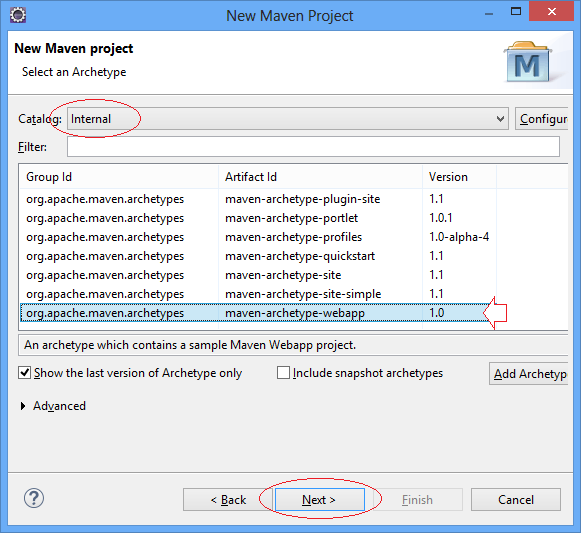
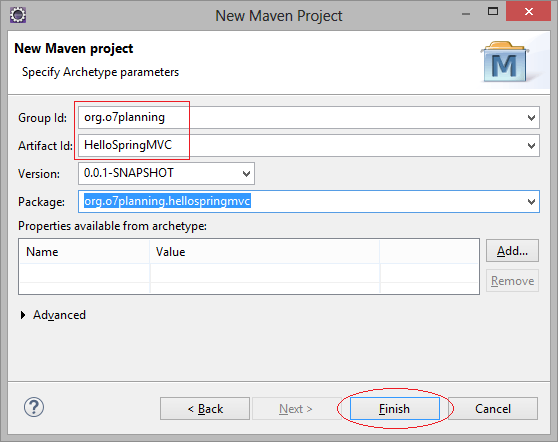
Select archetype "maven-archetype-webapp".
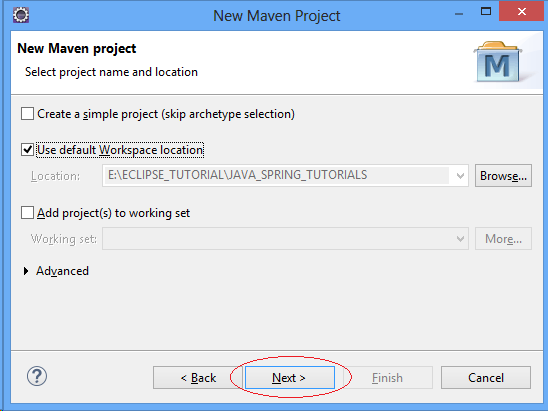
Enter:
- Group Id: org.o7planning
- Artifact Id: HelloSpringMVC
- Package: org.o7planning.hellospringmvc
This is the project structure is created:
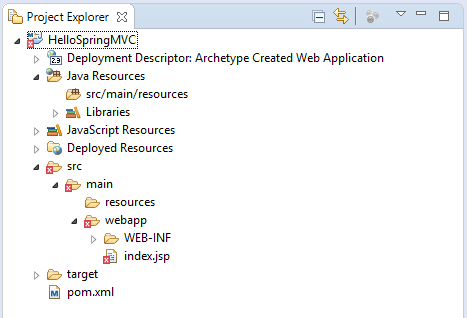
Do not worry about the error message when the Project has been created. The reason is that you do not declare the Servlet library.
Eclipse create Maven project structure may be wrong. You need to fix it.
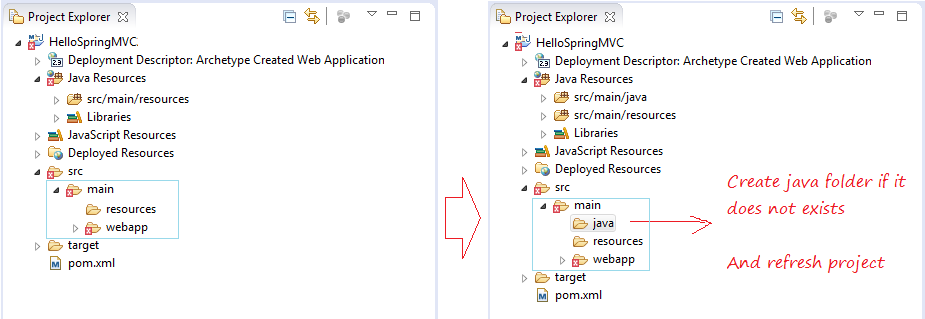
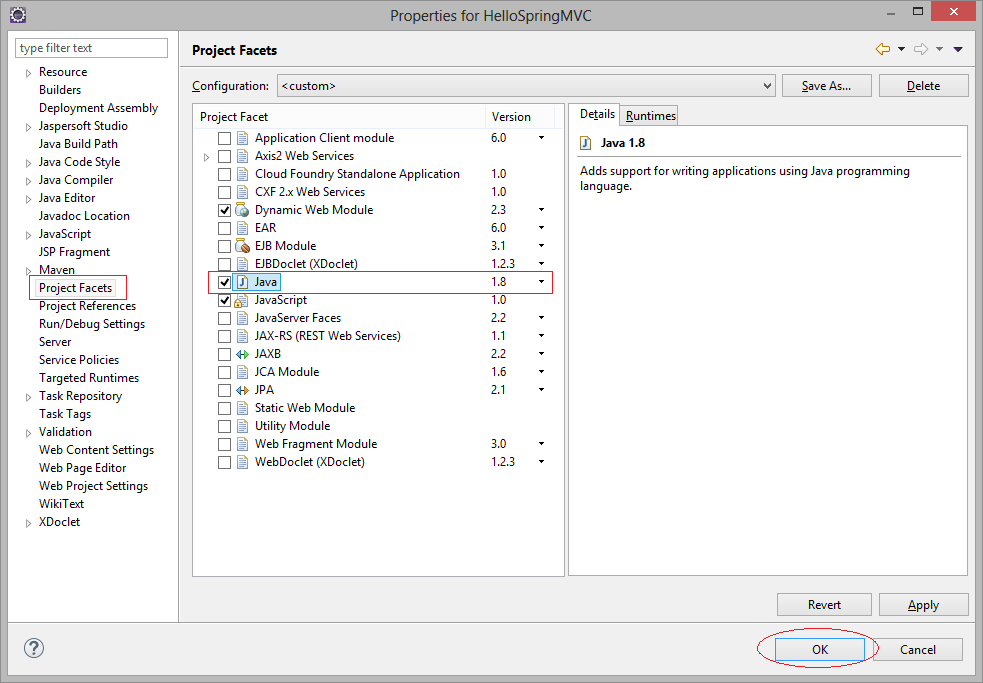
Make sure that you use Java> = 6
Project Properties:
3. Declare Maven and web.xml
Declaring library:
pom.xml
<project xmlns="http://maven.apache.org/POM/4.0.0" xmlns:xsi="http://www.w3.org/2001/XMLSchema-instance"
  xsi:schemaLocation="http://maven.apache.org/POM/4.0.0 http://maven.apache.org/maven-v4_0_0.xsd">
  <modelVersion>4.0.0</modelVersion>
  <groupId>org.o7planning</groupId>
  <artifactId>HelloSpringMVC</artifactId>
  <packaging>war</packaging>
  <version>0.0.1-SNAPSHOT</version>
  <name>HelloSpringMVC Maven Webapp</name>
  <url>http://maven.apache.org</url>


    <dependencies>

        <dependency>
            <groupId>junit</groupId>
            <artifactId>junit</artifactId>
            <version>3.8.1</version>
            <scope>test</scope>
        </dependency>

        <!-- Servlet Library -->
        <!-- http://mvnrepository.com/artifact/javax.servlet/javax.servlet-api -->
        <dependency>
            <groupId>javax.servlet</groupId>
            <artifactId>javax.servlet-api</artifactId>
            <version>3.1.0</version>
            <scope>provided</scope>
        </dependency>

        <!-- Spring dependencies -->
        <!-- http://mvnrepository.com/artifact/org.springframework/spring-core -->
        <dependency>
            <groupId>org.springframework</groupId>
            <artifactId>spring-core</artifactId>
            <version>4.3.1.RELEASE</version>
        </dependency>

        <!-- http://mvnrepository.com/artifact/org.springframework/spring-web -->
        <dependency>
            <groupId>org.springframework</groupId>
            <artifactId>spring-web</artifactId>
            <version>4.3.1.RELEASE</version>
        </dependency>

        <!-- http://mvnrepository.com/artifact/org.springframework/spring-webmvc -->
        <dependency>
            <groupId>org.springframework</groupId>
            <artifactId>spring-webmvc</artifactId>
            <version>4.3.1.RELEASE</version>
        </dependency>

    </dependencies>


    <build>
        <finalName>HelloSpringMVC</finalName>
        <plugins>

            <!-- Config: Maven Tomcat Plugin -->
            <!-- http://mvnrepository.com/artifact/org.apache.tomcat.maven/tomcat7-maven-plugin -->
            <plugin>
                <groupId>org.apache.tomcat.maven</groupId>
                <artifactId>tomcat7-maven-plugin</artifactId>
                <version>2.2</version>
                <!-- Config: contextPath and Port (Default: /HelloSpringMVC : 8080) -->
                <!--
                <configuration>
                    <path>/</path>
                    <port>8899</port>
                </configuration>
                -->
            </plugin>
        </plugins>
    </build>

</project>
Using Servlet API 3 or later:
web.xml
<?xml version="1.0" encoding="UTF-8"?>
<web-app xmlns:xsi="http://www.w3.org/2001/XMLSchema-instance"
    xmlns="http://java.sun.com/xml/ns/javaee"
    xsi:schemaLocation="http://java.sun.com/xml/ns/javaee
    http://java.sun.com/xml/ns/javaee/web-app_3_0.xsd"
    id="WebApp_ID" version="3.0">

    <display-name>HelloSpringMVC</display-name>

</web-app>
4. Configure Spring MVC
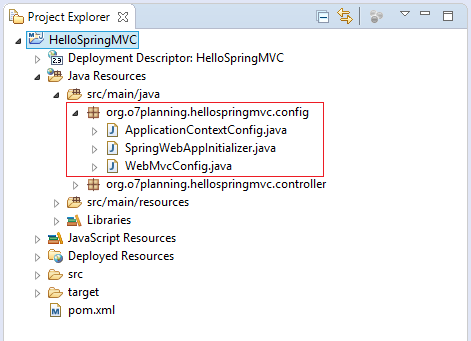
SpringWebAppInitializer is class that implements WebApplicationInitializer interface. Spring will read the configuration information in this class to initial your Web application.
In this class, you can normally register Servlets, Servlet Filters, and Servlet Listeners instead of registering them in web.xml.
An important servlet is org.springframework.web.servlet.DispatcherServlet, you can register it.
In this class, you can normally register Servlets, Servlet Filters, and Servlet Listeners instead of registering them in web.xml.
An important servlet is org.springframework.web.servlet.DispatcherServlet, you can register it.
SpringWebAppInitializer.java
package org.o7planning.hellospringmvc.config;
import javax.servlet.FilterRegistration;
import javax.servlet.ServletContext;
import javax.servlet.ServletException;
import javax.servlet.ServletRegistration;
import org.springframework.web.WebApplicationInitializer;
import org.springframework.web.context.ContextLoaderListener;
import org.springframework.web.context.support.AnnotationConfigWebApplicationContext;
import org.springframework.web.filter.CharacterEncodingFilter;
import org.springframework.web.servlet.DispatcherServlet;
public class SpringWebAppInitializer implements WebApplicationInitializer {
@Override
public void onStartup(ServletContext servletContext) throws ServletException {
AnnotationConfigWebApplicationContext appContext = new AnnotationConfigWebApplicationContext();
appContext.register(ApplicationContextConfig.class);
// Dispatcher Servlet
ServletRegistration.Dynamic dispatcher = servletContext.addServlet("SpringDispatcher",
new DispatcherServlet(appContext));
dispatcher.setLoadOnStartup(1);
dispatcher.addMapping("/");
dispatcher.setInitParameter("contextClass", appContext.getClass().getName());
servletContext.addListener(new ContextLoaderListener(appContext));
// UTF8 Charactor Filter.
FilterRegistration.Dynamic fr = servletContext.addFilter("encodingFilter", CharacterEncodingFilter.class);
fr.setInitParameter("encoding", "UTF-8");
fr.setInitParameter("forceEncoding", "true");
fr.addMappingForUrlPatterns(null, true, "/*");
}
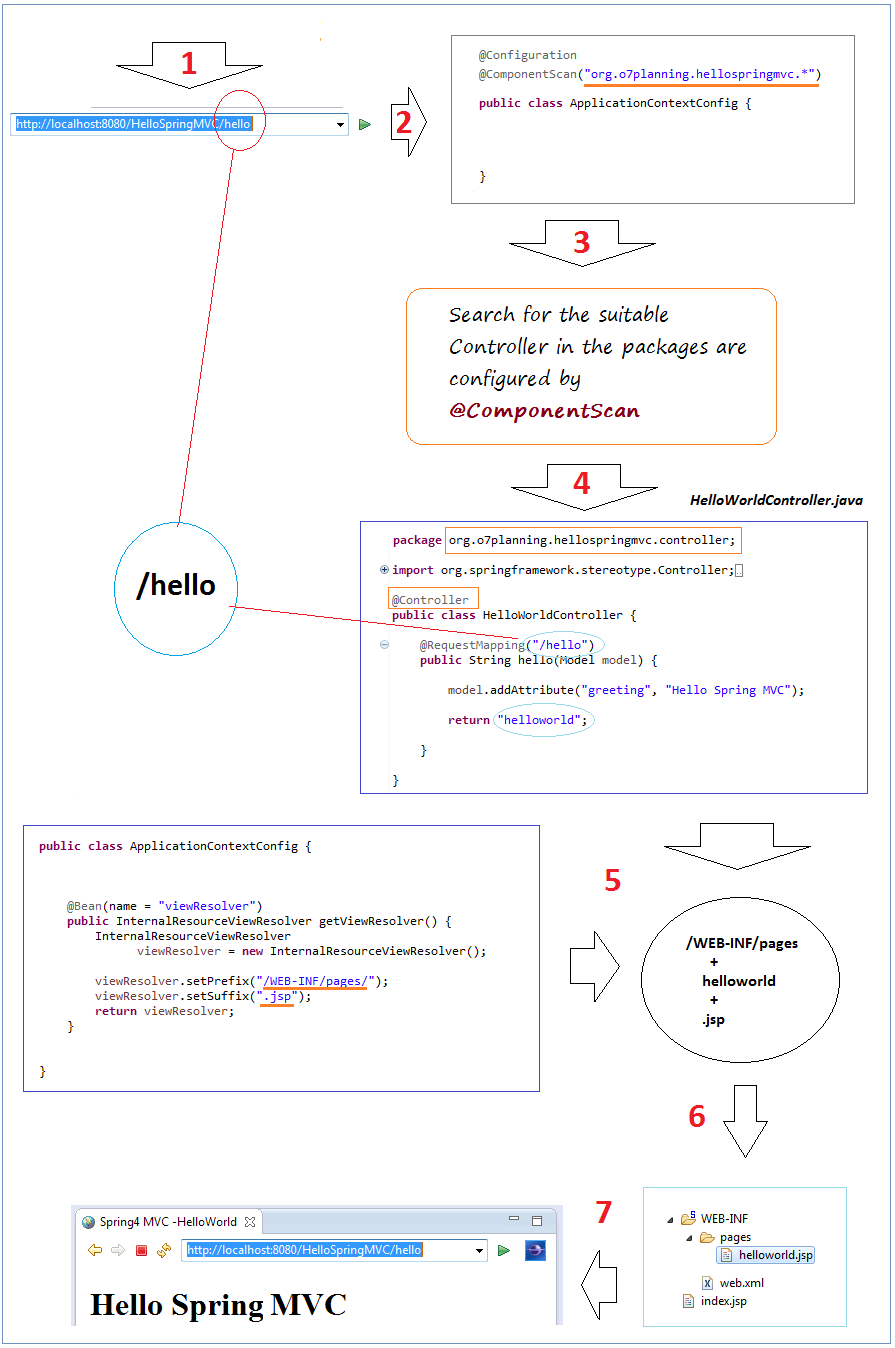
}ApplicationContextConfig class is used to declare Spring BEANs. It is annotated by @Configuration.
@ComponentScan("org.o7planning.hellospringmvc.*") - Deliver report to Spring to look for other Spring BEANs, and Controllers in the subpackages of org.o7planning.hellospringmvc.
@ComponentScan("org.o7planning.hellospringmvc.*") - Deliver report to Spring to look for other Spring BEANs, and Controllers in the subpackages of org.o7planning.hellospringmvc.
ApplicationContextConfig.java
package org.o7planning.hellospringmvc.config;

import org.springframework.context.annotation.Bean;
import org.springframework.context.annotation.ComponentScan;
import org.springframework.context.annotation.Configuration;
import org.springframework.web.servlet.view.InternalResourceViewResolver;

@Configuration
@ComponentScan("org.o7planning.hellospringmvc.*")
public class ApplicationContextConfig {


    @Bean(name = "viewResolver")
    public InternalResourceViewResolver getViewResolver() {
        InternalResourceViewResolver viewResolver = new InternalResourceViewResolver();
        viewResolver.setPrefix("/WEB-INF/pages/");
        viewResolver.setSuffix(".jsp");
        return viewResolver;
    }


}
WebMvcConfig class extended from WebMvcConfigurerAdapter is used to configure the resources used in the Spring MVC, for example, static resources (image, CSS, Javascript,...)
WebMvcConfig.java
package org.o7planning.hellospringmvc.config;

import org.springframework.context.annotation.Configuration;
import org.springframework.web.servlet.config.annotation.DefaultServletHandlerConfigurer;
import org.springframework.web.servlet.config.annotation.EnableWebMvc;
import org.springframework.web.servlet.config.annotation.ResourceHandlerRegistry;
import org.springframework.web.servlet.config.annotation.WebMvcConfigurerAdapter;


@Configuration
@EnableWebMvc
public class WebMvcConfig extends WebMvcConfigurerAdapter {

    // Static Resource Config
    @Override
    public void addResourceHandlers(ResourceHandlerRegistry registry) {
        registry.addResourceHandler("/css/**").addResourceLocations("/css/").setCachePeriod(31556926);
        registry.addResourceHandler("/img/**").addResourceLocations("/img/").setCachePeriod(31556926);
        registry.addResourceHandler("/js/**").addResourceLocations("/js/").setCachePeriod(31556926);
    }


    @Override
    public void configureDefaultServletHandling(DefaultServletHandlerConfigurer configurer) {
        configurer.enable();
    }

}
5. Jsp & Spring Controller
The Controllers are used to control the flow of the application.
HelloWorldController.java
package org.o7planning.hellospringmvc.controller;

import org.springframework.stereotype.Controller;
import org.springframework.ui.Model;
import org.springframework.web.bind.annotation.RequestMapping;

@Controller
public class HelloWorldController {

    @RequestMapping("/hello")
    public String hello(Model model) {

        model.addAttribute("greeting", "Hello Spring MVC");

        return "helloworld";

    }

}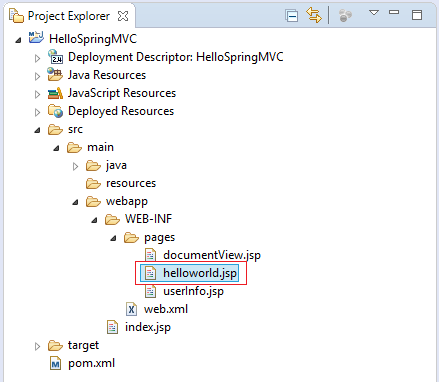
/WEB-INF/pages/helloworld.jsp
<!DOCTYPE html>
<html>
<head>
<meta charset="UTF-8">
<title>Spring MVC -HelloWorld</title>
</head>


<body>
    <h1>${greeting}</h1>
</body>


</html>
6. Run Spring MVC Application
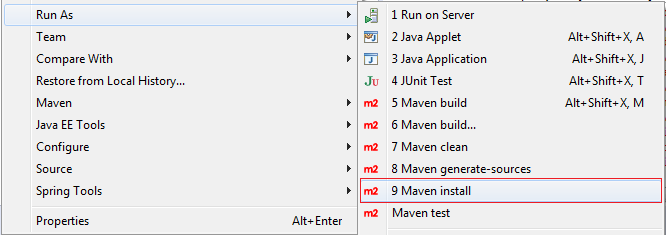
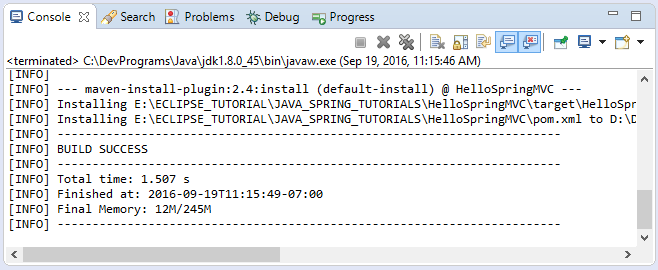
In the first, before running the application you need to build the entire project.
Right-click the project and select:
- Run As/Maven install
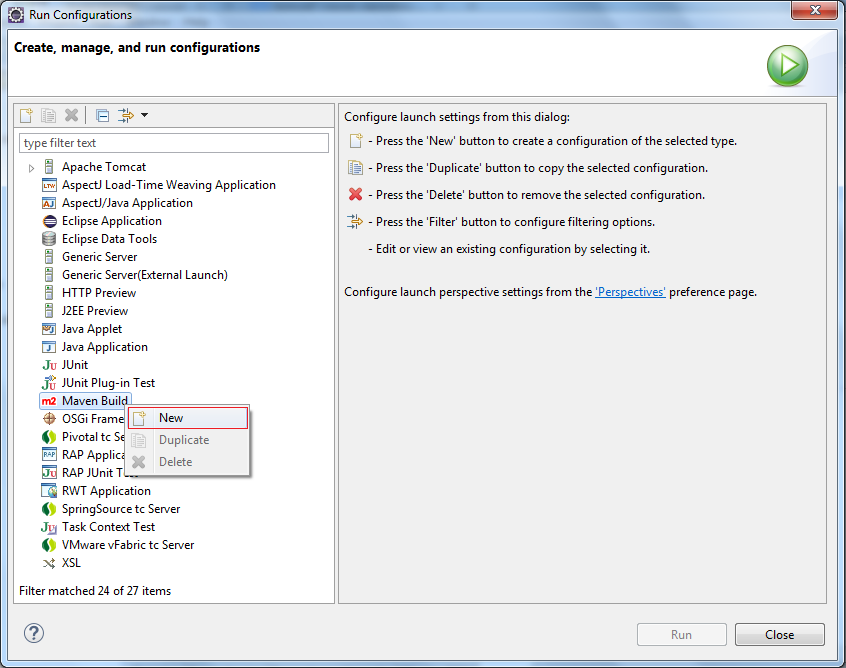
Run configurations:
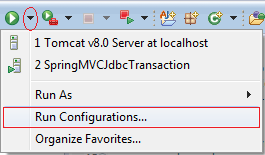
Enter:
- Name: Run HelloSpringMVC
- Base directory: ${workspace_loc:/HelloSpringMVC}
- Goals: tomcat7:run
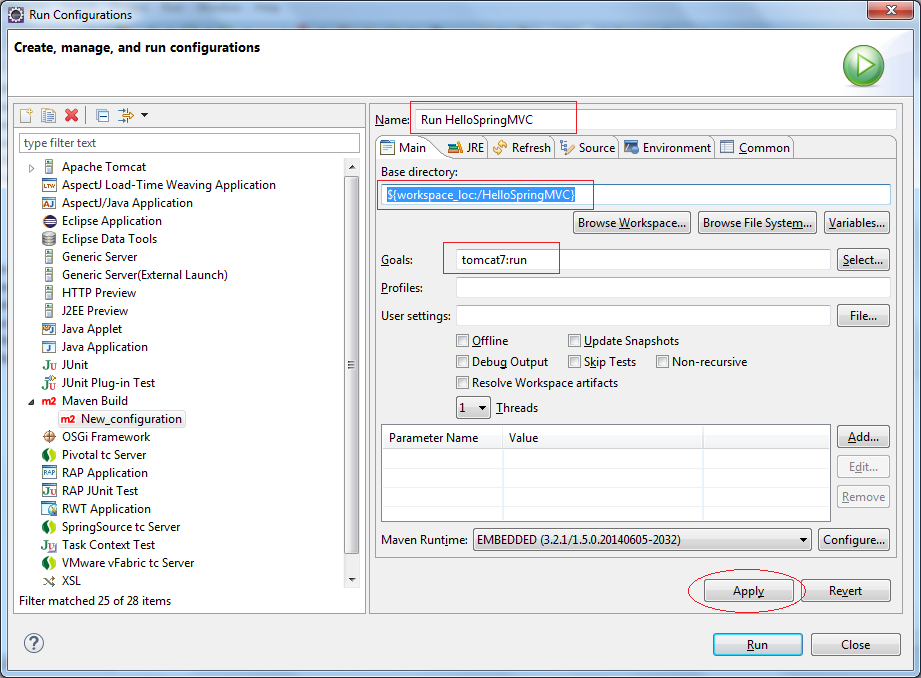
Click Run:
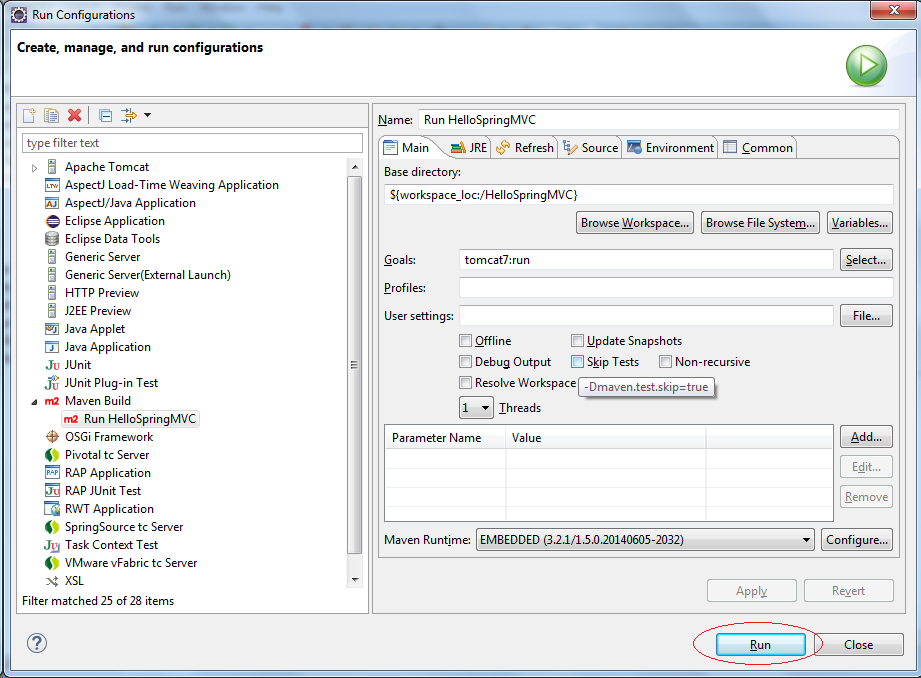
In the first run the program will take some minutes, so download the tomcat plugin library in order to run.
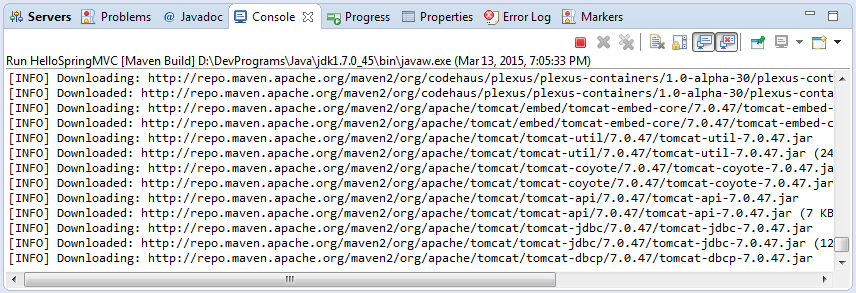
Everything was ready:
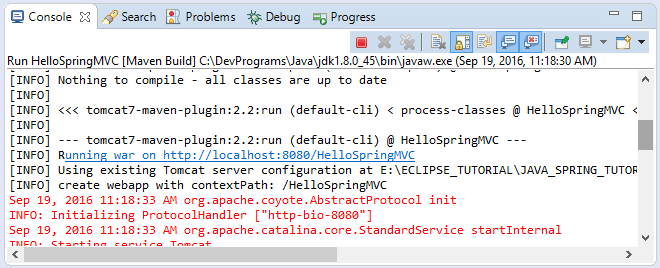
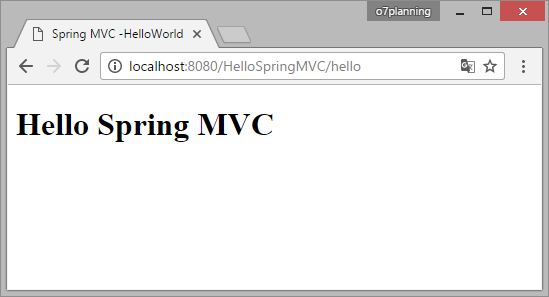
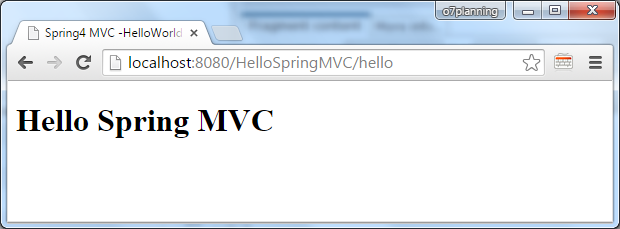
Run URL:
7. The flow of application
You have finished your project and run successfully in the previous step. Now we will see how the program runs.

8. Controller and methods
HttpServletRequest & HttpServletResponse
You can use HttpServletRequest, HttpServletResponse in the method of the Controller.
OtherExampleController.java
package org.o7planning.tutorial.springmvc;

import javax.servlet.http.HttpServletRequest;
import javax.servlet.http.HttpServletResponse;

import org.springframework.stereotype.Controller;
import org.springframework.ui.Model;
import org.springframework.web.bind.annotation.PathVariable;
import org.springframework.web.bind.annotation.RequestMapping;
import org.springframework.web.bind.annotation.RequestParam;

@Controller
public class OtherExampleController {

  ......

  @RequestMapping("/somePath")
  public String requestResponseExample(HttpServletRequest request,
          HttpServletResponse reponses, Model model) {

      // Todo something here

      return "someView";
  }

  ......
}
Redirect in Controller
Use the prefix "redirect:" of the String returned by the method, you can redirect to another page. See illustration:
RedirectExampleController.java
package org.o7planning.hellospringmvc.controller;

import org.springframework.stereotype.Controller;
import org.springframework.ui.Model;
import org.springframework.web.bind.annotation.RequestMapping;
import org.springframework.web.bind.annotation.RequestMethod;

@Controller
public class RedirectExampleController {

   @RequestMapping(value = "/redirect", method = RequestMethod.GET)
   public String authorInfo(Model model) {

      // Do somethong here

       return "redirect:/hello";
   }
}
Run URL:
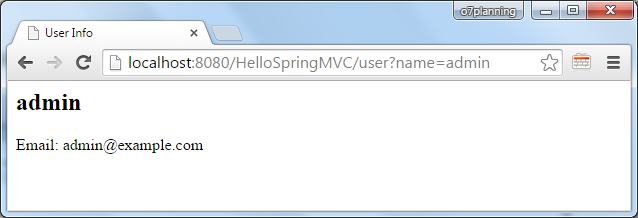
@RequestParam Example
Use the @RequestParam annotation to bind request parameters to a method parameter in your controller.
The following code snippet shows the usage:
RequestParamExampleController.java
package org.o7planning.hellospringmvc.controller;

import org.springframework.stereotype.Controller;
import org.springframework.ui.Model;
import org.springframework.web.bind.annotation.RequestMapping;
import org.springframework.web.bind.annotation.RequestParam;

@Controller
public class RequestParamExampleController {

  @RequestMapping("/user")
  public String userInfo(Model model,
          @RequestParam(value = "name", defaultValue = "Guest") String name) {

      model.addAttribute("name", name);

      if ("admin".equals(name)) {
          model.addAttribute("email", "admin@example.com");
      } else {
          model.addAttribute("email", "Not set");
      }
      return "userInfo";
  }

}
/WEB-INF/pages/userInfo.jsp
<html>
<head>
<meta http-equiv="Content-Type" content="text/html; charset=ISO-8859-1">
<title>User Info</title>
</head>
<body>

  <h2>${name}</h2>

  Email: ${email}
  <br>


</body>
</html>
Run URL:
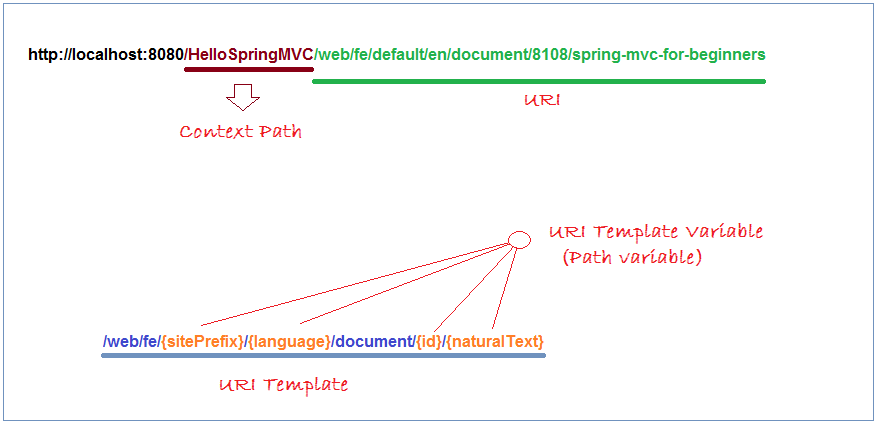
@PathVariable Example
In Spring MVC you can use the @PathVariable annotation on a method argument to bind it to the value of a URI template variable:
For example, this is a template URI:
- /web/fe/{sitePrefix}/{language}/document/{id}/{naturalText}
And the following URI matches the template above:
- /web/fe/default/en/document/8108/spring-mvc-for-beginners
- /web/fe/default/vi/document/8108/spring-mvc-cho-nguoi-moi-bat-dau
- .....
The following code snippet shows the usage:
PathVariableExampleController.java
package org.o7planning.hellospringmvc.controller;

import org.springframework.stereotype.Controller;
import org.springframework.ui.Model;
import org.springframework.web.bind.annotation.PathVariable;
import org.springframework.web.bind.annotation.RequestMapping;

@Controller
public class PathVariableExampleController {


  /**
   * @PathVariable Example:
   *
   * <pre>
   *
   *   http://o7planning.org/web/fe/default/en/document/8108/spring-mvc-for-beginners
   *
   *   or
   *
   *   http://localhost:8080/HelloSpringMVC/web/fe/default/en/document/8108/spring-mvc-for-beginners
   *
   * </pre>
   */
  @RequestMapping("/web/fe/{sitePrefix}/{language}/document/{id}/{naturalText}")
  public String documentView(Model model,
          @PathVariable(value = "sitePrefix") String sitePrefix,
          @PathVariable(value = "language") String language,
          @PathVariable(value = "id") Long id,
          @PathVariable(value = "naturalText") String naturalText) {

      model.addAttribute("sitePrefix", sitePrefix);
      model.addAttribute("language", language);
      model.addAttribute("id", id);
      model.addAttribute("naturalText", naturalText);

      String documentName = "Java tutorial for Beginners";
      if (id == 8108) {
          documentName = "Spring MVC for Beginners";
      }

      model.addAttribute("documentName", documentName);

      return "documentView";
  }
}
/WEB-INF/pages/documentView.jsp
<html>
<head>
<meta http-equiv="Content-Type" content="text/html; charset=ISO-8859-1">
<title>${documentName}</title>
</head>
<body>

   <h3>${documentName}</h3>

   Site Prefix: ${sitePrefix}
   <br> Language: ${language}
   <br> ID: ${id}
   <br> Natural Text: ${naturalText}
   <br>

</body>
</html>
Run URL:

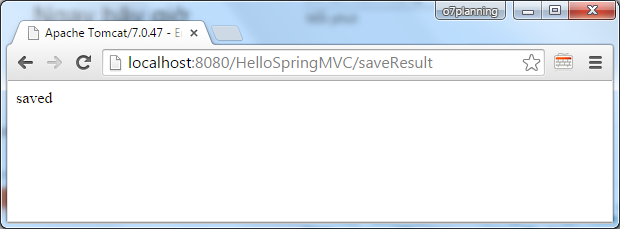
@ResponseBody Example
If you annotate a method with @ResponseBody, spring will try to convert its return value to a String and write it to the http response automatically. In this case, you do not need a specific View.
Note: Method not necessarily return type of String.
Simple example with @ResponseBody, and method returns String.
ResponseBodyExample1Controller.java
package org.o7planning.hellospringmvc.controller;

import org.springframework.stereotype.Controller;
import org.springframework.ui.Model;
import org.springframework.web.bind.annotation.RequestMapping;
import org.springframework.web.bind.annotation.ResponseBody;

@Controller
public class ResponseBodyExample1Controller {

   // Simple example, method returns String.
   @RequestMapping(value = "/saveResult")
   @ResponseBody
   public String authorInfo(Model model) {
       return "saved";
   }


}
Results of running the example:
An Example with @ResponseBody, method returns an Object.
- TODO
Spring MVC Tutorials
- Spring Tutorial for Beginners
- Install Spring Tool Suite for Eclipse
- Spring MVC Tutorial for Beginners - Hello Spring 4 MVC
- Configure Static Resources in Spring MVC
- Spring MVC Interceptors Tutorial with Examples
- Create a Multiple Languages web application with Spring MVC
- Spring MVC File Upload Tutorial with Examples
- Simple Login Java Web Application using Spring MVC, Spring Security and Spring JDBC
- Spring MVC Security with Hibernate Tutorial with Examples
- Spring MVC Security and Spring JDBC Tutorial (XML Config)
- Social Login in Spring MVC with Spring Social Security
- Spring MVC and Velocity Tutorial with Examples
- Spring MVC and FreeMarker Tutorial with Examples
- Use Template in Spring MVC with Apache Tiles
- Spring MVC and Spring JDBC Transaction Tutorial with Examples
- Use Multiple DataSources in Spring MVC
- Spring MVC and Hibernate Transaction Tutorial with Examples
- Spring MVC Form Handling and Hibernate Tutorial with Examples
- Run background scheduled tasks in Spring
- Create a Java Shopping Cart Web Application using Spring MVC and Hibernate
- Simple CRUD example with Spring MVC RESTful Web Service
- Deploy Spring MVC on Oracle WebLogic Server
Show More