Swift Tutorial for Beginners
1. Introduction
This is guide of Swift for beginners. In order to program Swift you must install XCode programming tools. You can see the instructions to download and install at:
This is a fast instructional document, if you are just starting with Swift, please read it respectively from top to bottom, this document will help you to have an overview before going into other detail documents.
2. Create your first Swift project
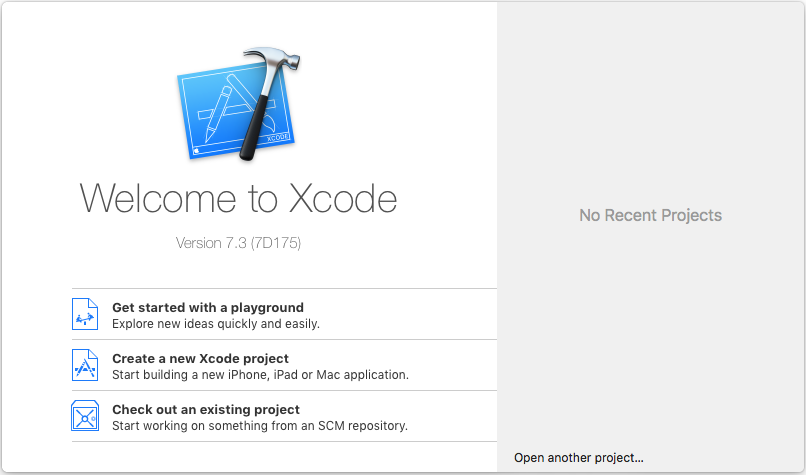
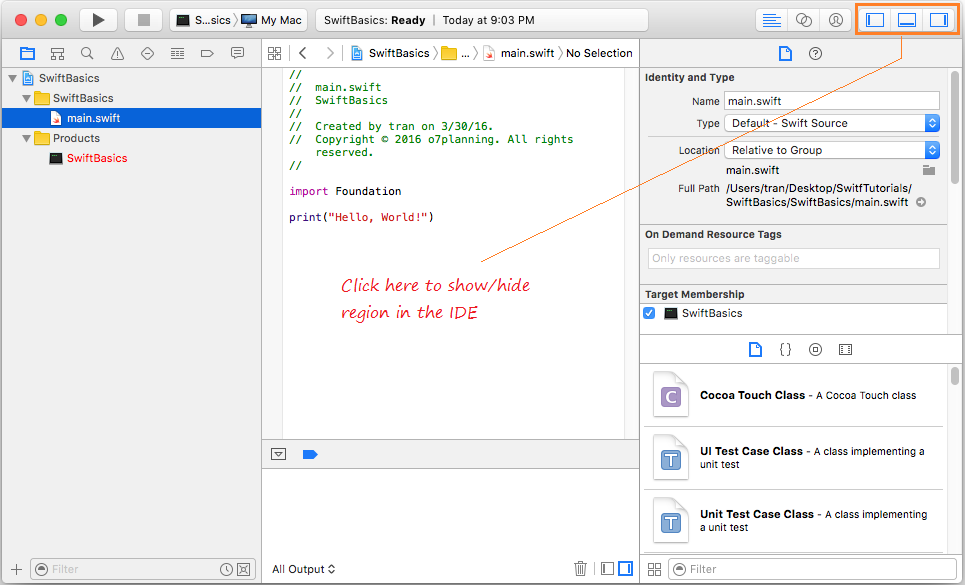
This is the first image when you open XCode.
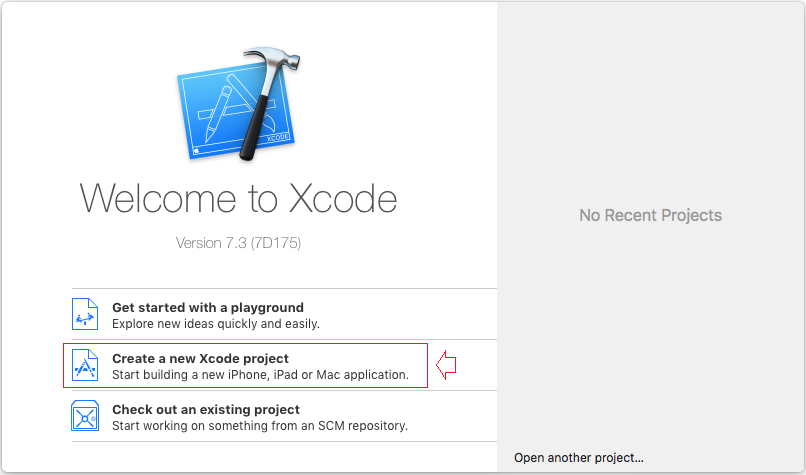
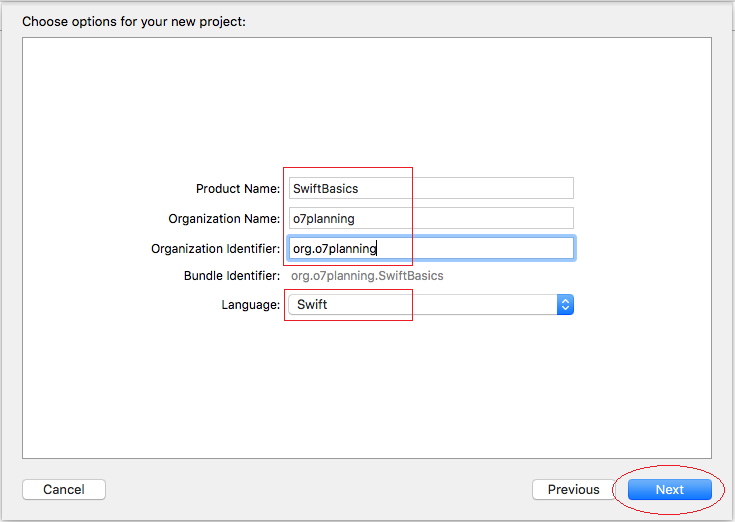
Create new Project:
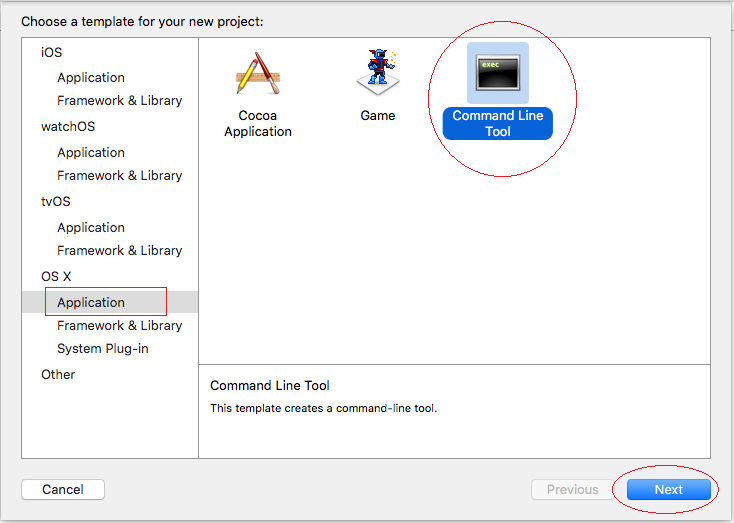
We created a simple Project (Console application, an application has no interface).
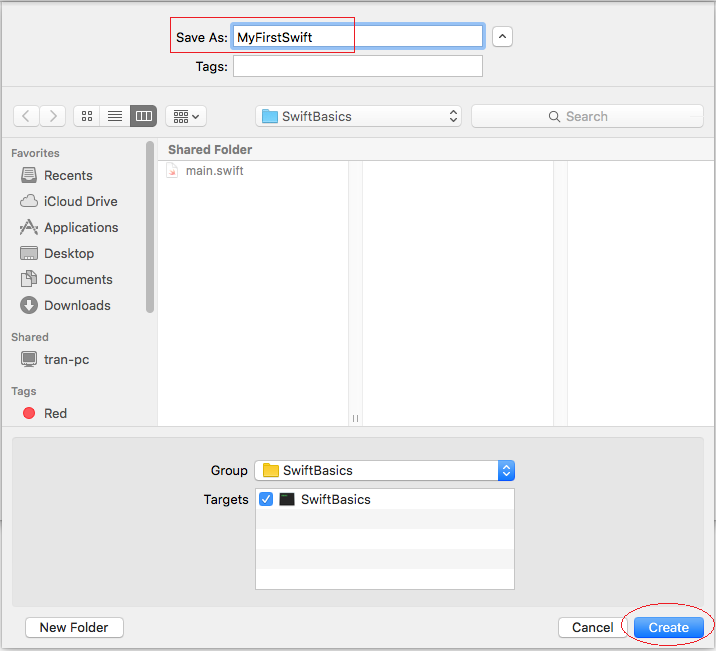
Name for your project is SwiftBasics:
Create a folder on the Desktop to store your Project.
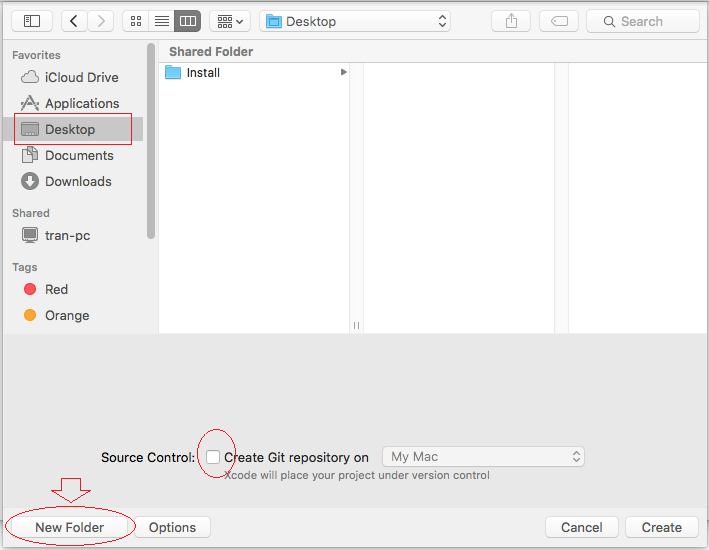
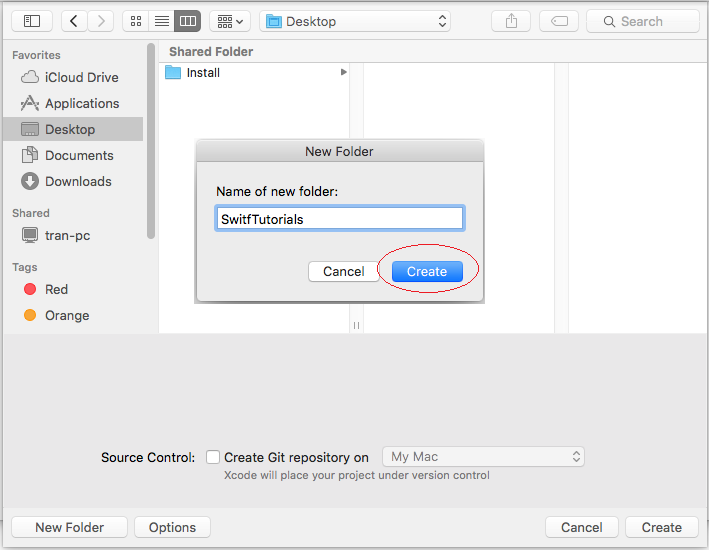
Name the folder containing your project is SwiftTutorials:
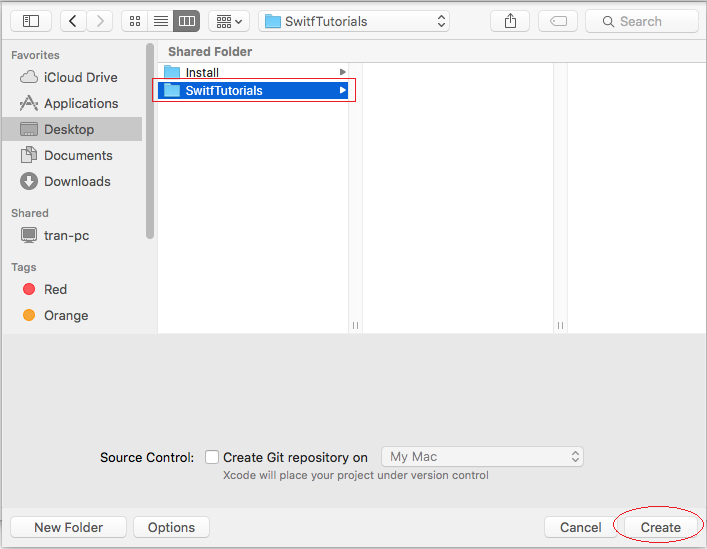
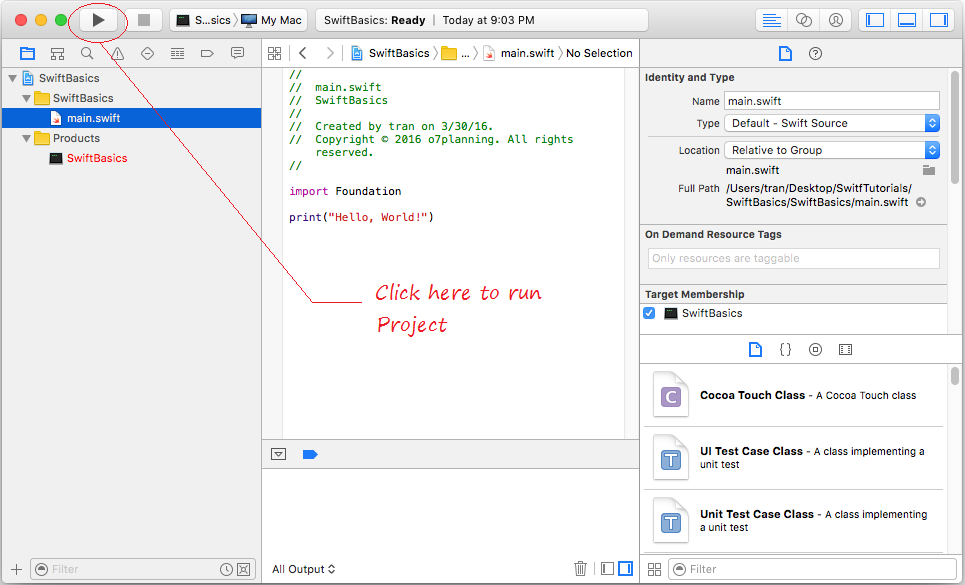
Your project is created.

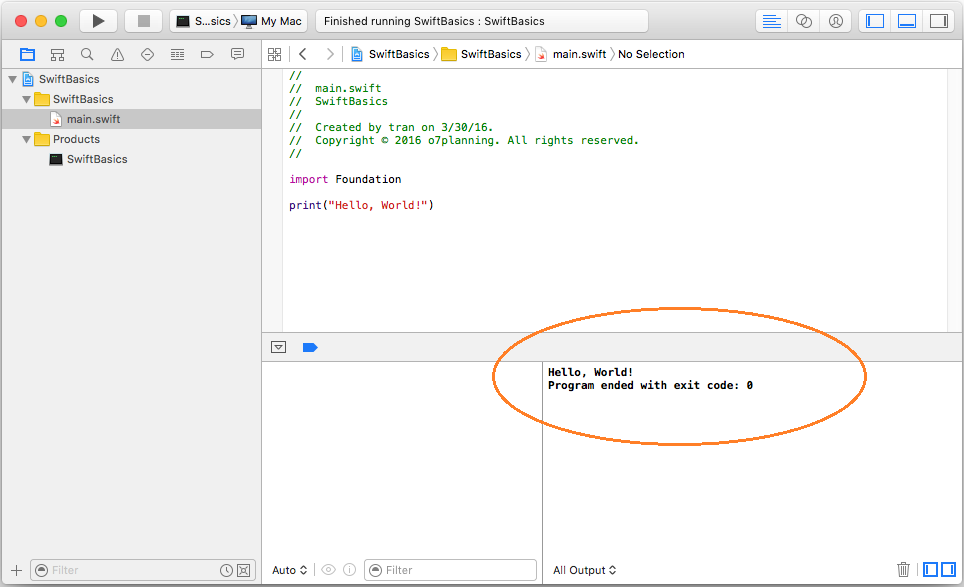
main.swift is a source file created when you create a project, you need to run this source file, it will write to the console "Hello, world".
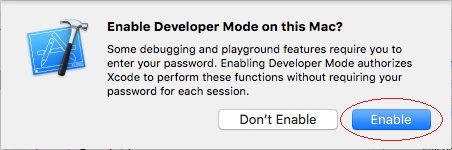
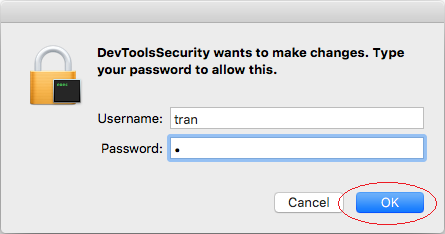
Nhấn "Enable" để cho phép chương trình chạy ở chế độ dành cho người lập trình.
The program runs and prints the message "Hello, world".
3. Explain the basic characteristics of the Swift
You need to have a basic look of Swift, this is very important.
What is Top level?
A command or expression not included in a function, block or a class means that it is located in the Top-Level.

Top-Level is the place to declare the use of the library, declare variables, constants, functions, class. By default, the variables and constants are declared in the Top-Level of this source file can be used in other source files in the same project.
You can not write an expression in the Top-Level, such an expression to call the function. So call the print("Hello") function to print the words "Hello" in Top-Level is invalid, unless you do it in the source files named main.swift (This is the exception).
The starting point of the Swift program:
In a Swift program, main.swift file is a special file, because it is the starting point to run the program. You can call or write the expression in the Top-Level in main.swift source file, which is an exception for this file.
I create a new source file named newfile.swift, you will get a error message when I deliberately write a expression at Top-Level.
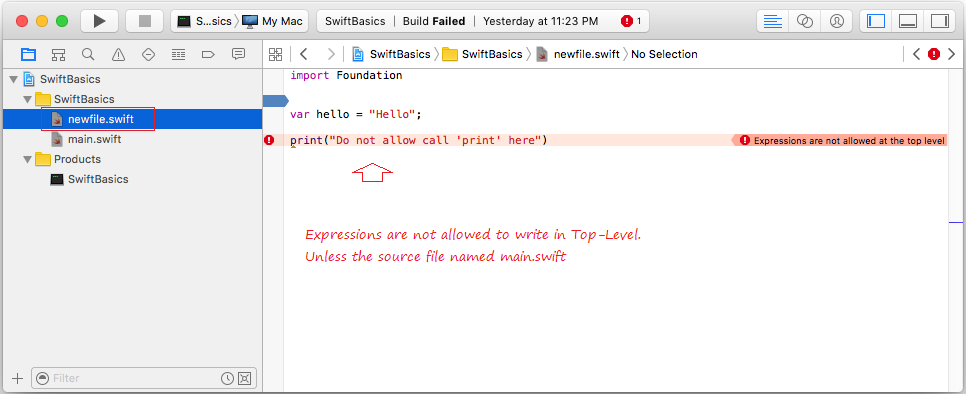
Expression should be placed in a function or block.
4. Add a new source file
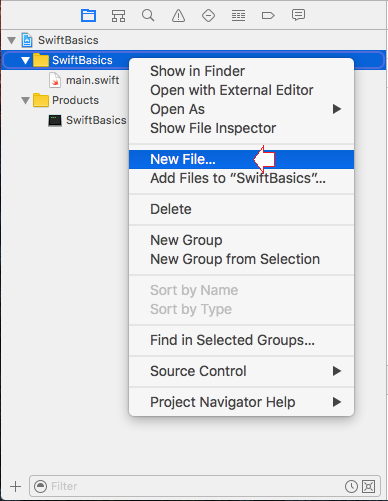
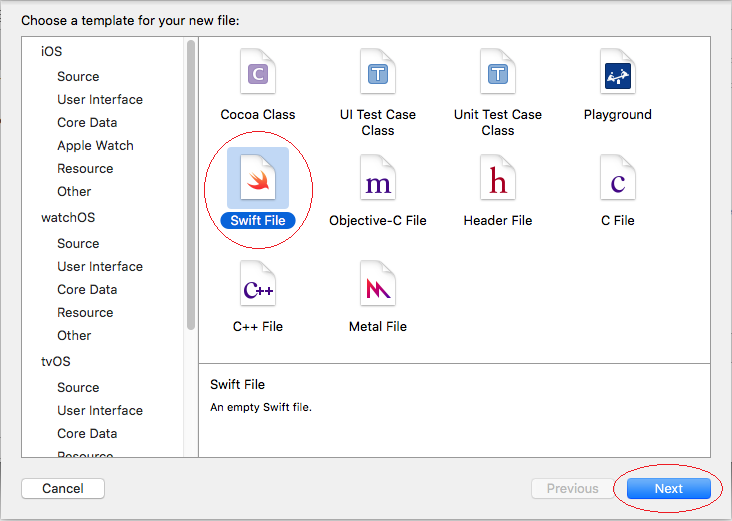
Now you need to create your first source file, and run it.
On XCode, right-click the folder containing the main.swift source file, select "New File".
Enter file name MyFirstSwift:
MyFirstSwift.swift file is created:
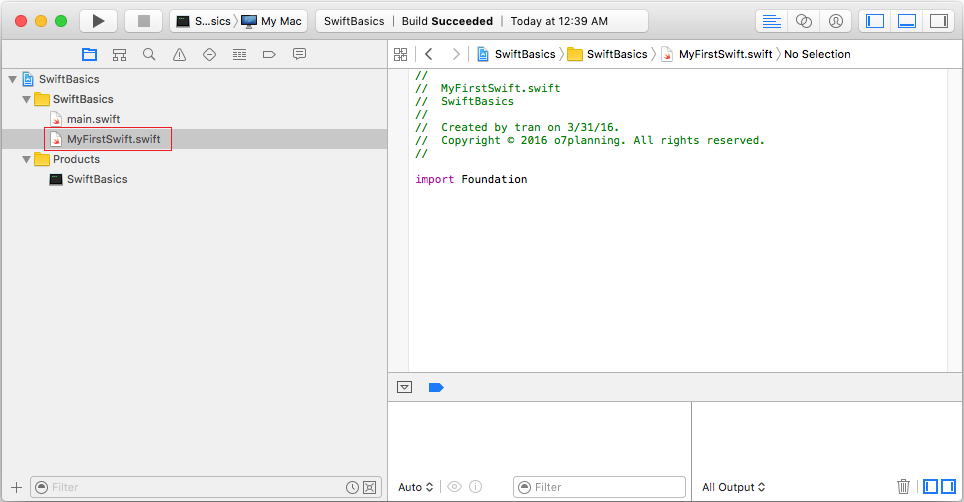
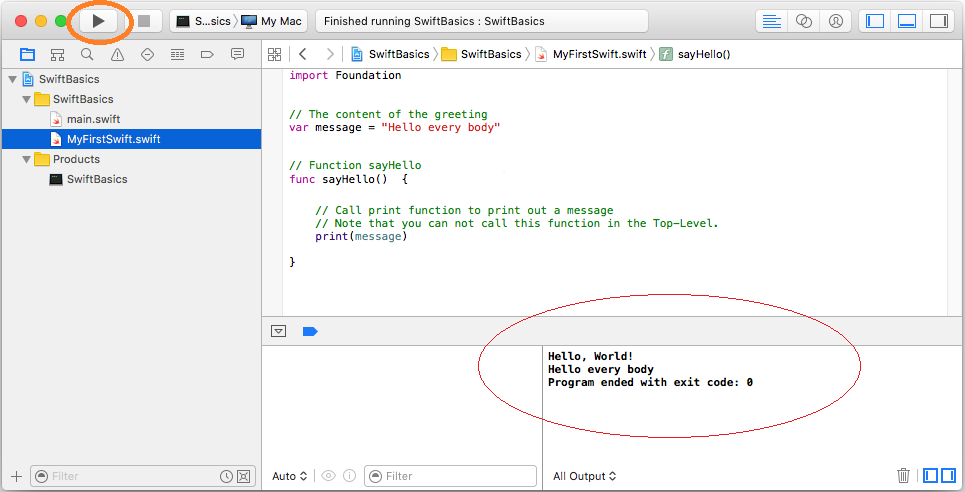
I edit the content of the source file that has been created, and added a sayHello() function, note: more about of the function will be discussed in another section.
MyFirstSwift.swift
import Foundation

// The content of the greeting
var message = "Hello every body"

// sayHello() function
func sayHello()  {

    // Call print function to print out a message
    // Note that you can not call this function in the Top-Level.
    print(message)

}
In Swift, starting point to run application is main.swift, so to test thesayHello() function you need to call in main.swift. Edit code of main.swift :
main.swift
import Foundation


print("Hello, World!")

// Call sayHello() function.
// Defined in MyFirstSwift.swift
sayHello()
Running project.
5. Data types in Swift
Type | Typical Bit Width | Typical Range |
Int8 | 1byte | -127 to 127 |
UInt8 | 1byte | 0 to 255 |
Int32 | 4bytes | -2147483648 to 2147483647 |
UInt32 | 4bytes | 0 to 4294967295 |
Int64 | 8bytes | -9223372036854775808 to 9223372036854775807 |
UInt64 | 8bytes | 0 to 18446744073709551615 |
Float | 4bytes | 1.2E-38 to 3.4E+38 (~6 digits) |
Double | 8bytes | 2.3E-308 to 1.7E+308 (~15 digits) |
6. Variables and variable declaration
A variable is identified by a name, for a data storage area that your program can be manipulated. Each variable in Swift has a specific type, which determines the size and layout of the variable's memory the range of values that can be stored within that memory and the set of operations that can be applied to the variable.
Variable can change value in the course of its existence in the program. The variables have a fixed value called constants. Using the let keyword to declare a constant variable.
In swift, you can declare a variable in the Top-Level or a local variable in a class or function. With the variable is declared in the Top-Level can be used in other source files in the same Project.
Declare a variable:
// Declare a variable.
var <Variable name> : <Data Type> ;

// Declares a variable, and assign a value to it.
var <Variable name> : <Data Type> = <value>;

// Declare a constant:
let <Constant name> : <Data Type> = <value>;

// Example
// Declare a variable
// Name of variable: year
// Data type: Int
// Value: 2016
var year: Int = 2016;

// With primitive data types (Int, Double, Bool) and String,
// you can ignore in the declaration.
// Swift can understand your intentions.
..

// Inferred as String
var languageName = "Swift"
var version = 1.0  // Double
var introduced = 2014  // Int
var isAwesome = true   // Bool
VariableExample.swift
import Foundation

// Use the keyword 'let' to declare a constant.
// Constant name is COPYRIGHT, data type is String.
// And its value is "o7planning".
// (This is a constant declared in Top-Level
// It can be used in other source files in the project).
let COPYRIGH: String = "o7planning"

// Use the keyword 'var' to declare a variable.
// Name of variable: year
// Data type: Int
// Value: 2016
// (This is a variable declared in Top-Level
// It can be used in other source files in the project).
var year: Int = 2016

func variableExample()  {
    // Declare a constant integer.
    // You can not assign new values for the constants.
    let MAX_SCORE = 100;

    // Declare an integer variable.
    var score = 90;

    // Declare a string
    var studentName = "Tom"

    // Write string to the Console.
    print("Hi \(studentName)")
    print("Your score: \(score)/\(MAX_SCORE)")
    print("Assign new value for studentName")

    // Assign new value for studentName.
    studentName = "Jerry"
    print("Hi \(studentName)")
}
Edit main.swift:
main.swift
import Foundation

// Call variableExample() function,
// is defined in VariableExample.swift file.
variableExample()
Running the example:
Hi Tom
Your score: 90/100
Assign new value for studentName
Hi Jerry
7. Branch Statements
If-else Statement
if is a command which checks a certain condition in Swift. For example: If a> b, then do something ....
The common comparison operators:
Operator | Meaning | Example |
> | greater than | 5 > 4 is true |
< | less than | 4 < 5 is true |
>= | greater than or equal | 4 >= 4 is true |
<= | less than or equal | 3 <= 4 is true |
== | equal to | 1 == 1 is true |
!= | not equal to | 1 != 2 is true |
&& | And | a > 4 && a < 10 |
|| | Or | a == 1 || a == 4 |
if ( condition )  {
    // Do something here.
}
Example:
// Example 1:
if ( 5 < 10 )   {
   print( "Five is now less than ten");
}
// Example 2:
if ( true )   {
    print( "Do something here");
}
Full structure of the if - else if - else:
// Note that at most one block of code will be executed.
// The program checks the conditions from top to bottom.
// When a condition is true, this block will be executed.
// The remaining conditions will be ignored.
...

// If condition1 is true then ..
if (condition1 )
{
     // Do something if condition1 is true.
}
// Else if condition2 is true then ....
else if(condition2 )
{
    // Do something here if condition2 is true (condition1 is false).
}
// Else if conditionN is true then ...
else if(conditionN )
{
     // Do something if conditionN is true
     // (All the above conditions are false)
}
// Else (All the above conditions are false).
else  {
     //  Do something.
}
IfElseExample.swift
import Foundation

func  ifElseExample()  {
    // Declare a variable type of UInt32 with random value.
    // (arc4random() function return random value).
    var randomValue: UInt32 = arc4random()
    print("Random value = " + String(randomValue))

    // Division 200 and returns the remainder
    // (Return 0 -> 99)
    var age: UInt32 = randomValue % 200;
    print("Your age= " + String(age))

    // Check if age < 80 then
    if (age < 80)    {
        print("You are pretty young");
    }
    // Else if age between 80 and 100 then
    // Ngược lại nếu age nằm giữa 80 và 100 thì ..
    else if  age >= 80 && age <= 100     {
        print("You are old");
    }
    // Else (The remaining cases).
    else    {
        print("You are very old");
    }
}
Running example:
Random value = 3107711145
Your age= 145
You are very old
Switch-Case Statement
Some examples use the switch statement:
SwitchExample1.swift
import Foundation

func switchExample1()   {
    // Require users to select an option.
    print("Please select one option:")
    print("1 - Play a game")
    print("2 - Play music")
    print("3 - Shutdown computer")
    print("---------------------")

    // Declare a variable type of UInt32 with random value.
    // (arc4random() function return random value).
    // Khai báo một biến kiểu UInt32 với giá trị ngẫu nhiên.
    // (Hàm arc4random() trả về một số ngẫu nhiên).
    var randomValue: UInt32 = arc4random()

    // Division 5 and returns the remainder (0, 1, 2, 3, 4)
    var myValue:UInt32 = randomValue%5

    // Declare a variable 'option'.
    // Cast UInt32 to Int.
    // 'option' value in 1, 2, 3, 4, 5.
    var option:Int = Int(myValue) + 1

    // String(option): Cast data type to String.
    print("You select: " + String(option))

    // Check the value of 'option'.
    switch (option)   {
    case 1:
        print("You choose to play the game");
    case 2:
        print("You choose to play the music");
    case 3:
        print("You choose to shutdown the computer");
    // Others case.
    default:
        print("Nothing to do...");
    }
}
Running example
Please select one option:
1 - Play a game
2 - Play music
3 - Shutdown computer
---------------------
You select: 1
You choose to play the game
You can using multiple values in a case:
SwitchExample2.swift
import Foundation

func switchExample2() {
    // Declare a varable and assign value of 3.
    var option = 3
    print("Option = \(option) ")

    // Check value of 'option'.
    switch (option)    {
    case 1:
        print("Case 1")
    // Case value in 2,3,4,5
    case 2, 3, 4, 5:
        print("Case 2,3,4,5!!!")
    // Case value in 6 -> 10
    case 6...10:
        print("Case 6...10")
    // Case value in 11 -> 20 and odd.
    case 11...20 where option % 2 == 1:
        print("Case 11...20 and odd")
    default:
        print("Nothing to do...")
    }
}
Running the example:
Option = 3
Case 2,3,4,5!!!
Fallthrought:
If you have worked with other languages like Java, C# you can find the syntax to use 'switch' no difference compared to Swift. In Swift when a case true, the statement block of this case will be executed, and in other cases not be running.
With Java, C# when a case true, the statement block of this case will be executed, and if there is no break statement, the next block case (or default) will be executed .
Swift was automatically break after it finished executing case block.
Swift added fallthrough statement (this statement is not available in Java, C#), fallthrought told the program to continue execute next case block (or default block).
Consider an illustration:
Consider an illustration:
Consider an illustration:
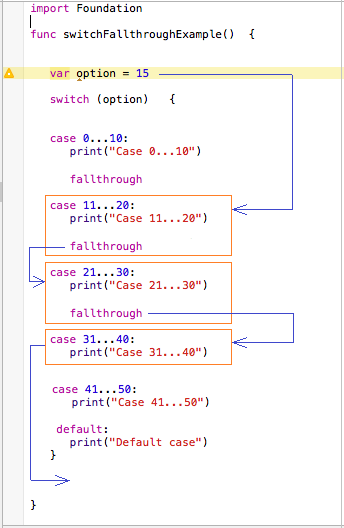
SwitchFallthroughExample.swift
import Foundation

func switchFallthroughExample()  {
    var option = 15
    switch (option)   {
    case 0...10:
        print("Case 0...10")
        // fallthrough: Execute next case.
        fallthrough
    case 11...20:
        print("Case 11...20")
        // fallthrough: Execute next case.
        fallthrough
    case 21...30:
        print("Case 21...30")
        // fallthrough: Execute next case.
        fallthrough
    case 31...40:
        print("Case 31...40")
    case 41...50:
        print("Case 41...50")
    default:
        print("Default case")
    }
}
Running the example:
Case 11...20
Case 21...30
Case 31...40
8. The loop in Swift
The loop is used to run repetitively a statement block . It makes your program execute repeatedly a statement block several times, this is one of the basic tasks of programming.
Swift supports 4 different kinds of loops:
Swift supports 4 different kinds of loops:
Swift supports 4 different kinds of loops:
- FOR .. IN
- FOR
- WHILE
- REPEAT WHILE
for in loop
for .. in loop use for iterator on a set, or array.
Syntax:
for <element> in <collection> {
       // Do something here..
}
This example using for .. in to iterate in an array (the definition of array will mention in the following section)
ForInExample1.swift
import Foundation

func forInExample1()  {
    // Declare an array type of String with 5 elements.
    var languages:[String] = ["Java","C#", "C/C++", "Swift", "Ruby"]
    for lang in languages  {
        print("Language " + lang)
    }
}
Running the example:
Language Java
Language C#
Language C/C++
Language Swift
Language Ruby
for loop
The syntax of the FOR loop:
for (initialize variable ; condition ; updates new value for variable )
{
        // Execute the block when the condition is true
}
Example:
// Example 1:
// Declare a variable x and assign value 0.
// The condition is x < 5
// If x < 5 is true then execute the block.
// After each iteration, the value of x is increased by 1.
for (int  x = 0;  x < 5 ; x = x + 1)
{
    // Do something here when x < 5 is true.
}
// Example 2:
// Declare variable x and assgin value of 2
// The condition is x < 15
// If x < 15 is true then execute the block.
// After each iteration, the value of x is increased by 3.
for (int  x = 2;  x < 15 ; x = x + 3)
{
    // Do something here when x < 15 is true.
}
ForLoopExample.swift
import Foundation

func forLoopExample()   {
    print("For loop example");
    // Declare variable x and assign value of 2
    // The condition is x < 15
    // If x < 15 is true then execute the block.
    // After each iteration, the value of x is increased by 3
    for (var x = 2; x < 15; x = x + 3)    {
        print( );
        print("Value of x = \(x)");
    }
}
Running the example
For loop example
Value of x = 2

Value of x = 5

Value of x = 8

Value of x = 11

Value of x = 14
while loop
Syntax of WHILE loop:
while (condition)
{
     // While the 'condition' is true, then execute the block.
}
Example:
// Declare a variable x.
int x = 2;

while ( x < 10)
{
    // Do something here when x < 10 is true.
    ...

    // Update value to x.
    x = x + 3;
}
WhileLoopExample.swift
import Foundation

func whileLoopExample()   {
    print("While loop example");
    // Declare a variable x and assign value of 2
    var x = 2;
    // The condition is x < 10.
    // If x < 10 is true then execute the block.
    while (x < 10)  {
        print("Value of x = \(x)");
        x = x + 3;
    }
}
Running the example
While loop example
Value of x = 2
Value of x = 5
Value of x = 8
repeat-while loop
Syntax of DO-WHILE
// Characteristics of the 'repeat-while' loop is that it will  execute the block at least 1 time.
// Once finished block, it will check  the conditions again whether continue to execute or not.
repeat   {
    // Do something here
    // After that, continue to check conditions whether continue to run this block or not.
} while (condition)
RepeatWhileExample.swift
import Foundation

func repeatWhileExample()    {
    print("Repeat-While loop example")

    // Declare a variale x and assign value of 2
    var x = 2

    // Execute block at least once.
    // After each execution of the block,
    // It will check the condition,
    // if the condition is still true, the block will be executed.
    repeat    {
        print("Value of x = \(x)")
        x = x + 3;
    } while (x < 10)
}
Running the example:
Repeat-While loop example
Value of x = 2
Value of x = 5
Value of x = 8
The break in the loop
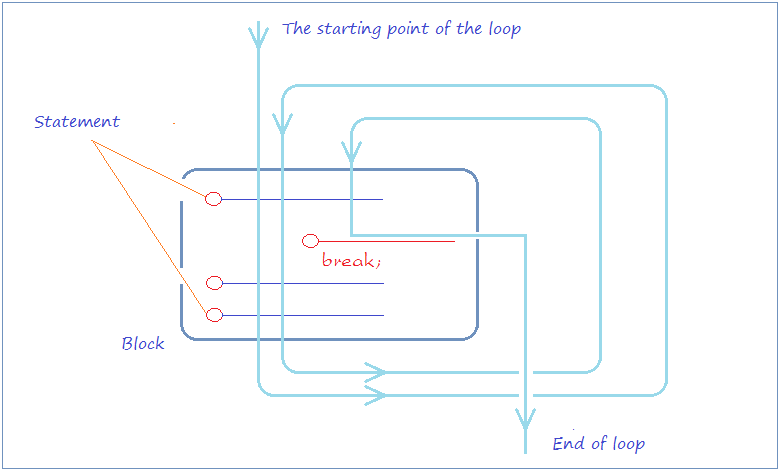
break is a command that may be located in a block of a loop. This command ends the loop unconditionally.
LoopBreakExample.swift
import Foundation

func loopBreakExample()    {
    print("Break example");
    // Declare a variable and assign value of 2
    var x = 2;
    while (x < 15)     {
        print("----------------------");
        print("x = \(x)");
        // If x = 5 then exit the loop.
        if (x == 5)  {
            break;
        }
        // Increase value of x by 1.
        x = x + 1;
        print("After +1, x = \(x)");
    }
}
Running the example:
Break example
----------------------
x = 2
After +1, x = 3
----------------------
x = 3
After +1, x = 4
----------------------
x = 4
After +1, x = 5
----------------------
x = 5
Continue statement within the loop
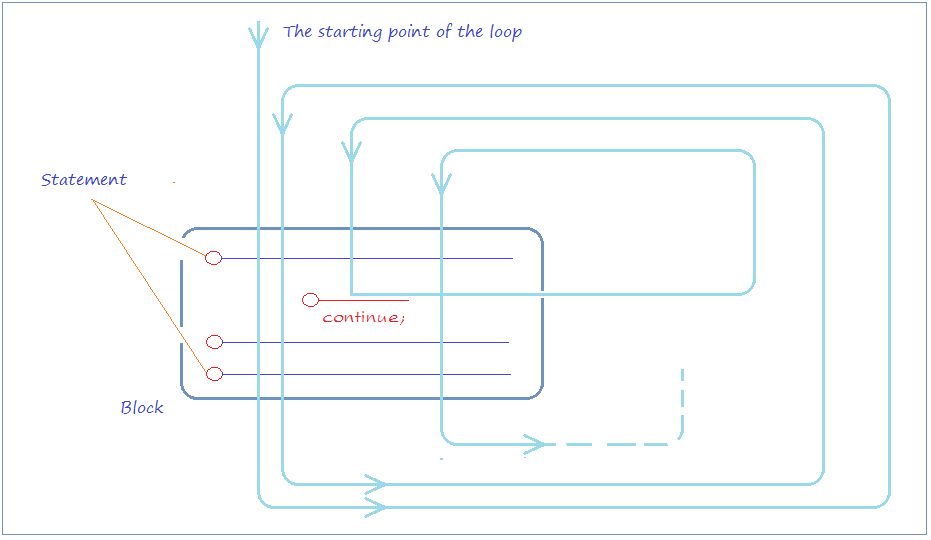
continue is a statement which may be located in a loop. When caught the continue statement, the program will ignore the command lines in below block of continue and start of a new loop.
LoopContinueExample.swift
import Foundation

func loopContinueExample()  {
    print("Continue example")
    // Declare a variable and assign value of 2
    var x = 2
    while (x < 7) {
        print("----------------------")
        print("x = \(x)")
        // % is used for calculating remainder
        // If x is even, then ignore the command line below of 'continue'
        // and start next iteration (If conđition is still true).
        if (x % 2 == 0)  {
            // Increase x by 1.
            x = x + 1
            continue
        }
        else {
            // Increase x by 1.
            x = x + 1
        }
        print("After +1, x = \(x)")
    }
}
Running the example:
Continue example
----------------------
x = 2
----------------------
x = 3
After +1, x = 4
----------------------
x = 4
----------------------
x = 5
After +1, x = 6
----------------------
x = 6
9. Arrays in Swift
One-dimensional array
Naturally, array on Swift is a Struct, it differs from an array of other languages such as Java, C#, ... The array of Java, C# has a fixed number of elements and can not add or remove the number of elements, while Swift's array can do it.
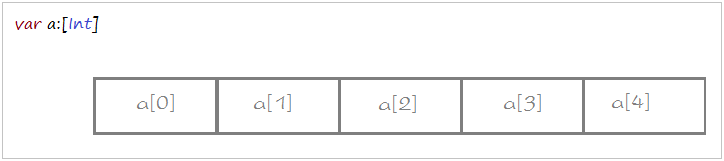
These are illustrations of one dimension array with 5 elements which are indexed from 0 to 4.
The syntax to declare a one-dimensional array:
// Way 1:
// Declare an array of int, specifies the elements.
var years: [Int] = [ 2001, 2003, 2005, 1980, 2003 ];

// Or (Inferred as array of Int):
var years = [ 2001, 2003, 2005, 1980, 2003 ];

// Way 2:
// Declare an array of Floats,
// 3 elements, all elements have value of 0.
var salaries:[Float] = [Float](count: 3,repeatedValue :0 );

// Or:
var salaries  = [Float](count: 3,repeatedValue :0 );

// Way 3:
// Declare a empty array (Have no elements)
var emptyArray:[Int] = [Int]()
Example:
ArrayExample1.swift
import Foundation

func arrayExample1()  {
    // Way 1:
    // Declare an array of Int, specifies the elements.
    var years: [Int] = [ 2001, 2003, 2005, 1980, 2003 ];
    print("--- years --- ");

    // count is a property of the array, it returns the number of elements.
    print("Element count of array years = \(years.count)");

    // Use a for loop to print out the elements of the array.
    for (var i = 0; i < years.count; i = i + 1) {
        print("Element at \(i) =  \(years[i])");
    }
    print("--- salaries --- ");

    // Way 2:
    // Declare an array of Floats, 3 elements, all elements have value of 0.
    var salaries:[Float] = [Float](count: 3,repeatedValue :0 );

    // Assign values to the elements.
    salaries[0] = 1000;
    salaries[1] = 1200;
    salaries[2] = 1100;

    // Use a for loop to print out the elements of the array.
    for (var i = 0; i < salaries.count; i = i + 1) {
        print("Element at \(i) =  \(salaries[i])");
    }
}
Running the example:
--- years ---
Element count of array years = 5
Element at 0 = 2001
Element at 1 = 2003
Element at 2 = 2005
Element at 3 = 1980
Element at 4 = 2003
--- salaries ---
Element at 0 = 1000.0
Element at 1 = 1200.0
Element at 2 = 1100.0
Array in Swift is Struct
On Swift, naturally, array is a Struct, therefore, it have the properties and methods. Including the method to add elements to the array or remove elements
// Declare an array of String, with 2 elements.
var languages = ["Java","C#"]

// Using append() method to append element to ends of array.
languages.append("Swift")

// Can also use the += operator to append an array at the end.
languages += ["C/C++", "Perl"];
Example:
ExpaddingArrayExample.swift
import Foundation

func expaddingArrayExample()  {
    // Declare an array of String, with 2 elements.
    var languages = ["Java","C#"]
    // Using append() method to append element to ends
    languages.append("Swift")

    // Can also use the += operator to append an array at the end.
    languages += ["C/C++", "Perl"];

    // Using for-in loop.
    for lang in languages {
        print("Language: " + lang)
    }
}
Running the example:
Language: Java
Language: C#
Language: Swift
Language: C/C++
Language: Perl
enumerate
enumerate() method of array returns object of EnumerateSequence struct. Each element of EnumerateSequence contains index information, and the element of the array.
See more about Struct:
Array example:
EnumerateArrayExample.swift
import Foundation
import Cocoa

func enumerateArrayExample()  {

    // Declare an array of String with 3 elements.
    var languages :[String] = ["Java", "C#", "Swift"]


    for  (index, element )  in languages.enumerate()  {

        print("Element at \(index) = \(element)");
    }

}
Running the example:
Element at 0 = Java
Element at 1 = C#
Element at 2 = Swift
Swift Programming Tutorials
- Install Mac OS X 10.11 El Capitan in VMWare
- Install XCode
- Swift Tutorial for Beginners
- Swift Functions Tutorial with Examples
- Swift Closures Tutorial with Examples
- Class and Object in Swift
- Swift Enums Tutorial with Examples
- Swift Structs Tutorial with Examples
- Programming for Team using XCode and SVN
Show More