Android UI Layouts Tutorial with Examples
1. What is Layout?
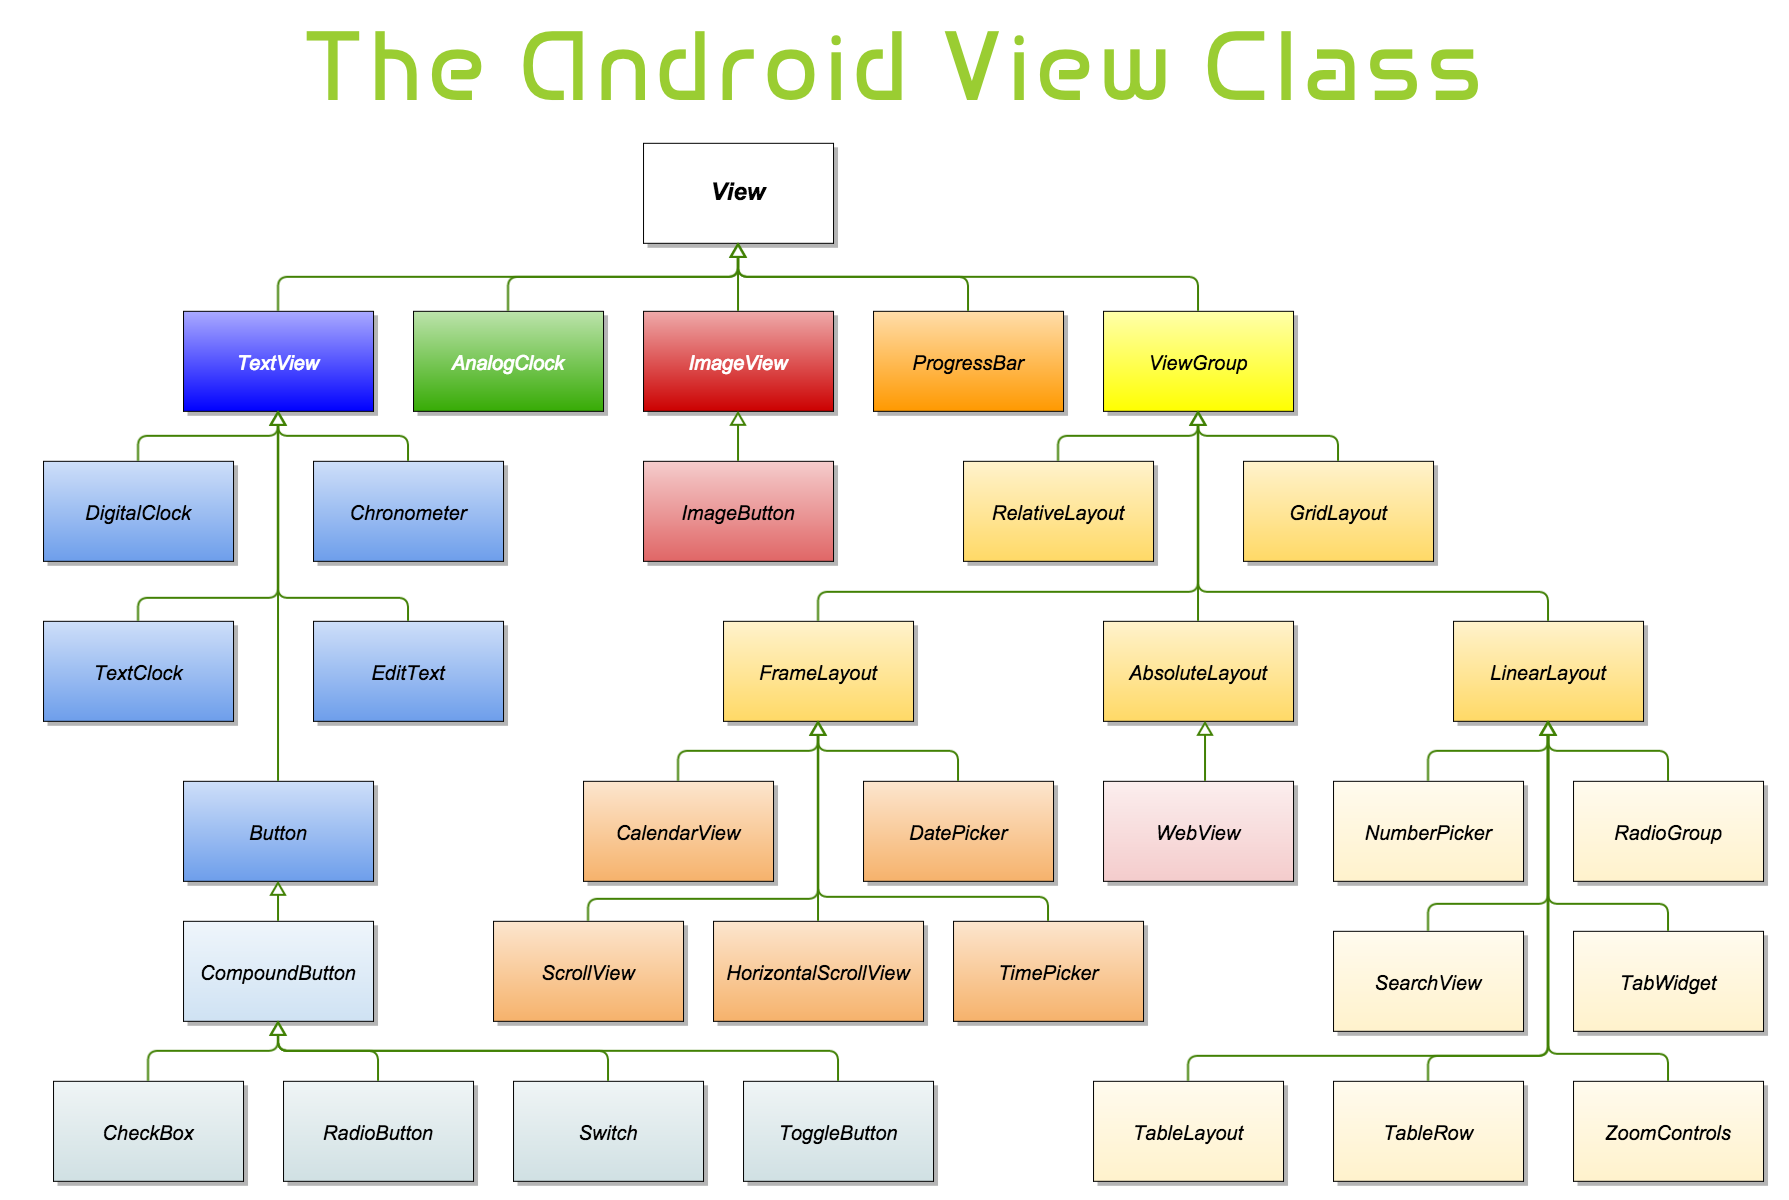
An Android layout is a class that handles arranging the way its children appear on the screen. Anything that is a View (or inherits from View) can be a child of a layout. All of the layouts inherit from ViewGroup (which inherits from View) so you can nest layouts. You could also create your own custom layout by making a class that inherits from ViewGroup.
- The image below illustrates the inheritance hierarchy between views in Android.
2. The standard Layouts in Android
- The standard Layouts:
Layout | Description |
LinearLayout  (Horizontal)  (Vertical) | LinearLayout is a view group that aligns all children in a single direction, vertically or horizontally. |
RelativeLayout  | RelativeLayout is a view group that displays child views in relative positions. |
TableLayout  | TableLayout is a view that groups views into rows and columns. |
GridLayout  | GridLayout uses a grid of infinitely-thin lines to separate its drawing area into: rows, columns, and cells. It supports both row and column spanning, which together allow a widget to occupy a rectangular range of cells that are next to each other. |
FrameLayout  | The FrameLayout is a placeholder on screen that you can use to display a single view. |
AbsoluteLayout | AbsoluteLayout enables you to specify the exact location of its children. Arrange the children views according coordinates x, y. |
- The standard Containers:
Container | Description |
RadioGroup  | |
ListView  | |
GridView  | |
ExpandableListView  | |
ScrollView  | |
HorizontalScrollView  | |
SearchView  | |
TabHost  | |
VideoView  | |
DialerFilter  |
3. RelativeLayout
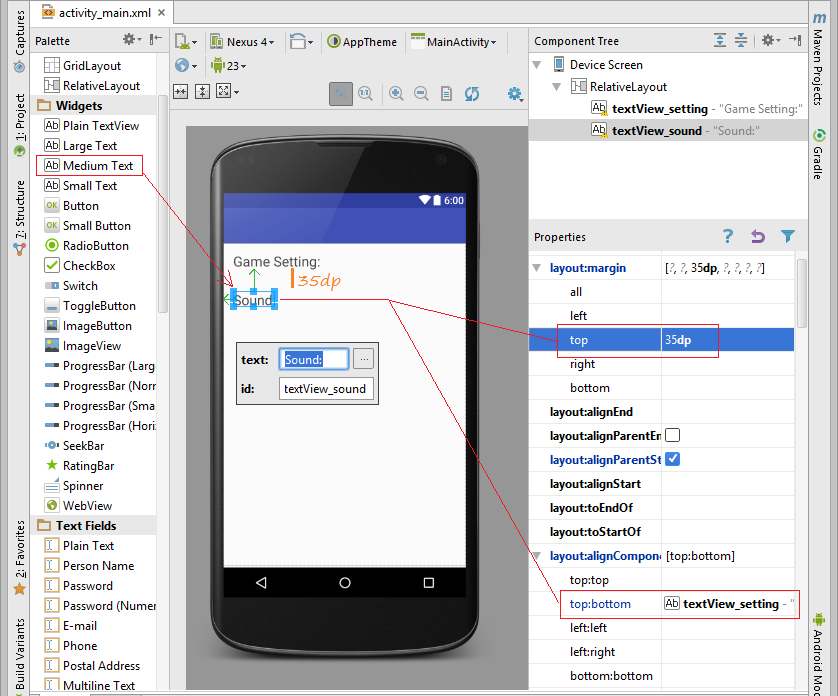
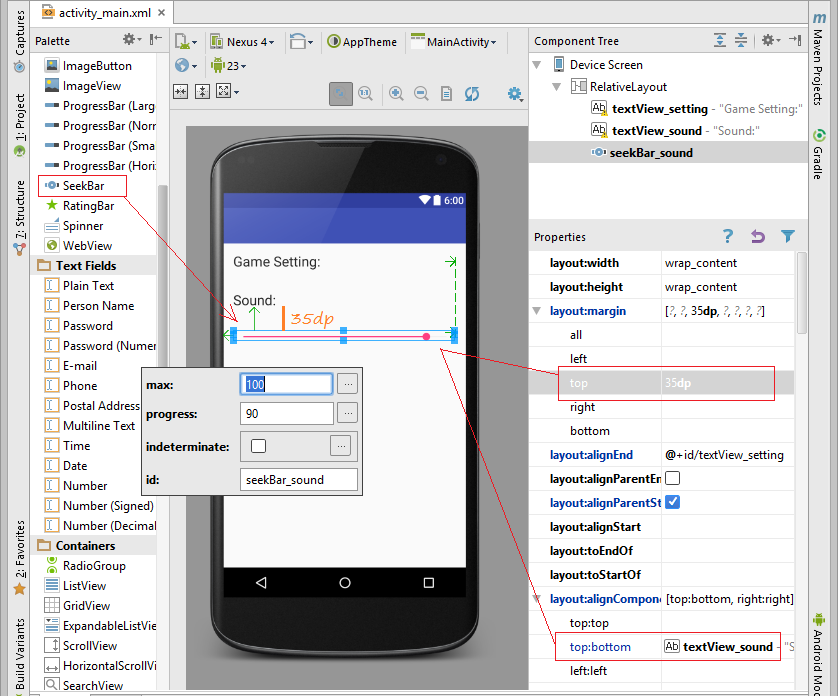
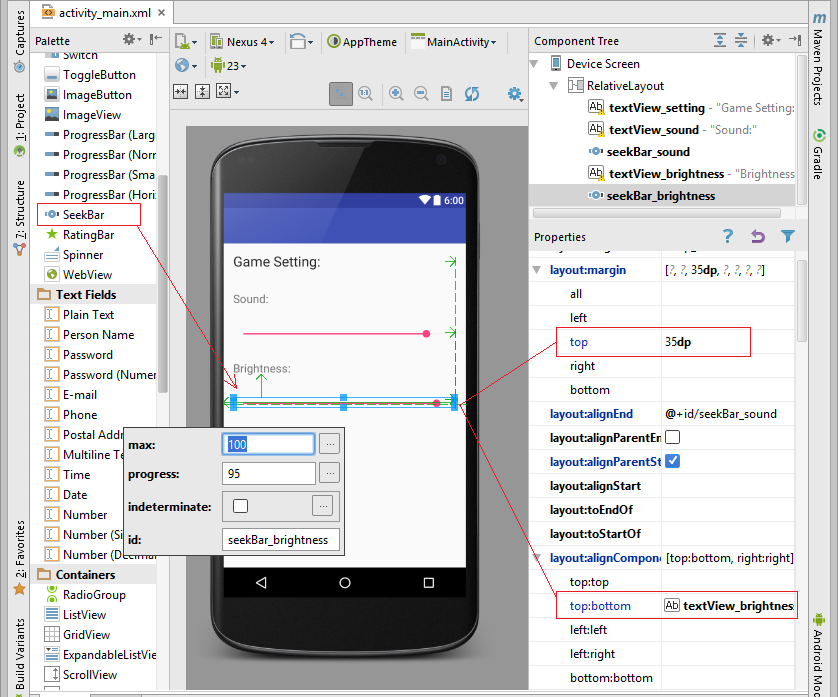
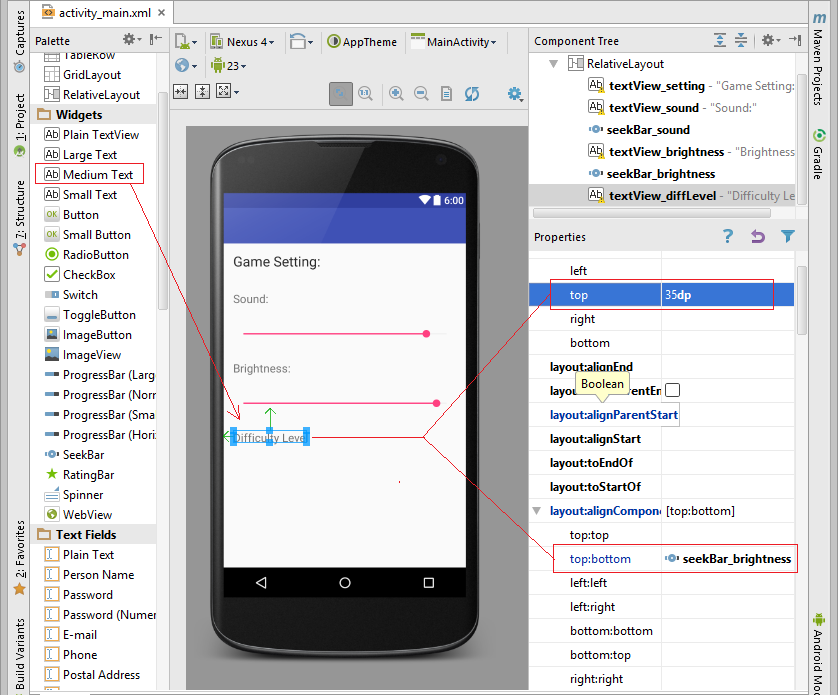
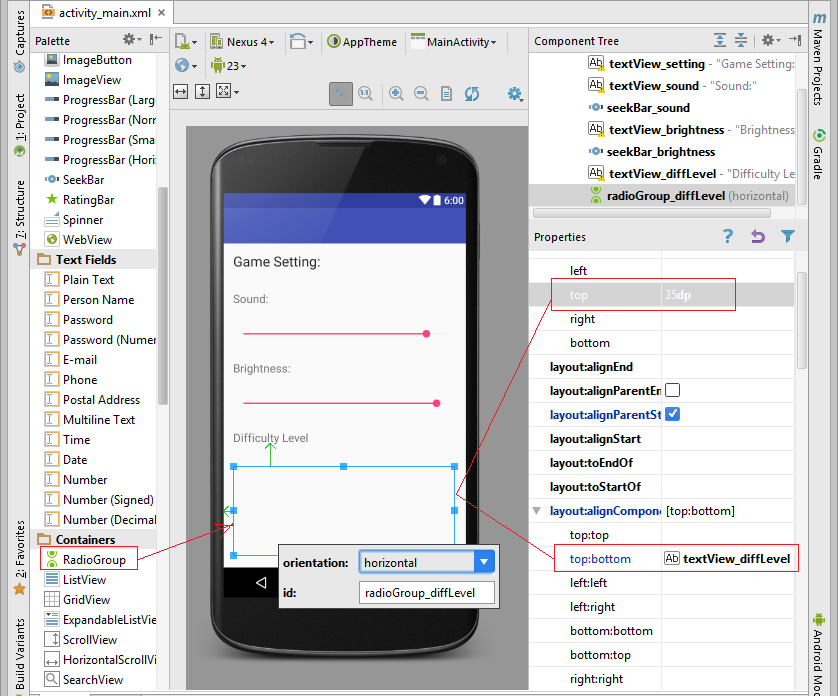
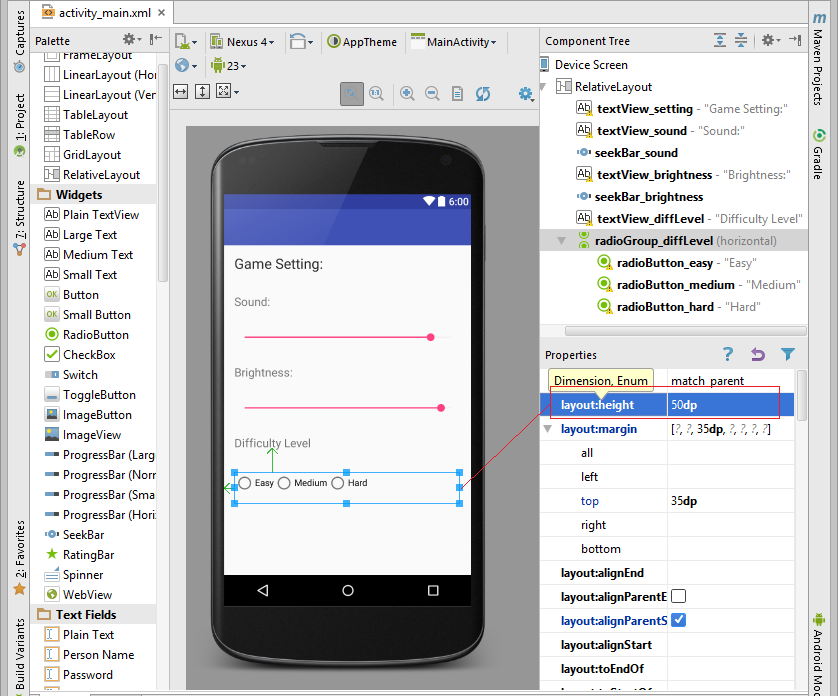
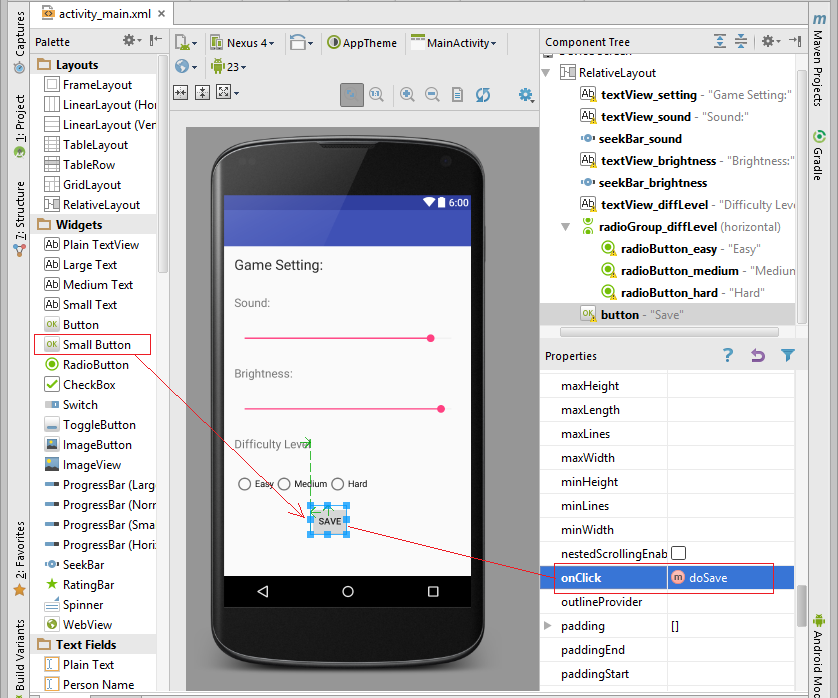
RelativeLayout is a view group that displays child views in relative positions. The position of each view can be specified as relative to sibling elements (such as to the left-of or below another view) or in positions relative to the parent RelativeLayout area (such as aligned to the bottom, left or center).
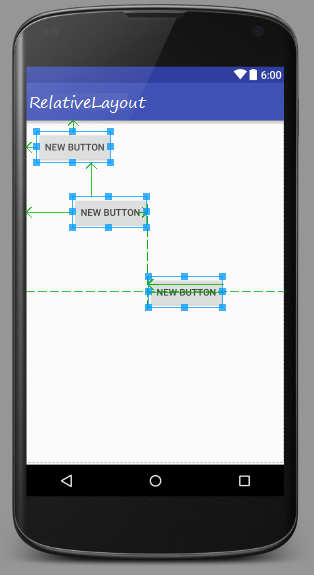
A RelativeLayout is a very powerful utility for designing a user interface because it can eliminate nested view groups and keep your layout hierarchy flat, which improves performance. If you find yourself using several nested LinearLayout groups, you may be able to replace them with a single RelativeLayout.
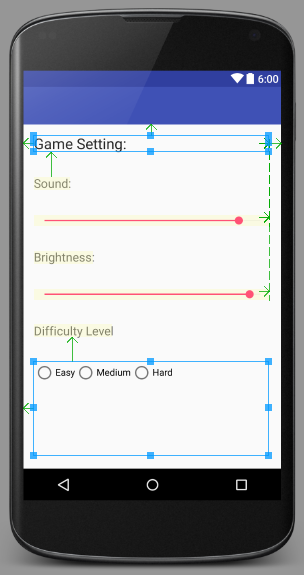
Please see the following interface, and you can design it using RelativeLayout.
- SLIDER:


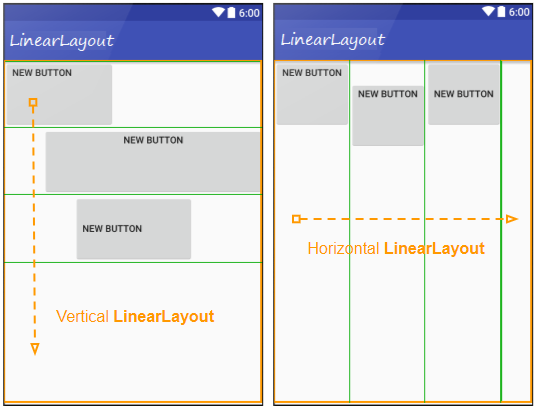
4. LinearLayout
LinearLayout is a ViewGroup that arranges the child View(s) in a single direction, either vertically or horizontally.
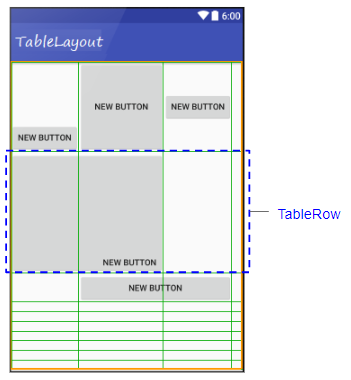
5. TableLayout
TableLayout arranges the View(s) in table format. Specifically, TableLayout is a ViewGroup containing one or more TableRow(s). Each TableRow is a row in the table containing cells. Child View(s) can be placed in one cell or in a merged cell from adjacent cells of a row. Unlike tables in HTML, you cannot merge consecutive cells in the one column.
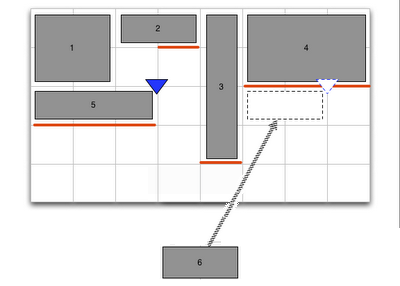
6. GridLayout
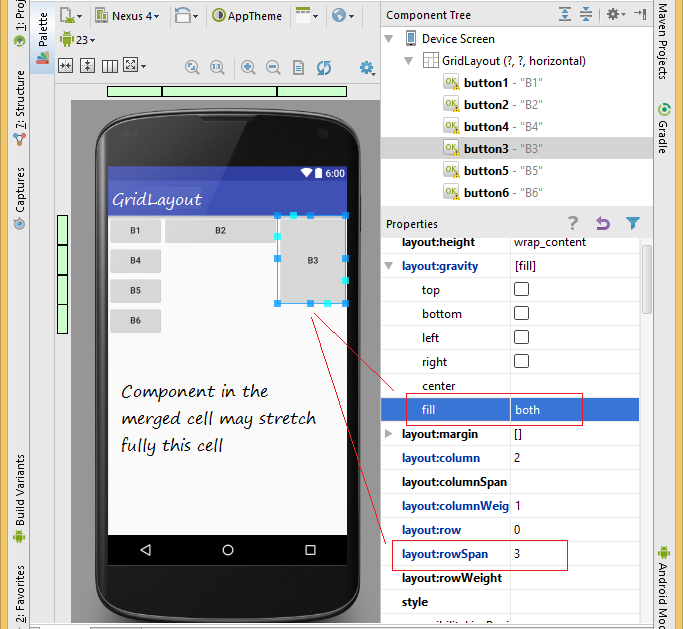
GridLayout uses a grid of infinitely-thin lines to separate its drawing area into: rows, columns, and cells. It supports both row and column spanning, this means it is possible to merge adjacent cells into a large cell (a rectangle) to contain a View.
Sizes, Margins and Alignment/Gravity
In GridLayout, specifying sizes and margins is done just as with a LinearLayout. Alignment/gravity also works just like gravity in LinearLayout and uses the same constants: left, top, right, bottom, center_horizontal, center_vertical, center, fill_horizontal, fill_vertical and fill.
Flexibility
Unlike most grids in other toolkits, Android GridLayout does not associate data with rows or columns. Instead, everything to do with alignment and flexibility is associated with the components themselves.
The flexibility of columns is inferred from the gravity of the components inside the column. If every component defines a gravity, the column is taken as flexible, otherwise the column is considered inflexible
The flexibility of columns is inferred from the gravity of the components inside the column. If every component defines a gravity, the column is taken as flexible, otherwise the column is considered inflexible
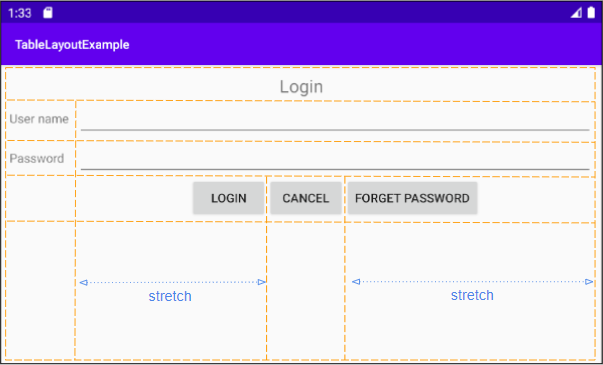
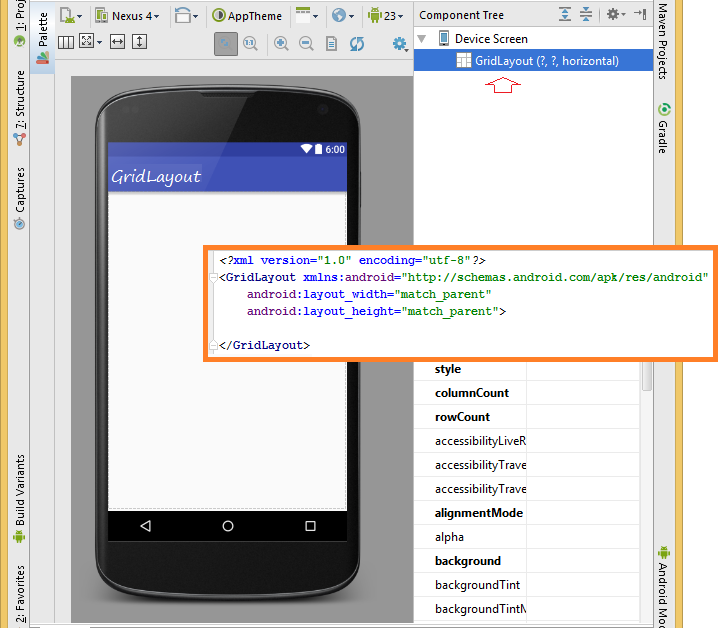
Example:
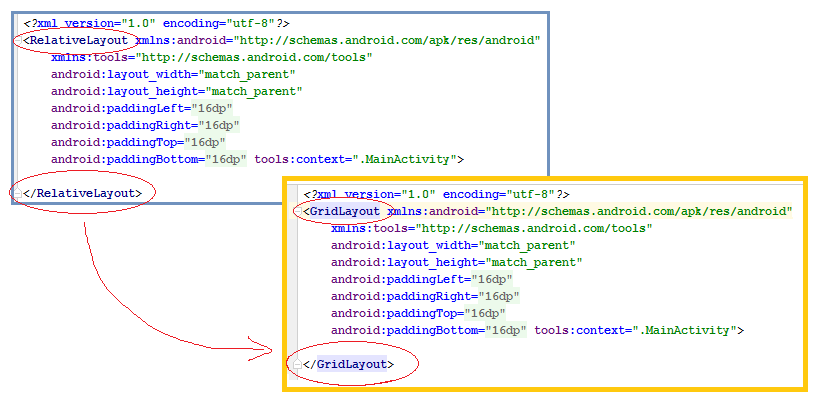
Note: If the root element of the interface is not GridLayout, you can change the name of card without having to change anything else, so you will have an interface with the root element is GridLayout.
Subcomponents determine its position in the grid according to the layout_row & layout_column attributes:
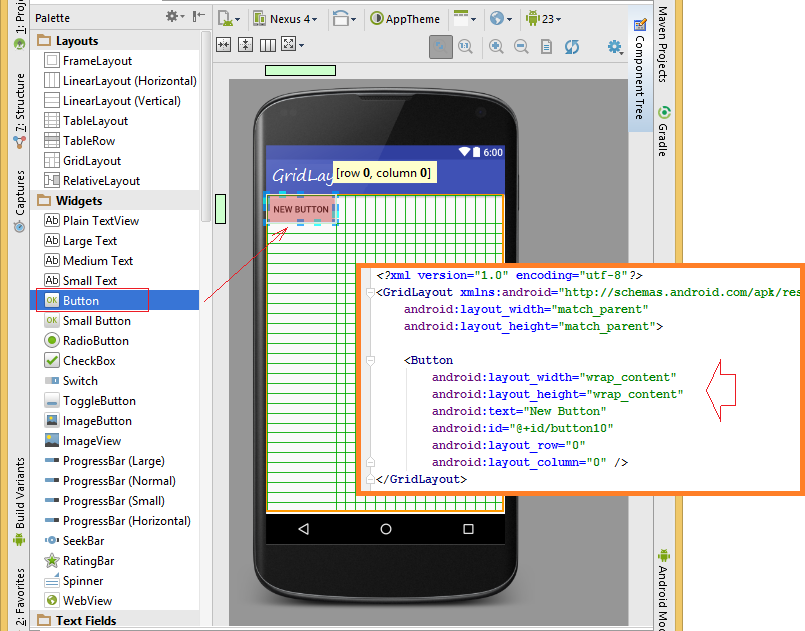
With GridLayout, if there is no object displaces grid column, the width of the grid at which is 0. Similarly, if row does not be displaced by any objects, the height of the grid at which is 0.
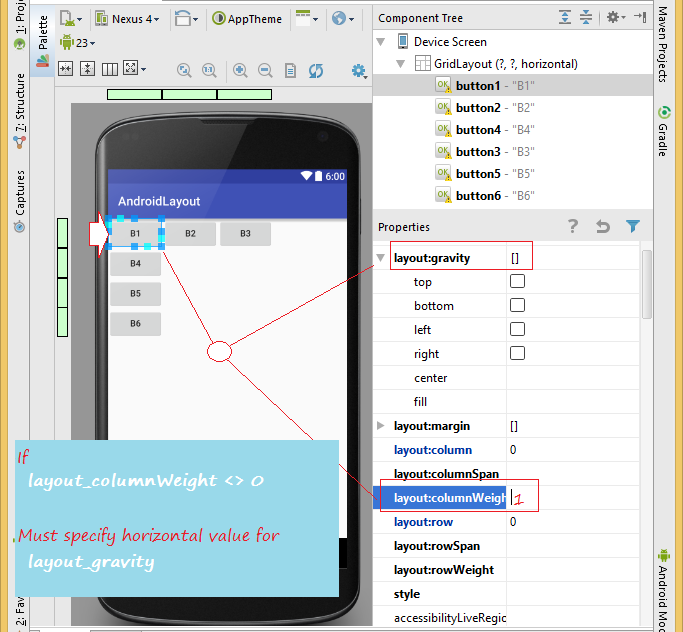
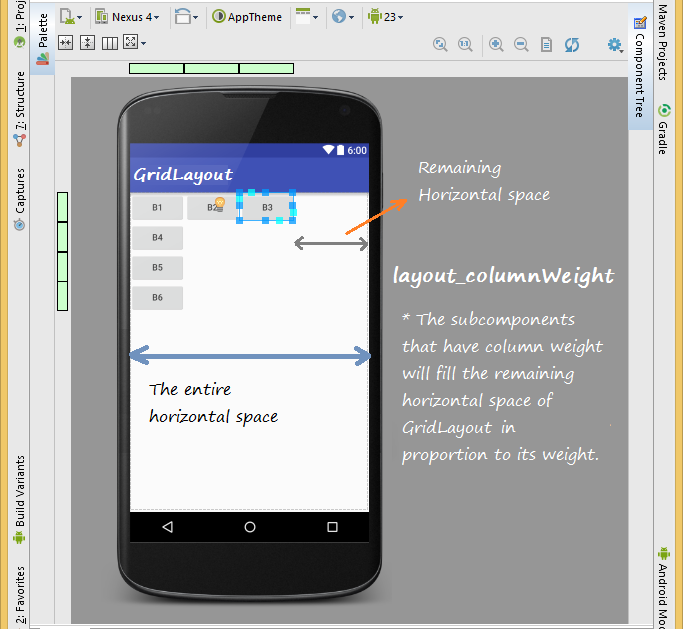
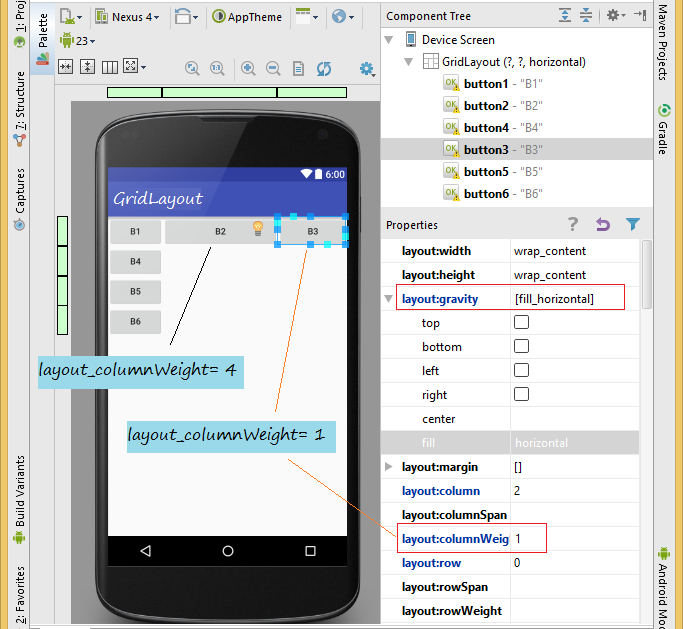
layout_columnWeight
In GridLayout, layout_columnWeight attribute is weight by column of the object in the cell, it may affect the occupancy by column, the default value is 0.
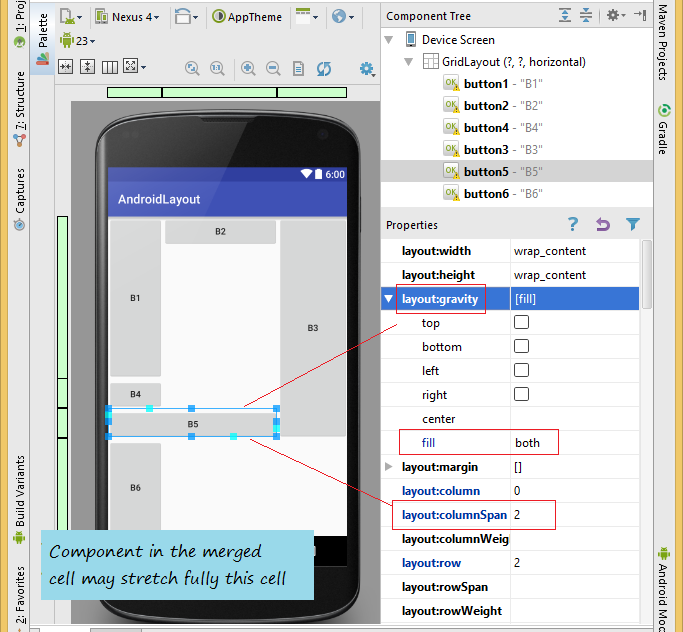
If you specify a value different than 0 for layout_columnWeight, you need to set layout_gravity value for the object, this is mandatory, if not specify the layout_gravity value, object can not be displayed on the grid:The value for layout_gravity in this case is:leftrightcenter_horizontalcenterfill_horizontalfill
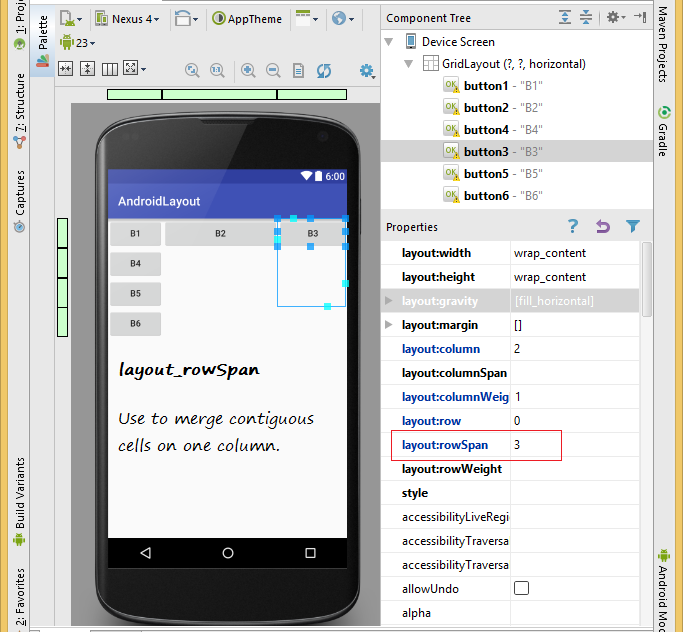
layout_rowSpan
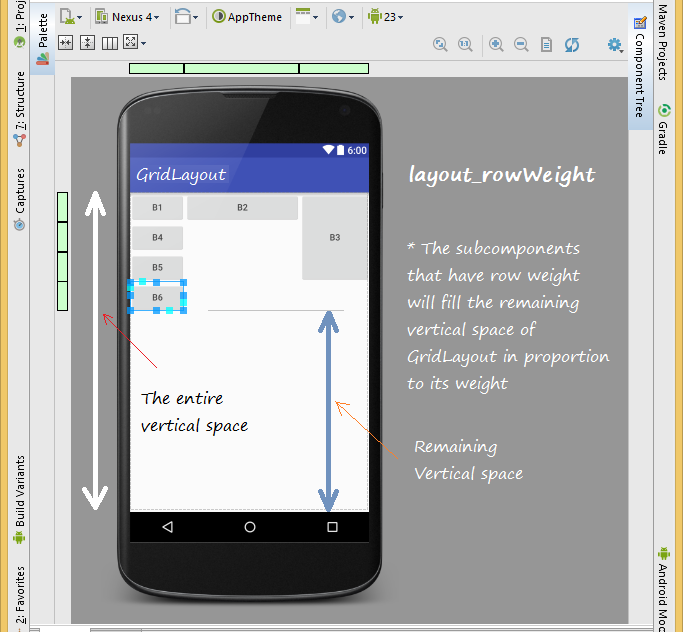
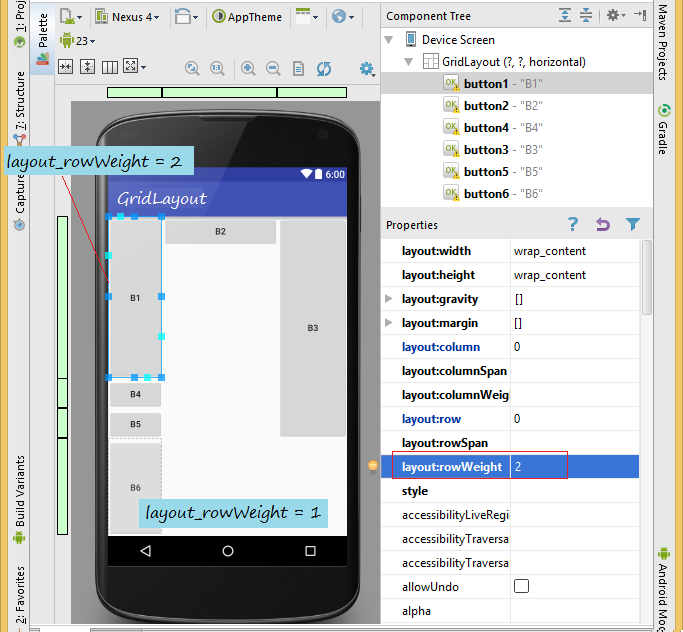
layout_rowWeight
In GridLayout, layout_rowWeight attribute is weight by row of the object in the cell, it may affect the occupancy by row, the default value is 0.
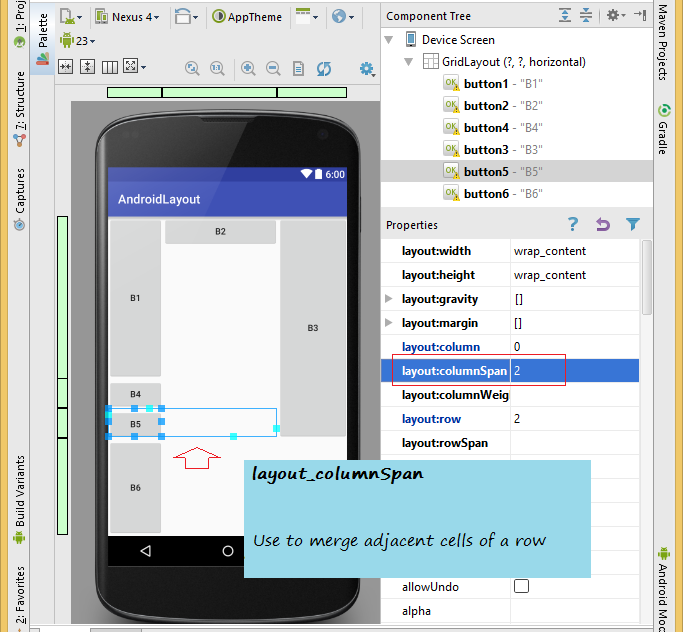
layout_columnSpan
OK, can you use GridLayout to design interface as shown below?


Android Programming Tutorials
- Configure Android Emulator in Android Studio
- Android ToggleButton Tutorial with Examples
- Create a simple File Finder Dialog in Android
- Android TimePickerDialog Tutorial with Examples
- Android DatePickerDialog Tutorial with Examples
- What is needed to get started with Android?
- Install Android Studio on Windows
- Install Intel® HAXM for Android Studio
- Android AsyncTask Tutorial with Examples
- Android AsyncTaskLoader Tutorial with Examples
- Android Tutorial for Beginners - Basic examples
- How to know the phone number of Android Emulator and change it
- Android TextInputLayout Tutorial with Examples
- Android CardView Tutorial with Examples
- Android ViewPager2 Tutorial with Examples
- Get Phone Number in Android using TelephonyManager
- Android Phone Call Tutorial with Examples
- Android Wifi Scanning Tutorial with Examples
- Android 2D Game Tutorial for Beginners
- Android DialogFragment Tutorial with Examples
- Android CharacterPickerDialog Tutorial with Examples
- Android Tutorial for Beginners - Hello Android
- Using Android Device File Explorer
- Enable USB Debugging on Android Device
- Android UI Layouts Tutorial with Examples
- Android SMS Tutorial with Examples
- Android SQLite Database Tutorial with Examples
- Google Maps Android API Tutorial with Examples
- Android Text to Speech Tutorial with Examples
- Android Space Tutorial with Examples
- Android Toast Tutorial with Examples
- Create a custom Android Toast
- Android SnackBar Tutorial with Examples
- Android TextView Tutorial with Examples
- Android TextClock Tutorial with Examples
- Android EditText Tutorial with Examples
- Android TextWatcher Tutorial with Examples
- Format Credit Card Number with Android TextWatcher
- Android Clipboard Tutorial with Examples
- Create a simple File Chooser in Android
- Android AutoCompleteTextView and MultiAutoCompleteTextView Tutorial with Examples
- Android ImageView Tutorial with Examples
- Android ImageSwitcher Tutorial with Examples
- Android ScrollView and HorizontalScrollView Tutorial with Examples
- Android WebView Tutorial with Examples
- Android SeekBar Tutorial with Examples
- Android Dialog Tutorial with Examples
- Android AlertDialog Tutorial with Examples
- Android RatingBar Tutorial with Examples
- Android ProgressBar Tutorial with Examples
- Android Spinner Tutorial with Examples
- Android Button Tutorial with Examples
- Android Switch Tutorial with Examples
- Android ImageButton Tutorial with Examples
- Android FloatingActionButton Tutorial with Examples
- Android CheckBox Tutorial with Examples
- Android RadioGroup and RadioButton Tutorial with Examples
- Android Chip and ChipGroup Tutorial with Examples
- Using image assets and icon assets of Android Studio
- Setting SD Card for Android Emulator
- ChipGroup and Chip Entry Example
- How to add external libraries to Android Project in Android Studio?
- How to disable the permissions already granted to the Android application?
- How to remove applications from Android Emulator?
- Android LinearLayout Tutorial with Examples
- Android TableLayout Tutorial with Examples
- Android FrameLayout Tutorial with Examples
- Android QuickContactBadge Tutorial with Examples
- Android StackView Tutorial with Examples
- Android Camera Tutorial with Examples
- Android MediaPlayer Tutorial with Examples
- Android VideoView Tutorial with Examples
- Playing Sound effects in Android with SoundPool
- Android Networking Tutorial with Examples
- Android JSON Parser Tutorial with Examples
- Android SharedPreferences Tutorial with Examples
- Android Internal Storage Tutorial with Examples
- Android External Storage Tutorial with Examples
- Android Intents Tutorial with Examples
- Example of an explicit Android Intent, calling another Intent
- Example of implicit Android Intent, open a URL, send an email
- Android Services Tutorial with Examples
- Android Notifications Tutorial with Examples
- Android DatePicker Tutorial with Examples
- Android TimePicker Tutorial with Examples
- Android Chronometer Tutorial with Examples
- Android OptionMenu Tutorial with Examples
- Android ContextMenu Tutorial with Examples
- Android PopupMenu Tutorial with Examples
- Android Fragments Tutorial with Examples
- Android ListView Tutorial with Examples
- Android ListView with Checkbox using ArrayAdapter
- Android GridView Tutorial with Examples
Show More